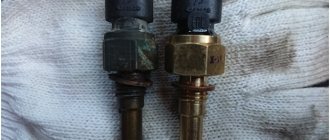
Two types of fuel pressure regulators
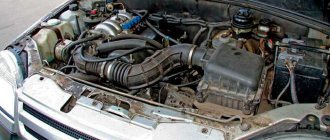
On Chevrolet Niva cars until 2009, the RTD was installed on the fuel rail. A pressure fuel line from a fuel pump was connected to the RTD housing. Excess fuel was returned to the gas tank through the drain pipeline, in common parlance “return”. Also, a vacuum supply tube from the intake manifold was connected to a separate housing pipe.
Cars produced after 2009 are equipped with a fuel module, which contains a coarse fuel filter, a turbine electric fuel pump with a control relay, a fuel level sensor and a fuel pressure regulator. Thus, the modern RTD has turned into a conventional overflow valve, which has simplified its design and increased the reliability of the power system as a whole. The function of determining the required instant amount of fuel was taken over by the ECU unit, summing up the readings of the throttle position and mass air flow sensors and controlling the injectors. In the electronic part of the ECU there has been a transition from a processor (controller) of type “7.0” to “7.9.7”.
Important! Controllers "7.0" and "7.9.7" are not interchangeable.
RTD malfunctions are usually caused by the fact that the spring acting on the valve “sags”; its force gradually decreases as a result of prolonged variable loads. The valve no longer fits so tightly to the seat, as a result, a significant portion of the fuel enters the “return”, the pressure in the ramp decreases even with a short stop of the engine. When you press the throttle pedal, the engine does not have enough fuel, which causes “dips” instead of increasing speed, especially during acceleration and transient conditions.
About malfunctions
Characteristic signs of a faulty RTD:
- Unstable operation of the engine at idle, the engine starts with difficulty and the first minutes after starting it “troubles”;
- Due to the unevenly enriched fuel-air mixture entering the cylinders, the crankshaft speed “floats” at idle;
- The engine “does not pull” and “stalls”, that is, it does not develop its former power and loses throttle response;
- When driving, jerks and twitches are felt, slow reactions to pressing the throttle pedal;
- Fuel consumption increases, the content of CO and CH in the exhaust gases increases.
Please note that any of these problems may not be caused by the pressure regulator, but by problems with something else.
Self-diagnosis
It should be noted that most of the symptoms of a faulty RTD are the same or very similar to problems with the electric fuel pump or injectors.
When the regulator is located in the fuel rail, to check it you should:
- Unscrew the control valve plug from the end of the ramp, in which a regular spool is located, like in the wheels of a car. There is a sealing ring located in the internal thread of the plug, the condition of which must also be checked and, if necessary, the ring or plug assembly must be replaced;
- Using a metal cap from the wheel “pipe”, unscrew the spool from the control valve and screw the hose of a conventional compression gauge onto the valve, having first unscrewed the adapter with the spark plug thread;
- Start the engine at idle speed and use a compression gauge to determine the pressure in the fuel rail. If the fuel pump is working properly, the device will show 2.8…3.0 kg/cm2. If you use pliers (carefully!) to pinch the return hose, the pressure should increase to 5.0...6.0 kg/cm2.
- Turn off the engine. Observing the readings of the compression meter, make sure that the residual pressure in the ramp remains within 2.8 ... 3.0 for a sufficiently long time, at least 10-15 minutes.
- If so, your fuel pressure regulator and fuel pump are working properly. If, when the return line was clamped, the pressure in the ramp did not rise or rose only slightly, the fuel pump is faulty. If the pressure in the ramp decreases quickly, the RTD is faulty.
- Remove the compression gauge, screw in the spool, screw in and carefully tighten the control valve plug.
When the regulator is located in the fuel module, as in all fairly “fresh” Chevrolet Niva cars, perform the same operations, with the exception of clamping the drain line – the “return”, since you do not have access to it. You can judge the serviceability of the fuel pressure regulator by the constant residual pressure in the rail.
Be careful when performing diagnostics! Do not smoke, do not use open fire! Before starting work, inspect the fuel lines and make sure they are tight and have no signs of leakage.
Self-repair (replacement) of the pressure regulator
Structurally, the “old” and “new” RDTs have a non-separable steel body and are therefore not repairable.
Repairing the regulator boils down to replacing it with a new one or a known good one.
It is not difficult to purchase an RTD and its price is relatively low. The unit goes on sale in packaging, complete with the necessary seals.
Replacing the RTD on a Chevrolet Niva car produced before 2009
You will need:
- Open-end wrench “24”;
- Hex key “5”;
- A narrow flat-head screwdriver with a blade that does not have sharp edges.
Operating procedure:
- Relieve the residual pressure in the fuel rail by unscrewing the control valve plug and unscrewing the spool;
- Using a 24mm wrench, unscrew the union nut of the fuel supply tube and slide the nut along the tube;
- Use a screwdriver to move and remove the plastic vacuum supply tube from the regulator nozzle;
- Using a 5mm hexagon, remove the two screws securing the regulator to the ramp. Using a screwdriver, remove the regulator from its socket and remove it from the fuel supply pipe. Save the O-ring under the tube collar.
- An O-ring will remain in the groove of the socket. Take it out with a screwdriver and inspect it.
- Place the O-ring on the installation fitting of the new regulator. Insert the fuel supply pipe with the O-ring on it into the regulator. Beforehand, determine whether the O-rings can be reused and apply a thin layer of engine oil to their surfaces.
- Install the new RTD, screw in and tighten the screws securing it to the ramp with a 5-point hexagon. Slide the union nut along the tube, tighten it by hand and tighten it with a 24mm wrench.
- Place the vacuum supply tube onto the regulator nozzle and push it until it stops.
- Screw the spool into the control valve, screw and tighten the valve plug.
Replacing the RTD in the fuel module of a Shniva car manufactured after 2009
Attention! When replacing the fuel pressure regulator in the fuel module, you can “along the way” perform several very useful procedures for your car: clean the gas tank of possible contaminants and sediment, clean the coarse fuel filter mesh, check the tightness of all pipelines of the module, and finally, change it yourself gasoline pump. Read how to do this on our website.
To replace the RTD you will need:
- Head “10” with extension;
- Small pliers;
- A narrow flat-head screwdriver with a blade that does not have sharp edges.
- A clean, dry container with a capacity of 2-3 liters.
- A piece of thin cardboard measuring 300x300 mm.
Operating procedure:
- Relieve the pressure in the power system, disconnect the wire terminal from the negative terminal of the battery.
- Bend back the soundproofing carpet, remove the hatch that blocks access to the gas tank and fuel module.
- Squeezing the clamps of the tip of the fuel drain tube, slide its tip from the fitting of the module cover. In the same way, disconnect the tip of the fuel supply tube from the second fitting of the cover.
- Using a 10" socket with an extension, unscrew the nuts (8 pcs) securing the pressure plate of the fuel module to the neck of the gas tank. Remove the spring washers from the studs.
- While lifting and turning the assembly, carefully (so as not to damage) remove the fuel level indicator sensor float from the hole in the tank. After removing the pressure plate from the fuel module cover, drain the remaining fuel in the module into a previously prepared container and transfer the dismantled unit to a workbench.
- Inspect the rubber ring sealing the connection between the fuel module cover and the tank and make sure it is intact. (It is not necessary to separate and remove the ring from the neck if it is not damaged.) To prevent any contaminants from entering the fuel tank, cover the neck of the fuel tank with a piece of cardboard.
- Using a screwdriver, move and remove the tip of the ground wire from the terminal of the regulator body.
- Using a screwdriver, remove the shaped bracket securing the regulator body.
- Using pliers, remove the regulator from the cover socket along with the O-rings.
- Install a new regulator with new O-rings into the cover seat. Lubricate both o-rings, large and small, with a thin layer of engine oil before placing them on the regulator.
- Secure the pressure regulator body with a curly bracket and perform all operations for installing the fuel module in reverse order. Place the tips of the fuel pipes onto the fittings until the lock clicks.
At the finish line, before closing the hatch, check the tightness of the external connections of the fuel module by test starting the engine.
And - good luck!
System check
But before resorting to any actions, you should check the entire lubrication system; on a Chevrolet Niva this can be done as follows:
- We turn off the car, open the hood, wait a couple of minutes until the engine cools down a little and the oil drains into the crankcase
- We check the condition of the oil sump; if there is a hole and a leak is observed, it is advisable to seal it for a while until you get to the point of repair; this can be done with the help of a wooden plug or a piece of rag.
- We look to see if oil is leaking in the area of the oil filter from under the gasket; this may be due to a loose filter or damage to the gasket itself.
- Check the oil level using the dipstick; it should be midway between the MIN and MAX marks; if it is below normal, add oil
If after the above steps the error message on the dashboard is on, check whether the oil pressure sensor itself is working.
You can check it by unscrewing the sensor and installing a mechanical pressure gauge in its place, start the engine and at idle speed look at the readings; if they are more than 0.05 MPa and continue to increase, then the problem is most likely in the sensor itself, or in the electrical circuit. If you have eliminated all the visible problems, but the light is still on, then you need to carry out a full diagnosis of the engine, and having already found the real cause of the error, begin repairs. Under no circumstances continue driving to the repair site in a faulty vehicle; use the services of a tow truck.
Also interesting: How do hydraulic compensators affect engine performance? — Online magazine for motorists
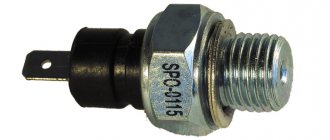
Oil pressure sensor Niva Chevrolet
The Niva Chevrolet oil pressure sensor is a device that allows you to monitor the pressure in the car’s lubrication system and signal its malfunctions. The pressure sensor notifies the driver via the dashboard of low pressure in the vehicle system, as well as low or no oil level.
If the oil level is low, the gas distribution mechanism, cylinders and pistons are subject to much more work load, and their service life is accordingly reduced. The oil pressure sensor reacts to a low level and transmits information to the electronic control unit. The electronic engine management system alerts the driver to low fuel levels via an indicator on the instrument panel.
The most common reasons for the indicator to trigger:
- Incorrect crankshaft bearing adjustment;
- Electrical problems;
- Low oil level;
- Incorrect operation of the oil pump;
- Pressure sensor failure.
Brake pedal sensor
The brake pedal sensor is installed on the pedal assembly under the Niva's steering column. In cars without the E-GAZ system, it is only responsible for turning the brake lights on and off. In cars that have an electronic throttle and therefore an electronic gas pedal, this sensor affects the operation of the pedal. If the brake sensor breaks down, the gas pedal stops working.
Signs of malfunction:
- The gas pedal does not work;
- Jerking when moving at a constant speed;
- Loss of power and vehicle dynamics;
Electronic engine control unit (ECU)
An ECU is a kind of computer in a car; it is in this device that the entire operation of the internal combustion engine is corrected. All sensors that are installed in the car transmit readings specifically to this unit, and based on the readings, it makes changes to the operation of the engine, which affects both the engine speed and its consumption.
Symptoms of ECU malfunction:
There can be a huge number of signs of malfunction of this unit, because signs of failure of one sensor may even indicate failure of the unit.
Crankshaft position sensor (CPS)
The Niva DPKV is installed in a special hole in the oil pump drive cover. This sensor is responsible for setting the ignition timing. The sensor takes readings from the crankshaft pulley, which has teeth and in one of the places there is “caries”, that is, several pulley teeth are missing. It is “caries” that the DPKV understands in what position the crankshaft is. The sensor itself resembles an inductive coil, which generates impulses when the crankshaft rotates and transmits them to the computer.
If the sensors fail, the car will not start.
Signs of DPKV malfunction:
- The car does not start;
- The car stalls spontaneously;
- Uneven operation of the internal combustion engine;
What elements make sense to repair?
O-rings, clamps and flexible hoses are typical consumables. Their service life is short, and repairs are impractical. Connecting hoses cost within a few hundred rubles, connecting elements are even cheaper, so it is much easier to replace them with new ones.
Steel pipelines are a completely different matter. The Chevrolet Niva user manual states that the damaged part of the fuel line can be repaired. Repairs are made by replacing the damaged area with a reinforced hose. The decision on the feasibility of repair is made based on measuring the length of the damaged section of the gas pipeline.
If the motor doesn't work
With the engine off and the ignition on, the emergency pressure light should be on, since the pump does not provide pressure and the light indicates a lack of oil pressure in the system. And if the light comes on when the ignition is off, then there can be one reason: a short circuit in the car’s electrical wiring.
When starting the engine, especially for the first time, after replacing the oil with a new one, the oil pressure light may not go out for some time. This is due to the fact that the lubricant was not distributed throughout the engine and uniform pressure was not created. This often happens if it is not poured into the oil filter before adding new oil. It may take 1-2 minutes until it is filled, until the lubricant fills all the technical gaps and holes.
To avoid this, before the first start (after changing the lubricant), disconnect the armored wire from the ignition coil and crank the engine several times with the starter. In this case, the engine will not start, and the oil will fill all the technical gaps of the engine.
Coolant temperature sensor (DTOZH)
DTOZH on Niva is installed in the cylinder head outlet pipe. The coolant temperature sensor is a fairly simple element in its design. The sensor is based on a thermistor, which changes its resistance as the temperature changes.
One of the functions of the sensor is to start the electric engine cooling fans when the coolant temperature threshold is reached. The sensor is also responsible for starting the engine in cold weather; according to the coolant temperature readings, the electronic control unit forms the fuel mixture necessary for more proper warming up of the car engine. This can be replaced by the presence of high warm-up speeds at the moment of starting the internal combustion engine.
Signs of DTOZh malfunction:
- Cooling fans do not work;
- No warm-up speeds;
- Difficulty starting the internal combustion engine;
- Increased fuel consumption;
Knock sensor(DD)
The knock sensor is installed on the right side of the vehicle's cylinder block. A DD is needed to catch detonations in the engine and adjust the fuel mixture. The sensor itself is made on the principle of a piezoelectric element and, in the presence of vibrations in the engine, transmits impulses to the ECU, which in turn adjusts the fuel mixture.
Signs of DD malfunction:
- Increased fuel consumption;
- Uneven operation at idle (increased vibrations);
- Jerks when the car moves;
Recommendations for selection
The emergency oil pressure sensor is selected according to the engine type. The second generation Chevrolet Niva (2007 - present) is equipped with a gasoline unit of the Z 18 XE model with a capacity of 125 hp. and engine capacity 1.8 liters. A smart choice is to search for a part using the car’s VIN, which contains all the technical characteristics of the engine depending on the year of manufacture. With this method, the likelihood of making a mistake and purchasing the wrong spare part for your car is reduced to zero.
Among the manufacturers of auto components, you can select many European brands that supply parts for the Z 18 XE unit: Era (Italy), Bosch (Germany), JP Group (Denmark). The price of branded analogues can be three to four times higher than the original ones made in Russia. For example, the cost of an oil pressure sensor for Niva type MM393, article number 2106-3829010, produced in Russia, will be only 120 rubles. An analogue produced in Germany already costs 520 rubles. When selecting, it is important not to buy a counterfeit sensor from China if there is no information about the manufacturer. In any case, the choice remains with the car owner.
Experts also advise paying attention to the production date of the new sensor. If it has been stored in a warehouse for more than five years, then you should not purchase it. The design of the device has a special membrane, which is responsible for moving the pusher. During operation with increasing oil pressure, the membrane must stretch - it must be sensitive to temperature changes. Long-term storage can cause the contacts of the nichrome thread to “sour” and such a sensor will soon fail.
Causes
If low oil pressure appears in the engine, the reasons for this may be the following:
- The lubricant needs to be changed. Perhaps it has lost its properties and become very liquid
- The filter is clogged
- There is a problem with the oil pump
- The pressure relief valve has failed
- The crankshaft plain bearings have small gaps and perhaps they have become larger than the permissible value
- Gaps appeared larger than required between the camshaft journals and its bed
- The wiring is faulty or there is a problem with the pressure sensor
If the lubricant was not changed on time, this could lead to a decrease in its viscosity, and therefore the gear pump that pumps the oil could not create the necessary pressure, which led to the appearance of a warning signal on the dashboard, and to prevent this, the oil must be changed every ten thousand kilometers.
A complete or partial failure of one of the cylinders occurs, the fuel mixture accumulates in the cylinder, and along their walls it enters the oil, and the greater the wear of the piston group, the more intense it will be, the combustible mixture enters the oil. And if at the same time coolant gets into the system, then engine repair cannot be avoided.
Very rarely, the cause of an error may be a clogged filter, as there is an intensive process of wear of parts in the engine. For example, if the chain guide shoe flies off and begins to hit the cylinder head, noise will appear and the chain will begin to punch a groove in the housing, and all the chips will begin to settle in the filter.
If the car owner does not provide sufficient care for the car, this can lead to clogging of the oil receiver grid. The appearance of all other reasons listed above are considered more serious malfunctions and in order to eliminate them you need to disassemble the engine.
Also interesting: Engine VAZ 2123 Niva Chevrolet
Pumps before 2006
EBN 21230-1139009-20-0. The first pump used specifically for Chevrolet - the VAZ 2123 had its own.
- Manufacturer: Utes;
- Date of withdrawal - 12.2005;
- Pump - Aisan;
- Housing - Utes 2123-1139009-20, metal cover;
- FLS - Cliff 4m / 21230-3827010-01-0.
The FLS used was, and is still being produced, by JSC Utes and has the designation “4M” printed on the field. It has a shape similar to the sensors from a regular Niva. Float length - 76 mm, height in the center - 16, at the edges - 13.
Ignition module (IZ)
The ignition module is installed on the left side of the engine on a bracket. This sensor is involved in the formation of ignition. It is this that produces the high-voltage voltage necessary to create a spark in the combustion chamber of the internal combustion engine. The module has two coils, they are also autotransformers, which produce a spark in pairs, each coil for two cylinders. If one of the coils fails, two cylinders fail at once.