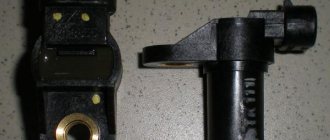
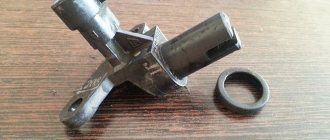
The standard Chevrolet Niva speed sensor is a separate module designed to transmit a signal from the gearbox output shaft to the speedometer. The device is simple - the functionality of the system is limited to only one option. The main advantage of the electronic system is increased accuracy. Such a speedometer has a minimal error, which increases traffic safety and eliminates the appearance of controversial fines for speeding.
This performance means that over a range of 1000 meters, the sensor generates more than 6000 pulses, which allows it to maintain extreme accuracy.
On the Chevy Niva, the sensitive sensor is made entirely of plastic; the contact chip is also quite sensitive. Therefore, care will need to be taken during repairs.
Where is the speed sensor located on a Chevrolet Niva
The DS sits directly on the gearbox housing. It is noteworthy that the location of the device on machines of 2008 and 2021 has not changed. The stability of the structure indicates the correct placement of the device. The module is covered by body panels and the gearbox housing, which makes it inaccessible to obstacles and sharp elements that could damage the sensor.
You can see what the module looks like in the photo.
Parts and consumables:
We find the sensor on the back cover of the transfer case and, if necessary, clean it of dirt. The terminal block with the supply wires is disconnected. To do this, you need to squeeze out the plastic clamp, as shown in the photo. A wrench is used to unscrew the device and remove it.
The photo below shows the process of removing it. If the product does not unscrew, then it is strictly forbidden to pull it. It is necessary to lubricate the threaded connection with WD fluid and wait until the corrosion wears off.
The sensor is being replaced with a new one. Its installation is carried out in the reverse order of removal.
Operating principle and design features
The standard Shnivy speedometer sensor is a hall sensor enclosed in a plastic housing. The element has a specific design that allows it to read the number of shaft revolutions.
The next stage of the device's operation is signal processing. The computer counts the revolutions of the box for a certain period of time and transmits the data to the speedometer display.
Connection diagram
The Shnivy sensor connector itself is a three-pin connector, where:
- red – plus;
- black – minus;
- blue – signal.
The electrical diagram of the element will tell you how the wiring is connected to the speedometer.
Skipping the details and complexity of the speedometer drive pinout, you should focus on connecting the sensor itself. There are three wires here.
- Cable number 1 is a plus, goes to the brake fluid sensor. To maintain constant nutrition.
- The second wire is connected to the speedometer and is responsible for transmitting the signal.
- The third one is black. The cable is responsible for the minus and is connected to another similar wire, or screwed onto the car body, directly at the installation site.
Device location.
Each vehicle is equipped with only the appropriate equipment, designed for a certain number of shaft rotations and installed in the appropriate seat. The Chevrolet Niva speed sensor is installed on the gearbox.
The sensor itself is a small steel or, more often than not, plastic device that is mounted in the shaft area. Inside the case there is a core that transmits impulses to a special controller responsible for displaying information on the instrument panel.
When carrying out work, it should be taken into account that the device can be quite fragile, so installation should be carried out with care.
Also interesting: Diagram and location of the fuse box Niva VAZ-21213 and 21214
Fuse
They are located directly in the mounting block.
According to the pinout of the fuse links, there is no separate element for the sensor. The on-board circuit only has a fuse responsible for part of the wiring. This is argued by the fact that the element does not have a separate power supply system - the positive conductor is connected directly to the DVTZh. The fault should be looked for directly from fuse F19.
Causes of breakdowns
There are a number of possible reasons for module failure. The most popular of them are described below.
- Mechanical damage. A similar problem occurs among users who operate the vehicle in off-road conditions. Protruding road surface elements, branches and stones can damage the plastic housing or break wires.
- Moisture ingress. Over time, the insulation of wires and blocks can dry out. The winding cracks and allows water to enter the system, which can cause a short circuit.
- System failure. During power surges, the on-board computer may malfunction. Errors within the module prevent data from being read from the device correctly.
Symptoms of a problem
Simply observing the car's behavior will help you understand that the speedometer sensor is not working. Typically the symptoms of a breakdown are factors.
- The speedometer needle jumps, jerks or does not respond. This is due to the complete failure of the device and the need for its immediate replacement.
- Increased fuel consumption. Part of the system is interfaced with the ECU, therefore, the remaining sensors will also act up.
- The speedometer is reporting incorrect data. If a motorist sees that the actual speed of the car differs significantly from the measured one, this is a sign of a device failure.
- 4. Separately, instability of idle speed should be considered. The device is also responsible for the operation of the motor at idle.
Why the speedometer does not work on the VAZ 2110 injector
All instruments on the VAZ 10 that indicate the speed of the vehicle are pointers, and signs of a malfunction are determined by deviations from the norm of the speedometer needle. If the speedometer is faulty, the arrow when the car is moving:
- does not deviate from zero, that is, does not show speed at all;
- stuck in one position, does not move in any direction;
- jumps, sharply changing readings, while the displayed speed does not correspond to reality.
There are other signs of a faulty speedometer, for example, the device works on a cold engine, and its readings correspond to the norm. As the engine warms up completely, the needle freezes and stops moving.
The main reason why the speedometer on a VAZ-2110 injector does not work is contamination (oiling) of the speed sensor (DS), failure especially often occurs if oil from the gearbox or engine gets onto the DS (for example, there is a leak from the valve cover of the internal combustion engine ). There are also other reasons:
- the speedometer itself has failed;
- the speed sensor is broken (this part on AvtoVAZ cars is not highly reliable);
- there is no normal contact in the DS plug or a break (short circuit) of the wires has occurred;
- The speedometer drive gears installed in the gearbox broke.
Checking the performance of the speedometer 2110
Before you start changing anything, you need to find out why the device does not show speed. First of all, they start checking with the speed sensor, since most often all malfunctions are associated with it. We inspect the DC for contamination, see if there is a break in the wires.
If the electrical part of the sensor is faulty, the Check Engine light on the instrument panel lights up. During computer diagnostics, if the sensor is faulty, the scanner displays error code P-0501, P-0501 or P-0503. Another error is detected by the on-board computer installed on the car.
There are also other signs of a faulty DS:
- at idle, the internal combustion engine is unstable, and the engine may stall at low speeds;
- fuel consumption has increased.
It is quite difficult to check the electrical circuit from the DS to the speedometer on a VAZ-2110 injector car, so here it is better to seek the help of specialists.
The DS drive gears located in the gearbox may also break. The drive itself is easy to check - you need to unscrew the two bolts that secure it with a 10th key and perform a visual inspection of this mechanism.
How to check the sensor
Usually, if the speedometer needle readings are incorrect, an error from the 0500 level is displayed on the dashboard. Such a code indicates the presence of problems in the module network and indicates the need for diagnostics. There are also possible ways to check the device.
- Check with a multimeter. Connect the positive terminal of the device to the sensor, and the negative terminal to the car body. If nothing happens when the sensor shaft rotates, it is faulty. In the working position, if you spin the wheel faster, the voltage also increases.
- Using a voltmeter. Raise the car on a jack, connect a voltmeter to the DC and spin the free wheel. In this case, changes should occur on the device proportional to the shaft rotation speed.
- A similar technique using control involves attaching a light indicator.
Clutch position sensor malfunctions
The following symptoms may indicate a malfunction of the clutch pedal position sensor:
- car "pecks" when changing gears
- a sharp increase or decrease in engine speed when the clutch is disengaged
Also, if a malfunction occurs in the clutch pedal position sensor, error 0830 “Clutch pedal sensor error” is recorded in the engine controller and the “Check Engine” light in the instrument cluster turns on.
Error 0830 is detected if the engine controller does not receive a signal from the clutch sensor:
- within 2 seconds after changing gear while driving
- after four gear changes at speeds above 10 km/h and engine speeds above 1000 rpm
The main reasons for error 0830:
- malfunction of the clutch sensor itself
- short circuit or open circuit
- Incorrect clutch pedal height
We encountered error 0830 while preparing the material “How to get there without a clutch?” We recorded video instructions on how to change gears without a clutch. After several gear changes without disengaging the clutch, the “Check Engine” light came on on the panel, which went out only after several dozen gear changes in normal mode.
Also interesting: Replacing a Chevrolet Niva radiator without air conditioning
Replacing the speed sensor
Installation does not require deep knowledge of mechanics or specialized, expensive tools. To change the sensor, just follow a simple sequence of steps.
- Drive the car onto an overpass or inspection hole. If such equipment is not available, you can use a jack.
- Disconnect the wiring from the battery and securely secure the machine. In this case, it is recommended to put the gearbox in neutral position.
- Climb under the car and find the DS on the front flange of the transfer case - this is a plastic part connected directly to the device body.
- Using a rag or brush, remove dirt, dust and possible debris from adjacent surfaces that could harm the operation of the new sensor.
- Using a screwdriver, loosen the clamp of the wiring plug and pull it off. In this case, extreme caution should be exercised - the part is quite fragile.
- Use key No. 22 to unscrew the sensor.
- Install the new part in the seat in reverse order.
The replacement process can be seen in more detail in the video.
