Payment for goods and downloading of the book in electronic form (PDF format) is made on the website.
To do this, you need to find the book you are interested in and click on the “Buy” button. The price of the book is indicated on the button.
For convenience, the price on the website for residents of Russia, Belarus and Kazakhstan is presented in rubles.
For residents of Ukraine in hryvnias, and for all other countries - dollars.
After clicking on the “BUY” button, a payment window will open where you can select a payment system with which you can pay for the selected book using any bank card (Visa, MasterCard, MIR, etc.)
When you click on the “Pay by bank card” button, the Portmone payment system will open, which is the easiest way to make a payment.
In addition, the website offers four payment systems for payment:
- Yandex (payment from any bank cards, Yandex Money account, QIWI Wallet, terminals, etc.);
- Portmone (payment from any bank cards, Portmone account);
- PayPal (payment from any bank cards, PayPal account);
- WebMoney (payment from any bank cards, payment from WebMoney wallets).
Payment via Yandex Cashier
After selecting payment via Yandex, the Yandex Cashier payment system will launch, where you need to select a convenient payment method (bank card, QIWI, Yandex Money account, etc.)
After specifying payment details and confirming payment, payment for the goods will occur.
If you have a bank card in a currency other than the ruble, then the money will be debited from the card at the rate of the Central Bank of Russia at the time of the purchase.
This payment method is optimal for residents of Russia, Kazakhstan and Belarus.
Official website of the Yandex Kassa payment system https://kassa.yandex.ru
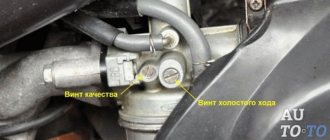
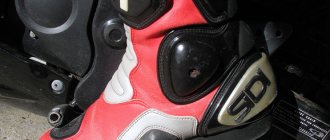
How do you know if the mixture is rich or lean?
To find out this indicator, you should look at the condition of the spark plug, namely at its electrodes. When the mixture is lean, the electrodes are quite white and traces of melting are visible; when the mixture is rich, the electrodes are too black and strong carbon deposits are visible. Of course, the optimal mixture is characterized by the normal state of the candle.
It might be useful to read:
- OKVED codes retail trade OKVED codes for eskhn;
- Which wipers are better, framed or frameless?
- How to install a mass switch on a VAZ;
- "Chaser Toyota": model history, description;
- Car Volga GAZ-M21;
- Do-it-yourself wheel balancing;
- Decoding the oil classification according to ACEA;
- Why is Mercedes-Benz AMG considered one of the best cars in the world? ;
Payment via Portmone
After selecting payment through Portmone, the payment system will launch, where you need to select the payment method: bank card or Portmone account.
The price in the Portmone payment system is converted into dollars at the exchange rate of the Central Bank of the country where you are located.
If you have a bank card in a currency other than the dollar, then the money will be debited from the card at the rate of the Central Bank of your country at the time of the purchase.
After specifying payment details and confirming payment, payment for the goods will occur.
Official website of the Portmone payment system https://www.portmone.com
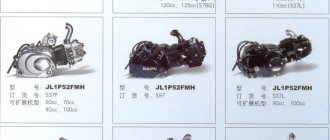
Installing piston rings
Remove the set of piston rings from the box. A piston ring set for a Chinese four-stroke scooter usually consists of five items. Three of which are a single assembled oil scraper ring, the other two: upper and lower compression.
A typical set of piston rings looks something like this
Or so
Carefully unpack the kit with perfectly clean hands.
In the kit you will find two of the thinnest rings and one thick corrugated ring (expander) - this will be an assembled oil scraper ring that needs to be installed on the piston first.
We place an expander in the lowest groove of the piston
We place thin oil scraper rings in the same groove - one under the expander, the second on top of the expander
We find the lower and upper compression rings in the kit and install them, respectively, in the middle and upper grooves of the piston - with marks on the side surface to the cylinder head (cylinder head). The lower compression ring differs from the upper one in color (not always) and the shape of the working edge (always). In most kits, the lower compression ring is painted black, and its working edge has a slight bevel.
Tags
The top compression ring in the vast majority of piston ring sets is a uniform light color. But this is in most cases, but in practice it happens that the kit comes with upper compression rings that are black or even red
By and large, the color is not particularly important to us, something else is important to us: the working edge of the upper compression ring has small roundings (chamfers) on the sides, and the working surface of the edge of the upper compression ring is covered with a shiny protective coating
For example, in this kit both compression rings are black. But the working surface of the upper compression ring is covered with a layer of protective coating, and small chamfers are removed on the edges of the working surface.
The lower compression ring has a matte working surface, and the working edge is beveled at a slight angle. All these moments are clearly visible in the photo.
The compression rings in this kit are red and black. As in the first case, the upper compression ring has chamfers on the working edge and a protective coating, and the lower one has a matte working edge beveled at an angle.
On classic piston ring sets, the upper compression ring has a light color and a rounded working edge. The bottom is dark in color and the working edge is beveled at a slight angle.
When installing the piston rings, do not forget about the marks. The marks on the rings after installation on the piston should be oriented towards the cylinder head (cylinder head).
Payment via PayPal
After selecting payment via PayPal, the PayPal payment system will launch, where you need to select the payment method: bank card or PayPal account.
If you already have a PayPal account, then you need to log into it and make a payment.
If you do not have a PayPal account and you want to pay using a bank card via PayPal, you need to click on the “Create an Account” button - shown with an arrow in the picture.
PayPal will then prompt you to select your country and provide your credit card information.
After specifying the information required to make the payment, you must click on the “Pay Now” button.
Official website of the PayPal payment system https://www.paypal.com
Payment via WebMoney
After selecting payment via WebMoney, the payment system will launch, where you need to select the payment method: bank card or WebMoney wallet.
If you already have a WebMoney wallet, then you need to log into it and make a payment.
If you do not have a WebMoney wallet and you want to pay in another way, you need to select any of the methods that WebMoney offers and make the payment
After specifying payment details and confirming payment, payment for the goods will occur.
Official website of the WebMoney payment system https://www.webmoney.ru/
Installing the timing chain tensioner
If you have a 157QMJ series engine, do the following: unscrew the plug on the tensioner body; We insert a thin flat screwdriver into it and begin to tighten the bolt until the tensioner rod goes inside the body.
Without releasing the screwdriver while simultaneously holding the tensioner body, with your free fingers, insert the tensioner into the cylinder, screw it in with bolts, and only then release the screwdriver and screw the plug into place.
If you have a 139QMB series engine, then do this: unscrew the plug from the tensioner housing and remove the spring; push the rod inside the body; install the tensioner in the cylinder; insert the spring into the housing and screw in the plug.
After installing the piston, do not forget to adjust the thermal clearances of the valves and break in the engine.
Downloading a book
After successfully completing the payment (by any method) and returning to the KrutilVertel store from the payment system website, you will be taken to the successful payment page:
On this page you need to indicate your e-mail, where access to download the book will be sent.
If you are already registered on our website, then simply follow the link to your personal account.
The book you purchased will be in your personal account, from where you can always download it.
Please note that after making the payment, you need to return back from the payment system website to the KrutilVertel website.
If for some reason you did not return back to the site and closed the payment system tab with a message about the successful completion of the payment, please let us know - we will send you a letter indicating access to download the book.
Setting the valve timing ch2 (in collective farm style - ignition)
Without knocking the piston off from TDC, we orient the camshaft so that the large hole and marks on its sprocket become as shown in the photo and, while putting on the chain, install the camshaft in bed.
Ideally, the marks on the sprocket should be strictly parallel to the plane of the valve cover connector. In practice, unfortunately, such accuracy is difficult to achieve. And this is mainly due to the stretching of the timing chain. And there’s nothing you can do about it - either change the timing chain to a new one or catch the phase by switching the teeth, but this method of setting the valve timing is not acceptable to me personally.
Problems when paying with bank cards
Sometimes difficulties may arise when paying with Visa/MasterCard bank cards. The most common of them:
- There is a restriction on the card for paying for online purchases
- A plastic card is not intended for making payments online.
- The plastic card is not activated for making payments online.
- There are not enough funds on the plastic card.
In order to solve these problems, you need to call or write to the technical support of the bank where you are served. Bank specialists will help you resolve them and make payments.
That's basically it. The entire process of paying for a book in PDF format on car repair on our website takes 1-2 minutes.
If you still have any questions, you can ask them using the feedback form, or write us an email at [email protected]
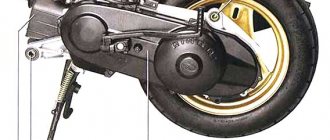
How to remove an engine from a scooter frame
We put the scooter on the central stand, or, depending on the model of the scooter, remove the lower plastic tray and place some kind of box under the frame.
We remove the seat and seat tank, remove the tube from the breather, if necessary, remove the air filter, unscrew the rear shock absorbers, depending on the scooter model, it is not always necessary to remove the shock absorbers completely, in my case I simply unscrew the lower bolts and tie them with wire to the rear mudguard .
On some scooter models, when removing the engine you have to additionally remove the rear mudguard.
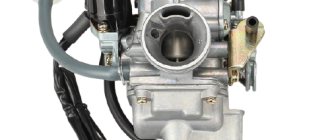
We disconnect the spark plug cap, remove the entire carburetor along with the intake manifold, and do not forget to close the intake channel in the head.
How to then connect a carburetor to a scooter is written in detail in the article: How to install a carburetor on a scooter engine
Unscrew the wire from the starter.
Unscrew the ground terminal from the engine (marked with an arrow)
The “ground” can also be attached to the valve cover, depending on what model, in any case it must be connected to the engine, so look for it.
We are looking for the generator connector in the “on-board network”.
We disconnect the plugs and take the harness somewhere far away.
Remove the rear brake cable.
Or the rear brake caliper.
How to remove the caliper is written in the article: Replacing scooter brake pads
Don't forget to remove the brake hose clamp (marked with an arrow).
Unscrew the nut on the axle.
With one hand we hold the engine from below, with the other hand we remove the axle.
Roll the engine completely out of the frame.
In conclusion, a little advice: when reinstalling the engine, before tightening the axle nut, apply “blue” thread locker to the threads.