Dynastarter
However, it is not only the engine that can make a motorcyclist clearly see all the components of his motorcycle. The most common problem is a problem with the dynastarter . The engineers of the Tula plant installed it in Muravya, instead of a conventional alternating current generator.
Why is it so important? If you notice a red light on the instrument panel while the moped is running, it means you are running out of charge. This happens because the generator is not producing alternating current. To begin with, in such a situation, it is necessary to check the integrity of the wires connected to the dynastarter and the relay regulator. If everything is in order, then the problem lies directly in the dynastarter. There may be three main causes of problems:
- difficulty in rotor operation (dirt getting into the collector or dust accumulation);
- freezing or wear of brushes;
- violation of the integrity of electrical equipment.
Since in most cases the operation of the dynastarter is difficult due to contamination of the collector, it is worth carrying out a simple disassembly according to the instructions described in the moped operating book. The main rules when working are neatness and cleanliness. After disassembly, be sure to thoroughly rinse all parts in gasoline and lubricate the rubbing parts, and under no circumstances throw away the parts.
Motor scooter repair Ant
It's no secret that the engineers of the Tula plant have created equipment with which the average owner has to feel like a mechanic. To this day, having found another problem, Ant’s owner has to pick up a tool, remembering the would-be engineers. One of the main problems is the engine of the Ant scooter, which is repaired in most cases of breakdowns.
Dynastarter
However, it is not only the engine that can make a motorcyclist clearly see all the components of his motorcycle. The most common problem is a problem with the dynastarter. The engineers of the Tula plant installed it in Muravya, instead of a conventional alternating current generator.
Why is it so important? If you notice a red light on the instrument panel while the moped is running, it means you are running out of charge. This happens because the generator is not producing alternating current. To begin with, in such a situation, it is necessary to check the integrity of the wires connected to the dynastarter and the relay regulator. If everything is in order, then the problem lies directly in the dynastarter. There may be three main causes of problems:
Engine assembly
Unlike a dynastarter, repairing an Ant scooter engine with your own hands is difficult to do according to the operating book. Therefore, it is worth seeking the advice of experienced motorcycle owners. Most often, the engine has to be disassembled when there are problems with the clutch mechanisms, the operation of the gearbox, as well as wear on the crankshaft, bearings or oil seals. The most important rule is not to be afraid to disassemble the engine yourself. Using these instructions, disassembling and assembling the engine of the Ant scooter will not be difficult.
So, the procedure for disassembling the engine:
- To begin, prepare your workspace. If you want to achieve proper and trouble-free operation, keep all parts clean and tidy. Remember and complete the disassembly order. [sc:ads3]
- First of all, remove the engine from the frame. To do this, you will need to remove the supporting hood covering the engine. Simply put, you need to unscrew the deflector, the volute and the wires: high-voltage, positive and ground. You can unscrew it in any order.
- Place the moped at any speed, unscrew the nut securing the dynastarter to the crankshaft and, holding the brake, press it out.
- With the scooter running at speed, unscrew the nut located on the drive sprocket.
- Remove the generator stator by unscrewing the 4 screws and remove the casing with the wires coming from it.
- Then we move on to removing the clutch cable and kickstarter lever.
- Now the task is to remove the muffler. To do this you will need a special key. In some cases, the muffler is secured to the cylinder with two regular bolts.
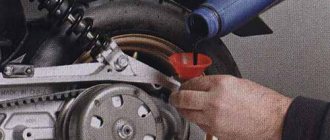
- Drain the oil from the gearbox by unscrewing the drain bolt.
- Then unscrew the three points securing the engine.
- Now you need to unscrew the cylinder secured by 4 nuts located on the head.
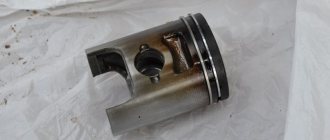
- Remove the head and place the cylinder vertically, with the open part up. The piston can be left in the crankshaft unless replacement is required. Otherwise, you need to pull out the locking rings and then knock out the pin.
- Now remove the bushing on the output shaft where the drive sprocket previously was.
- Unscrew the “flower” with the attached right crankshaft oil seal.
- Then remove the kickstarter cover secured with a stop bolt and 5 screws.
- Next, the clutch is removed. The central adjustment screw can be left untouched, but the 3 fingers with hooks located around it must be unscrewed.
- Pull out all the clutch discs located inside and remove the clutch lever attached to one bolt. The lever must be removed along with the spring.
- Use a chisel to break off the lock washers of the crankshaft and clutch basket and remove the rods and balls.
- After this, the entire structure is removed.
- Now the engine can be separated into halves; you just need to unscrew all the connecting screws.
- When all the parts are disconnected, you can tackle the problem area where the problem has arisen.
Ant scooter engine repair
Details Created: 02/03/2014 07:28
Repairing an ant scooter engine must begin with the selection of a high-quality tool. You must have:
- flat wrenches;
- several Phillips and minus screwdrivers;
- a pair of hammers;
- wire cutters;
- pliers and long-nose pliers;
- set of socket wrenches;
- several files with different grain sizes;
- needle files;
- hacksaw for metal;
- several sheets of paper sandpaper of various grain sizes;
It is not critical if several tools from the list may be missing, it depends on the type of work being performed. However, it is advisable to have a complete set of tools, which, fortunately, is available in every garage. Some operations require special tools, which can still be made with your own hands from available materials. A set of these tools will be enough to perform routine maintenance and repair of the ant scooter engine.
Some people believe that repairs can be done with cheap sets of wrenches in terrible condition, licked screwdrivers, and other types of inappropriate tools. Sometimes they manage to repair the engine, but the quality of the work leaves much to be desired, not to mention the fact that it is simply stupid and dangerous. Thus, it is possible to cause both minor engine malfunctions, for example, damaged mounting bolts, and fatal ones - engine jamming or burning out of the cylinder block.
Disassembling and repairing an ant engine will not be difficult if you have high-quality tools and consumables. Replacement parts must be selected as high quality as possible, since some operations require accuracy down to hundredths of a millimeter. Repair depends on the diagnostics performed, wear of engine components, and non-standard operating modes.
So, first you need to remove the engine from the frame and place it on a workbench, not forgetting to drain the oil before doing this. Then you need to remove the cooling covers and dynastarter. The dynastarter rotor can only be removed with a special puller; do not try to use a chisel or hammer. After this, you need to straighten the lock washer, unscrew the nut and remove the sprocket from the main gear. Next, turn the engine over, tighten all the bolts on the clutch cover, and tap the cover on all sides with a mallet, thus removing it. Remove the kickstarter shaft from the crankcase, unscrew the nuts on the clutch disc, and remove several clutch discs. For further work, you need to have a special puller, which can be made from an old clutch disc with a handle welded to it. We put the puller on the inner drum, remove the washer, hold the drum with the puller and unscrew the nut. Remove the lock washer from the crankshaft journal and unscrew the nut. We remove the basket with the sprocket and chain, remove the adjusting washer along with the outer drum bushing. We take the clutch rod out of the secondary shaft, then you need to turn the engine over, after which you need to shake out the ball and the second clutch rod. Unscrew the nuts and remove the cylinder head. We take out the cylinder, take out the retaining ring at the piston pin and push the piston pin out. Then you need to unscrew all the coupling bolts, turn the engine over and tap the engine evenly with a mallet until the crankcase halves come apart. Holding the engine in weight, take out the box and tap the crankshaft.
Thus, we completely disassembled the engine of the Ant scooter. Do not forget to diagnose all components during disassembly, such as: chain, cylinder mirror, quality of gaskets, all gears, bearings. It is necessary to check that there is no dirt, scuffing, metal shavings, or excessive play in the engine components.
- Back
- Forward
We recommend reading:
Repair manual
Diagram, comments, ignition installation algorithm
I recently came across a miracle of Soviet technology called an “ant scooter” for repairs. The engine of this “ant” showed no signs of life. Therefore, I didn’t even bother diagnosing it, and immediately began the overhaul, which I started with its complete disassembly. Moreover, its owner asked that everything be done at the highest level, and the highest level of repair involves a complete disassembly of the engine with subsequent troubleshooting of all components and mechanisms (in my understanding, of course).
We’ll have such a wow copy on the menu today, it’s moderately well-kept, which of course makes us happy.
We remove the engine and place it on some table, not forgetting to first drain the oil from it.
We remove the cooling casings and the dynastarter; how this is done is described in detail in the article: Repairing the dynastarter of the Ant scooter
Unbend the lock washer, unscrew the nut, and remove the final drive sprocket.
We turn the engine over, unscrew the bolts on the clutch cover, tap the cover with a mallet on all sides, and remove it from the engine.
Remove the kickstarter shaft from the crankcase.
The motor chain was severely stretched and must be replaced.
Unscrew the shaped nuts on the clutch pressure plate.
We remove several clutch discs, put a puller on the inner drum, unbend the lock washer, hold the drum with the puller and unscrew the nut (right-hand thread). It’s easy to make such a puller yourself - to do this, just take an old clutch disc and “weld” a small tire to it, in general, you’ll understand everything from the photo.
Unbend the lock washer on the crankshaft journal and unscrew the nut (right-hand thread), on this engine the nut was not clamped and was easily unscrewed with your fingers.
Photo report: How to remove the engine from the Ant scooter?
To be honest, the task of removing the engine from the “Ant” frame is quite a bit of work... As for me, it’s easier to pull a diesel engine off a tractor than from this rattling thing... This is, of course, a joke. But seriously, removing the engine from the Ant is much more difficult and takes longer than from any other Soviet motorcycle.
Tools
Preparation
If after removing the engine you plan to disassemble it, then it is better to drain the oil from it in advance while it is on the frame. And one more thing: since in any case we will have to crawl under the scooter and unscrew something there, look for some old sweatshirt or pea coat for bedding
Removal
Unscrew the air filter and remove it from the engine
Disconnect the power hose from the carburetor
We unscrew the two nuts securing the carburetor to the cylinder and so that it does not interfere with us, we remove it to the side
At your discretion: either remove the sprocket cover and move it to the side, or disconnect only the speedometer cable from it - it doesn’t matter
We look for the lock on the rear wheel drive chain and disconnect it. I don’t know about you, but there was no lock on the one I was testing. Some deer riveted a chain right there. I had to “Bulgarize”...
Disconnect the clutch cable. While the right moment has presented itself, if possible, remove the cable from the frame and check for suitability
Whatever one may say, the winding lever will only get in our way - unscrew it
Unscrew the two nuts on the muffler elbow mounting flange
The muffler, which will prevent us from removing the engine, is attached to the frame with two bolts. We unscrew the bolts and remove it together with the knee or separate it in place and remove it separately - it doesn’t matter
Unscrew the gearbox drive rod and throw it on the ground
Disconnect the breaker contact wire from the coil
Disconnect the ground wire. The ground wire is located at the bottom of the engine just behind the muffler elbow. Attached to the engine with a 10 nut
We remember the location and unscrew the dyno starter wires from the relay regulator. After unscrewing the terminals, remove the wiring harness from the frame
The engine is attached to the frame at three points: one at the very bottom, the other two - in front and behind. We unscrew the bolts that secure the engine to the frame. For greater convenience, the bolts on the engine do not need to be removed and instead, only the brackets can be unscrewed from the frame
The front mounting point is located just behind the muffler elbow. I don’t worry too much and only unscrew the bracket bolts
The lower mounting point is under the engine. Unscrew the nut and remove the bolt from the mount
The last attachment point is at the rear
We dump the engine on the left side. If your engine is converted to a magneto, then before removing the engine, just in case, remove it. This will be more convenient and the work will take place without consequences for the magneto, and therefore for your wallet
Build errors
In most cases, the right main bearing of the crankshaft fails due to an assembly error almost in the first season after repair. The engine that we are now repairing is no exception. The bearing has practically crumbled and in any case needs to be replaced with a new one.
The mistake is that when installing the flange on which the dynostarter stator is attached, the oil channel through which lubricant flows to the main bearing and oil seal is sealed.
To ensure that the main bearing lasts at least several seasons, cut the gasket under the flange a little along the contour of the oil channel and when you put the flange in place, do not smear anything with sealant there.
And one more thing: to avoid self-unscrewing of the bolts securing the dynostarter stator flange to the crankcase, and they come loose very often, apply a little thread locker to the threads. If possible, use a medium-strength fixative - “blue”.
Analysis of previous repair errors
We remove the flange on which the stator is mounted and carefully inspect the connector plane for interference by “drop-dead handles”.
No matter how many times I repair Ants, I come across the fact that all sorts of “drop-dead little hands” seal the oil channel through which oil flows to the crankshaft main bearing and oil seal. I'm already tired, honestly - how much can you? Why cover it up???
It doesn’t matter to me, but how do you think the bearing and oil seal should work without lubrication? Admire what happens to the main bearing when it runs dry.
We unscrew the bolts and half the crankcase.
Assembly
I bought this main bearing. It seems to be our production. There are Chinese analogues in stores - they are more expensive, but I don’t know what their quality is... I try to buy something that may not be of such super-duper quality, but at least one that has been proven over the years.
The quality of production is such that there is essentially nothing to complain about. The price is quite reasonable - 350 rubles.
We press the inner race of the main bearing onto the right crankshaft journal. External - screw the stator flange of the dynostarter and press it into the crankcase until it rests against the flange.
We install the oil seal, retaining ring and main bearing into the left half of the crankcase. I'm installing a new main bearing. It is closed, but it doesn’t matter: we open it, wash out the factory grease and install it in the crankcase.
Lubricate all bearings and working edges of oil seals with clean engine oil. And very carefully, so as not to accidentally wrap the edge of the oil seal - insert the crankshaft into the left half of the crankcase, assemble the gearbox and knock out the crankcase guides by 5-6mm.
We degrease the crankcase connector, install a new gasket and install the second half of the crankcase.
We tighten the bolts and immediately, so that nothing gets into the crankcase, install the piston. I'm installing a new piston, cylinder head and reed valve body. The piston one, like everything else, is of no particular origin - most likely Rostov, but clearly not Chinese. I didn’t want to get involved with this counterfeit, but the owner didn’t want to wait until they bore the cylinder and put a liner in the cylinder head and insisted on buying it. You see the prices for spare parts - it’s up to you to decide whether to contact this new product or not.
We install the second main bearing into the crankcase and secure it with a retaining ring.