Replacing steering column switches and hazard warning switch
Using a screwdriver, remove the decorative trim.
Using a 24mm socket, unscrew the steering wheel mounting nut, leaving it flush on the shaft.
. by hitting the rim with your palms, we knock the steering wheel off the shaft splines
If it is not possible to remove it in this way, press the rim with your knees and knock it down, striking the shaft through a soft metal mandrel
Finally unscrew the nut and remove the steering wheel.
Using a Phillips screwdriver, unscrew the four screws holding the halves of the steering column casing together on both sides.
...and one self-tapping screw securing the lower half to the column.
Remove the bottom trim by cutting the plastic clamp securing the wiring harness to it.
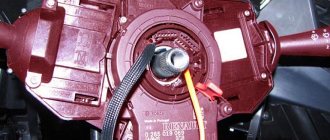
When removing the top half of the housing, be careful not to lose the rubber ring from the ignition switch.
To replace the hazard warning switch, remove it from the connecting block and install a new one.
Inside the dashboard, we disconnect the connecting blocks of the voltage supply harness to the steering column switches: eight-connector.
...six - and two-socket.
We take them out from the bottom of the dashboard.
Using the “8” socket, loosen the bolt of the clamp securing the steering column switches.
...and remove them together with the wiring harnesses from the steering column, moving them upward along the axis
We install new steering column switches in the reverse order of removal.
When placing the wiring harnesses in the lower casing, be sure to secure them with a plastic clamp and make sure that they do not touch the steering shaft universal joint.
Replacing the steering column switches and warning lamp switch
Once closed, use a screwdriver to remove the decorative trim.
Using the “24” head, unscrew the wheel fastening nut, leaving it on the shaft by hand.
. Hitting the rim with your palms deflects the steering wheel from the shaft slots
If you can't remove it this way, hug your knee, knocking it down, hitting the rod through a soft metal mandrel
Finally, unscrew the nut and remove the steering wheel.
Use a Phillips screwdriver to loosen the four screws that secure the steering column cover halves on both sides.
. And one self-tapping screw that secures the lower half of the column.
Remove the bottom plate, cut out the plastic clip, and attach the cable harness to it.
Steering column switch for VAZ-2107
For the convenience of enabling some control functions, the VAZ-2107 car has a steering column switch, which consists of three levers. The functions of these levers include the following:
- switching between low and high beam headlights;
- turning turns on and off;
- turning on the windshield wiper in two modes and the windshield washer.
Thanks to the switch, the driver's functions are greatly simplified. There is no need to be distracted from the controls in search of one or another button to turn on the required function. Therefore, the presence of such levers is a very important element in driving a car, and when the switch fails, driving the “seven” becomes impossible. This article will tell you about the principle of repair and how to replace switches located below the steering wheel.
Diagram for switching on direction indicators and hazard warning lights
The direction indicators are activated by the steering column switch. The hazard warning mode (all direction indicators flash) is activated by a switch mounted on the steering column. Since 1995, the design of the switch has changed the connection diagram of the control lamp and eliminated terminals “5” and “6”.
The alarm relay must ensure that the turn signal lamps blink at a frequency of 90±30 per minute at an ambient temperature of –20 to 50° C and a voltage of 10.8 to 15 V. If one of the turn signal lamps burns out, the blinking frequency of the control and remaining lamps doubles.
| The relay is installed in the passenger compartment on the front panel behind the instrument panel. | The diagram for switching on the hazard and turn signals is shown in Figure 2. |
Replacing the side turn signal lamp
If the car has a fender liner, remove it.
| From the inside of the wing, remove the protective cover along with the turn signal socket and replace the faulty lamp. | We insert the cartridge into the pointer body and put on the protective cover. |
Replacing the side turn signal
1. From the inside of the wing, using a “7” head or a piece of pipe of a suitable diameter, we squeeze the antennae of the indicator body clamp and push them into the hole in the wing.
Similarly, push out the second latch and remove the pointer.
We bring the wires out through the hole in the wing.
| 2. To replace the cartridge, remove it from the wires and connect a new one to them. | |
| 3. Insert the lamp with the socket into the pointer housing. | 4. Aligning the clamps with the holes, install the turn signal in place. |
DETAILS: Photo report on changing engine oil in a Volvo XC90 Instructions on how to change engine oil in an XC90
avtomechanic.ru
- Repair manuals
- Repair manual for VAZ 2105 (Zhiguli) 1980-1992.
- Diagram for switching on direction indicators and hazard warning lights
| 1 – block headlights with front direction indicators; 2 – side direction indicators; 3 – mounting block; 4 – ignition relay; 5 – ignition switch; 6 – relay-interrupter for direction indicators and hazard warning lights; 7 – turn signal indicator lamp located in the speedometer; | 8 – rear lights with direction indicator lamps; 9 – alarm switch; 10 – direction indicator switch in a three-lever switch; A – to terminal “30” of the generator; B – numbering of plugs in the hazard warning switch; B – the order of conditional numbering of plugs in the relay-interrupter of direction indicators and hazard warning lights |
Repairing auto parts yourself is a responsible task that should be taken as seriously as possible. Sometimes a faulty spare part takes the driver by surprise, forcing him to spend a lot of time and money searching for a good service station, but there is an alternative solution to the problem; this requires a small amount of knowledge and a set of tools.
When repairing the turn signal and hazard warning circuit of a VAZ 2105 Zhiguli, you need to be extremely careful and not neglect the little things. To get acquainted with the issue, car enthusiasts often use various Internet portals dedicated to auto parts.
Some of them use narrowly focused forums. But, as a rule, only generalized information is provided there, which is known initially. Where can you find a reliable source that offers really useful things? Our portal is open for this 24 hours a day.
A detailed description of such a unit as the circuit for switching on the direction indicators and hazard warning lights of the VAZ 2105 Zhiguli has a good structure with thematic headings. In addition, there is always the opportunity to familiarize yourself with the intricacies of installation. There are often situations when a driver is confident in his abilities, but when he gets down to work, questions begin to arise.
In addition to the repair manual, the owner of a personal car will be able to prevent a lot of breakdowns that occur due to the human factor, thanks to the information located on the site. Users are presented with a lot of useful recommendations for proper operation, which will help significantly extend the life of the unit and avoid many negative consequences.
DETAILS: Renault Logan clutch replacement - MegaSOS
Online support is an excellent and most convenient way to obtain the necessary information. Another significant plus is that articles are written for people. We understand that the reader will do everything with his own hands, and we try to make it as convenient and efficient as possible. Use the resource at any time of the day and find the answer to any question you may have regarding cars.
July 13th, 2013 admin
We repair the device
The switches located under the steering wheel of a VAZ-2107 car, at the first sign of a malfunction, require, first of all, to find out the reason why this or that function does not work. To find out the reason, you must first remove the device and try to determine the problem yourself. There are not so many reasons for breakdowns, but often you have to replace the device with a new one. So, in order to determine the reasons for the failure of the steering column switches, let’s look at what parts they consist of, and for this a photo will help us.
The design of the switches is non-separable. In any case, when a problem arises with the operation of the control levers, it is necessary to remove it and try to carry out repairs. Even if it doesn’t work out, you can always buy a new element.
The steering column switch on a VAZ-2107 car is removed in the following sequence:
- Disconnect the car from the power source and remove the steering wheel.
- We proceed to removing the protective casing of the steering column shaft, where the control levers are installed. To do this, use a Phillips screwdriver to unscrew 4 bolts and a self-tapping screw.
- After removing the casing, we move on to the levers of important functions themselves. The block with the power wires is disconnected.
- Unscrew the bolt securing the switches located at the bottom.
- Once the fastening is loosened, the switch can be removed without much effort.
Now you can repair the device by first inspecting any possible damage. If there are none, you need to clean the contacts in the connecting block and bend the sagging springs. It is also necessary to check whether the wiring from the device has been unsoldered. After the repair has been carried out, we need to find out whether we have fixed the problem. To do this, we connect the pads and put the terminals on the battery; if all functions work, then the repair was successful.
How to replace a device
If after repair the steering column switch refuses to work, then there is nowhere to go, you will have to purchase a new one. The cost of such a switch on a VAZ-2107 is around 300-500 rubles. Not that much of a cost for such an important control. Now a replacement is being carried out, which involves removing the old one and installing a new element in its place. How to remove a non-working device is already known, so let’s get down to business. To do this, you need to install the device in place, secure it and connect the power wires. Replacement does not involve any difficulties, after which the functionality of the device is checked and the casing and steering wheel are installed.
The process of repairing and replacing switches under the steering wheel takes no more than an hour, after which this device will work as if the car came straight from the showroom.
How to remove the wiper motor of a VAZ 2107
Operating principle
On a VAZ 2107 car, the wipers are driven by a 12 V electric motor. A relay is installed in the windshield wiper activation circuit. It is responsible for the intermittent operation of the wipers, which work without interruption or at intervals of four seconds.
The windshield wiper is connected in parallel through the contacts of the closer. They are located in the gearbox housing and are “responsible” for returning the brushes to their original position and abruptly stopping the motor. The driver controls the operating mode of the windshield wiper using the switch. The whole mechanism works thanks to a motor. It is prohibited to operate a car with faulty wipers, so car owners must ensure that they are in good working order. And in bad weather, driving with non-working wipers is very dangerous!
Where does which wire go, or just a diagram
Connecting wipers and washer
“Plus” power is supplied from the ignition switch through fuse No. 2 at 10 Amp of the mounting block. The permanent “plus” goes along the black and yellow wires to contacts “4” of the connectors of the gear motor and the steering column switch. It should not disappear even when the switch is in the “off” position. The blue wire supplies “+” 12 V power to the motor when the switch is in “continuous mode” position. On the blue-white wire, in the “off” position there should be a “minus”, and in the “continuous mode on” position the “minus” is turned off. This is done to slow down the motor when the power to the closer is turned off.
The red wire supplies the relay with “+” 12 V from the switch when the intermittent mode is turned on. At the moment of operation, contacts “2” and “4” close, and “1” and “3” open, the motor starts working and the brushes make one or two movements. Then “+” 12 V is turned off, and contacts “1” and “3” are closed to each other and to “minus”. The motor stops for a few seconds and then the cycle repeats.
The washer pump motor is connected to “+” 12 V constantly with a black and yellow wire through the same fuse No. 2. “Minus” is applied when you press the windshield wiper lever from bottom to top.
Video about how a windshield wiper works
Main components of wipers:
- trapezoid;
- gear motor;
- relay;
- brushes.
If the wipers do not work, then the reason must be sought in any element.
Video troubleshooting in the electrical part
VAZ 2107 wiper malfunctions
Replacing a burnt out motor
During the winter season, at sub-zero temperatures, wipers often stick to the windshield. The wiper motor is under a lot of load, and it burns out if the bimetallic fuse does not work or the fuse burns out.
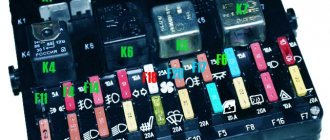
Location of the glass cleaner and washer fuse in the mounting block
In such cases, it is necessary to replace the motor. To do this, you need to remove all the parts in a certain order:
- Unscrew the fastening nuts;
- bend the lever and remove it from its seat;
- Using a 22mm wrench, unscrew the trapezoid fastenings on both sides;
- remove the plastic inserts;
- remove the hood seal;
- remove power from the windshield wiper motor;
- remove it with the drive from the hole in the body;
- bend the protective cover, unscrew the fastening nuts;
- press on the protrusions of the slots on the reverse side, on which the wiper arms sit, so that they fall inward, move in different directions, the trapezoid with the motor will come out.
Video instructions for replacing the windshield wiper trapezoid
After disconnecting the mechanism parts, you can repair the gear or install a new motor. But the electric motor must be inspected, even if it is in working condition. It is a conventional DC electric motor, the rotation of which, through a worm gearbox, is supplied to a trapezoid.
Walk over the collector with a cloth soaked in solvent. If there is a lot of wear, you need to change the armature or motor. Defects on the gear will require it to be replaced. Assembly occurs in reverse order. Therefore, before installing a replacement electric motor, you need to clean the trapezoid from contamination, lubricate the rubbing elements, motor and gearbox.
Trapezius problems
The trapezoid transmits rotational movements from the electric motor to the wipers and ensures the reciprocating movement of the wipers while cleaning the glass. Interruptions in the operation of wipers occur due to problems with the trapezoid; oxidized bushings and corrosion on the axles lead to jamming and slow operation of the mechanism. You can remove the trapezoid with a flat-head screwdriver. To set the correct position when installing the trapezoid, you must:
- set the motor to the initial position;
- place the crank and short rod parallel to each other;
- After that, attach the motor to the trapezoid.
VAZ classic - installation of steering column switches from Chevrolet Niva
It should be admitted that the steering column switches on models of the classic VAZ range cannot be called too inconvenient, but time does not stand still and already on the Chevrolet Niva this accessory has a number of obvious advantages. This concerns, first of all, a reduction in the number of control elements and a general improvement in the design (connection via “helicopter” blocks greatly facilitates installation when troubleshooting). In addition, the new switches have a more elegant appearance and, of course, after prolonged use, the original “steering wheel stalks” become extremely unreliable.
Windshield wiper device
Before repairing faulty wipers, you need to understand their design features. The main components of wipers are:
- Electric motor.
- Electric washer pump.
- Circuit breakers.
- Control relay.
- The switch is a three-position switch that regulates the speed of the brushes.
- Brushes.
Actually, this is what cleaning the windshield from rain, dirt and dust in the summer is based on. If the wipers of the VAZ 2107 do not work, then the cause of the breakdown must be sought in one of the listed elements. What are the main types of malfunctions, we will consider further.
Possible windshield wiper malfunctions
The main types of malfunctions include the following reasons:
- the switch has failed, which happens in frequent cases;
- the fuse has blown, which could have happened as a result of an overload of the electric motor, water getting on it or overheating of the wiring;
- poor circuit contact or lack thereof;
- windshield wiper motor malfunction;
- breakdown of the VAZ 2107 windshield wiper relay.
If the breakdown consists of a blown fuse, then replacing it will not be enough; it is also necessary to find the true cause of such consequences. Next, we will consider the main types of wiper malfunctions on the VAZ-2107 with a detailed description of their solutions.
The wipers stopped turning on
If the wipers on a VAZ-2107 do not work in two switch positions, then the reason is most likely hidden in a blown fuse. This element is located on the fuse block and serves to protect the circuit from overloads and short circuits.
Checking the fuse is the first thing you need to start repairing. To check, you should use a tester, or simply exchange it for a known good one of the same rating. In rare cases, fuse contacts may oxidize and need to be cleaned and replaced.
Steering column switch for VAZ-2107
This product was chosen by 8 customers
The original steering column switch, which is supplied to the AvtoVAZ conveyor.
Designed to replace failed standard ones.
Weight, kg: 0.45 Dimensions, cm: 35 x 16 x 7 Volume, m3: 0.00392
Windshield washer does not work
To remove dirt from the windshield, the washer is used together with the windshield wiper. The device sprays water or a special liquid. The main elements of this mechanism are:
- fluid reservoir;
- motor;
- nozzles;
- connecting tubes.
During the operation of a car with a washer, various problems may arise that lead to its inability to work:
- motor failure;
- fuse blown;
- kinking of tubes;
- breakdown of the steering column switch;
- poor contact on the power supply circuit.
Checking the motor
It is easy to check if the washer pump is not working properly. To do this, just open the hood and pull the lever of the steering column switch, which is responsible for the function of supplying fluid to the windshield. At this moment, the operation of the motor will be clearly audible. If this does not happen, then the malfunction may be caused either in the pump itself or in the fuse or other part of the electrical circuit. To make sure that the problem lies in the motor, we use a multimeter to measure the voltage when the washer is turned on. If there is voltage, but the pump does not work, then you need to take care of replacing it.
Video: checking the wiper motor on a “classic”
Injectors
If the motor is running, but liquid is not supplied through the nozzles, then the problem will not be difficult to identify, since there are only a few reasons for this phenomenon:
- clogged injector fittings;
- the supply tube has come off;
- kinking of the tube.
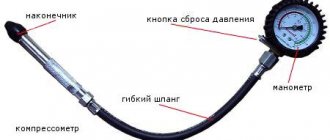
The malfunction can be determined by inspecting the tubes from the motor to the injectors. If there are no areas with kinks and the tube has not fallen off, then the reason lies in clogged nozzles, which can be cleaned with a sewing needle and blown out with a compressor.
Fuse and mounting block
The integrity of the fuse is checked in the same way as for windshield wipers. The same protective element as for the wipers is responsible for the operation of the washer. In addition to the fuse, sometimes the track in the mounting block through which power is supplied to the washer burns out. In this case, you need to disassemble the fuse box and restore the current-carrying element by soldering, having first cleared the varnish from the track.
Understeering's shifter
You should start checking the steering column switch on a VAZ 2107 if the fuse, motor and the entire electrical circuit through which voltage is supplied to the pump are in good condition. In this case, the wiring should not have breaks, melted insulation or other visible damage. To check the steering column switch, only a multimeter will be enough. Having disconnected the connectors from the device in question, we connect the probes of the device in the dialing mode with a two-pin block. If the switch is working properly, then when the washer is turned on, the device will show zero resistance. Otherwise, the mechanism will have to be replaced.
Video: checking the wiper mode switch
Product delivery options
Note! Below are the shipping methods available specifically for this product. Payment options may vary depending on the shipping method. Detailed information can be found on the “Delivery and Payment” page.
Parcel by Russian Post
Available payment methods:
- Cash on delivery (payment upon receipt)
- Using cards Sberbank, VTB, Post Bank, Tinkoff
- Yandex money
- QIWI
- ROBOKASSA
Shipping throughout Russia. Delivery time is from 5 to 12 days.
Parcel by Russian Post 1st class
Available payment methods:
- Cash on delivery (payment upon receipt)
- Using cards Sberbank, VTB, Post Bank, Tinkoff
- Yandex money
- QIWI
- ROBOKASSA
Shipping throughout Russia. Delivery time is from 2 to 5 days. More expensive than regular delivery by Russian Post, approximately 50%. Parcel weight up to 2.5 kg
Express Parcel EMS
Available payment methods:
- Cash on delivery (payment upon receipt)
- Using cards Sberbank, VTB, Post Bank, Tinkoff
- Yandex money
- QIWI
- ROBOKASSA
Shipping throughout Russia. Delivery time is from 3 to 7 days. More expensive than regular delivery by Russian Post, approximately 100%.
Transport companies
Available payment methods:
- Using cards Sberbank, VTB, Post Bank, Tinkoff
- Yandex money
- QIWI
- ROBOKASSA