- Signs indicating oil leakage into the combustion chamber
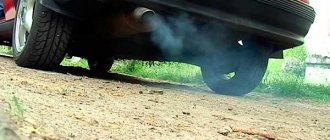
When penetrating into areas of high temperature, the oil burns, thereby turning into bluish smoke.
If the appearance of oil in a place of high temperature occurs precisely through the holes in which the valves move, smoke appears when the engine starts and stops when it warms up. In this case, excessive oil consumption may be detected, and an oily coating may also appear on the spark plugs.
Replacing valve stem seals on a VAZ 2107 engine
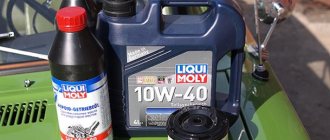
Valve seals should be replaced when blue smoke appears from the exhaust pipe of a VAZ 2107, especially when braking the engine. To work on replacing valve stem seals on a VAZ 2107 car engine, you will need a desiccant, an inertial puller, a torque wrench and a tin rod.
Removing the valve stem seals 1. Prepare the VAZ 2107 car for operations (Preparation of the VAZ 2107 car for maintenance and repair).
2. When performing the following operation (after removing the camshaft housing), it is recommended to mark the location of the valve drive levers.
3. Remove the housing assembly with the camshaft, valve drive levers and springs (see “Camshaft and valve levers - replacement”). When removing the camshaft, the pistons of the 1st and 4th cylinders were set to the TDC position, which would prevent the valve from falling into the cylinder after removing the crackers. In this position, we replace the oil seals on the valves of the 1st and 4th cylinders.
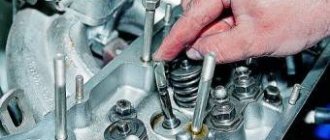
5. Install the desiccant pressure bracket onto the spring plate, securing the support bracket with a nut screwed onto the bearing housing mounting stud.
6. Squeezing the valve spring with a depressurizer, remove two crackers from its points. Unscrew the nut and remove the desiccant.
7. Remove the spring plate.
8. Remove the outer and inner springs.
9. Remove the inner spring support washer.
10. Install the collet of an inertial puller on the oil scraper cap to remove the valve stem seals and compress the collet by striking the upper striker against the lower one. By striking the puller nut with the upper striker, we press the valve stem seal off the valve guide.
We recommend: How to change rubber bands on windshield wipers - a DIY job
Installing valve stem seals on a VAZ 2107 engine 1. If the set of new valve stem seals includes an installation sleeve, then to prevent damage to the working edge of the valve stem seal, put the sleeve on the valve stem.
2. Lubricate the inner surface of the valve stem seal with engine oil and move it along the installation sleeve until it stops against the valve guide. Remove the installation sleeve.
3. Using the mandrel included in the puller kit, press the oil scraper cap onto the valve guide. 4. We install the parts removed from the valve onto the VAZ 2107 car engine in reverse order.
6. Similarly, replace the oil seals of the remaining valves of the 1st and 4th cylinders.
7. Turn the crankshaft 180° and, holding the camshaft sprocket with the chain, set the pistons of the 2nd and 3rd cylinders to the TDC position.
8. Replace the valve stem seals of the 2nd and 3rd cylinders.
9. After replacing the valve stem seals, turn the crankshaft 540° to set the piston of the 4th cylinder to the TDC position of the compression stroke.
10. Install the housing with the camshaft on the studs of the cylinder head and tighten the fastening nuts evenly (see “Camshaft and valve levers - replacement”).
11. Untie the wire, install the sprocket with the chain on the camshaft, tighten the fastening bolt and lock it by bending the petals of the lock washer.
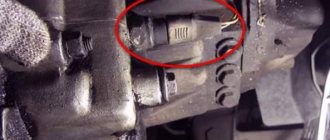
12. Check that the marks match.
13. “Charge” the chain tensioner and, having installed it in its original place, “discharge” (see “Timing chain tensioner - replacement”) and adjust the chain tension (see “Timing chain - adjustment”).
14. Adjust the gap between the levers and camshaft valve cams (see “Gap between the valve levers and camshaft cams - adjustment”).
Replacement of VAZ 2107 engine valves
The need to replace VAZ 2107 valves arises in the following cases:
- the valves are bent due to a skipped timing chain or as a result of severe wear on the rod;
- the plate cracked;
- The valve itself burned out.
For repairs, you will need to purchase new valves and prepare the tools used when replacing valve stem seals. In addition, the cylinder head must be removed from the engine. This is done as follows:
- Use a 10mm socket to unscrew the cylinder head fasteners.
Replacing valve guides
Valve bushings (valve guides) are designed to guide the movement of the valve stem. Thanks to the precise fit of the head on the seat, the combustion chamber is sealed. The correct operation of the valves largely depends on the serviceability of the seats and guides, which wear out over time and begin to negatively affect the operation of the engine. In this case, the bushings and seats must be replaced.
If the bushings are heavily worn, oil consumption increases, valve stem seals fail, and lubricant gets into the cylinders. As a result, the temperature regime of the engine is disrupted, and carbon deposits form on its individual parts. The main signs of guide wear:
- increased oil consumption;
- the appearance of noise in the cylinder head area.
To make sure that it is the bushings that are faulty, you need to open the hood and listen to the engine. If uncharacteristic sounds and noises are heard, then it will be necessary to diagnose the valves and their guides.
For repairs you will need:
- hammer;
- sweeps at 8.022 and 8.028;
- mandrel for pressing out and pressing in bushings.
Replacement of valve bushings is carried out on the removed engine head in the following sequence:
- We hit the mandrel with a hammer and knock out the valve guide.
Replacing the valve seat
The operation of valves with seats, like the entire engine, is associated with exposure to high temperatures. This can lead to the formation of various defects on parts, such as holes, cracks, and burns. If the cylinder head overheats, misalignment may occur between the valve sleeve and the seat. As a result, the tightness of the connection will be broken. In addition, the seat wears out faster along the cam axis than in other places.
To replace the seat, you will need to remove it from its seat. The required set of tools and equipment may vary depending on the capabilities of the car owner:
- machine;
- electric drill;
- hammer;
- metal attachment;
- old valve.
The saddle can be dismantled in the following ways:
- Using a machine. The saddle is bored and becomes thin and less durable. During the process, the remaining part of the seat is rotated and removed with pliers.
- Using an electric drill. A small abrasive wheel is clamped into the drill chuck, the tool is turned on, and it is cut into the saddle. At a certain point, the part can be removed due to loose tension.
- By welding. The old valve is welded to the seat in several places. The valve together with the seat is knocked out with hammer blows.
Installation of a new seat is carried out in the following order:
- To ensure the required tension of 0.1–0.15 mm, the cylinder head is heated on a gas stove to 100 °C and the seats are cooled in the freezer compartment of the refrigerator for two days.
- Press the seat into the engine head with gentle hammer blows through the adapter.
- After the heads have cooled, they begin to countersink the seats.
It is best to cut the chamfer on a machine. Rigid fastening of the part and centering of the cutter will ensure high accuracy, which cannot be obtained using hand tools. If this is not possible, you can use cutters and a drill.
Three edges are cut on the saddle with cutters with different angles:
The last edge is the narrowest. It is with this that the valve will come into contact. After this, all that remains is to grind the valves.
Video: replacing the valve seat
Grinding in VAZ 2107 valves
Grinding in the valves is necessary to ensure the tightness of the combustion chamber. It is performed not only after replacing the seat, but also when compression in the cylinders decreases. Grinding can be done in the following ways:
- on a special machine;
- hand cutter;
- mechanically.
Since special equipment can only be found in car repair shops or machine shops, in garage conditions the latter option is the most common. For manual grinding you will need:
Grind the valves in the following sequence:
- We put a spring on the valve and insert its stem into the bushing.
Preparing for work
Before you start, it is recommended that you watch the video on replacing valve stem seals on your car. From the very beginning, you should thoroughly wipe the upper part of the timing belt, as well as the mechanism cover.
To make it more convenient, you need to unscrew the air filter housing, wrap the carburetor with film or cloth to prevent foreign objects, moisture and dirt from getting into it during operation. Unscrew the spark plugs and remove the cover with the gasket.
We recommend: Inoperative window regulators: causes and solutions to the problem
The 4th cylinder must be moved to TDC (top dead center) on the compression stroke. For this purpose, the crankshaft should be rotated to a position in which the intake and exhaust valves of the 4th cylinder remain in the closed position before and after TDC. This location of the piston should be determined by the distance between the valves and rocker arms.
You can find out what position the piston is in using any rod by measuring the distance in the spark plug hole. You should also check whether the marks on the sprocket and the housing match.
Causes and results of wear of valve stem seals on VAZ 2107/2106.
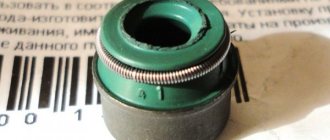
The purpose of the valve stem seals is to prevent excess engine oil from entering the engine combustion chamber. The cap should fit snugly against the valve and allow only the small amount of oil through that is necessary to lubricate it. The caps are made of special rubber, but over time, the edge of the valve stem cap wears out, deteriorates, the rubber ages, loses elasticity and peels off from the base. As a result, the cap begins to let oil through and it begins to get under the valve.
Leaking oil burns on hot valves, as a result of which carbon deposits build up on the internal walls of the engine, the cross-section of the intake and exhaust channels narrows, and the engine loses power. During active use of the engine, carbon deposits begin to fall off, its particles clog the seat and working chamfer of the valve, as a result, the fit of the valves is disrupted, the engine begins to operate intermittently and stalls. Another outcome is valve burnout, which leads to failure and replacement of VAZ 2107/2106 valves.
Removing oil seals
Replacing valve stem seals on a VAZ 2107 begins with disassembling part of the gas distribution mechanism and removing the old caps. To do this, you must perform the following operations:
- Unscrew the spark plugs using a special wrench;
Note: after removing the spark plugs, check their condition and replace if necessary.
- Unscrew the timing cover bolts;
- remove the cover;
- set the camshaft position according to the marks;
- bend the petals of the lock washer that prevents the camshaft sprocket mounting bolt from unscrewing;
- unscrew the bolt;
Tip: to prevent the camshaft from turning, you must engage the first gearbox speed.
- unscrew the chain tensioner fastening;
- remove the tensioner;
- remove the sprocket;
Advice: so as not to have to re-adjust the position of the chain on the sprocket teeth, you need to tie the chain to the sprocket with wire and place it on the cylinder block.
- unscrew the nuts securing the camshaft bearing housing;
- remove the housing with the camshaft;
- remove the rocker (rocker arms) of the valves.
To remove the valve stem seals, perform the following operations on each of the intake and exhaust valves:
- insert a tin rod (8 mm in diameter) into the spark plug hole to prevent the valves from lowering;
- fasten the puller (depressurizer) to the studs so that the bracket rests against the valve spring plate;
- press the puller onto the plate, compress the valve spring and pull out the crackers from the valve groove;
- remove the desiccant;
- dismantle the springs with the plate and support washer;
- pry it up with a screwdriver and remove the oil seal.
Note: replacement of VAZ 2107 valves is also carried out using a desiccant. But before the operation, it is necessary to remove the engine head to ensure that the valves can be removed and installed.
Why are oil seals needed and how are they designed?
Engine cylinders need protection from foreign substances entering the combustion chamber. It is the oil seals (or valve stem seals) that play the role of a kind of protector. Their task is to prevent oil from penetrating while the valve stems are operating. If the caps have lost their function, they must be replaced. Otherwise, carbon deposits will begin to appear on the walls of the engine, which will lead to increased oil consumption.
A running engine causes all elements of the gas distribution mechanism to constantly move. They rub against each other, which inevitably leads to wear. To reduce the wear rate, oil gets onto the surface of each element. In this case, you need to ensure that the oil does not end up in the working area of the valves. Otherwise, the motor will begin to malfunction. To ensure that not a drop of oil penetrates into the combustion chamber, oil seals are installed.
Valve seals have a very simple structure. They consist of only three elements:
- Base. This is the oil seal frame, which is made in the form of a steel bushing. This element ensures the strength of the spare part.
- Spring. It ensures the tightness of the mechanism by pressing the rubber tightly against the valve stem.
- Cap. This is the main element of the device, made of rubber. With its help, excess oil on the rod is eliminated.
Diagnostics
If the oil consumption in your car’s engine increases significantly, and is even accompanied by blue smoke from the exhaust pipe, and the dynamics of the car at the same time have not changed and fuel consumption has not increased, then it is too early to think about major repairs. This problem can be solved by replacing the oil seals. This operation is not too complicated and can be done with your own hands, besides, the price of the repair kit is mere trifles. For this you will need:
- Bright garage;
- Set of tools;
- A device for desiccating valves (sold at any auto store);
- And of course – our instructions.
Replacement
general information
I should please you - replacing valve stem seals on a VAZ 2105 does not require removing the cylinder head, although in order to show this “trick” we will need to use a flexible rod with a diameter of about eight millimeters (I used solder). At the initial stage, it is necessary to carry out some preparatory actions:
- Of course, the first thing we do is disconnect the battery;
- Remove the air filter housing;
- Fuel pump;
- Distributor;
- Ignition distributor drive housing (hexagon “five”)
- Remove the valve cover.
- We remove the camshaft bearing housing along with the shaft, while making sure that the chain and sprocket do not fall into the engine block. To do this, do the following:
Procedure
So:
- “undermine” the camshaft sprocket mounting bolt;
- loosen the chain tensioner nut by half a turn;
- loosen the chain by squeezing the tensioner shoe with a screwdriver until the chain loosens;
- tighten the nut;
- We completely unscrew the bolt securing the sprocket and remove it; the chain is fixed, preventing it from slipping into the block.
Advice! Before performing the above work, it is advisable to align the marks located on the sprocket and on the camshaft bearing cover. This action is necessary in order to set the pistons in the first and last cylinders of the engine to the upper position, which will prevent the valves from falling into the combustion chamber after we dry them out.
Replacing oil seals on a VAZ 2105 usually starts with the first cylinder. The next step is to fix the valve in the upper position with a tin rod, for which:
- all spark plugs are pre-unscrewed;
- A rod is inserted through the spark plug holes, with the help of which the valve is pressed upward.
- install the device for loosening the valves on the valve spring cup (the bracket is fixed on the stud securing the camshaft housing with a nut) and press it until the cracks are released.
Disassembly
Valve desiccation
- We take out the crackers and carefully release the spring;
Take out the crackers
- We disassemble and take out the entire spring element (upper and lower cups, inner and outer springs).
- Using pliers or a special inertial puller, we dismantle the valve stem seals.
Inertia oil seal remover
At this point, the process of removing the caps is considered complete. As you can see, this process is not too labor-intensive and does not require additional video and photo materials, then we proceed to install new caps and then reassemble the engine in the reverse order.
Assembly
As a rule, when purchasing a set of valve stem seals, it is accompanied by a special guide sleeve, the purpose of which is to prevent possible deformation of the edges of the caps and a mandrel, with the help of which the cap is pressed into place. Further:
- We install the cap on the valve stem, having previously lubricated its surface with engine oil;
- We put on the mandrel;
- By lightly tapping, we finally “seat” the cap onto its working place.
Mandrel for pressing the cap
Advice! After replacing the valve spring, apply several blows with a hammer to its upper cup so that the valve cotters “fall into place.”
At this point, the installation of the cap is also complete; we proceed to assembling the valve spring mechanism and replacing the caps on other valves (do not forget to move the cylinder piston to top dead center and secure the valve from falling with a tin rod).
Signs of breakdown
To prevent serious problems in engine operation, it is necessary to promptly diagnose and correct oil seal failure.
You can judge the wear of valve stem seals on a VAZ 2107 by the following signs:
- There is an increased release of white or blue exhaust gases.
- Engine oil consumption increases significantly.
- The candles become covered with black soot.
If you find these signs of failure, you need to make sure that the entire gas distribution mechanism is working properly, and not just the caps. Pay special attention to valve diagnostics. If necessary, replace the valve stem seals on the VAZ.
If the problem is not diagnosed and corrected in time, the following consequences may occur:
- the motor will lose dynamics;
- it will begin to work unstably and will often stall at idle;
- the pressure in the cylinders will decrease;
- carbon deposits form not only on the valves, but also on the walls of the cylinders and pistons;
- the tightness of the system will be compromised.
When carbon deposits appear on the engine walls, its service life decreases sharply. If the problem is not corrected in time, the situation will lead to an expensive overhaul of the engine. But these difficulties can be avoided by simply replacing the oil seals on the VAZ 2107.