Design and operation of the rear axle
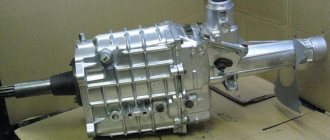
The rear axles of VAZ-2101, -2102 cars and their modifications have the same design and are completely unified, with the exception of gearboxes, the main gear of which has a different gear ratio.
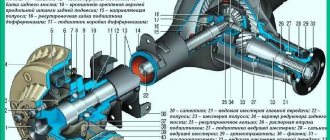
For the VAZ-2101 and its modifications it is 4.3, and for the VAZ-2102 it is 4.44. To distinguish gearboxes for station wagons, the letter “U” is applied to their neck. A gearbox is attached to the housing (beam) 18 (Fig. 79) of the rear axle, in which the main gear and differential are located. The driving 32 and driven 41 gears of the main gear are paired in terms of contact and noise, so if one of them is damaged, both are replaced. Between the inner rings of bearings 23 and 29 of the drive gear there is a spacer sleeve 30, which, deformed when the drive gear nut is tightened, provides preload in the bearings.
An adjusting ring 31 is installed between the end of the drive gear and the inner bearing, which determines the correct position of the drive gear relative to the driven gear.
The driven gear of the main gear is attached to the flange of the differential box 22, which rotates on two bearings 46. The preload in these bearings, as well as the gap between the teeth of the drive and driven gears, is adjusted by nuts 47, wrapped in split bearing beds. The semi-axial gears 40 are installed in the cylindrical slots of the differential box and rest on the box through support washers 42. By selecting the washers according to their thickness, a lateral gap of 0.0-0.1 mm is established between the teeth of the satellites and the semi-axial gears.
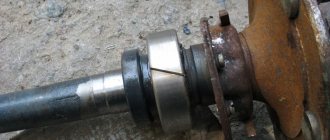
Axle shaft 2 with its inner end enters the spline hole of the semi-axial gear, and with its outer end it rests on a ball bearing 16, which is secured to the axle shaft with a locking ring 7. The axle shaft bearing is sealed in the socket of the bridge beam on the inside with a self-clamping oil seal 17, and on the outside with a rubber ring. The bearing is secured in the beam seat by a plate 8, which, together with the oil deflector 6 and the brake shield 1, is secured with four bolts to the beam flange 15.
The dimensions of the main mating parts and the limits of permissible wear during operation are given in table. 12.
Adjustment and installation of the VAZ 2107 gearbox
Main pair engagement depth adjustments
In this case, it is necessary to select the thickness of the adjusting washer.
So: Instead of the device, we install the “original” shank and tighten the nut until it stops lightly, leaving a gap. The differential with planetary gear assembly, bearing caps are installed and their mounting bolts are tightened.
When replacing the shank oil seal, a number of incorrect actions are allowed, which ultimately lead to premature failure of the gearbox. Before releasing the shank nut, according to the technology for performing the work of replacing the oil seal, it is necessary to remove the axle shafts (which is almost never done, since the amount of work will increase many times). Although according to the price list, the removal of the axle shafts will most likely be included in the list and a fee will be charged for this, since this is required by the plant’s technology for replacing the oil seal. This is a necessary condition, since the axle shaft will create resistance when tightened and correct adjustment will simply be impossible to achieve.
Before releasing the shank nut, it must be secured against turning and the tightening force of the nut must be checked with a torque wrench, around 12 kgf. Before installing the oil seal, if its outer surface is not rubberized, then you need to use a sealant to guarantee it. Thus, a mark of 0.15 mm on the gearbox stocking will be sufficient to pass oil through the outer surface of the oil seal.
Back to assembly...
The adjusting nuts are installed, and the gap on the main pair is pre-selected (the final working gap is 0.08 to 0.12 mm). Then paint is applied to the teeth of the planetary gear from an aerosol can and, using a shank, it is necessary to make several movements in different directions in order to fix the contact spots in the paint.
Read, it may be useful: Diagram of the brake system - its structure, principle of operation and malfunctions
Now, having turned the planet gear back, you can clearly see the contact patch on its teeth with the teeth of the pin. The contact patch (in this case) shows that the adjusting washer on the shank is thicker than the required thickness. We slightly tighten the shank nut, thereby moving its bearing, which makes it possible to move the gear teeth towards each other, that is, as if “reducing” the thickness of the adjusting washer. Using the differential bearing adjusting nuts, we set the approximate gap (reducing it slightly).
Then we again apply paint to the teeth of the planetary gear and again begin to rotate the shank (or gear) in different directions to print the contact patch between the teeth. It can be seen that the contact patch has risen a little, but still not enough and it is necessary to tighten the shank nut a little again. Similar actions with paint and turning the gear must be carried out until the contact patch is located exactly in the middle of the teeth, and the sound of the turning teeth becomes quieter.
After correct (final) adjustment, the sound will be almost inaudible.
Remember to tighten the differential bearing adjusting nuts every time you tighten the shank nut. As a result, the contact patch was located exactly over the entire surface of the teeth. It should be noted that this is the condition for the location of the contact patch for old (working) pairs. For new main pairs, the contact patch, as mentioned above, should be located in the center of the teeth.
Further. The planetary gear mounting covers are released and the differential is removed. The shank nut is unscrewed and removed. Since the shank was installed only with a bearing without an adjusting washer, there was a gap between the bearing and the shank gear where the washer would fit. This gap is measured with a set of feeler gauges, thereby calculating the required thickness of the adjusting washer.
It turns out, as in the case of using instruments and accessories, the size for the required adjusting washer was also 3.36 mm. The shank bearing is removed, an adjusting washer (3.36mm) is installed, the bearing is put in place and the gearbox is assembled. The shank is installed, the shank nut is tightened, min. 12 kgf. The differential with planetary gear is installed, the covers and bolts are tightened, but not completely.
By the way, the lids should not be mixed up. The adjusting nuts of the differential bearings are installed and the gap on the main pair is pre-set. Then the differential cover bolts are finally tightened. The gap in the main pair is finally adjusted and the adjusting nuts are secured.
The gearbox parts are assembled in the reverse order of disassembly. You can press in the bearing rings using a hammer and a special tool (a socket wrench head will do).
Adjusting the VAZ 2107 gearbox
Bridge VAZ 2101
The rear axle is one of the main elements of the VAZ 2101 transmission. It is designed to transmit torque from the driveshaft to the axle shafts of the vehicle, as well as to evenly distribute the load on the wheels while driving.
Specifications
The drive axles of VAZ cars of the 2101–2107 series are unified. Their design and characteristics are completely identical, with the exception of the gear ratio. For a “kopeck” it is 4.3. VAZ station wagon models (2102, 2104) were equipped with gearboxes with a gear ratio of 4.44.
Table: main characteristics of the rear axle of the VAZ 2101
Technical characteristics of VAZ-2101 - VAZ-2103 cars
Technical characteristics of VAZ-2101 - VAZ-2103 cars
Repair and operation manual - General information about VAZ-2101 - VAZ-2107 cars - Technical characteristics of VAZ-2101 - VAZ-2103 cars Technical characteristics of VAZ-2101 cars - VAZ-2103, VAZ-2102, VAZ-21021, VAZ-21023
| Options | VAZ car model | ||||
| 2101–2103 | 21011 | 2102 | 21021 | 21023 | |
| Total information | |||||
| Number of seats including driver's seat | 5 | 5 or 2 | |||
| Load capacity, kg | 400 | 430 | |||
| Weight of the equipped vehicle, kg | 955 | 1010 | |||
| Weight on the front axle, kg: | |||||
| – equipped car | 515 | 520 | |||
| – full | 615 | 630* or 575* | |||
| Weight on the rear axle, kg: | |||||
| – equipped car | 440 | 490 | |||
| – full | 740 | 810* or 865 | |||
| Vehicle clearance at full load and normal tire pressure, mm: | |||||
| – to the front suspension cross member | 175 | 175 | |||
| – to the rear axle beam | 170 | 170 | |||
| Smallest turning radius (along the track axis of the front outer wheel), m | 5,6 | 5,6 | |||
| Maximum speed in top gear, km/h: | |||||
| – at full vehicle weight | 140 | 143 | 135 | 138 | 145 |
| – with driver and one passenger | 142 | 145 | 137 | 140 | 147 |
| Acceleration time of a car from a standstill with gear shifting to a speed of 100 km/h, s: | |||||
| – at full vehicle weight | 22 | 20 | 25 | 21 | 19 |
| – with driver and one passenger | 20 | 18 | 23 | 19 | 17 |
| Maximum rise with a length of at least twice the length of the vehicle, overcome without acceleration at the full weight of the vehicle, % | 34 | 34 | 32 | 32 | 34 |
| Braking distance at full vehicle weight from a speed of 80 km/h, m | 43,2 | 43,2 | 43,2 | 43,2 | 43,2 |
| Engine | |||||
| Engine model: | 2101 | 21011 | 2101 | 21011 | 2103 |
| Cylinder diameter and piston stroke, mm: | 76x66 | 79x66 | 76x66 | 79x66 | 76x80 |
| Working volume, l: | 1,2 | 1,3 | 1,2 | 1,3 | 1,45 |
| Compression ratio | 8,5 | 8,5 | 8,5 | 8,5 | 8,5 |
| Rated power according to GOST 14846 (net) at a crankshaft speed of 5600 min-1, hp. | 58,7 | 63,7 | 58,7 | 63,7 | 71,1 |
| Maximum torque according to GOST 14846 (net) at a crankshaft speed of 3400 min-1, kgf m | 8,7 | 9,4 | 8.7 | 9,4 | 10,6 |
| Cylinder operating order | 1–3–4–2 | ||||
| Transmission | |||||
| Clutch | single disc with central pressure spring | ||||
| Transmission | mechanical, three-way, four-speed | ||||
| Gear ratios: | |||||
| - first | 3,75 | ||||
| – second | 2,30 | ||||
| – third | 1,49 | ||||
| – fourth | 1,0 | ||||
| - reverse | 3,87 | ||||
| Cardan transmission | two shafts with an intermediate elastic support are connected to the gearbox with an elastic coupling. The two rigid universal joints at the ends of the rear shaft have needle bearings | ||||
| main gear | conical, hypoid | ||||
| Gear ratio | 4.3 or 4.1 | 4,44 | 4,1 | ||
| Chassis | |||||
| Front wheel suspension | independent, wishbone, with coil springs, telescopic hydraulic shock absorbers and anti-roll bar | ||||
| Rear wheel suspension | dependent, rigid beam connected to the body by one transverse and four longitudinal rods, with coil springs and hydraulic telescopic shock absorbers | ||||
| Wheels | stamped disk | ||||
| Rim size | 114J–330 (4.5J–13) | 127J–330 (5J–13) | |||
| Tires: | |||||
| – chamber diagonal | 6,15–13 (155–330) | 6,45–13 (165–330) | |||
| – chamber radial | 165/80R13 | 165/80R13 | |||
| Steering | |||||
| Steering gearbox | globoidal worm with double-ridge roller | ||||
| Gear ratio | 16,4 | ||||
| Steering gear | three-link, consists of one middle and two lateral symmetrical rods, a bipod, a pendulum arm and swing arms | ||||
| Brakes | |||||
| Service brakes: | |||||
| – front | disk | ||||
| – rear | drum with self-centering shoes and rear brake pressure regulator | ||||
| Service brake drive | foot hydraulic, dual-circuit | ||||
| Parking brake | manual, with cable drive on the rear brake pads | ||||
| Electrical equipment | |||||
| Electrical system | single-wire, negative pole of power supplies connected to ground | ||||
| Rated voltage, V | 12 | ||||
| Accumulator battery | 6ST-55, capacity 55 Ah at 20-hour discharge mode | ||||
| Generator | G-221, alternating current with built-in rectifier, output current 42 A at 5000 min-1 | ||||
| Starter | ST-221, with electromagnetic traction relay and freewheel | ||||
| Spark plug | A17DV | ||||
| Body | |||||
| Body type | sedan, all-metal, monocoque, four-door | station wagon, all-metal, load-bearing, five-door | |||
* With a load of 5 people. and 80 kg of cargo. ** With a load of 2 people. and 290 kg of cargo. Quote
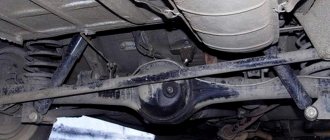
Rear axle device
The design of the rear axle of the VAZ 2101 consists of two main elements: a beam and a gearbox. These two nodes are combined into one mechanism, but they perform different functions.
What is a beam
The beam is a structure of two stockings (casings) rigidly connected by welding. Flanges are welded into the ends of each of them, designed to accommodate semi-axial oil seals and bearings. The ends of the flanges have four holes for installing brake shields, oil deflectors and plates that press the bearings.
The middle part of the rear beam has an extension in which the gearbox is located. In front of this extension there is an opening closed by the crankcase.
Half shafts
The machine's axle shafts are installed in stockings. At the inner ends of each of them there are splines with which they are connected to the semi-axial gears of the gearbox. Their uniform rotation is ensured by ball bearings. The outer ends are equipped with flanges for mounting the brake drums and rear wheels.
Gearbox
The gearbox design consists of a main gear and a differential. The role of the device is to evenly distribute and redirect the force from the driveshaft to the axle shafts.
main gear
The main transmission mechanism includes two bevel gears: drive and driven. They are equipped with spiral teeth that ensure they are connected at right angles. Such a connection is called hypoid. This design of the main gear can significantly improve the grinding and running-in process of gears. In addition, maximum noiselessness is achieved during gear operation.
The main transmission gears of the VAZ 2101 have a certain number of teeth. The drive has 10, and the driven has 43. The ratio of the number of their teeth determines the gear ratio (43:10 = 4.3).
The driving and driven gears are selected in pairs on special machines in the factory. For this reason, they are also sold in pairs. In case of gearbox repair, replacement of gears is allowed only as a set.
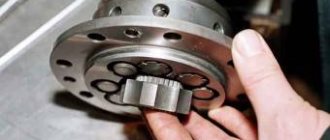
Differential
The center differential is necessary to ensure that the wheels of the vehicle rotate at different speeds depending on the load on them. The rear wheels of a car do not travel the same distance when turning or overcoming obstacles in the form of holes, potholes, or ledges. And if they were rigidly connected to the gearbox, this would lead to constant slippage, causing rapid tire wear, additional stress on transmission parts, and loss of contact with the road surface. The listed problems are solved using a differential. It makes the wheels independent of each other, thereby allowing the car to freely turn or overcome various obstacles.
The differential consists of two side gears, two satellite gears, adjusting washers and a cast iron box that acts as a housing. The axle shafts fit into the axle gears with their splines. The latter rest on the internal surfaces of the box using adjusting washers of a certain thickness. They do not contact each other directly, but through satellites that do not have a rigid fixation inside the box. While the car is moving, they move freely around their axis, but are limited by the surface of the driven gear, which prevents the axis of the satellites from moving from the mounting sockets.
The differential housing with the mechanism is installed inside the gearbox on roller bearings pressed onto the housing support journals.
Malfunctions of the rear axle of the VAZ 2101 and their symptoms
The complexity of the rear axle design does not in any way affect its performance or service life. If all the parts are selected accurately, the unit systematically undergoes appropriate maintenance, and the car has not been involved in traffic accidents, it may not declare itself at all. But it also happens the other way around. If you do not pay due attention to the bridge and ignore possible signs of its malfunction, problems will definitely appear.
Signs of failure of the “penny” rear axle
The most likely symptoms that your vehicle's axle is faulty are:
- oil leak from the gearbox or axle shafts;
- lack of transmission of torque from the “cardan” to the wheels;
- increased noise level in the lower rear part of the car;
- noticeable vibration when moving;
- uncharacteristic noise (hum, crackling) when accelerating the car, as well as when braking the engine;
- knocking, crackling from the side of the bridge when entering a turn;
- crunch at the beginning of movement.
Failure of the rear axle of VAZ 2101
Let's consider the listed symptoms in the context of possible malfunctions.
Oil leak
Let's start with the simplest thing - lubricant leaks. This is probably the most common problem that owners of “kopecks” face. A timely detected leak does not pose any threat to the unit, however, if the oil level reaches a critical minimum, rapid wear of the main gears, axle shafts and stellites is inevitable.
Lubricant from the rear axle of the “penny” may leak from under:
- a breather, which serves as a kind of pressure valve;
- oil filler plugs;
- drain plug;
- shank oil seal;
- gearbox flange gaskets;
- axle seals.
Lack of transmission of torque from the driveshaft to the wheels
Unfortunately, such a malfunction is also not uncommon. Most often it occurs due to low quality parts or manufacturing defects. The breakdown is characterized by the lack of reaction of one or both rear wheels when the “universal shaft” rotates normally. If you have to face such a situation, you can safely prepare to replace the axle shaft. Most likely, it simply burst.
Increased noise level in the bridge area
Strong noise from the bridge while driving may indicate such malfunctions as:
- loosening of the fastening of the wheel rims to the axle shafts;
- wear of axle shaft splines;
- failure of semi-axial bearings.
Vibration
Vibration in the rear of the vehicle while driving can be caused by deformation of the shaft of one or both axle shafts. Similar symptoms also occur due to deformation of the beam.
Noise when accelerating or braking
A hum or crackling sound that occurs when accelerating a car, as well as during engine braking, is usually a sign of:
- insufficient amount of lubrication in the gearbox;
- wear of the mechanism bearings or improper tightening;
- failure of semi-axial bearings;
- exhaustion or incorrect adjustment of the distance between the main gear gears.
Knocking or rattling noise when turning
Extraneous sounds in the area of the rear axle during cornering may occur due to:
- occurrence of chips and scuffs on the surface of the satellite axis;
- wear or damage to satellites;
- increasing the distance between gears due to their wear.
Crunching sound at the start of movement
A crunching sound when starting the car may indicate:
- wear of the satellite axis mounting sockets;
- shank play;
- change in the gap in the connection between the drive gear and the flange.
How to check the rear axle
Naturally, noises such as hum, vibration, crackling or knocking can also occur due to other malfunctions. For example, the same driveshaft, if the outboard bearing breaks or the crosspiece fails, can make a crunching sound and vibrate. Failure of the elastic coupling of the universal joint is also accompanied by similar symptoms. The rear struts or other suspension elements may be knocking. In any case, before starting to repair the bridge, it is important to make sure that it is the one that is faulty.
Checking the rear axle is performed as follows:
- We drive out onto a flat section of the road without holes or ledges.
- We accelerate the car to 20 km/h.
- We listen and note the accompanying noises.
- We gradually increase the speed of the car to 90 km/h and remember at what speed this or that uncharacteristic sound occurs.
- Without turning off the gear, release the accelerator pedal, reducing the engine speed. We continue to monitor changes in the nature of the noise.
- Again we accelerate to 90–100 km/h, turn off the gear and ignition, letting the car coast. If the extraneous noise does not disappear, the rear axle gearbox is in order. Without load, it cannot make noise (except for the bearings). If the sound disappears, the gearbox is probably faulty.
- We check the tightness of the wheel bolts by tightening them with a wheel wrench.
- We install the car on a horizontally flat surface. We hang its rear wheels with a jack so that we can rotate them freely.
- We alternately rotate the wheels of the car left and right, and also push them back and forth to determine the play. The wheel should turn easily without jamming. If the wheel plays or slows down when the bolts are securely tightened, the axle bearing is most likely worn out.
- When the gear is engaged, we rotate each of the wheels around its axis. Let's look at the behavior of the cardan shaft. It should also spin. If it doesn't turn, the axle shaft is most likely broken.
Video: extraneous noises in the rear of the car
Repair of the rear axle of VAZ 2101
The process of repairing the rear axle is a rather labor-intensive task that requires certain skills and special equipment. If you do not have sufficient experience and the necessary tools, it is better to contact a car service.
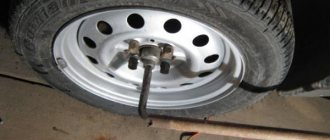
Replacement of axle shafts, their bearings and seals
To replace a deformed or broken axle shaft, its bearing, and oil seal, you will need to dismantle the wheel and partially disassemble the beam. Here we will need:
- car jack;
- wheel bolt wrench;
- car body stand;
- wrenches “8” (“12”) and “17”;
- flat screwdriver;
- round nose pliers or pliers;
- hammer;
- large chisel;
- “grinder” with the ability to connect to the electrical network;
- gasoline blowtorch or gas burner;
- vice;
- grease.
In addition, you will also need the spare parts themselves that are planned to be replaced, namely the axle shaft, bearing, lock ring, oil seal. The table below shows the catalog numbers and characteristics of the necessary parts.
Gearbox and rear axle of the classic VAZ 2107 2106 2101 2105
It would seem that nothing can be improved on the classic vases. However, there are 3 options for gearboxes and 4 rear axle gearboxes. The gearboxes come in 2101, 2105, 2106. The gears (1st, 2nd, 3rd) in 2101 are shorter than in 2105, and longer in 2106. Gearboxes come with gear ratios of 3.9, 4.1, 4.3, 4.44. How to find out the gear ratio? Raise the rear wheel, put it in neutral, make 10 rotations of the wheel and count the revolutions of the cardan.
Cardan speed
What does the gear ratio give? The higher it is, the lower the speed in all gears at the same speed. On standard sixes with a 1500 engine, a 2105 gearbox and a 4.1 axle are installed at the factory. If the engine is 1600, then the gearbox is original (2106), the axle is 3.9 or 4.1.
Let's assume that all cars have 175/65R13 tires. Let's now look at the graph of the dependence of the car's speed on the engine speed (always on the graphs the standard 1500 with a 2105 gearbox and a 4.1 axle will be indicated in green. Why - because there are more of them than all the others).
With a 2106 gearbox and a standard 4.1 axle (raspberry) with a standard engine, we get a gain in dynamics only due to the long 1st gear, the 2.3 has become longer, which is not good (with a standard engine).
If the engine is boosted, then long gears are what you need: maximum power will be delivered over a wider speed range without compromising dynamics. For example, let’s take gearbox 2106 and gearbox 3.9 (raspberry):
Here all the gears are longer (especially the first). For example, in our version in first gear the speed range of 3500-6500 is at a speed of 28-53 km/h, and in the standard it is at 25-45 km/h. Feel the difference! By the way, in this configuration, the first, second, third gears completely coincide with the 11th row on the chisels (with a 3.7 axle), the fourth is shorter, and if the fifth, then it is not much longer than the chisel fourth gear... truly, everything new is well forgotten old :).
Another thing is if we install a 4.44 bridge (raspberry):
Compare: 1-longer ? 2,3-shorter, 4-short!! That is, from a traffic light in first gear, we rev up the engine when the “standard” is already shifting to 2, then second, third, fourth, and we go forward. This option is optimal for a standard engine. However, there is a minus: in 4th gear, already at 140 km/h the revolutions will be 6000... here it is better to use standard 5th gear, which will create a complete picture. Here you have the highway, and the city - and the wolves are fed up and no one was hurt. And due to the fact that at maximum speed modes the revolutions will be close to maximum, the dynamics on the track will be amazing.
That is, with a standard 1500 or 1600 engine, tuning the gearbox and gearbox is as follows: Option 1 - install a 2106 gearbox with 5th gear. — Install gearbox 2102 (4.44).
And if the engine is boosted, then there is option 2: - gearbox 2106. - Gearbox 3.9 Or 1st, if you want to tear everyone around the city.
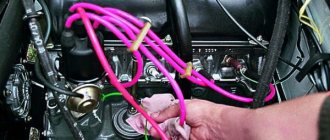
“Quiet, the operation is underway!” or Replacing the rear axle gearbox seal on a VAZ 2107
The sequence of work when replacing the gearbox seal is as follows:
- We measure and record the moment of resistance to rotation of the flange (the axle shafts must be removed!).
- Unscrew the flange nut.
- Remove the flange from the shaft splines.
- Using expansion pliers, remove the oil seal. If you don't have pliers, you can pry it off with a screwdriver. Be careful not to damage the surface of the socket.
- We inspect the flange. If its surface has a pronounced groove in the place where the working edge of the oil seal rubbed, then before installing the new oil seal, insert a washer 1 mm thick into the socket. If the flange is damaged on the working surface, replace it with a new one.
- Lubricate the outer surface of the oil seal with lithol and carefully drive it into the crankcase socket using a mandrel of suitable diameter. If there is no mandrel, press in the oil seal by evenly tapping the end along the circumference of the outer diameter. Make sure that there are no distortions - the working edge should be strictly perpendicular to the shaft axis.
- We inspect the lead-in chamfer on the flange. It should not have defects that could damage the working edge. We install the flange, avoiding sudden movements and impacts, so as not to knock the spring off the oil seal. Before installation, you can lubricate the flange chamfer with transmission oil to make the process easier.
- We tighten the nut, periodically checking the moment of resistance to rotation of the flange. Remember that at the end of the tightening the resistance in the bearings increases much more intensely than at the beginning. The moment of resistance to rotation should be 1–2 kgf.cm greater than what we recorded before unscrewing the nut. In any case, if the moment exceeded 9 kgf.cm, and the bearings in the bridge were still old, remove the flange again, take out the inner ring of the bearing and change the spacer sleeve. If the bearings are new (new means they have not traveled a single kilometer, because after a hundred kilometers they can be considered old for adjustment purposes), then the normal moment of resistance to rotation after tightening the nut for them should be in the range of 16–20 kgf. cm. Replacement of the rear bearing affects gear alignment, so please refer to the appropriate instructions for this procedure.
To prevent self-loosening, the flange nut has a special plastic insert, which, when crushed against the thread, creates additional resistance both when screwing and unscrewing. As a rule, such nuts can withstand up to ten unscrewings without losing their locking properties. If in doubt, get a new nut.
We reinstall the axle shafts and brake drums, screw on the driveshaft, and fill in the oil. We make a test drive and if everything is in order, we enjoy life, until we suddenly find a treacherous spot under the bridge again...
Read, it may come in handy: How to replace brake fluid on a “classic” VAZ
Video: How to carry out work on a VAZ 2107
Operating principle of the rear axle
The rear axle is used to transmit torque in a car from the engine, through the gearbox, through a cardan transmission to the rear axle, final drive, differential, axle shafts to the driving wheels of the car.
These components and parts are located in the rear axle of the car, which consists, respectively, of two main parts: a hollow beam (includes two stamped casings welded together) and a housing, a rear axle gearbox.
The rear axles of VAZ 2101-2107 cars have almost the same design and can be said to be unified among themselves. The exception is rear axles in all-wheel drive vehicles and front-wheel drive VAZ vehicles (and their modifications).
Installation
1. Installation of the rear suspension of the VAZ 2101, 2102 is carried out in the reverse order of removal.
2. In this case, install springs on the suspension of the same class as on the front suspension. In exceptional cases, when class A springs (with yellow markings) are installed on the front suspension, and there are no springs of this class for the rear suspension, it is allowed to install class B springs (with green markings) on the rear suspension.
3. To prevent damage and excessive tightening of the elastic bushings of the rod hinges and shock absorbers:
load the rear of the car so that the distance from the axle beam to the body side member, measured 100 mm from the crossbar bracket, is 125 mm; Use a torque wrench to tighten the nuts on the bolts securing the longitudinal and transverse rods, as well as on the pins securing the shock absorbers to the bridge beam and to the body.
Checking technical condition
Before checking, wash all parts thoroughly.
When washing, protect rubber parts, bushings and protective coatings from solvents.