How to adjust valves on VAZ 2110-VAZ 2112?
Note! Let’s immediately say about all the engines that were installed on cars of the tenth family, firstly, on all of them (it doesn’t matter whether it’s a carburetor or an injector) the valves are adjusted identically, only the only difference will be in removing the cylinder head cover, as they said earlier, the thermal clearance of the valves is adjustable only by 8 valve cars, so if you have a 16 valve, then you can completely forget about it and never think about it, and what’s more, don’t forget to buy the cylinder head cover gasket at the auto store; you will remove the cover, and when removing this gasket, be sure to replace it with a new one, if there is one It’s also possible to stock up on a good sealant, it will come in very handy!
One more thing, the valve clearance is checked only at positive temperatures, namely at “+20 ° C”, so if you carry out work in winter, then either do everything in a heated garage, or warm up the car thoroughly and quickly remove the cylinder head cover with gloves and check (the engine will have cooled down a little at that point) on a warm engine the gap at the valves and, if necessary, make calculations and change the adjusting washers (this can be done without rushing, the main thing is to measure the gap while it’s warm outside or while the engine is warm)!
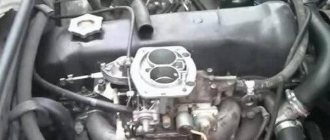
1) Let's start adjusting, first, use a cloth or something else to clean the Cylinder Head cover from dirt, make sure that after removing it, no dirt or other unnecessary objects (Pebbles, for example) get into the valve mechanism, then disconnect it from the cylinder head cover all the hoses (Don’t be afraid to disconnect them, these are crankcase ventilation hoses and after they are disconnected, no liquid will flow out of them) that are connected to it, and in total there are two hoses connected to it on carburetor cars (Pipes would be more correct to call them), one of the pipes comes from the air filter housing, and the other is connected on the opposite side of the cover, you will immediately find them if the engine is in front of your eyes, and they are attached by clamps, these clamps will need to be slightly loosened with a screwdriver and then disconnected hoses, as for injection cars, there is practically nothing different on them, the same two pipes are located in exactly the same places as the pipes of a carburetor car, for clarity, we indicated both of these pipes with arrows in the photo below.
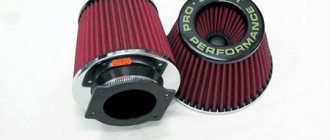
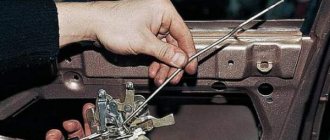
2) As soon as the hoses are disconnected, we go further and move on to other things that may interfere with the removal of the cylinder head cover, on carburetor cars this is the air filter housing, for example, and it must be removed (How to remove the housing, read the article: “Replacing the air filter housing with VAZ"), on injectors this is a bracket that holds the throttle cable (This bracket is shown in the photo with a red arrow, and it is attached to either three or two nuts, everything depends on the engine, for clarity, both nuts securing the bracket in the photo are indicated by blue arrows, You unscrew these nuts and put the bracket and the cable aside and, if necessary, remove the throttle cable; how to do this, read the article: “Replacing the throttle cable on a fuel-injected car”).
3) And to finish removing the cover, unscrew the two outermost lateral cap nuts with a socket wrench or something like it and you can remove the cover from the car engine, but if you have a carburetor car, then also unscrew the central nut as shown in the photo below nut and remove the throttle cable bracket and let it hang on the cable (If the cable does not allow you to remove the cylinder head, then you disconnect it from the carburetor; how to do this, read the article: “Adjusting the cable on carburetor cars”), as soon as the operation is completed done, unscrew the same two side cap nuts and remove the cover from the carburetor car.
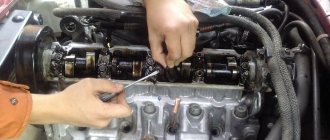
4) Now that the cover is removed, remove the oil near the pushers (Indicated by arrows in the small photo) to make it more pleasant to work and so that the dipsticks do not become dirty; once the oil around them is removed, remove the side cover that covers the timing belt (It is indicated by an arrow in the main photo ), it is attached to two bolts in the side and one in the center secures it, you unscrew all these bolts and then remove it from the car.
5) Then you will need to turn the crankshaft until the mark on the camshaft pulley (Indicated by a red arrow) coincides with the mark (Whisker) which is located on the rear timing belt cover, and to make the marks match, you will most likely have to turn the crankshaft , this is done in several ways, but we will only talk about the easiest of them; at the beginning, do not forget to turn out the spark plugs (it will be easier this way; read about how to turn out the spark plugs in the article: “Replacing spark plugs on a car”), after which engage the fourth (Direct) gear and roll the car until the marks coincide, but if the work is carried out in a garage and it is not possible to roll the car (By the way, you can roll it in jerks, that is, turn on the fourth, roll about two meters, engage neutral gear, roll the car back and again the fourth and so on until the marks coincide), then hang out any of the front wheels and turn it by hand, again until the marks coincide, there is another way but we won’t tell you about it, but then you will also tear off the crankshaft pulley mounting bolt, but in principle we can give a hint, in general, you will need to set the neutral gear and the crankshaft pulley mounting bolt (the pulley itself is indicated as number 3, and the bolt can be seen in the center in the photo) will need to be turned clockwise, until the marks coincide, but in no case do not turn the bolt securing the camshaft pulley (This pulley is indicated by number 1 in the small photo), otherwise some people do this.
6) Once everything is done, turn the crankshaft pulley a little more (Turn clockwise about 40-50°), in this position the camshaft cams will turn from the pushers and you can start checking the gaps, to do this, insert the feeler gauge between the pusher and the camshaft cam first, second, third and fifth valves and check the gaps, which should be “0.2+0.05 mm” for the intake valves and “0.35+0.05 mm” for the exhaust valves, if the gap does not match on any of the valves, then remove adjusting washer and replace it with a new one, it is removed as follows, first the pusher itself is pushed down (inside, by the way, it is indicated by a blue arrow), the easiest way to push the pusher in is with a screwdriver or a special device that you most likely don’t have, we’ll stick with a screwdriver , by the way, before recessing it, turn it with your hand so that it faces you with the groove facing you (It has two grooves through which it is very convenient to get the adjusting washer by picking it up with tweezers or something similar, the groove is indicated by a yellow arrow for clarity), after then use a screwdriver to push the pusher inwards and use tweezers to pick up the adjusting washer through this groove (indicated by the red arrow) as shown in the small photo and you can select a new one.
Note! The counting of valves must begin from the camshaft pulley, that is, the first valve comes from it at the beginning, then the second, etc., so that you do not get confused, we have posted a photo below in which we clearly indicated the number of the valves, we will immediately note which of these valves are the intake ones are valves numbered “2, 3, 6 and 7”, respectively, valves numbered “1, 4, 5 and 8” are exhaust valves, make sure you don’t make a mistake when you make the adjustment!
7) Regarding the selection of the thickness of the adjusting washer, which regulates this very thermal gap, first, on the washer that you took out, write down or remember the numbers that are printed on it (This is its thickness, but if the washer was not installed correctly or if the valves have not been adjusted for a long time , then this inscription has been erased and in this case either you will need to resort to using a caliper, or using a micrometer, we recommend using a micrometer since it will more accurately determine the thickness of this washer, so measure it and write it down in the same way or remember it, the record should look like these are the numbers “3.75 mm”), now, based on these numbers, determine the thickness of the new washer, and it is calculated according to a certain formula: “H = B + A – C”, in which the letter H stands for the thickness of the new adjusting washer, the letter B is the thickness old washer taken out, the letter A is the measuring gap that you got when you checked the gap with a feeler gauge between the pusher and the camshaft cam, by the way it is calculated in millimeters, and the letter C is the nominal gap, as we have already indicated, the nominal gap should be “0.2” for intake valves +0.05 mm”, for exhaust “0.35+0.05 mm”, well, just achieve a nominal gap right around “0.35 mm” for exhaust, for example, we do not recommend you, always take the average value, for example “0.40 mm”, that is, you will create a gap so that you have it a little, and not tightly everything stands, for example, purely under “0.35 mm” and by the way, when you get a number, round it up, for example, it turns out that the new washer should be “3.81 mm”, round it up up to “3.80 mm”, if “3.84 mm”, then round it up to “3.85 mm”, there are simply no new adjusting washers with a thickness of “3.81 mm”, “3.84 mm”. Well, that's all, all the washers are installed in their places in the reverse order of removal, after installing the new washers, check the valve clearance, if it is incorrect, it means either the washer was of the wrong thickness, or you messed something up, then one turn ( 360°) rotate the crankshaft and adjust the clearances of the fourth, sixth, seventh and eighth valves in the same order and finally pour the engine oil that is used in your car into the upper part of the cylinder head (This is where you wiped it with a rag in the beginning for convenient operation was) and install everything in its place, at the same time change the gasket at the cylinder head cover and if you have sealant, then apply it to this gasket and by the way, when installing new shims, install them with the inscription facing down so that the camshaft cams do not erase it behind very short time.
Additional video: You can clearly see the process of adjusting the thermal clearances of the valves in the video below:
Note! Watch another instructive video below, it will also give you additional information and if you plan to adjust the valves in the near future, we hope you won’t have any problems!
Setting rules
Every car owner can refer to the manual regulations. It is worth saying that the nominal installation of valves on the VAZ 2110 8-valve injector occurs at the factory. According to the operating instructions, it is recommended to carry out the first adjustment at 10,000 km. This mode is called running-in. And then, adjustments should be made every 45,000 km. In some cases, engines operate properly up to 80,000 km.
For reference! The installation of valve pusher washers on VAZ 2110-12 vehicles (8 valves), with injection and carburetor engines, is completely identical.
Adjustment frequency
The need to adjust the valve clearances in the VAZ 2110 is remembered when the characteristic sound of rattling pushers is heard from under the hood. With this, the VAZ 8-valve engine was lucky: there are engines in which the valve clearances manage to decrease as they wear out, and here the burnout of the valves and the need to dismantle the head would already remind of itself.
However, there is still no need to postpone adjustment until the last minute. The noise of the gas distribution mechanism itself is a direct consequence of the increase in shock loads in it: the top of the cam does not roll onto the pusher, but hits it. Even when idling, each cam will experience more than 400 such impacts per minute - and how many of them will there be in one trip? And impacts mean an increase in wear and a risk of developing fatigue stresses, and on the most loaded part of the camshaft.
Factory regulations require the first valve adjustment at 3000 mileage (breaking in of parts), then at 45,000 and then every 45,000 mileage. When purchasing a VAZ 2110 secondhand, it is worth combining valve adjustment with replacing the timing belt in order to immediately have a guaranteed starting point for routine procedures. As the mileage increases, a valve grinding procedure may be necessary.
Device
In order to understand why there is a need to adjust the valves, you need to understand a little about the operation of the VAZ 2110. So, when the engine is cold, there is a gap between the cam and the pusher.
It is needed for the so-called compensation of thermal expansion. Simply put, we all know that when heated, all objects tend to expand.
So that there is room for expansion, and the component parts do not break or bend, there are gaps. However, they must be of a strictly defined size, otherwise instead of benefit we will get harm.
Engine device
Symptoms of problems
So, the need for intervention is indicated by the following signs:
- You can hear the valves knocking;
- Compression in the engine drops, it, as they say, “does not hold up”;
- Oil “drives” from under the valve cover;
- The engine response decreases, it pulls poorly;
- “Shots” are heard through the muffler;
- The carburetor “sneezes”;
- Fuel consumption increases.
All of the listed symptoms can arise both for other reasons and “thanks to” poorly adjusted valves of the VAZ 2110. In order for them to close tightly and not knock, they need to be “brought back to normal.”
Symptoms
To understand that the valves on the VAZ 2110 engine need adjustment, it is enough to know the behavior of the engine. After prolonged use, the car owner may notice that the engine has begun to work somehow differently. This fact should alert you, because the consequences can be serious.
The main symptoms of a faulty valve mechanism adjustment on a VAZ 2110 look like this:
- the engine is noisy when starting up after a long period of parking (clacks);
- compression in the cylinders disappears (the engine loses its former power);
- Valve cover gasket leaks oil;
- “shots” appeared in the carburetor or muffler;
- fuel consumption has increased.
The listed signs can be diagnosed independently, without resorting to the services of a car service. Before you put the VAZ 2110 in for repairs and begin adjusting the valves, you should prepare a mechanic’s tool: a micrometer, a rack for pressing the pushers and a multi-part feeler gauge. The last thing to measure is the thermal gap between the camshaft cam and the adjusting washer. Instead of a rack, it is possible to use two powerful slotted screwdrivers.
The installation kit (fixture and probe) is sold in most Auto Parts stores. Its cost varies from 200 to 500 rubles. Correct installation of valves on a VAZ 2110 8 valve injector or carburetor is the key to success.
Preparatory stage
It starts with turning off the on-board power supply to the car, for which the terminals are removed from the battery and it is necessary to drain the old engine oil into a prepared container through a service plug and coolant from the engine crankcase, this is done by disconnecting the lowest radiator pipe from the cylinder block, the only precaution is Carrying out the procedure on a cooled engine, otherwise you can get your hands burned!
Spare parts and tools for work
Before starting work on replacing valves on a VAZ 2110, high-quality new parts are purchased, the names and original articles of which are as follows:
- Set of gaskets: valve cover (art. 2108-1003270/77) and cylinder head (art. 21083-1003020), intake and exhaust manifolds (set art. 21083-1008081), exhaust gas intake pipe (art. 2103-1203020-04) , as well as an oil seal (art. 2108-1005034) and oil flinger rings (art. 2108-1007026-86) (the so-called cylinder head repair kit)
- New valves for the fuel mixture intake system 4 pcs. (art. 21083-1007010)
- New exhaust system valves 4 pcs. (art. 2108-1007012)
- Valve guides 8 pcs. (art. 2108-1007032-87)
- Engine coolant
- New bolts securing the cylinder head to the cylinder block (art. 2108-1003271Н/О)
- Timing belt (art. 2108-1006040-86) and generator drive belt (art. 1000012562)
- Engine oil and oil filter
Repairs to replace worn-out parts are carried out using a standard set of tools, which are usually sold as a set, namely:
- a set of open-end wrenches marked from 8 to 21 mm;
- set of internal hex keys;
- a set of sockets with a diameter from 8 to 24 mm;
- valve desiccant;
- screw valve guide puller;
- torque wrench (needed for proper tightening of the camshaft, cylinder head and camshaft gear bolts);
- Screwdriver Set;
- electric drill;
- specialized lapping paste of two types (for rough lapping of valves to their working surface of the combustion chamber and for finishing grinding);
- gloves to protect hands from possible damage.
This is interesting: How to replace the cabin filter of a Hyundai Solaris yourself: step-by-step instructions, where it is located.
The presence of tools, parts and a covered room will allow you to carry out troubleshooting work yourself, since the price of replacing 8 valves on a VAZ 2110 in non-certified services in the fall of 2021 varies from 30 to 45 thousand rubles. At a certified service station of official dealers, such work will cost more than 50 thousand, which will greatly affect the financial situation of the car owner.
Adjusting valves VAZ-2112 16 valves: photo and video
Adjusting the valve mechanism of the 16-valve VAZ-2112 engine is a rather complicated operation, but can be done with your own hands. Thus, many motorists have come across the concept of hearing valves ringing, especially when moving from low to medium speeds. In this article, we will look at how to properly adjust the valves on a car, and also talk about some of the nuances of the process.
Video about adjusting valves on the front-wheel drive family of VAZ cars (2110-2112)
The video will tell you how to properly adjust the valves on a 16-valve engine, as well as give some tips and tricks.
Valve adjustment process
The process of adjusting valves on an engine
Before moving directly to the adjustment process, it is worth noting that this operation is carried out only on a completely cooled engine. Experienced VAZ drivers recommend waiting at least one night.
To make the adjustment, you will need a few tools, namely a set of keys and sockets, as well as a valve cover gasket and a special feeler gauge.
So, let's proceed directly to the operation:
- We disconnect and move to the side the tip of the throttle valve drive. We dismantle the cable and bracket for fastening the throttle position
- Using a 10mm wrench, unscrew the bracket for the throttle cable to the receiver.
- We dismantle the crankcase ventilation hoses. Unscrew the clamps and remove the crankcase ventilation hoses.
- We unscrew the valve cover using a 10mm socket and dismantle it. Remove the valve cover and bearing caps to adjust the valves
- Remove the gasket from the valve.
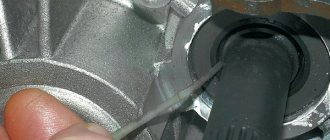
- We dismantle the timing belt protective cover. We dismantle the timing belt protective cover to get to the crankshaft pulley
- Turn the crankshaft clockwise until the marks on the camshaft pulley and crankshaft align with the block. Turn the crankshaft clockwise
- We rotate the crankshaft by 40-50 degrees.
- We check the gaps at the first and third camshaft cams. The gap between the washers and the cams should be: 0.15 mm for exhaust valves and 0.20 mm for intake valves. We adjust the gaps using feeler gauges
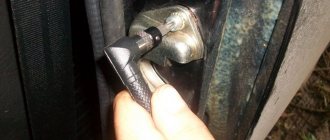
- If the clearances are outside the norm, a special device is installed to adjust the valves. Special tool for adjusting valves and replacing shims
- Using the fang, we turn the pusher.
- We press the fang on the pusher so that it sinks, and then take it out and remove the adjusting washer with tweezers. If there is no special device, then motorists use two flat screwdrivers. Using tweezers, remove the adjusting washer
- Now, you need to install a new adjusting washer. The calculation is based on the formula: H=B+(AC), where A is the measuring gap, B is the thickness of the removed washer, C is the nominal gap, H is the thickness of the new washer. The washer is marked on the top surface, which lies down when installed.
- In the same way, we measure the gaps of the remaining cams and change the remaining washers.
- Assembly is carried out in reverse order. Assembling the valve cover must be carried out according to an algorithm with precise adherence to the torque and order of tightening the bolts.
What types of shims are there?
A set of adjusting washers for all occasions
For cars of the VAZ family there are 125 sizes of shims, but not all are used.
Therefore, let’s consider the most popular sizes of spare parts that are installed on these engines (if you don’t want to run to the auto store again later): 3.30, 3.35, 3.40, 3.45, 3.50, 3.55, 3.60, 3.65, 3.70, 3.75, 3.80, 3.85, 3.90, 3.95, 4.00, 4.05, 4.10, 4.15, 4.20, 4.25, 4.30, 4.35, 4.40, 4.45, 4.50;
Adjusting washers in two sizes: 3.95 and 3.30
What are the consequences of untimely valve adjustment?
When the entire replacement process is considered, it is worth recalling what the consequences of untimely adjustment of the valve mechanism may be:
- Wear of camshafts. Thus, incorrect clearance can lead to premature wear of the camshaft cams.
- Damage to valve lifters when adjusting washers hit them.
- General wear of all elements of the head and timing mechanisms.
- In some cases, it may happen that the timing belt breaks and bends the valves.
conclusions
The valve adjustment of the 16-valve VAZ-2112 engine should be carried out once every 12-15 thousand kilometers or when the engine noise increases. Often, a metallic knock is heard at low speeds. Adjustments must be made on a cold engine and with all the tools available. If a car enthusiast is not sure that he is able to do this on his own, then it is recommended to contact a car service center, where everything will be done quickly and efficiently.
Necessary tools and devices for adjusting valve clearances on VAZ 2110-2115
- 10mm wrench for removing the valve cover and disconnecting the gas pedal cable
- Phillips and flathead screwdriver
- Set of probes from 0.01 to 1 mm
- A special device (rail) for recessing and fixing valve tappets
- Tweezers or long-nose pliers
- A set of shims or a certain number of necessary ones (it will become clear after measuring the gaps)
Adjusting valves VAZ 2110 8kl
If you have the instructions for repairing and operating the car at hand, the location is also explained there.
Nominal clearances
As for the installed clearances between the camshaft cams and valve tappets, they should be as follows:
- For intake valve = 0.2 mm (+- 0.05)
- For graduation (0.35 mm) (+- 0.05)
Checked at engine temperature close to 20 °C. That is, the engine must be cold.
Calculation and selection of the thickness of new adjusting washers
If, when measuring the gap, it turns out that some of the adjusting washers need to be replaced with new ones, with greater or less thickness, then you need to know the following simple formula:
H=B+AC
- where A is the value of the measured gap, B is the thickness of the old washer, C is the nominal gap, H is the thickness of the new washer
Again, the instructions above explain all this in more understandable language.
After adjusting the valves on a VAZ 2110-2112, you must install all the removed parts in the reverse order of removal and start the engine. Listen for knocking noises while the engine is running, both when the engine is cold and when it is hot. Also, pay attention to starting the engine so that there are no problems with this. If there is still a knock or other symptoms, it is necessary to re-measure the gaps of the non-problem valves.
Any mechanism wears out over time and needs debugging. The same can be said about the valves on the VAZ 2106. Initially, their thermal gap is set correctly. However, as the engine operates, its value gradually changes.
Over time, the gap may become smaller or larger. When the clearance decreases, the valves tighten, which leads to a loss of tightness. With large gaps, the valves are not able to open completely.
If there is a problem, you will hear it. The engine will begin to make a characteristic metallic ringing sound coming from the top. People simply say about this unpleasant sound: “valve knocking.” In the video you can clearly hear what it sounds like:
Experts recommend adjusting the valves in a timely manner, without waiting for problems to arise. The VAZ 2106 valves are adjusted after 30,000 kilometers. It would not hurt to do this after repair work on the engine. This is especially important to do if the cylinder head has been removed.
You can check the gap every 10,000 kilometers.
Adjustment process
Having opened the hood, the first thing you should do is unscrew the spark plugs: it will be much more convenient to rotate the crankshaft. Everything that would interfere with the removal of the valve cover is also dismantled: the throttle cable bracket, the crankcase ventilation pipes.
Next, remove the valve cover itself by unscrewing the two shaped nuts at the edges. It is better to separate the cover more carefully so as not to damage the gasket and stud seals.
In the eight-valve VAZ 2110, two cams are open, and it is easier to illustrate the operation on the second cylinder. However, the camshaft beds will not interfere with the remaining cylinders.
When an inline four is operating, each two cylinders operate in antiphase - when the compression stroke ends at the top dead center (TDC) of the first cylinder, then in the fourth cylinder the piston is also at the top point, but at the end of the exhaust stroke. Similarly in the second and fourth, but with a difference of half a turn of the crankshaft. For us, this means that we will measure the gap in two valves at one time:
The numbers of the cams under which the clearance is measured are indicated starting from the camshaft pulley.
To start work, install the camshaft pulley according to the marks (the protrusion on the pulley opposite the protrusion on the casing). Rotate the pulley clockwise using a spanner wrench or a ratchet head.
When marks 1 and 4 coincide, the cylinders are set at top dead center. However, for any real-life engine, the intake and exhaust phases are not only wider than one stroke (90 degrees along the crankshaft or 180 degrees along the camshaft), but also shifted relative to the dead points. Therefore, the table above shows the points when the cams stand on the pushers strictly with the backs of their heads. It would be possible to measure the gap without such precision - the back of the cam has the shape of an arc, the center of which coincides with the axis of rotation of the camshaft, but no one is safe from an unevenly worn or initially inaccurately machined camshaft.
It is convenient to use pulley teeth to measure angles: 3 teeth on the camshaft are approximately equal to 50 degrees on the crankshaft.
Having aligned the camshaft, we measure the gaps in a pair of valves with feeler gauges: in the first case, under the first and third cams. Starting from a probe with a thickness of 0.2 mm, we sort through the plates from the set until the next one begins to enter the gap without noticeable force, but with a barely perceptible interference. We record the resulting gap. The nominal clearance for the intake valve is 0.2 mm, for the exhaust valve – 0.35 mm (the exhaust valves heat up more during engine operation, and a larger gap is given to compensate for their lengthening).