Installation
After removing the hydraulics, carefully remove any remaining oil and coke from the wells. Degrease the internal threads with something decent (gasoline, acetone, white spirit). Mount the screws into the cylinder head (tightening torque is about 7-8 kg). We kindly request. Technologies do not stand still. Use a medium-strength thread locker for this operation. The price list includes a product that I use during assembly, manufactured by Febi (Germany). There is nothing more disgusting than the moment when you start the operation - “adjusting the field valves”, and suddenly you see that the screw is rotating along with the lock nut. I'll tell you a secret, everything will have to be disassembled and reassembled)). After this operation, I recommend taking a short break; there will be enough time for lunch for the thread locker to polymerize. After this you can install everything else. Don't forget a few drops of motor oil or mounting paste on the working surface of the rocker and the soldier's ball.
Useful tips
In order for the engine to work normally, timely adjustment of the valves on the Niva car is required. To successfully complete the setup, you need to know several important points. Firstly, adjustment, of course, is not the most difficult process, but, nevertheless, it makes sense to take on such work only if you already have at least a little experience in simple car repair and maintenance.
- Adjusting valves on a scooter
If questions arise during the repair of a VAZ car, then the necessary information can be easily found on the Internet. These can be either articles or topics on specialized forums. You can also ask your question there if you couldn’t find the answer to it.
Secondly, if the decision to carry out the work yourself is made, then you should remember: you can adjust the gap only if the motor has cooled down to ambient temperature. It is desirable that its temperature corresponds to 20-25 ˚C.
To simplify the work and more conveniently count crankshaft rotations, you should remember a few simple nuances. Thus, it is more convenient to determine the angle of rotation by making additional marks, for example, with a marker. Or you can focus on the movement of the distributor slider. When the shaft rotates 180˚, the slider will rotate 90˚.
After tightening the lock nut, you must make sure that the gaps have not changed. This can be done easily when the nut is tightened. If a decrease occurs, the adjustment should be repeated, taking into account this error.
Useful video:
Did you like the article? Leave your comment.
After a certain period has passed, the valves must be adjusted for each car. In this material we will analyze in detail how this procedure is performed, what tools are needed for this, and what you should pay attention to when adjusting Niva valves. This instruction is relevant for the following Niva models: 21213, 21214, 2121 with a carburetor engine.
IMPORTANT! You should take on the job only if you already have experience in maintenance and simple repairs.
Adjusting the Niva valves, process
zero position and offset mark
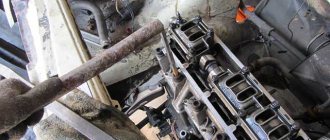
- The first task is to label everything. I will not describe this procedure. I will only say one thing: if you couldn’t do this or have no idea what it is, you definitely don’t need to climb any further. Don't be upset if the mark on the camshaft gear doesn't hit the center. This only happens in AvtoTAZ books and manuals. Or half a tooth forward or half a tooth back. Mark for mark, this is rather an exception to the rule. The photo shows very clearly that there is a clear vertical line on the gear and a dot that corresponds to the mark on the gear on the other side. Be careful with the mark on the camshaft. This is a small dot on the back of the gear near the teeth. When everything is according to the marks, we will call this position ZERO.
- Adjustment of valves. This operation can be complete, or it can be simplified. It all depends on the camshaft you installed. Why do I recommend starting with the 21213 camshaft in almost all articles? Because it can be adjusted simply and quickly in two steps. So, everything is on the marks, in the zero position. We adjust 8, 7, 6, 4 valves. Working tools, open-end wrenches 17 and 13 mm. Using a ratchet wrench, turn the crankshaft clockwise once until the mark on the crankshaft pulley matches. That is, we make a full turn, 360 degrees. We do not pay attention to the distribution mark; it will be vertically below. We adjust 1, 2, 3, 5 valves. Voila, the process is complete. This adjustment is only possible on full-base shafts.
- Fully adjustable. We wanted to install an Estonian shaft, the shaft is not full, and simple adjustment does not work here. We set the timing belt to the zero position and make a vertical line on the camshaft gear (I use an oil marker). We adjust valves 8 and 6. We turn the engine by the crankshaft so that our line points to “three o’clock”, this is the first position. We adjust valves 7 and 4. Turn it further, the dash is at “six o’clock”. We adjust valves 1 and 3. And finally, turn it one more time, the dash at 9 o’clock, 5 and 2 valve. The process is over.
How to determine the upper compression point
The easiest way to identify it is by the position of the candle. It would be better to unscrew the spark plug and install a long screwdriver in its place as a guide.
You need to set the fifth gear and start rotating the raised wheel. With the help of this, not the most tricky, trick, it will be easy to determine the upper compression point. The top point will become clearly visible from the protruding screwdriver. Then you can stop.
The same is done with the remaining cylinders. When the cylinder is in the desired position, use the locknut to adjust the play so that the feeler gauge passes into it with slight pressure. It is worth considering that after changing the position of the mechanisms, the size of the Niva valve clearance may also change.
Next, you need to adjust the position of the valves of the remaining dummies. The Niva valves are adjusted according to the order of operation of the dummies. You can determine it by turning the crankshaft with the starting handle.
It is necessary to turn strictly clockwise, half a turn. Next, rotate the crankshaft clockwise until the mark on the gear matches the mark on the bearing housing exactly. It is now possible to adjust the clearances of the Niva valves that release exhaust gases, the fourth dummy, which allows access of flammable substances to the third cylinder.
While holding the adjustment bolt, it is necessary to loosen the locknut. By adjusting the position of this bolt, adjust the play to the required requirements. The criterion is still the same. The feeler gauge should not fit into the gap too easily, but not too hard either. The purpose of the adjustment is the harmonious operation of the motor.
Upon completion of the actions, you need to check how correctly the adjustment was made. To do this, you need to start the engine, warm it up, and listen to how it works. It is important that there is no unnecessary noise or hum. These symptoms indicate that parts in some places may be incorrectly adjusted, broken, or that the gap width does not correspond to the standard.
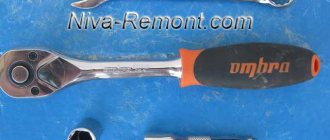
Tool
probe 0.15 mm
There are two ways to adjust according to the type of tool. By probes and by a dial indicator. For semi-professional use, the first option is suitable. The Fiat manual recommended the following clearances at an engine temperature of 20 degrees (that is, normal). Intake valves 0.15 mm. Graduation is slightly more than 0.17-0.20 mm. My personal opinion after 20 years of practice is the following. The set gap very much depends on the manufacturer and valve material . If this is a valve of average quality, then the gaps can be made according to the manual. If there are Kolbenschmidt valves on both the inlet and outlet, then you can do 0.15 in a circle. Now on to the probes. Of course, everything is determined by the word experience, and the first two or three times you can adjust this... “what you can’t say in a fairy tale, you can’t describe with a pen.” Therefore, I remembered one wonderful thing for mechanics, turners and milling operators, which was made in the USSR, for technical control. It was called a plug gauge. That is, it is a calibrated tool, with two “tails”, one passable, the other non-passable. By analogy with this miracle, I offer two tools. The first is a 0.15 mm gap adjustment gauge and a set of gauges that contains a 0.2 mm gauge. Now all the “miracles” of adjustment come down to a simple thing. One should get through, the other shouldn't. This way we get into the required tolerance range.
set of probes, “fan”
How to determine the upper compression point
The easiest way to identify it is by the position of the candle. It would be better to unscrew the spark plug and install a long screwdriver in its place as a guide.
You need to set the fifth gear and start rotating the raised wheel. With the help of this, not the most tricky, trick, it will be easy to determine the upper compression point. The top point will become clearly visible from the protruding screwdriver. Then you can stop.
The same is done with the remaining cylinders. When the cylinder is in the desired position, use the locknut to adjust the play so that the feeler gauge passes into it with slight pressure. It is worth considering that after changing the position of the mechanisms, the size of the Niva valve clearance may also change.
Next, you need to adjust the position of the valves of the remaining dummies. The Niva valves are adjusted according to the order of operation of the dummies. You can determine it by turning the crankshaft with the starting handle.
It is necessary to turn strictly clockwise, half a turn. Next, rotate the crankshaft clockwise until the mark on the gear matches the mark on the bearing housing exactly. It is now possible to adjust the clearances of the Niva valves that release exhaust gases, the fourth dummy, which allows access of flammable substances to the third cylinder.
While holding the adjustment bolt, it is necessary to loosen the locknut. By adjusting the position of this bolt, adjust the play to the required requirements. The criterion is still the same. The feeler gauge should not fit into the gap too easily, but not too hard either. The purpose of the adjustment is the harmonious operation of the motor.
Upon completion of the actions, you need to check how correctly the adjustment was made. To do this, you need to start the engine, warm it up, and listen to how it works. It is important that there is no unnecessary noise or hum. These symptoms indicate that parts in some places may be incorrectly adjusted, broken, or that the gap width does not correspond to the standard.
Why do you need to make adjustments?
The power unit needs adjustment approximately once every twenty thousand kilometers. If this is not done, the valve clearance may become too small or too large. This will lead to unpleasant consequences.
- Excessively large gap leads to incomplete opening of the valves. This causes poor filling of the combustion chamber, disrupts the operation of the gas distribution system and, as a result, leads to a significant decrease in engine power. This is true for both carburetor and injection power units.
- In addition, an increase in the gap leads to a characteristic knock (“valves are knocking”), which experienced drivers can detect even while inside the Niva 2121 car. This sound helps to diagnose the problem in time and take measures to eliminate it.
- Reduced clearance is typical for exhaust valves. Due to wear on the seat, the parts move closer together. The impact of the cam on the valve occurs earlier, it remains open longer. This disrupts the operation of the gas distribution system and the power unit as a whole.
- Another problem of small clearance appears due to a decrease in contact time with the seat - heat transfer deteriorates. The valve overheats, which ultimately causes it to burn out.
Knocking also means that the valves are subjected to increased shock loads, which quickly reduces their service life and can lead not only to the breakdown of the parts themselves, but also to engine failure. Therefore, repair measures should be taken immediately as soon as suspicious noise appears. The clearance in the valve mechanism can and should be brought into compliance with the operating standards of the VAZ 2121 Niva.
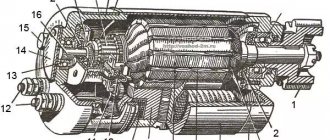
Design of hydraulic compensators on Niva Chevrolet
As you know, on standard or, more simply put, “classic” VAZ engines, rockers were mounted in the gas distribution mechanism, and valve clearances were adjusted with special screws.
However, on the 2123 engine for Niva Chevrolet, hydraulic compensators are provided, made in the form of exactly the same adjustment bolts, and the gaps are adjusted due to the operation of the plunger pair and the required oil pressure in the engine.
Despite the apparent complexity of the design, the structure of the engine is very simple and consists of only four parts:
- Hydraulic compensator housings.
- Return spring.
- A plunger pair, or rather, of its two parts, upper and lower, that is, a plunger and a check valve with a piston.
Why do valves start knocking?
Among all the possible reasons why valves on a Chevrolet Niva start knocking, it is necessary to highlight the main ones:
- Insufficient system oil pressure.
- The oil channels in the engine are dirty, and this causes intense contamination of the entire lubrication system.
- The lubricant level in the system is insufficient.
- The seat for the hydraulic compensator is worn out.
- The parts and components of the hydraulic compensators are worn out.
It happens that hydraulic compensators begin to knock immediately after starting in cold weather, and literally immediately after 30–60 seconds it goes away. This is explained by the fact that the oil arrives to the hydraulic compensators late and does not have time to provide them with the required amount of lubricant.
This problem can be solved after the oil and oil filter are replaced. And when the valves knock when the engine is “hot”, a regular oil change is no longer enough; you will have to remove the “head”, the camshaft and clean the channels. If this procedure does not bring any results, you will have to change the hydraulic compensators.
Please note that valve knocking caused by hydraulic compensators can have the following consequences:
- There is wear on the camshaft cams.
- Rocker surfaces will show severe wear
- Valve stem wear.
Driving for a long time with such a “knock” is highly not recommended, because it directly affects the wear of the timing mechanism parts, fuel consumption will increase and power will decrease.
What is required for adjustment
In practice, correctly set gaps pass about twenty thousand, after which extraneous sounds appear, which become stronger at lower speeds, and in order to re-adjust the gaps the following set of tools is needed:
- Any rags preferably dry
- A set of keys containing a key for thirteen and seventeen
- Dipstick
This adjustment must be made when the engine has cooled down and the temperature does not exceed 25 degrees.
How to adjust valves yourself
After the engine has cooled down and all the necessary tools are at hand, you can start working:
- The first thing you need to do is disconnect the terminal from the battery.
- After the car is de-energized, unscrew the cylinder head cover and remove the distributor cap and unscrew the existing spark plugs
- Having gained access to the crankshaft, we begin to turn it as it rotates until the marks that are located on the bearing housing and the camshaft itself match; the shaft should be rotated with both hands, holding a ratchet, or with a special wrench
- Having set the marks, aligning them between the star and the protrusion on the body, we begin the adjustment on the sixth and eighth valves, take a feeler gauge, the thickness of which is 0.15 millimeters, and insert it between the rocker and the camshaft cam.
- If the dipstick comes out with little effort, then the work was done correctly. To begin the adjustment, you need to unscrew the lock nut with a 17 wrench, and the adjustment itself will be done with a 13 wrench
- After the adjustment has been made and everything is adjusted according to the standards, we fix the adjustment bolt and tighten the locknut.
- Once everything is fixed, we turn the crankshaft one hundred and eighty degrees and adjust the next pair four and seven, and then one and three.
Question answer
How often are the Niva valves adjusted? I recommend carrying out the second adjustment, which I call final, after 500-700 km, after installing the kit and the first adjustment. As a rule, 2-3 valves “run away”. According to Soviet books and training manuals, it was recommended to CHECK the gaps once every 12-20 thousand km, that is, about once a year. Operational practice has shown that engines run without adjustment for 50 and 80 thousand km. Therefore, the following recommendation is factual.
A series of articles devoted to hydraulic compensators and bolts:
Part 4. Installing the “death to hydraulics” kit and adjusting the gaps