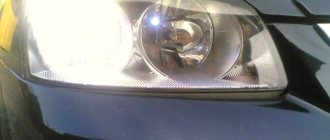
Properly adjusted headlights on a vehicle are a prerequisite for safe driving at night.
It is not very pleasant, and even unsafe, to move along the road at night, when oncoming traffic blinds you to the point of darkness. But it may happen that your car also causes inconvenience for other road users.
Poor visibility for the driver while driving may also be a reason to check the adjustment. Light problems can make it difficult to pass annual technical inspections. Therefore, such a check should become a rule for all drivers.
Important! To improve road illumination, additional lighting in the form of fog lights is recommended.
About the reasons for violation of regulations
Cars have properly adjusted headlights. Unfortunately, these settings are broken. There can be many reasons for this, for example:
- Violation of body geometry;
- Replacing headlights;
- Front suspension repair;
- Installation of other rubber on wheels;
- Suspension lift.
The luminous flux of the headlights will be directed up or down, or even to the sides. Sometimes inappropriate and inept intervention by car owners leads to lighting problems. In any of these cases, you need to adjust the light.
Adjustment
As for adjustment, this is also quite an important point. There are several options for adjusting the optics - all of them are described in detail here. If necessary, you can purchase a special electric corrector designed to change the angle of the light beam. Such an electronic device automatically sets the required tilt angle depending on the load on the car. By design, such a device includes a regulator for fixing the position of optical elements, as well as several mechanisms with seals and electrical wires.
A little about how adjustments are made on Niva 21213
If the car is equipped with a hydraulic headlight leveler, then they can be adjusted using it without leaving the vehicle interior.
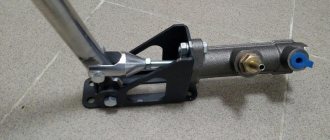
The photo above shows the hydraulic corrector's executive body. The position of the headlight reflector is adjusted by changing the length of the rod, which changes under hydraulic pressure.
If the front suspension elements have been replaced, or the type of tire has been changed, the adjustment can be done on your own.
- How to adjust headlights with your own hands: adjusting low beam and PTF
A few words about adjusting the light on the stand
All vehicle operating instructions recommend making such adjustments on a special stand. How to remove headlights on a Nissan Qashqai. However, in some cases this operation can be easily performed independently. In cases where body repairs were carried out to restore body geometry
, it is best to contact the service and perform this procedure using a special stand.
The photo shows one of these stands. It is a stand that rotates freely in any direction. laser centering of the light beam , a glass lens with a lux meter, and a mirror for precise positioning are placed on it
We install LED headlights - bright light
Watch an interesting video about installing LED headlights on a Niva:
Properly adjusted headlights will give the driver a feeling of confidence on the road at night. Almost every car enthusiast is familiar with the situation when an oncoming vehicle blinds the eyes. This causes inconvenience and affects traffic safety. Many people think that the driver simply forgot to switch from high beam, but the problem may lie elsewhere. Let's figure out how to adjust the headlights on a Niva car and whether it can be done independently.
A short guide on how to adjust the light of a Niva car
Correctly adjusted headlights on a vehicle are a prerequisite for safe driving at night.
It’s not very pleasant, and also dangerous, to move along the road at night, when oncoming traffic blinds you to the point of darkness. How to install fog lights (ptf) on a fret viburnum. But it may happen that your car also causes inconvenience for other road users.
Poor visibility for the driver while driving may also be a reason to check the adjustment. Problems with light can make it difficult to pass annual technical inspections. Therefore, such a check should become a rule for all drivers.
In what cases is adjustment required?
When purchasing, you receive a new Niva with perfectly adjusted lighting - light at one point, without glare. But over time, these settings are violated. Poorly adjusted headlights can create significant interference when driving at night, in rain, fog, and in winter. An unexposed light “illuminates” the space in front of the car, thereby creating a negative effect. The light curtain interferes with the driver's view and blinds oncoming cars. Xenon headlights can cause problems for vehicles ahead.
- Adjusting headlights, VAZ 2108, 2109, 21099 cars
What can cause a violation of the factory settings:
- damage to headlights followed by replacement;
- part repair;
- changing light bulbs;
- installation of halogen and xenon lamps;
- an accident resulting in a violation of the body geometry;
- installing tires of a different height and width;
- replacing front springs;
- repair of the front part of the Niva.
A check will also be required if such a procedure has not been carried out since the date of purchase. Over time, the position of the light beam gets lost. This is caused by frequent driving on uneven roads. If you have difficulty seeing the roadside at night or your friends complain that the Niva’s optics are blinding, it needs to be adjusted.
Checking the optical adjustment is mandatory when purchasing a used car. The previous owner of the Niva could have had an accident, and then had to level the body with putty or adjust the headlights on his own, without the proper mechanic skills.
To determine if the headlights are not adjusted correctly, place the car in front of a wall and turn on the lights. The light rays will be directed in different directions - up, down, or spread to the sides, but not to one point. Such a simple check will be a signal to urgently adjust the headlights. It is quite possible for the driver to set the Niva’s luminous flux correctly independently.
Do-it-yourself headlight adjustment for VAZ 21214
Headlight adjustment diagram
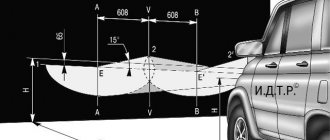
Select a flat horizontal area within the base of the car at a distance of 5 m from the screen - a light wall of a building, garage, etc. You can use a sheet of plywood or hardboard measuring 1x2 m. Fill up the car, put the tools and spare wheel in their original places, check the tire pressure on all wheels.
Measure the distance from the centers of the headlights to the floor, at this height draw a line on the screen, and 120 mm below it - a second one (if a headlight range control is installed, the second line is drawn 65 mm below the first). Draw a vertical center line on the screen (the distances from it to the centers of the left and right headlights should be equal) and lines corresponding to the centers of the headlights.
Set the headlight range adjustment control (if equipped) to the minimum load position. Cover one of the headlights with a piece of cardboard, plywood, etc. Turn on low beam headlights. Opposite the recesses in the rim of the optical element and the radiator grille are the headlight adjustment screws. Use the adjusting screws to ensure that the upper boundary of the light spot (horizontal) coincides with the bottom line, and the point where the beam breaks (the point of intersection of the horizontal and inclined sections) coincides with the vertical line of the center of the headlight.
To adjust the headlight beam in the vertical plane, screws C and D are turned in the same direction and at the same number of revolutions. The difference in revolutions of one screw without correction of the other should not exceed 3 revolutions.
In the horizontal plane, the headlights are also adjusted with screws C and D, but by rotating them in different directions. For example, if one screw is turned one turn clockwise, then the second screw must be turned one turn counterclockwise.
Adjust the second headlight by covering the first one.
Use a Phillips screwdriver to turn the outer screw C for adjusting the light beam of the right headlight.
Using a Phillips screwdriver, turn the internal screw D for adjusting the light beam of the right headlight.
| 120 posts on previous pages |
Reg.: 10/22/2013 Messages: 98 From: Russia, Rostov-on-Don Age: 31 Car: VAZ 21310 2008, Multitronics TC 740, Gena 100A
Name: Andrey Reg.: 09/06/2011 Topic / Messages: 3 / 457 From: Novoshakhtinsk, Rostov region Age: 37 Car: worn-out red nif 85 yr. was, now 21213 moray eel, born 98 was. green shniv 04
Reg.: 11/05/2007 Messages: 4943 From: Novosibirsk Age: 35 Car: Fora, 212180 2002 carb
Reg.: 01/25/2010 Topics / Messages: 1 / 1171 From: Tomsk region Age: 30 Car: VAZ-21310 2007
Name: Yaroslav Reg.: 03/21/2012 Topic / Messages: 3 / 8260 From: Taganrog Age: 28 Car: VAZ-21214-50-120 (06/01/2012), SHTAT UniComp 400L (firmware 3.3.1), VAZ-11173 2012, VAZ-21 112 2006
Reg.: 12/06/2004 Topics / Messages: 4030 / 23190 From: Moscow Age: 65 Car: 21214M, 2013
Alexey aka ALER.
Name: AlexanderReg.: 04/22/2015 Messages: 109From: OdessaAge: 44Car: VAZ-21213, 2003, 150 thousand km.
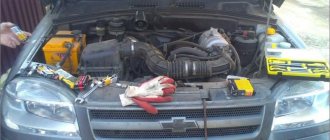
I have a question about adjusting the headlights. The car is already 12 years old. Rubber - 15″. There is no elevator. When I bought the car 7 years ago, I immediately changed the headlights (the old ones were already rusty) to the same standard factory ones. I tidied up the hydraulic corrector mechanism (it was dirty and practically did not move), installed halogen 100/90 (it needed a stronger one, because...
Throughout the entire time (as I was driving a Niva), approximately once every 2 years I had to adjust the headlights additionally. Because I noticed that somehow they were starting to shine too close. In the end, I adjusted it to the point where the adjusting bolts were tightened to the limit and the hydraulic corrector was at maximum.
But I wasn’t particularly upset, because... These changes were attributed to the fact that the suspension becomes outdated over time and “sags” due to the wear of many elements.
This summer, having saved up some money, I had the suspension repaired. They were replaced - shock absorbers (KYB Exctl-G), suspension springs (installed factory ones, original ones. Front - white, rear - white with a stripe), rubber pads under the springs (standard), rubber bands of transverse and longitudinal rods. The hubs and their bearings, silent blocks, ball and steering elements did not change, because the master said that they were still in good condition. The car lifted noticeably.
But what was confusing was that the range of the headlights (both high and low) remained the same! The far limit of illumination with low beam is approximately 7 m from the bumper, and the high beam seems to be too close. Headlight adjustment, I repeat, is at maximum along with the hydraulic corrector. It seems that after replacing all of the above parts, the chassis along with the car body should have increased the range of the headlights? But no
“There are two screws on the sides (horizontally on the right and left). If you screw both, the headlight rises. If you screw it in all the way, but the headlights are still too low, place something where the working cylinder of the hydraulic corrector rests on the headlight. Or you can put some hard cambric on its pusher.” ? Then the next question is - what thickness should I glue the lining to the headlight, where the hydraulic corrector rests?
Adjusting Niva headlights
Automatic correction
Even the most accurate manual correction is inferior to automatic adjustment. Using auto-correction, you can achieve better performance. This will also affect the subsequent operation of the Niva. Auto-correction is recommended when xenon or halogen headlights are installed.
The main advantage of an automatic corrector is that the light beam is set and maintained in accordance with road conditions. The nature of the vehicle's movement is taken into account. Namely:
- driving on uneven roads;
- turns right, left;
- braking;
- going uphill.
The automatic corrector consists of:
- 2-3 ride height sensors (installed front and rear);
- electronic unit;
- actuators.
Using the block, the ground clearance of different axles of the Niva is monitored. Those. it automatically detects body tilt. This data is processed and the headlight angle is adjusted.
How to install autocorrector on Niva:
- The headlights are removed.
- The old manual corrector is removed.
- The new sensor socket is secured with sealant.
- A headlight corrector is installed in it.
- The ground clearance sensor is attached to the bottom.
- The device wire is pulled through a tunnel with tubes.
No additional adjustments are necessary. The headlights will adjust themselves, taking into account the load of the Niva and the nature of its movement. The installation itself will take no more than 10 minutes. The only drawback of this device is its high cost. The cost of an electromechanical corrector starts from 1,700 rubles, but for installation you only have to buy a sealant.
As you can see, Niva owners can independently set the beams of light on the headlights without using improvised means. The main thing is to strictly follow the instructions and prepare the test site correctly.
How to properly adjust Chevrolet Niva headlights with your own hands? We will answer this question and tell you how to correctly adjust the low and high beam headlights, as well as fog lights. Most often, Niva owners are interested in this issue, and for good reason. After all, you can do this yourself, without resorting to outside help. The brighter and better the optics shine, the easier it is to keep the road at night, respond to obstacles in a timely manner, etc. For many growers, the issue of lighting quality comes first and can cause irritation in insufficient lighting.
On the one hand, we can agree with this, because what kind of security can we talk about if there is no decent coverage. But on the other hand, some cars have optics installed by the manufacturer themselves, which do not shine with quality and fine-tuning.
This applies to a greater extent to domestic cars. And if the car has a solid mileage, then there is no point in further discussion at all. We know that with every ray of sunlight, optics fade and become duller. The ability to qualitatively reflect the light of lamps in headlights is gradually decreasing.
Moreover, an accident or traffic accident can lead to damage to the body part and the geometry of the frame will be disrupted. Regardless of whether the optics are new or old, they will shine worse.
Replacing headlights on Niva 2121: tips and tricks
Car enthusiasts have always wanted to improve their car, and this applies to many areas, especially lighting. Tuning headlights on a VAZ-2121 is no exception. The car's good cross-country ability allows it to be used in difficult conditions, where lighting is extremely important. With the help of fairly simple manipulations with minimal cost, you can significantly improve the illumination of the route.
What headlights to put on a car
For headlights on the Niva 21214, tuning may involve replacing bulbs, sidelights and other road lighting elements in the evening and at night. The design of the electrical network includes lighting fixtures for the VAZ-2121 interior and some other components. Headlights are important not only as a lighting device, they allow you to notify other road users about the driver’s planned maneuver. Simply put, the quality of lighting affects many areas of movement, without them it is impossible to drive normally at night.
The front and rear lights on the Niva are somewhat different in type; they need to be selected individually.
Key types of gas-discharge components are most often used:
- tungsten models are the cheapest, but they have a low luminous flux;
- halogen or incandescent lamps. They are cheap and much more common in cars. Such light indicators can be installed for distant and near illumination of a stout canvas;
- xenon – a modern and efficient type of device.
Many owners of VAZ 21214 Niva cars are trying to improve the effect given by their running lights (headlights)
Nowadays, Niva headlights with LED elements, which are inlaid into a crystal structure, are becoming increasingly common. Similar models are used to transmit signals to drivers and to illuminate the route. According to the technical specifications, LEDs are characterized by increased brightness compared to other lamps, and an increase in efficiency is noted by 300%. Additionally, the density of light radiation on the road increases. For the Niva-2121 headlight, tuning using LEDs can only be performed for cars with a 7-inch slot size.
In general, tuning headlights on a Niva is a simple procedure that is carried out for most cars when the driver gets tired of insufficient lighting and falls into potholes. The situation is typical for all SUVs produced in Russia and the CIS. The increasing number of cases of optics modernization is associated with a significant improvement in the technical characteristics of modern flashlights.
The owner of a Niva-2121 or Niva-21213 can choose among tank, crystal and standard options, it all depends on the amount, preferences and goals.
Based on practice, tuning of headlights on Niva-21213 is carried out more often using models from the manufacturer Wesem. Such optics can be easily installed in the grooves, instead of the base light bulb. It is optimally suited for domestic 4x4 vehicles, since the installation process takes only 10 minutes, and the lighting is significantly improved. Depending on the Niva car model, tuning should be carried out with 12 or 24 V light bulbs.
When it comes to replacing the Niva-2121 fog lamp, you can also prefer models from Wesem. They are distinguished by a clear boundary of the illuminated contour from below and above. Due to this useful property, it is much easier to adjust and adjust the headlight according to GOST. During the tests, it was found that the fog lights do not “hit” the eyes of oncoming drivers, and when turned on simultaneously with the low beam, the quality of lighting improves even more.
Practice shows that, on average, the original condition of optics on Niva is maintained for 1.5-3 years
Tuning of optical elements of Niva 21214
Upgrades and tuning on models 21213 and 21214 often involve changing the glass on the canopy or the materials of the reflector construction. In other cases, it is not so much tuning that is required as repair: resoldering burnt out contacts, replacing cloudy optics, eliminating a damaged reflector or block. Most lighting work can be done independently, which is what car enthusiasts take advantage of.
To clearly stand out on the road among similar cars, it is possible to install tank headlights. Today this tuning option is the most popular and effective. To install the front and/or rear tank headlights of the Niva 2121, it is necessary to remove the rim and remove the reflector itself. Work must be carried out carefully to prevent damage to the structure. To complete the task, you need to unscrew 4 bolts and disconnect the housing.
If the owner does not want to stop at installing tank lights, you can further improve the design using a simple method - applying tinting film to the lights.
The method is very popular, it can be performed in several stages:
- After completing the installation of the desired bulbs, you need to adjust the Niva headlights. If you have no adjustment experience, it is better to trust a specialist.
- When installation and adjustment are completed, you need to connect them to the power system.
- Before installing the rear light, you need to check whether the seal is present and ensure its quality. There should be no gaps visible at the connection point, otherwise condensation will appear inside, which will lead to lamp failure.
- If there are still gaps, you need to remove the headlight and treat the area around the contact perimeter with sealant.
It is recommended to replace lighting fixtures with similar ones from different manufacturers.
Regarding the installation of fog lights, everything is easy; you need to unscrew the plastic panels from the door in the trunk area and disconnect the connector. An optical element will be present from the inside; it should be removed, which will require unscrewing a couple of nuts.
How to properly adjust Niva headlights
In total, there are three main methods that are used for adjustment:
- Seek help from experienced mechanics. Not in our case, since we want to learn how to do everything with our own hands;
- apply a special technique to adjust the headlights;
- adjust by eye to a spot on the road.
Also interesting: Niva tuning: 145 photos of ideas on how to improve the VAZ 2121 with your own hands
The second option is the most acceptable for all car owners.
The whole process can be described in three points:
- markings on the wall,
- applying headlights to the wall,
- line adjustments and fine superstructure.
Important: before each repair, make sure that the car itself is in full working order, the body geometry is not damaged, and the optics are in good condition.
There is no point in starting to adjust the Niva's headlights if there is deformation of the body.
Must be checked:
- tire pressure. It should be within the permissible norm - for a Chevrolet Niva it is 1.9 bar for almost all tire sizes;
- springs and transmission are in good condition;
- even distribution of load on the chassis. It is prohibited to carry out adjustment work if the machine is under a load that is unevenly laid on the chassis.
If you do not work through the above points, the setting will be completely incorrect and later you will have to redo the entire headlight setting again.
Installation and connection of electric headlight corrector for Niva
0:1076
Many years ago they gave away the gearmotors for beer from the state 3102. I wanted to buy the control unit in the store, and bought it, but as it turned out it was not the right one, and was returned to the store. There is a similar one with the designation YUMGI, but with 31105. YUMGI is similar to BUK, but it has only 5 contacts, but it costs only 500 rubles. If you figure out the connection, you can also plug in YUMGI.
The BUK turned out to be a rare thing, they carry it to order, and the price tag for GAZ car parts was announced at 1,200 rubles. I tried searching through disassembly sites, and besides, I also needed connectors. On disassembly for 300 rubles. BUK and 3 connectors were purchased. The seller did not want to cut off the connectors from the wiring, trying to sell me the entire wiring.
Then, when I was about to leave, the seller remembered that he had cut wiring from the Volga lying somewhere. I cut off the necessary connectors from two wires.
0:25471:504
BUK-02 and EPK-02
1:530
All the components are there, all that remains is to assemble the wiring. At the market, in the aisles with radio components, I bought multi-colored 0.75mm2 wires. I needed 7 m of purple and orange wire, and 3 meters of red, green, gray, brown, white and yellow wires, 1 m of blue and black wire. And also 4 meters of 8 mm corrugation. Wires and corrugation cost 330 rubles.
Algorithm for adjusting headlights of Niva Chevrolet
Before starting, you should thoroughly wash all Niva optics. It is necessary to wipe it, and if there are defects or damage, replace it with a new one. The slightest crack or chip will not give the desired result in adjusting the light.
From the inside of the hood we find two adjusting bolts on the body. One is responsible for horizontal adjustment, the second is responsible for vertical adjustment. Alternate twisting will lead to precise alignment of the light beam to the proper level. Sometimes it happens that a few millimeters are missing from the long-awaited level.
In this case, you should place several washers at the base of the housing mount. To do this, you need to dismantle the headlight, put a couple of washers on the plug mounts and install the optics again in their original place. Step-by-step instructions on how to adjust Chevrolet Niva headlights:
- We find a flat area with a flat wall;
- prepare tape and chalk for drawing lines on the wall;
- we drive up to a distance of 2 meters to the wall;
- do not turn off the engine, turn on the low beam;
- squeeze the handbrake for safety;
- set the headlight range control to the middle position, if available;
- Mark the center of the light beam of each headlight with chalk. This can be done either with chalk or in the form of crosses with tape;
- we drive away to a distance of 5 meters;
- We connect the previously obtained points exactly with a line;
- exactly in the middle of the resulting segment we draw a vertical line, indicating the middle of the body part of the technical device;
- below, at a distance of 7 centimeters, draw a line called a secant;
- turn on the low beam;
- in the hood we find adjusting screws in the headlight plastic housing. We begin to twist them little by little so that the light beam lies exactly between the horizontal line and the secant line;
- Now that the low beam is set, let's move on to the high beam. Ideally, the high beam will not have to be adjusted;
- Under normal operating conditions, the lighting quality should improve. If this does not happen, then look for the reason for the violation of the body geometry. There may have been an accident or accident that you don't know about.
Also interesting: How much oil is in the Niva 21214 engine
We adjust the headlights ourselves
It is quite possible for the driver to select and set the required luminous flux on the car independently. To do this, you need to have an understanding of the design of lighting devices and the principles of their adjustments. Such data is described in the vehicle’s operating instructions, and there is also a description of such a procedure.
Let us briefly recall this. To begin work, you need to prepare a tool and a flat area.
All you need is a Phillips screwdriver and a shield to cover the headlight. The tire pressure is checked in the car; the instructions may regulate a certain amount of fuel in the tank, as well as the installation of a load on the front seat, which must correspond to the driver’s weight. To put it more simply, the equipment of the machine should correspond to the version in which it is most often used.
At the next stage, adjustment involves preparing a site, which in some way replaces the adjustment stand. You can use the wall of a house or garage, a garage door, or a suitable shield as such a stand. On it you need to draw a diagram for adjusting the headlights. It has almost the same appearance for all cars and consists of two horizontal lines and three vertical ones.
Lines on the diagram:
- The axis of symmetry of the machine is designated as O; The center of the right and left headlights are indicated by the letters A and B; The number 1 indicates the height above the floor; Under number 2 is the line, which is located below the first by 120 mm, and if a hydraulic corrector is installed in the car, it is already 65 mm lower. Before starting adjustment work, you need to put the hydraulic corrector handle in the position where the load is at its minimum. Before this, the car is installed on the site at a distance of 5 meters from the shield or wall. After this, you can start making adjustments.