The transfer case is one of the main sources of vibration and noise in the Niva 21214 and the modernized Urban.
The peculiarity is due not only to the specific design solutions of the unit, but also to the method of attaching the part to the car. So, instead of mounting it on the power components of the body, as is customary in the global automotive industry, engineers implemented a method of communication through silent blocks directly to the floor of the car. The result is a rapidly collapsing bottom at the points of engagement and “splitting” at speeds above 80 km/h.
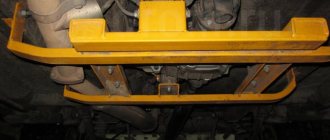
One way to relieve stress is to install a transfer case subframe on the Niva. At the same time, the owner will notice a decrease in vibration load, an increase in the natural service life, and also the protection of the transmission. The disadvantages are the relative complexity of implementing the idea and the ground clearance reduced by 2-3 cm (corrected by a suspension lift).
Manufacturing according to the scheme
Although the market has no shortage of offers, it is possible to save money by making a subframe for Niva 2121 with your own hands according to the drawings.
In the creation process, you will need a 4 mm sheet of cold-rolled steel 0.525x0.350 m, angles 35x35, 70x50, 70x70 with a length of 0.7 m, 0.4 and 0.4 m, respectively, as well as a 0.73 meter channel 16. Used as fasteners bolts M8, M10, M12x1.25 and M12x1.5. In the creation process you will need a 4 mm sheet of cold-rolled steel 0.525x0.350 m, angles 35x35, 70x50, 70x70 with a length of 0.7 m, 0.4 and 0.4 m, respectively, as well as a 0.73 meter channel 16. M8, M10, M12x1.25 and M12x1.5 bolts are used as fasteners.
Standard tool:
• Calipers and ruler;
An alternative tuning option is permissible using not corners, but a square profile with a section of 60x30 or 40x25.
There are ideas of placing the RC and the checkpoint on the same “frame”.
Preparation.
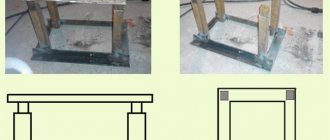
1. After the initial preparation of the elements, finishing processing and connection into a single structure is carried out: 1. In the channel, in accordance with the diagram, rectangular windows are cut out, ending no closer than 0.8 cm to the edge of the edge. Bevels (chamfers) are eliminated;
2. In corners measuring 70x50 or 70x70, holes are made for bolted connections, after which they are tacked by welding.
3. Corners of 35x35 cm are fixed to the lower edge of the channel, to which sheets are welded to protect against impacts and dirt. In the latter, for the purpose of access to the drain plug and regular cleaning, service holes are cut out.3. Corners of 35x35 cm are fixed to the lower edge of the channel, to which sheets are welded to protect against impacts and dirt. In the latter, service holes are cut out in order to gain access to the drain plug and regular cleaning.
Suspension lifting Niva VAZ 2121 21213 21214 2131
We will tell you how to properly perform tuning modifications in this material. Do-it-yourself elevator - drawings, diagrams, sizes, types of kits. Lifting varies in the degree of intervention in the standard structure. For some, it is enough to raise the SUV by a few centimeters, and for others by as much as 20.
Extreme tuning – maximizing cross-country ability for traveling on severe off-road conditions.
It is advisable to perform such work with a partner. First of all, it's safer. Secondly, some lifting work is performed with four hands. Let's take the front suspension as an example.
Raise the front end. You can safely cling to the standard bumper, only the jack is installed under the pipe securing it. By removing the wheel, we get full access to the lever and spring. The front suspension 21214 is made using a double wishbone design, which simplifies the task.
The lever travel is limited by the shock absorber. Unscrew its fastening and move it to the side. Next you need to free the suspension from the anti-roll bar. The mounting bolts may become stuck due to corrosion, so we will use a penetrating liquid (such as WD-40). The stabilizer silent block clamp can be pryed off with a pry bar.
Then disconnect the hub from the lower arm. To do this, you need to jack up the suspension and fix the steering knuckle of the wheel. You can tie it with wire. Then unscrew the 3 mounting bolts and release the ball joint.
We fix the spring with ties and lower the jack. We remove the old elastic element. In some cases, it is enough to simply lower the lever with your foot, and the spring will come out without the use of ties.
Remove the upper support rings from the old springs. With their help, the elastic element is centered in the cups.
They come together easily with a hammer and screwdriver. We install the rings on new, longer springs. We put the elastic elements in their regular places and jack up the lower arm until it is completely aligned with the lower cup. At the same time, an assistant centers the shock absorber eye and moves the steering knuckle to the mounting location of the lower ball joint. We tighten the ball “triangle” and attach the shock absorber mounting axis.
By manipulating the jack, we “catch” the mounting holes for the stabilizer bar clamp. With its bolts it should get into the normal place without distortion. After such modernization, the clearance increases by 30-50 mm. This is enough to install wheels of larger diameter, and the bottom will still rise above the ground.
The rear axle of the Niva can be lifted by installing spacer supports of increased height. When using a size of up to 50 mm (according to changes in front end height), no modifications to the rear axle are required. By lifting the rear axle, maintenance can be carried out on the axle and brake system.
The handbrake cable may need to be replaced. It is lengthened by a couple of centimeters. Otherwise, the Niva lift will lead to increased wear of the brake pads in the rear drums. Disconnect the lower shock absorber mounts and lower them until the springs stretch.
We take out the elastic elements and knock off the support rings from them. We clean the upper cup and carry out anticorrosive treatment. We install new supports of increased size and seat the springs using a jack. We fasten the shock absorbers, assemble the axle, and mount the wheels.
Such a lift will not arouse suspicion among traffic police inspectors, and the cross-country ability of your NIVA 2121 will improve. No drawings, much less homemade parts, are required. You buy new springs and about the rates, the rest is a matter of technology. Labor costs for an elevator of one NIVA are two people/one day off.
Design modification.
To strengthen the subframe and reduce the profile height (up to 2 times), it is possible to additionally equip the side shelves of the channel with 4 corners at the level of the hole under the transfer case, followed by cutting off the sidewalls to the corner flange.
Finer tuning is provided by connecting the spar and subframe through couplings/bushings.
Frame for Niva in detail. 4. — Lada 4×4 3D, 3.0 l., 1993 on DRIVE2
Hi all!
I continue to work on the frame for my miracle Niva, you can look at the previous stages in my logbook :) Today I finished both front side members. In my opinion, this is the most hectic part of the process. There are many parts, many holes, everything must match down to the millimeter.
Full size
Muzzle!
I cut bolts and bushings from the old spars and put them in order. These are the interesting bolts you see at the bottom. With square caps so that they do not turn, but at the same time are not tightly clamped - they are welded with sheet metal boxes. Unfortunately the boxes rotted, I made an option no worse from a 10 mm square.
Full size
Bolts with square hats.
As always, all surfaces that need to be welded are tightly sandblasted, then treated with a rust converter and primed with Novol acid primer.
Full size
Frame element.
I tried on the spars on the beam. Before fitting, I carefully sandblasted the seats. There were build-ups of rust and dirt!
Full size
Sandblasted seat for the spar.
Thank God everything came together. There is a discrepancy between the diagonals of the side members, about six tenths of a millimeter, I think this is not critical!
Full size
Pre-fitting!
Of course, as always, there were some jokes! As I told you, I started assembling the frame according to someone else’s drawing. Many jambs have already surfaced before, and here’s another one. According to this drawing, the steering gearbox is installed on such a box, as well as the response bipod. So, it’s good that I try everything on 100 times. At maximum eversion, the bipods rest against the corners of these boxes! Here you have a solid work, here you have engineers and drawings!
Full size
I had to cut and remake the boxes locally!
In general, I won the front! I fixed everything, assembled and tightened it. All dimensions are now ok, the steering works clearly, it doesn’t rub anything in anywhere!
Full size
Final fittings!
Good mood to you all!
Installation
For ease of installation, the car is fixed on a lift or above a pit. Pre-preservation of surfaces (attachment points, subframe) is carried out using protective agents, for example, Movil.
The finished product is tried on site individually for each vehicle. 4 holes are drilled along the perimeter of the structure, symmetrical relative to the center line. Having previously loosened the transfer case fasteners.
Having placed the plates on the interior side, as in the photo, the subframe is attached to the side members with M12x1.25 bolts.
see also
Comments 32
you've already screwed it up, you bastards
1. the frame is an independent strength element 2. the frame is not formed from shit bought at the nearest metal depot (and this, as they say in Odessa, “there are two big differences”) 3. crop farming is a dead-end branch of Evolution 4. for those who are in tank, see paragraph. 1,2,3,4
And I like it))) There will be problems with the quality of the frame, I’ll pick up hardware from something more serious at disassembly. Thank you for your wishes