Communities › Do It Yourself › Blog › Do-it-yourself partial loading roller
From time to time, I had to transport cars that were not running, after an accident, with a faulty brake system, etc.
It is for this reason that I decided to make a semi-truck for towing using the partial loading method, especially since the production cost is quite low and does not take up much space in the garage. I will say in advance that initially I did not plan to write any reports, so there will not be many photographs, and they will be of a purely overview nature, rather than informative. And so, let's go. About 6 years ago I already welded a roll from a 50x50 profile pipe, I did it without any calculations, just by eye; to attach the hub, I used a piece of the rear beam from a VAZ 2108 welded to the profile pipe.
To summarize, we can highlight several comments on my design: 1) The loading height is too high, it is very difficult to drive the car. 2) Incorrect distribution of the center of gravity above the axis of the undercarriage, the center of gravity was behind the axis of the undercarriage, because of this, the drawbar rose upward, thereby lifting the rear of the car. 3). 4) The ramps (ladders) are too weak. They were welded from a 32x32 angle, which bent after several times of use. In the end, the tackle was sold and left St. Petersburg somewhere near Veliky Novgorod.
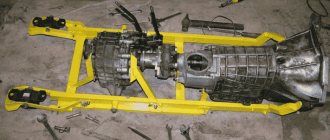
A couple of years later, I had another rear beam lying around in the scrap metal, I decided to weld another tackle, so to speak, to work on the mistakes. I deliberately made the trolley not rotating (since this is easier, and not dismountable, because again, this one is simpler, and I think more reliable. This time I welded the trolley frame into a rectangle, and made the loading height of the trolley lower, welding spacers between the frame and a piece of the rear beam.
Again, I cooked this design by eye, without drawings. The size of the wheel niches was chosen in such a way that wheels from 13 Zhiguli to large 17 would fit there.
I want to say that this design of the drawbar and coupling head, during operation, showed itself very well: it does not break, twist, or bend anything. And the height of the hitch turned out to be optimal, for towing behind a mid-size crossover or for towing behind some minibus.
Another design flaw came to light: I didn’t calculate where to attach the tie rods, so I had to stick to what was there)))
The entire hitch is welded from a 50x50 profile pipe, and the ladders (ramps) are welded from a 40x20 pipe placed on edge.
You can read about making another similar tackle here
Specifications
- Frame
- Weight
- Brake systems
- Technical features
| Length: | 2.3 m |
| Width: | 2.29 m |
| Track: | 2.05 m |
| Ground clearance: | 215 mm |
| Number of axles/wheels: | 1/2 |
| Maximum landing width, mm: | 1820 |
| Ramp length: | 1.2 m |
| Weight of transported cargo: | 2000 kg |
| Weight of loaded trailer: | 68.08 kg |
| Working: | No |
| Parking: | No |
| Tires: | R13 |
| Tire pressure: | 1,8. 1,9 |
| Hitch: | automatic, backlash-free, ball type |
| Hitch ball diameter: | 50 mm |
| Ground clearance: | 215 mm |
| Arrival angle: | 18 |
Collapsible detailed drawing with dimensions
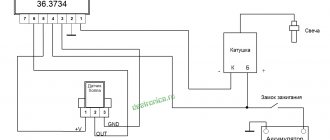
The principle of rolling is that the transported vehicle runs over it, and the wheels are fixed in special openings welded from a square pipe and additionally tightened with a stripper.
The wheels of a dolly trailer steer and follow the path of the tractor, this is done thanks to steering rods installed and connected into a single structure with the trailer drawbar.
Materials
And so, let's carefully look at the material provided.
The dolly trailer is designed for towing passenger cars using the partial loading method. The dolly trailer must be transported disassembled, otherwise at the first traffic police post you will be issued a fine, because... A trailer without a car will be considered a trailer. with all that it implies. During the design, emphasis was placed on turning the wheels, because Without swivel wheels, there is a skid when towing a car. There are photos of tests and the product itself. PS Special THANKS to users: sanfox for the 3D model “VAZ wheel hub. " and Dimka_88 for "Winch Q=0.5t". And also to the user of a BMW 8 series from an automobile site from Chelyabyansk. Basically it was his idea. I just tried to turn simple sketches into drawings, and them into a product with testing and subsequent operation.
Composition: 3D parts and assemblies. Details, specifications, assemblies. STEP file, Info files (images)
Software: KOMPAS-3D 16.1
Date of: 2018-09-17
Views: 1 321
11 Add to favorites
A car is not a luxury, as pedestrians believe. Man has made great strides in development, having mastered mechanized wheeled vehicles. Today, this vein, although not as strong, but no less intrusive, continues to excite the minds of motor vehicle enthusiasts from large factories to garage workshops. Exactly in that order. After all, the latter have fewer resources and a much greater desire to experiment. Designing a trailer for a car with your own hands is a suitable goal.
The reason why drivers choose a homemade trailer for a passenger car: individual parameters, cost. Serial manufacturers offer any modification, but the further from the base, the higher the price. Why is this necessary if a pair of wheels, a metal profile and a tool are lying around in the garage? Registration will not cost more, and the experience gained is invaluable. Before constructing the future pride of the street, you need to understand the types of homemade trailers for cars.
Read more: Getting into trouble, what is trouble?
What will it take?
First of all, it is necessary to prepare an approximate drawing of the future structure. You can take a photo of any finished stand as its basis. In our case, it will be a kind of stool with four lifting legs, which will be raised to the desired height using any old jack.
The main thing is to take the necessary measurements. First, let's measure the ride height. For cross-country models it is approximately 32 mm. Accordingly, the minimum height of the stand for storing a motorcycle will be about 26 mm. In order to carry out repair work, the unit must be raised by approximately 40-45 cm. Accordingly, for this you will need to purchase 4 pipes 30 x 30 mm about 20 cm long and the same number of pipes of a slightly smaller diameter (25 x 25 mm) about 25 cm long One pipe should fit into the glass (pipe of a larger diameter) not too tightly, but it is better not to allow the elements to dangle too much. The optimal space between the pipes is considered to be 1 mm, so if you purchase parts of a different size, you should take this into account.
In order for the structure to be a full-fledged lift, when making a stand for a motorcycle with your own hands, you additionally need to prepare:
- a piece of corrugated metal, about 4 mm thick;
- corners 35 mm;
- welding machine.
Healthy! Of course, expensive equipment is difficult to obtain, so if desired, you can fasten the entire structure with ordinary bolts.
After this you can start working.
Requirements for a car trailer according to GOST
The first thing a person who has decided to independently manufacture a car trailer needs to know is that it, like any vehicle, has certain requirements. In this case, all requirements are described in detail in GOST 37.001.220-80, which is called “Trailers for passenger cars.” In order not to burden car enthusiasts with reading the primary source, it is worth making a selection of relevant information specifically on the issue under discussion.
So, a car trailer must meet the following requirements:
How to refuel your car at a gas station - step-by-step instructions
Factory or homemade
When repairing and servicing a bike, it is advisable to use both types of tackles - front and rear types. Factory solutions will meet all safety requirements, will be more functional and will have additional accessories, but all this will be quite expensive. On the other hand, homemade options will be several times cheaper, but the safety and functionality of such products will be much lower.
Read more: How to calculate engine volume in cubic meters
Advantages of factory devices:
- factory tackles are used by professionals;
- they have ideal proportions and geometry;
- can be operated by one person;
- can be installed under the pendulum and slider;
- have many adjustments and settings.
Required tools and materials
So, before you start assembling the desired structure, it is worth preparing a number of tools and materials that will be required at various stages of assembly.
Replacing the fine fuel filter - instructions
Good day everyone, from the title of the post you guessed that my name is Alexey =) On bikepost they have repeatedly talked about handmade tackles, but, as they say: repetition is the mother of stuttering. A little background to get acquainted: Not so long ago, namely in the fall of 2010, I became the owner of a full-powered six hundredth SiBer of 2004. which I was incredibly happy about and at the same time saddened by the fact that it was no longer the season and I would have to wait almost 9 months for the first ride (Norilsk, see Google maps ;))
But I didn’t despair and didn’t waste time, I read various books, articles, etc. on handling this beast and sports bikes in general, because it was quite boring getting on a hundred or more horses after the 5th Jupiter, the experience of communication with which was limited to two months already in 2004... In April 2011 I went on vacation, in which I purchased all the equipment and two Dunlop GPR 200 cylinders. But for the 2011 season I didn’t install it because the cylinders left over from the previous owner still looked “complete” and they were enough for our season. But before the 2012 season I was already thinking about “HOW will I do this?” Naturally, in the course of my still short motorcycle history on the Internet, I many times came across service tackles from various manufacturers, models that could be purchased by paying a certain amount of wooden ones, but my passion for doing everything with my own hands prompted me to make this unit. In order not to waste time and material, it was decided to start by making a drawing and a 3D model with all dimensions and thinking about what, where and with what it will be attached. It is clear that I needed the dimensions of the width of the pendulum and the distance from the floor to the installation location of the tackle. But this task was complicated by the fact that the red horse’s stall was piled up to the roof, even with a slide. Because I was absolutely not ready for the shovel rendezvous (neither morally nor in terms of equipment) so I decided to turn to the “help of the hall,” namely, the forum of the site cbr600.ru. I never found the desired sizes on the Internet, and the forum is not very efficient. Photos and AutoCad came to the rescue. Photos were found “from the front” and “in profile”, scaled to the required size and then the process began... Because. I lost my skills in working in this CAD package a long time ago, because I use it from time to time, I had to spend a certain amount of time to get the hang of it. I will omit the moments of “invention” of options for mounting locations and their fastening to the frame, and the manufacturing process itself will better express it all in a photo with comments and, of course, a drawing.
Types of motorcycle stands
Today, tackles have proven themselves to be very convenient devices for repairing and servicing a bike. Every motorcycle owner who has had to repair their equipment has thought about purchasing such a device. The tackle allows the owner of the iron horse to install it very steadily for repairs. The roller is very convenient when changing a wheel - it allows you to hang the motorcycle and thereby easily remove the wheel.
We can say that a homemade stand is a do-it-yourself motorcycle stand, only without a table. If there are wheels, the lift can easily be moved to a given location for repairs. The small dimensions of the device allow it to be used in places with limited space.
- rear - for servicing the rear of the motorcycle;
- front - for servicing the front of the motorcycle.
Read more: Infiniti qx50 ground clearance
The front type lift comes with an adapter that allows you to hang the wheel for repairs. The adapter is selected for a specific bike model. This tool is suitable for repairing the front fork. A do-it-yourself car tray is ideal for storing cars in the winter. It has a simple design and does not require special knowledge to operate it.
The rear type tackle is a little more structurally complex. It features an L-shaped device with a handle. It is equipped with clamps whose task is to securely hold the wheel. The width of the clamps is selected for a specific wheel. Such tackles are mainly used by repair services, as they allow lifting weights of up to 300 kg. With the help of such a tackle, you can hang the motorcycle in such a way that the suspension is maximally unloaded. Thanks to this feature, it is quite easy to replace the chain.
DIY tackle drawings dimensions photos
We welcome everyone who is interested in motorsport.
Today we would like to talk about a rigid hitch with partial loading of a car. In common parlance - “tackle”. Two manufacturers are widely known in our village. Both make turntable carts. About the first one, we heard not the most flattering reviews from friends: the carts fall apart, after each race they have to be patched and strengthened. The second one is in perfect order with the reliability of the carts, but due to the high metal consumption, the “rolls” are very heavy. And everything would be fine, but recently nothing has been heard about the second manufacturer. Therefore, we decided to weld the cart ourselves.
We started with analyzing and designing a tackle to suit our needs.
We decided to make a rigid cart for several reasons:
To transport a car, we need a minimum loading height, because... "Tooper Killer"
in the summer it will drive on asphalt, which means installing a suspension with minimal ground clearance. It is easier to achieve the minimum loading height on a rigid cart, because There is no rotary superstructure.
For further maintenance of the hitch, we need to drive it into our boxes, and our gate is 2.5 m. There are again problems with the rotary one, because it is wider than the hard one. Having experience owning a rotary trolley, we can say that this is a serious storage problem: there are few garage boxes where you can drive the cart.
The metal consumption of the structure and, accordingly, the cost are lower. Fewer nodes means greater reliability. And it’s easier to make a rigid one than a rotary one.
The only disadvantage of a hard tackle is the effect of pushing the tractor in a turn. Precisely because of the lack of ability to turn. This feature is felt on light tractors, but in the case of our
- it will be little noticeable. And there haven’t been many maneuvers in narrow places in our entire travel history. Having assessed all the pros and cons, we settled on a hard tackle.
CONTACTS
Please note that you can rent a trailer on the day of your request only if there are trailers free of armor. If you want to be guaranteed to rent a skateboard for a specific date or on weekends, holidays and pre-holidays, make your reservation in advance.
For questions about purchasing a car rental - tel. 8 (917) 527-6016
OUR ADDRESS
Russia, Moscow, Sorge street, 21 building 3
WE ARE ONLINE
OUR PHONES
DAILY, WITHOUT HOLIDAYS AND WEEKENDS from 9 to 21!
8 ( 917 ) 527 6016 8 ( 977 ) 877 1013