Replacing the distributor (ignition distributor) on a VAZ 2108-VAZ 21099
Direct replacement
Removal
1) First, de-energize the engine system by disconnecting the negative terminal from the battery. (Instructions and procedures are described in the article: “Replacing the battery” in the first paragraph).
2) Next, disconnect the high voltage wires from the distributor cover.
3) Remove the vacuum hose from the vacuum regulator fitting.
4) Then completely unscrew the top nut securing the distributor and wire holder.
5) Remove the holder from the car engine.
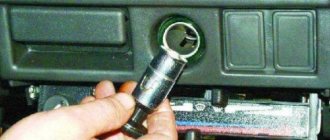
6) Use your hands or a screwdriver to disconnect the wire block from the distributor.
7) Now unscrew the two remaining nuts that secure the distributor at the bottom: use a wrench to unscrew the left nut of the distributor.
Then unscrew the right nut.
 Remove the distributor directly from the engine of the car.
Installation: 1) First, remove the two screws from the cover and remove it.
2) Then turn the slider with strictly outer contact opposite the “first cylinder” terminal located on the cover.
3) Install the distributor in the reverse order of removal.
4) Place the negative terminal on the battery and set the initial ignition timing. (We recommend that you familiarize yourself with the process in the article: “Installing the ignition”).
Changing the cover
1) First, disconnect all high-voltage wires from the cover.
2) Then use a Phillips screwdriver to remove the screws holding the plastic cover to the distributor.
3) Remove the cover and replace it with a new one.
Note! The cover on the distributor is installed in only one position. And the high voltage wires are put on the cover in the order: 1-3-4-2. There is a marking “1” on the distributor cover itself, start counting from there in order, counterclockwise.
Replacing the slider:
1) First, remove the cover according to the instructions described above.
2) Next, remove the slider from the shaft by pulling it with your hand.
Note! The slider is installed in its place only in one position, when the slot on the shaft is directed in the opposite direction from the contact!
Additional materials Below is a link to a video with information on today's topic:
Dismantling
After dismantling the distributor, you can disassemble the device in order to repair its components, or completely replace the distributor with a new unit.
- De-energize the car by removing the negative from the battery;
- Disconnect the high-voltage components and the vacuum ignition corrector hose from the distributor;
- Remove the drive cable responsible for the throttle valves from the bracket. Next, the fastening nuts are unscrewed and the bracket is dismantled;
- Before removing the ignition distributor, apply a mark to the housing of the distributor and drive of auxiliary elements. This way you can simplify your task of setting the ignition timing for its precise setting. The mark is applied to the metal by scratching;
- Press the latch holding the block with the power wires and disconnect it from the distributor;
- Place the piston from the first cylinder to the top dead center position by moving the engine flywheel clockwise;
- Unscrew the remaining ignition distributor screws. The first fastener was removed when removing the damper cable sheath bracket;
- Remove your damaged distributor.
Disassembly and repair
Quite often, repair work with the distributor is associated with wear and the need to change the seals (coupling). To change the oil seal, as well as other failed components of the distributor, we bring to your attention the appropriate instructions, as well as video tips.
- Remove the ignition distributor cap by releasing the locking clip.
- Remove the slider. It is wiped with a clean rag and checked for mechanical damage. If there are chips or cracks, the element must be replaced.
- The runner must fit tightly on the shaft, which is achieved due to the presence of a plate spring with a pressing action. If it stretches or breaks, replace it.
- There is a resistor in the slider housing. The normal reading of its resistance is 1 kOhm. By measuring the data with an ohmmeter, you can draw conclusions regarding the performance of the component.
- Remove the low voltage wiring terminal. To do this, unscrew the mounting screw from the housing.
- Remove the plastic screen that serves as dust protection.
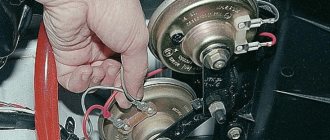
- A power wire comes from the Hall sensor and is held by the holder's claws. Using a screwdriver, the claws are opened and the wire is removed. Next, you need to unscrew the pair of mounting screws securing the Hall sensor support plate.
- Remove the vacuum corrector. Just be sure to disconnect it from the support plate lever before doing this. To perform this operation, carefully remove the retaining ring from the pin.
- The next step is to remove the pair of screws that hold the corrector to the distributor body.
Disassembling the unit
- Lift the corrector lever slightly, which will allow you to remove it from the sensor plate pin and remove the corrector itself.
- These steps will allow you to easily remove the support plate by lifting it with a flat head screwdriver. Remove the element. The plate must be replaced if the bushings are worn out or there is mechanical damage to the unit.
- Unscrew the two fasteners to disconnect the plate and the Hall sensor.
- You need to remove the oil seal, that is, the coupling. It is located on the distributor shaft. The coupling is closed with a thrust washer. That, in turn, is fixed with a retaining ring. You first need to remove the ring, which will make it possible to remove the thrust washer.
- Remove the oil seal by knocking out the pin with a small-diameter borer. Determine the dimensions of the boletus during the repair process.
Checking for damage
- There are adjusting washers under the oil seal.
- Remove the roller along with the centrifugal regulator from the distributor body.
- Clean the housing using kerosene and a dry cloth. Make sure that there are no mechanical damage, chips or cracks on the case.
- Examine the condition of the bushings. The roller rotates on them, and with severe wear, the roller begins to become loose. Also, the device is replaced along with the bushings if there are signs of wear, defects, or damage.
- To disassemble and replace damaged elements of the centrifugal regulator, you first need to remove the weight springs using a screwdriver.
- If the springs are intact and undamaged, not deformed, make notes on their seats. If you mix them up during assembly, problems may arise.
- Remove the driven plate along with the screen from the shaft.
- Make sure how effectively the weights move along their axes. Movements should be free, without any jamming. If there are problems, the weights are changed.
- It is a mistake to check the movement of loads without first removing and cleaning them.
As you disassemble the distributor, you will be able to identify damaged components and replace them with new ones using a repair kit. If the damage is serious, it is better to replace the entire ignition distributor.
The distributor is an important and sometimes capricious element. But replacing it and repairing it shouldn’t cause any problems.
Source
Removal and installation of VAZ 2109 distributor
It is important that before you begin removing the distributor, you need to remember the position of the distributor relative to the body. You can even apply marks so that during installation you can put the VAZ 2109 distributor in the same position.
Now we disconnect the high-voltage wires from the distributor cap, there are 4 of them, as well as one central one from the ignition coil.
In the picture below we see which plug with wires also needs to be disconnected.
Then remove the distributor corrector hose.
We begin to unscrew the fastening of the VAZ 2109 distributor itself. There are three of them.
It is most convenient to unscrew with a regular key. We do not unscrew the side fastenings completely, since it is necessary to set the TDC marks.
Before removing the distributor, you need to set the piston of the first cylinder to top dead center. To do this, you need to align the marks on the housing and the flywheel through the hole in the gearbox housing. Set neutral and use a 10mm key to turn the crankshaft pulley to the desired position. It should look approximately the same as in the picture.
And only after this we remove the distributor from the studs.
A new distributor for a VAZ 2109 costs about 1,000 rubles. Before installation, you need to remove the cover by unscrewing the fastener.
When reinstalling, you need to make sure that the outer contact of the slider is opposite the output of the first cylinder on the cover.
Simply put, when the distributor has already been installed on the studs, lean the cover and see if it matches or not.
Now you can screw all the distributor fasteners into place. And you need to remember that it is necessary to maintain the original position of the distributor relative to the body in order to maintain the ignition timing.
Start of disassembling the distributor
First, unscrew the two bolts that secure the cover to the distributor body. Then remove the slider by pulling it up. Pay attention to its condition; there should be no rust, no damage, no signs of wear, no burning. In this case, in its normal position, the slider should fit tightly to the distributor rotor. A good fit is ensured by a small leaf spring. If it becomes loose or breaks or becomes deformed, the entire slider must be completely replaced. The cost of this element is small, no more than 50 rubles, so there will be no problems with it. Please note that all wires of the VAZ 2109 distributor must be disconnected from the power system.
Signs of incorrect ignition settings
Signs that ignition adjustment is necessary on a carburetor VAZ-2109 may vary. The first symptom of a broken ignition angle is a decrease in car power. This often happens when the carburetor is clogged and the required amount of fuel does not enter the combustion chamber.
The second sign by which you can suspect that the ignition is not working properly is that the gas pedal goes to the floor when you press it.
The third is unstable operation of the car at idle. This often occurs due to clogged jets or incorrect mixture supplied by the carburetor.
The fourth sign is increased fuel consumption. It’s time to highlight it as the main symptom of a malfunctioning ignition system. Naturally, it can also occur during other malfunctions, but, as practice shows, a broken distributor angle causes high fuel consumption.
The fifth sign is problematic engine starting. When faced with such a problem, you should not blame the carburetor, it has nothing to do with it, the cause must be sought in the ignition system.
To avoid false signs, it is necessary to adjust the carburetor before looking for faults in the ignition system.
Ignition coil
Ignition coil
You can check it without removing it. Let's find out how to check the coil if the remaining elements are in full working order. In addition to difficulties starting the engine, the following symptoms may indicate problems with the coil:
- When accelerating at low speeds, dips are observed.
- At low speeds, the dynamics of the power plant are lost.
- The car can suddenly revive at high speeds.
- Regular or partial difficulties with the engine plant.
If the machine is equipped with several coils, then checking for similar symptoms is carried out using a scanner. This way you can obtain more accurate information and determine cylinder malfunctions.
So, misfires on the coil occur due to a worn runner, cracks in the distributor, damage to the armor wires, or difficulties related directly to the spark plugs. If these elements are put in order or replaced, but the problem remains, the diagnosis continues. As a rule, diagnosing sparking will not give a clear answer.
If you disassemble the distributor and check the resistance of the coil, then this is not a panacea. A spark can be supplied, but the coil has difficulty with breakdowns on the winding. The coils themselves are not cheap, otherwise you could not bother, buy a new element, install it, and then we’ll see.
Distributor diagnostics
How do you still diagnose the operation of the coil? How to do this in a cheap and simple way, without disassembling anything and without using an expensive scanner? Let's figure it out, it's possible.
We arm ourselves with the necessary tools:
- We find a couple of old candles (you don’t need to take new ones, since this is just a test).
- Probe and hammer.
It is recommended to clean spark plugs from old scale before use.
It is also important that they fit the markings and correspond to the type: short or long
The whole operation will go around the candles. After preparing the spark plugs, you will need to take a 0.7 mm feeler gauge. The NW gap size of most foreign cars is 1.1 mm. Rarely, but there are also gaps of 1.3 mm.
The spark plugs are clamped in a vice, then a probe is inserted between the spark plug ember and the side electrode. If the probe does not fit, then it is driven into the hole with a hammer; if it sits too loosely, the electrode bends. As a result, we get four SZ with the required gap between the electrodes.
No matter how working the spark plugs on the car are, we unscrew them. We install the prepared SZ with a straightened gap.
Further like this:
- The driver gets behind the wheel and drives away.
- You should drive in the same modes as always.
If the behavior of the car does not change, then there are no complaints about the coil. The problem will have to be looked for in other places. As a rule, this is more likely due to incorrect installation of the timing belt or problems with the fuel supply.
Distributor runner
But if the problems disappear or become smaller, the coil in almost all cases requires replacement, because its efficiency is reduced to nothing.
Since the spark does not completely disappear even when the coil is not working, it can be extremely difficult to determine its functionality without the steps described above. Until the coil “dies” completely, and this process can last for a very long time, it is almost impossible to analyze the efficiency of operation at one hundred percent.
The principle of operation of a four-stroke power plant
You can understand why it is important to connect high-voltage wires correctly if you study the principle of operation of the power plant. The carburetor or injector of the VAZ-2109 operates on approximately the same principle, since both power plants are four-stroke.
- First, the cylinder volume is filled with the fuel mixture and exhaust gases. This process is called "inlet".
- The engine then goes into compression. With it, the valves are closed, and the crankshaft and connecting rod move the piston upward. The mixture of fuel and air is transferred to the combustion chamber.
- During the expansion stage, the ignition is switched on and a spark appears. It ignites the fuel mixture, resulting in the formation of gases. They put pressure on the piston, causing it to move down. This force is transmitted through the connecting rod to the crankshaft.
- The process is completed by the “release” of exhaust gases through the exhaust system.
In order for the engine to operate smoothly and without jerking, the processes must take place in a certain order. This, first of all, concerns the order in which the cylinders are put into operation.
Setting the angle of the closed state of the breaker contacts
The angle of the closed state of the breaker contacts (UZSK) is, in fact, the gap between the contacts of the breaker. Due to constant loads, it gets knocked down over time, which leads to disruption of the spark formation process. The UZSK adjustment algorithm is as follows:
- Disconnect the high-voltage wires from the distributor cover.
- Unfasten the two latches securing the cover. Remove the cover.
After setting up the UZSK, the ignition timing is always off, so it should be set before assembling the distributor.
Video: setting the gap between the breaker contacts
Replacing the distributor with your own hands
Before you begin to remove the distributor (ignition distributor) on the VAZ 2109-2108, you must disconnect the negative terminal from the battery. This procedure is not as difficult to perform on your own as it might seem, but there are very important points that are worth paying attention to. This will be discussed in detail during the description of the procedure. To perform this repair you will need the following tools:
- 10 open-end wrench or socket wrench
- Socket head and ratchet handle
- Phillips blade screwdriver
Distributor device with Hall sensor
On the VAZ-2109, the manufacturer installed a contactless type distributor equipped with a Hall sensor. It is four-spark, additionally equipped with a centrifugal and vacuum corrector.
In addition to correctors, the device has other elements that contribute to proper operation. Thus, the distributor is equipped with a special plastic screen. It is necessary to protect the working surfaces of the mechanism from dust and dirt. The slider mounted on the distributor rotor has a constant resistance of about 1 kOhm. In addition, the design includes thrust washers, lock washers and O-rings. The body is one-piece, aluminum.
Purpose and types of distributors
The main distributor of the “six” is located on a horizontal platform made to the left of the engine valve cover. The unit shaft, ending with splines, enters the drive gear inside the cylinder block. The latter rotates by the timing chain and at the same time rotates the oil pump shaft.
The distributor performs 3 functions in the ignition system:
- at the right moment it breaks the electrical circuit of the primary winding of the coil, causing a high voltage pulse to form in the secondary;
- alternately directs discharges to the spark plugs according to the operating order of the cylinders (1-3-4-2);
- automatically adjusts the ignition timing when the crankshaft speed changes.
The spark is supplied and the air-fuel mixture is ignited before the piston reaches the upper extreme point, so that the fuel has time to fully burn. At idle, the advance angle is 3-5 degrees; with increasing crankshaft speed, this figure should increase.
Various modifications of the “sixes” were equipped with different types of distributors:
- VAZ 2106 and 21061 were equipped with engines with a working volume of 1.6 and 1.5 liters, respectively. Due to the height of the block, distributors with a long shaft and a mechanical contact system were installed on the model.
- VAZ 21063 cars were equipped with a 1.3 liter engine with a low cylinder block. The distributor is a contact type with a shortened shaft, the difference for models 2106 and 21063 is 7 mm.
- The updated VAZ 21065 series was equipped with contactless distributors with a long rod, working in conjunction with an electronic ignition system.
The difference in the length of the drive shaft, depending on the height of the cylinder block, does not allow the use of the VAZ 2106 part on a 1.3 liter engine - the distributor simply will not fit into the socket. Installing a spare part with a short shaft on a “clean six” will also not work - the splined part will not reach the gear. The rest of the filling of the contact distributors is the same.
Distributor in a contactless ignition system
The contact ignition system, which is installed on the antediluvian classic VAZ models, is an example of Italian reliability, stability and maintainability. This system (not the ignition system in principle, namely the VAZ one) was developed by the Fiat concern in 1963 and remained practically unchanged throughout the entire era of the reign of the classic Lada, right up to the moment when the last VAZ 2107 was rolled out of the gates of the Izhevsk plant. the last seven already had a contactless ignition system; it did not undergo any significant changes.
On cars of the Samara family - 2108, 2109, 2114, the ignition system is contactless. What does this mean and what are the differences between it and the contact system? Here they are:
- there is no contact group in the VAZ 2109 distributor;
- the operation of the contactless ignition system is controlled electronically, and not by single-cell electromagnetic relays;
- adjustment of the ignition timing is carried out using other methods;
- The VAZ 2109 contactless distributor is more compact than classic VAZ distributors.
The operating principle of the ignition system and its main tasks have not changed with the use of a contactless system. It has become easier to maintain and has become less dependent on mechanical wear of the contact group, but more on the quality of electronic semiconductor components. Electronic control units of old 2109 require mandatory testing before purchase, since the quality of domestic radio components may not always be stable.
Purpose of distributor VAZ 2109
In any ignition system, contactless or contact, there are two circuits - high voltage and low voltage. The distributor, the ignition distributor, is exactly the device that deals with both high-voltage and low-voltage wiring. Its main task is to distribute high voltage between the spark plugs at the right moment and in a certain order.
The distributor works as follows: High-voltage voltage is generated in the ignition coil by electromagnetic induction. It is supplied via a high-voltage wire to the central contact of the distributor cap. The contact is in constant interaction with the slider, which distributes the current across four contacts corresponding to the spark plug in the cylinder. The slider is in constant rotation and alternately closes the central contact with the spark plug contacts. Current is supplied to the spark plugs through high voltage wires in the order determined by the order of operation of the cylinders - 1-3-4-2. The slider is driven by a drive shaft, which is connected to the camshaft.
Operation of the hall sensor and centrifugal mechanism
The VAZ 2109 distributor device allows you to adjust the ignition timing while the engine is running. This is achieved through a centrifugal device, which is capable of moving the slider with a sharp increase in the number of revolutions. The design of the centrifugal mechanism is similar to those installed on distributors with a contact ignition system.
The VAZ 2109 distributor also has a vacuum corrector. It works as follows: when a vacuum is created in the intake manifold, to which the corrector is connected, the vacuum is transmitted through a tube to a chamber with a rubber diaphragm. The diaphragm is connected to a rod, which is hinged to the plate on which the hall sensor is located. It was this sensor that replaced the contact group in the distributor and made the ignition system more stable. Together with the plate, the sensor can move, adjusting the ignition timing, increasing or decreasing the angle, depending on the intensity of the set of revolutions and the vacuum in the manifold.
Malfunctions in the distributor
Since the 2109 distributor has a minimum of mechanical parts, it is not as susceptible to wear as a distributor with a contact group. However, they exist and you need to be prepared for them.
- The hole for ventilation and pressure compensation on the distributor shank often gets clogged. This leads to the fact that crater gases, having no other outlet, break through the distributor shaft seal and oil the slider.
- Breakdowns to ground occur in the distributor cap due to microcracks.
- Due to poor quality elements, the hall sensor fails;
- The distributor shaft bearing becomes loose.
All these troubles can be solved quite simply, if you don’t mind the time, everything can be eliminated with your own hands. The VAZ 2109 distributor, the price of which is not much more than 1000 rubles, is, in principle, a consumable unit, so making a decision to repair it may be unprofitable in terms of time spent. I wish you the right spark distribution, and good luck on the roads.
Adjusting the ignition using the tachometer
To carry out this type of economical ignition adjustment of the Zhiguli 2109, two people will be needed. One should be in the interior of the Nine, the second should rotate the distributor.
Step-by-step adjustment using the tachometer
- Turn on the ignition and watch the tachometer needle.
- A second person must loosen the bolts securing the distributor and turn it.
- When you turn the key in the ignition, the tachometer needle sharply deviates and returns to zero.
- The distributor should remain in the position when the tachometer needle deviates.
- This method of adjusting the ignition timing requires patience, as it is very difficult to adjust the first time.
Specifications
Before we begin to describe the process of refining and increasing the power of the VAZ 2109 carburetor engine, it is worth understanding what power units were installed on the vehicle, and also consider the main technical characteristics.
During the production process, the “nine” was equipped with three options for carburetor engines:
21081 (1.1 8V)
| Name | Index |
| Volume | 1.1 liter (1099 cc) |
| Number of cylinders | 4 |
| Number of valves | 8 |
| Fuel | Petrol |
| Injection system | Carburetor |
| Fuel consumption | 6,7 |
| Cylinder diameter | 76 |
| Cylinder operating order | 1-3-4-2 |
2108 (1.3 8V)
| Name | Index |
| Volume | 1.3 liters (1289 cc) |
| Number of cylinders | 4 |
| Number of valves | 8 |
| Fuel | Petrol |
| Injection system | Carburetor |
| Fuel consumption | 7.0 l |
| Cylinder diameter | 76 |
| Cylinder operating order | 1-3-4-2 |
High voltage wires
No spark VAZ 2109 carburetor reasons
Often the main difficulty when repairing a carburetor VAZ 2109 is the reconnection of high-voltage wires that were previously disconnected from the distributor cover. It's also an ignition distributor.
The difficulty is that many people forget the connection procedure or simply do not know. But in practice, returning high-voltage wires is much easier than understanding the ignition module used on the injection VAZ 2109.
By following a few simple rules, you can easily return the wires to their rightful places.
- The ignition distributor cover is installed in its place, that is, on the distributor, only in a single position. Therefore, even if you wanted to, you won’t be able to confuse anything here. Otherwise the lid simply won't fit.
- There is an installation mark on the cover, which indicates the location of the wire socket from the first cylinder.
- The wires must be connected in the following sequence - 1, 3, 4, 2. Move counterclockwise when looking at the distributor cover from the side of the expansion tank.
If for some reason there are no installation marks on the VAZ 2109 carburetor distributor cover, just follow the connection principle shown in the image.
How to test the ignition yourself
This fairly simple method of checking the operation of the ignition system can be used both for cars of the “ninth” family and for other passenger vehicles equipped with a carburetor engine. However, it should be noted right away that some experience is required here, since the test is carried out by ear.
So, first you need to accelerate the car to a speed of 50 km/h and engage fourth gear. Now press the gas pedal all the way and listen to the engine. If at this moment quiet detonation sounds appear, it means that the VAZ-2109 ignition timing is set correctly. The late timing is indicated by the absence of sounds during acceleration. In the case when the detonation sounds are too loud, one should conclude that the ignition is early. In both the first and second cases, your car’s engine requires re-adjusting the ignition timing.