How to remove the air deflector: step-by-step instructions
It would seem, why suddenly remove the air duct deflector. The need for this may arise for various reasons. For example, it may simply fail, in which case it should either be repaired or replaced. To improve the interior, some people purchase deflector grilles from other car models and install them. Our goal is to tell you how to remove the air duct deflector in order to carry out the desired operations. The process will be examined using the example of different VAZ models. Here you will also find instructions on how to remove the air deflector on foreign cars.
Removing deflectors: how to remove wind deflectors correctly
Side window deflectors, which protect the driver and interior of the truck from splashes (precipitation and windshield wiper), cigarette smoke and ash, can sooner or later fail. Although it is not uncommon for a windshield to serve faithfully for 10 years or more, the time comes to change it. In our material we will talk about how to properly remove deflectors from a truck window.
Please note that the visor should be removed based on the method of its installation. Dismantling a deflector glued to tape will be different and will take much longer than one that was attached under a sealing rubber band.
Dismantling windshields mounted on adhesive tape (using the adhesive method)
Before you remove window deflectors installed with industrial tape, you should prepare. Bring a stepladder, because you will have to work at the level of the visor. Another option is to remove the entire door and work on a horizontal surface, but this is more troublesome.
For dismantling you will need:
- hair dryer (a construction hair dryer is best, but a high-power household hair dryer is also suitable);
- solvent (White spirit);
- stationery knife or thin fishing line;
- rags;
- rubber scraper;
- about an hour of free time.
How to peel off side window deflectors: step-by-step instructions
Open and securely lock the door from which you will remove the visor. Clean the work surface, wash and dry if necessary.
Turn on the hairdryer and thoroughly but gently heat the area where the deflector is fixed to the door. Be careful as excessive heat may damage the coating.
Pry up one of the edges of the windshield and thread the fishing line under it.
Continuing to heat the visor with a hairdryer, move the line to the opposite edge, cutting off the plastic from the tape and paintwork. Take your time. If there is no fishing line at hand, then the manipulation can be carried out using a stationery knife, but even more carefully and slowly.
Once the visor is completely removed from the door, you will need to remove the industrial tape that was used to affix it. To do this, take a rag, soak it generously in solvent and, soaking the tape, remove it with a scraper.
After completely cleaning the door from traces of fastening, wash and dry its surface.
If you are not sure that you can remove the windshield from your truck yourself, trust the specialists at the service station. They will carry out the dismantling procedure carefully, without damaging the paintwork of the side door.
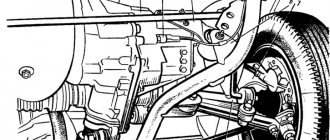
Removing the deflector on VAZ cars: step by step
The most common problem faced by owners of VAZ cars is the breakdown of the plastic curtains on the central deflector, as well as the air intake clogged with debris and dust.
On the VAZ 2106
The rotary air duct deflectors on the VAZ 2106 are round and are located on top of the instrument panel. It is held in place by three plastic snap fasteners.
Layout of deflectors on the VAZ 2107
On the classic, there are two deflectors (33) in the center, separated by a plastic partition. They are inserted into the sealing rubber inside and held in place by compression. Plus there are small floating clips on the top and bottom. Easy to remove. At the attachment points they are pryed with a screwdriver and pulled out. The side deflectors (5) are removed in the same way.
On old-style cars VAZ 2110, 2111, 2112, everything is also very simple. The grille is held in place by latches, so you just need to pry the grille with a screwdriver and it will snap off. You must first remove the plastic cover on the slider. The deflector on new cars cannot be dealt with so easily, since the grille is additionally fixed with screws. To remove it, you will need a Phillips and slotted screwdriver.
- The fasteners that need to be unscrewed are located behind the plastic cover.
- Pry it off with a flathead screwdriver.
- Under the insert you will see two screws, you need to unscrew them with a Phillips screwdriver.
- After removing the screws, simply remove the grille; it is no longer secured in any way.
Video: dismantling deflectors on a VAZ 2110
On the Lada Granta the process is trivial. The air duct deflectors are simply pulled out of their seats.
Video: removing deflectors on Lada Granta
On Priora and Kalina, air duct deflectors can also be removed without additional labor costs. On Kalina, for example, they are attached with two screws: from the top.
Top mount
Lower mount
However, Lada Vesta will throw up a lot of surprises in this sense. Since the air duct deflectors are additionally fixed there, and the screws of the side air ducts are located in hard-to-reach places.
To remove the side deflectors, remove the cover covering the fuse box on the left. It can be secured with a nail with a black plastic cover.
Video: dismantling the fuse cover on the Lada Vesta
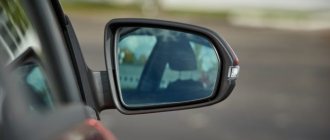
How to remove side window deflectors yourself quickly and correctly
How often do you have to deal with bad weather on the road? Given the peculiarities of the domestic climate, probably quite often. If so, you are of course using deflectors, which not only help protect your side windows from small stones and dirt, but also allow you to open them slightly when it rains, eliminating the possibility of moisture entering the car, even in strong crosswinds.
Deflector - types and principles of operation
The main task of the deflector, or as it is also called the “cut-off”, is to prevent air flows carrying dirt, small stones and moisture from entering the car interior. This task is accomplished by using them to create a certain aerodynamics of the car body, which does not allow dust flows to get inside the car.
Kia Rio
But with this model you will have to seriously tinker. Since the deflector is attached to screws that are hidden by the visor. It must first be removed.
The tools you will need are Phillips and slotted screwdrivers, a flashlight and a construction spatula.
The process involves some combination of activities. Watch in detail how this work is done in the video.
Video: removing the instrument panel visor on a Kia Rio
;
Only then can you remove the central deflector. It is attached to pistons and screws. Two screws at the top, two pistons at the top and one at the bottom. After the deflector is removed, you need to disconnect the plug.
Before dismantling the left deflector, remove the left panel and the panel under which the fuse box is located. The deflector is attached to the side with two self-tapping screws. Before dismantling the right panel, open the glove compartment and remove the right panel, unscrew the screws. Now, by prying with a screwdriver, you can remove the deflector.
Video: dismantling the central and side heating deflectors
This is how the air duct deflector is removed on different cars. Of course, within one article it is impossible to give complete instructions for all car models. From all of the above, we can conclude that the amount of work that needs to be done to remove the air duct deflector is not the same. In some cars, the deflector is removed simply by pulling it out (Renault Logan), in others you have to remove the dashboard or other large elements (Lada Vesta, Kia Rio).
What are deflectors and the reasons for their failure?
Before considering the main topic - how to remove the air ducts of a VAZ 2114 and their nozzles, you should first briefly talk about what they are.
The deflector (otherwise called an air duct nozzle or air deflector) is designed to reflect the flow of air moving from the stove through a special channel (air duct) and deflect it in the desired direction (in the direction that the driver or passenger wants - for this there is the possibility of deflecting the deflector guides ).
Due to the peculiarities of their design and location, side deflectors are often damaged as a result of mechanical stress (for example, when accidentally pressed). In addition, they can break if you try to clean them with a hard object (screwdriver or knife) using significant force.
How to dismantle central deflectors and install new ones
Removal of deflectors may be necessary in one of the following cases:
- they are clogged and require cleaning;
- a deeper cleaning of the system with removal of the air ducts is necessary;
- the deflectors were pressed into the air duct;
- The deflectors are broken and need to be replaced.
In any case, whatever the reason for dismantling them, it is quite simple to do and does not require a lot of free time or special tools. The entire process of removal and reinstallation takes place in just a few steps, the first of which is removing the dashboard panel.
In order to do this, you need:
- disconnect the battery;
- remove the receiver/radio tape recorder, disconnect the cable harness from it;
- remove the center console screens;
- remove the cigarette lighter by disconnecting the harness of suitable wires;
- remove the ashtray light bulb and disconnect the wires that go to it;
- remove all protruding buttons and adjustment knobs (to do this, carefully pry them off with a screwdriver);
- Use a Phillips screwdriver to unscrew the screws holding the instrument panel panel (one each on the left and right);
- Unscrew two screws located above the dashboard and two screws located under it;
- pry and remove the rear window heating plug;
- Unscrew the self-tapping screw located under this plug with a Phillips screwdriver;
- move the panel back and to the right;
- disconnect all blocks with wiring harnesses from the switches and on-board computer.
Once the panel is completely detached, the deflectors themselves can be removed. To do this, you need to unscrew the three screws responsible for fastening the central deflectors. One of them is located under their body, the other two are on its sides. After this, all that remains is to remove the deflector, clean it (if necessary), and install it back.
Assembly of the front panel and its installation are also carried out according to the above described scheme, but in the reverse order.
Before installing the deflectors in their place, it will be very useful to cover their perimeter with sound-absorbing material, such as modelin.
Removing glass deflectors
The dividers can crack from severe frosts, be damaged by hail or pebbles from under the wheels of other cars, or (if the products were of poor quality) fade in the sun.
To install new wind deflectors, or simply start driving without them, you need to know how to remove old window deflectors on a car.
Tools and materials
To remove the deflectors from the car, glued with double-sided tape, you need to prepare in advance:
To remove windshields on mechanical fastenings, you only need an ordinary screwdriver (sometimes additionally a shaped one, or depending on the type of fastenings) and a plastic or thick rubber scraper.
Preparatory activities
Before removing the deflector from the car door, you need to determine exactly how it is attached, prepare the necessary tools and thoroughly clean the working surface of the body and glass from dust and dirt. It is better to work on a sunny but not very hot day or in a clean garage with good lighting.
Technology for removing deflectors on mechanical fastenings
Removing window deflectors from the car, which are held by special brackets-holders on screws or bolts, occurs in several stages:
Deflectors on car windows
To preserve the paintwork, instead of a screwdriver in steps 4-5, you can also use a plastic scraper to clean the windows from ice.
How to remove deflectors with tape
To remove the deflectors from the car that were held on with double-sided tape, proceed as follows:
You need to work with cutting objects carefully so as not to damage the car’s paintwork. There is no need to try to cut the tape right at the surface of the door. Not only can the blade scratch the paint, but the line also has small but sharp edges that can cause micro-scratches. Over time, such damage will turn into a full-fledged crack or even a chip.
Replacing side deflectors
Now let's look at how to remove the VAZ 2114 interior air deflectors located on the sides (and this is quite simple to do - they are attached without the use of screws at all, but are held in place by eight latches). The first 4 of them are located on the outside - two in the upper part under the overlay and two in the lower part.
In order to squeeze them out, you should use a thin screwdriver or a strong knife blade. Also, in order to avoid scratches on the surface of the reflector, you should place a soft cloth under the instrument. Once the outer latches are open, all that remains is to disconnect the deflector housing from the duct body (which is held in place by the remaining four latches) and remove it.
Installing the reflector in place is done in exactly the same way, but in the reverse order. A very useful action before installation (both in the case when replacing the heater deflectors of a VAZ 2114 with new ones, and when installing old ones in their original place after cleaning) would be to glue the entire perimeter of their body with a noise-insulating material, which at the same time plays the role of a seal (for example, modelin or its analogues).
When opening the side reflector latches, you should place a soft material under a screwdriver or knife - this will protect the case from damage and scratches.
How to dismantle the deflector?
To carry out work on dismantling the deflector, it is very important to prepare in advance all the materials necessary for the work. Depending on how the device is mounted, the methods for dismantling it will vary. Therefore, this point is worth taking into account. If the element is attached to the door with double-sided tape, then to remove it you will need a hair dryer, a utility knife and a solvent, as well as a plastic ruler or scraper for removing ice, and a rag. If the car deflectors are plug-in, then to dismantle them you will need a screwdriver and a little free time.