Why is a gasket between the cylinder head and the valve cover needed?
The valve cover is necessary to protect the cylinder head mechanism from dust and dirt; the seal also performs other functions:
- Provides tight installation of the cover to the cylinder head flange;
- Seals the volume that the lid closes and prevents oil leakage.
The part is not critical for the operation of the internal combustion engine - the engine will work quite normally without it. But it serves to clean the power unit, increases fire safety, and improves the ease of maintenance of the motor. In addition, the sealant makes a significant contribution to maintaining the technical characteristics and purity of motor oils.
In the modern automobile market, there are many engine models with different cylinder heads. However, all internal combustion engine gaskets are designed in fundamentally the same way. This is a flat-shaped sealing element that follows the shape of the plane of contact with the cylinder head.
What is the best valve cover sealant? list of recommended
Choosing the best sealant based on heat resistance When choosing a sealant for an engine, you need to focus on the specific properties of the composition. In this case, be sure to check the heat-resistant tolerance.
Here you can get by with compounds that are destroyed even after 150 or 175 degrees. Selecting products from specific companies The choice of the best sealant for your car can be made based on the vehicle manufacturer’s instructions.
Here are the car manufacturer's recommendations on this issue. Advice.
When to replace
This gasket must be replaced immediately after a leak is detected. If you do not replace it on time, then soon the entire surface of the engine, as well as all units near the internal combustion engine, will be covered in oil.
Then dust and dirt will certainly stick to the oily elements. Dust not only significantly spoils the appearance of the engine, because the valve cover is the first thing that catches your eye. A layer of oil and dust on the surface of the internal combustion engine greatly worsens heat exchange processes - the engine temperature will rise.
During operation of the engine with a leaking valve cover, oil will inevitably get to the sensors and other electronic devices - the sensors may fail. If the leak is quite severe, the oil level will quickly drop - driving without oil leads to very sad consequences.
This is interesting: Symptoms and signs of crankshaft sensor malfunctions and checking it
Most often, the cover is changed in the following cases:
- Engine overhaul;
- Determination of oil leaks at the seal installation site;
- Cylinder head repair, timing belt repair, unit maintenance.
The frequency of replacement differs on different car models - it all depends on the gasket material. Original products are of higher quality, non-original and cheaper ones are most often a low-quality copy from the Middle Kingdom.
The service life of the gasket depends entirely on the quality of the product and the material. The average price of an element is small, so everyone tries to buy something inexpensive, because the element is insignificant. Many people do the same. As a result, oil leaks under the hood. There is no need to do this.
Among the reasons for replacing the valve cover gasket, the first thing to highlight is the low quality of consumables for the car. It happens that you buy a product at an average price, but after a few days of intensive use of the car, the leak appears again.
When choosing, you should carefully examine the surface of the gasket and its materials; it is important to make sure that the part is elastic. Hard gaskets will not provide the required tightness, and gaskets that are too soft will certainly be pressed through during installation.
Another popular reason that leads to replacement is improper installation. The gasket is destroyed during its installation.
The nuances of using valve cover sealant
Each of the listed sealants has its own characteristics. Accordingly, you will find precise information on their use only in the instructions supplied with the product. However, in most cases there are a number of general rules and simply useful tips that should be followed. In particular:
Review of popular automotive high-temperature sealants
- The sealant is completely vulcanized only after a few hours. You will find the exact information in the instructions or on the packaging. Accordingly, after applying it, the car cannot be used, and even just start the engine at idle until the composition has completely dried. Otherwise, the sealant will not perform its intended tasks.
- Before applying the product, working surfaces must not only be degreased, but also cleaned of dirt and other small elements. For degreasing, you can use various solvents (not white spirit). It is better to clean it with a metal brush or sandpaper (depending on the degree of contamination and the elements being cleaned). The main thing is not to overdo it.
- When reinstalling, it is advisable to tighten the bolts with a torque wrench, following the specific sequence provided by the manufacturer. Moreover, this procedure is performed in two stages - preliminary tightening, and then full.
- The amount of sealant should be average. If there is a lot of it, then when tightening it can get into the engine, if there is not enough, then the effectiveness of its use is reduced to zero. Also, do not cover the entire surface of the gasket with sealant!
- The sealant must be placed in the groove of the cover and wait about 10 minutes, and only then can the gasket be installed. This procedure provides greater comfort and effectiveness of protection.
- If you are not using an original gasket, then using a sealant is highly advisable (although not necessary), since its geometric dimensions and shape may differ. And even a slight deviation will lead to depressurization of the system.
Draw your own conclusions...
Each car enthusiast must decide whether or not to use sealant. However, if you are not using an original gasket, or there is a leak from under it, you can use a sealant. However, it must be remembered that if the gasket is completely out of order, then using sealant alone may not be enough. But for prevention, you can still apply sealant when replacing the gasket (remember the dosage!).
Preparing for work
The valve cover gasket can be replaced in any convenient place - in an open area or in a garage. There is no need to drain engine lubricant or antifreeze. What tools will be needed for disassembly:
- a head with an extension and a knob, suitable in size to the cover mounting bolts;
- flathead and Phillips head screwdrivers;
- pliers;
- rags.
Work is carried out with the power unit cooled down to a comfortable temperature. If you don’t have time to wait for the engine to cool down, perform disassembly wearing cloth gloves that protect your hands from burns.
Before replacing, prepare the following consumables:
- a new gasket element selected according to the car model;
- O-rings for bolts (installed on certain brands of cars);
- high temperature sealant and degreaser such as white spirit.
The use of sealants to treat the seal before installation is not necessary. For example, on engines of classic VAZ 2101–07 models, the gasket does not require additional sealing. On 16-valve engines with a wider flange, the use of sealant is desirable, but not required.
Advice. Take your time to buy and change a gasket that leaks a little oil at one point. First, check and tighten the threaded connections - perhaps the seal has sagged and the bolts have become loose. If the operation does not help and drips still appear, the gasket element will have to be replaced with a new one.
Do-it-yourself replacement of the internal combustion engine valve cover gasket
If we don’t talk about a specific car model, the gasket is changed as follows.
First of all, I disconnect all the hoses and pipes that are connected directly to the valve cover. Next, I unscrew the gas pedal drive cable. Then I unscrew the bolts and remove the cover. Then I remove the old gasket.
Note: How to check the pressure in a car's air conditioner yourself
In order for the sealing element to work effectively and to avoid leaks in the future, it is important to thoroughly clean the surfaces of oil. You also need to thoroughly degrease both surfaces - both the cover and the cylinder head. Gasoline or carburetor cleaning fluid is suitable for degreasing.
Next, you can install the cylinder head cover and tighten the bolts. Here it is better to use a torque wrench - it is important not to overtighten.
Let's start to disassemble
First, drain the oil and antifreeze. We remove the protective cover, the air filter with pipes, disconnect the ignition coil connectors, the throttle cable and the throttle assembly.
We remove the thermostat housing and simultaneously disconnect all the available connectors and pipes. We remove all the wiring that was in our way towards the battery.
We remove the generator. We unscrew the eight thirteen nuts holding the intake manifold and remove it. We unscrew all the bolts securing the valve cover, as well as the side engine support.
Unscrew the eight nuts and remove the exhaust manifold.
Removing the valve covers on engine 21124 (16v 1.6)
Remove the filter box and decorative trim (see Chapter 1). Next, remove the ignition coils: disconnect the plugs and use a “10” key to unscrew the fastening screws.
Customized ignition coils
What to do with the damper drive cable: remove the rubber holder from the bracket, cut the plastic clamp.
The throttle cable needs to be released
Now remove the throttle assembly according to the instructions from the previous chapter.
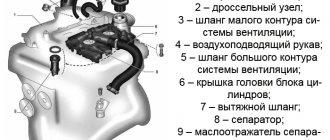
How to remove a plastic intake module
A wiring harness is attached to the front of the intake module. The cables go to the DPKV, DPRV (DF) sensors and to the adsorber valve. All connectors must be disconnected, then the wiring harness is removed.
The photo shows how the brake system hose is disconnected, as well as the crankcase ventilation hose. It is also necessary to remove the oil dipstick and tube by unscrewing screw 1.
Plastic part attachment points:
- Key “10” : two nuts 1;
- Key “13” : three nuts 2, two bolts 3.
All elements are shown in the photo.
Mistakes that novice mechanics make
Errors in installing the gasket are another reason for replacement. As mentioned above, during the replacement process it is necessary to thoroughly clean the contact planes. If this is not done, the seal will soon leak and will have to be replaced.
Novice mechanics often rush and forget about this point.
Another common mistake is neglecting the torque wrench. The fasteners are tightened sufficiently. In this case, the sealing element is pinched, squeezed out, and there can be no talk of any kind of sealing.
Also, due to improper tightening, the seal is pressed unevenly onto the planes.
Review of popular sealants
A review of valve cover sealants will help car owners decide on which brand to choose, since there are currently a lot of such products available in stores and car markets. And only reviews after actual use can fully answer which sealant is better. Being extra careful when choosing will help protect you from purchasing counterfeit goods.
Black Heat Resistant DoneDeal
This is one of the highest quality sealants made in the USA. Designed to operate in the temperature range from -70°C to +345°C. In addition to the valve cover, the product can also be used when installing engine and transmission oil pans, intake manifolds, water pumps, thermostat housings, and engine covers. It has low volatility, so it can be used in engines with oxygen sensors. The sealant composition is resistant to oil, water, antifreeze, lubricants, including motor and transmission oils.
The sealant withstands shock loads, vibration and temperature changes. At high temperatures it does not lose its performance properties and does not crumble. The product can be applied to already installed gaskets in order to extend their service life and improve heat resistance. Does not cause corrosion on metal surfaces of engine components.
Product code - DD6712. Package volume: 85 grams. Its price as of winter 2017/2018 is 300 rubles.
ABRO 11-AB
A good sealant, popular due to its low price and decent performance characteristics. It can also be used when installing various other gaskets on the vehicle. Therefore, this tool will certainly be useful to you in the future when repairing your car.
On the left is the original ABRO packaging, and on the right is the fake one
Features and Specifications:
- maximum use temperature - +343°C;
- has a chemically stable composition that is not affected by oils, fuels, antifreeze, water and other process fluids used in the car;
- excellent resistance to mechanical stress (significant loads, vibrations, shears);
- comes in a tube with a special “spout” that allows you to apply a thin layer of sealant to the surface.
Note! Currently, a large number of counterfeit products are sold in car markets and stores. In particular, ABRO RED, which is produced in China, is essentially an analogue of a sealant with much worse performance characteristics. Look at the pictures below so that in the future you can distinguish the original packaging from the counterfeit one. Sold in a tube weighing 85 grams, the price of which is about 200 rubles as of winter 2017/2018.
Another name for the mentioned sealant is ABRO red or ABRO red. Has matching color packaging.
Victor Reinz
In this case we are talking about a sealant called REINZOPLAST, which, unlike silicone REINZOSIL, is not gray, but blue. It has similar performance characteristics - a stable chemical composition (does not react with oils, fuel, water, or aggressive chemicals). The operating temperature range of the sealant is from -50°C to +250°C. A short-term increase in temperature up to +300°C is allowed while maintaining performance characteristics. An additional advantage is that the dried composition is easy to remove from the surface - it leaves virtually no traces on it. Is a universal sealant for gaskets. Catalog number for ordering 100 g. tube - 702457120. Average price is about 300 rubles.
The advantage of Victor Reinz brand sealants is the fact that they dry quickly. You will find exact operating instructions on the packaging, but in most cases the algorithm for use will be as follows: apply sealant to the work surface, wait 10...15 minutes, install the gasket. And unlike other sealants, your car's engine can be started within 30 minutes (although it's better to wait extra time if you have it).
Dirko
Sealants of this brand are produced by Elring. Popular products of this brand are the following products - Dirko HT and Dirko-S Profi Press HT . They have similar characteristics, both among themselves and in relation to the sealants described above. In particular, they are resistant to the listed process fluids (water, oils, fuel, antifreeze, etc.), and have proven themselves under conditions of high mechanical loads and vibration. The operating temperature range of Dirko HT (a tube weighing 70 grams has code 705.705 and a price of 300 rubles as of winter 2017/2018) is from -50°C to +250°C. A short-term increase in temperature up to +300°C is allowed while maintaining performance characteristics. The operating temperature range of Dirko-S Profi Press HT is from -50°C to +220°C (a tube weighing 200 grams has code 129.400 and a price of 1000 rubles for the same period). A short-term increase in temperature up to +300°C is also allowed.
Types of sealants TM Dirko
There is also a composition called Dirko Spezial-Silikon (a tube weighing 70 grams has code 030.790), which is designed specifically for sealing oil pans and crankcase covers. It is especially advisable to use it on surfaces that are subject to deformation during operation. Its operating temperature range is from -50°C to +180°C.
As for installation, after applying the product to the surface, you must wait 5...10 minutes. Please note that the time should not exceed 10 minutes, since the protective film is formed within the specified time period. After this, you can apply the gasket to the sealant.
Anaerobic sealant Permatex Anaerobic Gasket Maker
Anaerobic sealant “Permatex” is a thick composition that, when vulcanized, quickly compacts on an aluminum surface. The result is a strong but elastic connection that is resistant to vibration, mechanical stress, aggressive process fluids, and temperature changes. Sold in a 50 ml tube, the cost is about 700 rubles as of winter 2017/2018.
Other popular brands
Currently, the market for sealants, including high-temperature ones, is very saturated. It is necessary to understand that the range of different brands in the corners of our country is different. This is primarily due to logistics, as well as the presence of its own production facilities in a particular region. However, the following sealants are also popular among domestic car enthusiasts:
- CYCLO HI-Temp C-952 (tube weight - 85 grams). This is a red silicone car sealant. It is rarely found on sale, but is considered one of the best similar compositions.
- Curil . Also a very popular series of sealants from the above-mentioned Elring company. The first brand is Curil K2. Temperature range from -40°С to +200°С. The second is Curil T. Temperature range is from -40°C to +250°C. Both sealants have a wide range of applications, including use on the engine crankcase. Both sealants are sold in a dispenser tube weighing 75 grams. Curil K2 has code 532215 and costs 350 rubles. Curil T costs about 400 rubles as of winter 2017/2018.
- MANNOL 9914 Gasket maker RED . This is a one-component silicone sealant with a working temperature range from -50°C to +300°C. Very resistant to high temperatures, as well as fuel, oil and various process fluids. The sealant must be applied to a degreased surface! Complete drying time is 24 hours. The price of a tube weighing 85 grams is 170 rubles.
All sealants listed in this section are resistant to fuel, oils, hot and cold water, weak solutions of acids and alkalis. Therefore, they can be used as a valve cover sealant.
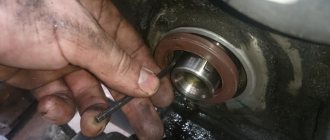
Why are guide bushings needed?
Before installing the cylinder head, perform the following steps: clean the threaded holes, as well as all holes for the bushings (photo 1). Each bushing is installed in place, and only then a gasket is placed on top.
Metal parts adjacent to the gasket must be degreased. We looked at the cylinder head tightening diagram, but the cylinder head itself must be installed correctly:
- We place the cylinder head on the cylinder block;
- By moving the part in different directions, we ensure that the bushings fit into the recesses.
After “step 2” the screws can be tightened.
Sealant
No sealing compounds are used when installing the gasket! Solidol, CIATIM and other lubricants are not even needed. The main thing is that the metal must be degreased. And the cylinder head gasket must be new.
Cylinder head cover and tightening order of its bolts
The metal cover installed on the cylinder head must not allow air to pass through. At points of contact with other parts, tightness must also be maintained. Therefore, sealant is applied to the edge of the lid. An example is shown in the photo.
Here you need to use materials: Loctite-574, ANACROL, etc. The screws on the cover are tightened with an “8” key.
Recommended screw tightening torque
The recommended screw tightening torque is only 3-4 N*m. Don't be surprised: the sealant will do its job. You just need to let it dry after putting the cover in place.
You can unscrew the screws in any order. Their number is 15 or 14. When installing, it is better to follow the sequence shown below.
There is usually no need to replace the screws - the load is too small. We wish you success.
Common Misconceptions
If the bolts are pulled out too much, they are tightened in four steps. At “step 2” the tightening torque will be 70-85 N*m. All of these are common misconceptions that do not apply to 16-valve internal combustion engines.
All steps in one video: replacing the cylinder head gasket
If you find an error, please select a piece of text and press Ctrl+Enter.
We recommend reading:
Privacy Overview
This website uses cookies to improve your experience while you navigate through the website. Out of these cookies, the cookies that are categorized as necessary are stored on your browser as they are as essential for the working of basic functionalities of the website. We also use third-party cookies that help us analyze and understand how you use this website. These cookies will be stored in your browser only with your consent. You also have the option to opt-out of these cookies. But opting out of some of these cookies may have an effect on your browsing experience.
Necessary cookies are absolutely essential for the website to function properly. This category only includes cookies that ensures basic functionalities and security features of the website. These cookies do not store any personal information.
Diagnosis of gasket condition on a Chevrolet Lacetti
The service life of the valve cover gasket on a Chevrolet Lacetti, as a rule, barely reaches 15–20 thousand.
An oil leak can occur as a result of engine overheating , then the cover becomes deformed and loses its seal. This is rare, but mostly oil oozes from under the cap and penetrates into the spark plug wells simply due to the gasket losing its elasticity and the sealant losing its properties.
Oil leakage occurs as a result of loss of elasticity of the valve cover gasket.
At the first appearance of traces of oil, and even more so when oil appears in the spark plug wells, you should not wait, but look for a new gasket as soon as possible.
Huge variety of articles
The market offers about a dozen gaskets for the cover of Lacetti engines; they are the same for 1.4 and 1.6-liter engines .
The original GM gasket bears article number GM96 353 002. It has a simple square profile, lasts quite a long time, but costs about 450 rubles.
There is a very inexpensive analogue of Parts Mall with the same index at a price of about 180–200 rubles . Many people prefer the Victor Reinz 155345601 . Its price is approximately 600 rubles , the gasket has a T-shaped profile and works no worse than the factory one. It is not recommended to buy cheap analogues, since they harden quickly, even a good sealant will not save you.
Valve cover gasket GM 96 353 002.
The procedure and torque for tightening the cylinder head on a VAZ-2112 with 16 valves: tightening the cylinder head bolts
VAZ cars of the 2112 family were produced with two 16-valve valves: 21120 and 21124. The cylinder head of these engines has different intake ports. In theory, there are no other differences. And therefore, the tightening torque of the bolts on the VAZ-2112 cylinder head will be the same if we talk about any 16-valve internal combustion engine. Tightening is performed in three steps, although repair books give another option (it is for 8-valve engines).
The following video shows how the cylinder head is installed in 5 minutes:
Installation and dismantling procedure
The part called the cylinder head is attached to the cylinder block with 10 screws. They are unscrewed with a 10mm socket wrench. The procedure for dismantling the cylinder head is shown in the first photo.
Reversal sequence (1-10)
The standard screw length is 93 mm. If the screw has been pulled out to at least 95 mm, it is replaced with a new one (AvtoVAZ requirement).
During installation, a different scheme is used (photo 2). Each screw is lubricated with machine oil, otherwise the efforts will be reduced to nothing.
The order of tightening the head is indicated in this photo
Tightening torque for cylinder head cover bolts
For VAZ-2112, the cylinder head tightening torque is standardized:
- First pass – the force is 20 N*m;
- Each screw is turned 90 degrees to the right;
- Wait 20 minutes, then turn the screws another 90 degrees.
At first the effort is very small. But at “step 3” it will be difficult to cope with the work. Use the lever.
Replacing the oil pan gasket on a VAZ 2170 2171 2172 Lada Priora [edit]
If oil leakage through the oil pan gasket cannot be eliminated by tightening its mounting bolts, it means that the gasket is severely deformed and must be replaced. Perform the work on an inspection ditch, overpass, or, if possible, on a lift.
1. Remove the Lada Priora engine mudguard (see “Removing and installing the Lada Priora engine mudguard”).
3. Using a 10mm wrench, unscrew the bolts securing the front cover of the clutch housing...
5. Using a socket head, unscrew the sixteen bolts securing the Lada Priora oil sump.
7. Remove the crankcase gasket from the mating surface of the cylinder block.
9. Place a new gasket on the mating surface of the Priora oil sump.
- Helpful advice
In order to fix the gasket on the crankcase, apply a layer of sealant to its mating surface and glue the gasket to it. In addition to fixation, the sealant will provide better tightness of the connection. For the same purpose, we recommend applying sealant to the mating surface of the cylinder block.
11. Fill the engine crankcase with oil.
Why oil leaks from under the valve cover, all the reasons
A dirty engine, oil leaks on the cylinder block, hoses and attachments are covered with a disgusting layer of a mixture of oil and dust... This picture is familiar to many Chevrolet Lacetti owners. The valve cover gasket may be the cause of an oil leak, but not the cause. And the reasons need to be looked deeper
A correctly and carefully installed gasket will never leak oil
There can be many reasons for an oil leak, but the main one is improper installation of the gasket. Regardless of whether we use sealant or not, the technology for installing all parts with a large contact plane is basically the same. It is very important to observe a number of points. Any experienced mechanic will tell you that in order to prevent oil from escaping from under the cap, you must:
- Clean thoroughly .
- Make sure that they are geometrically infallible - the plane must be perfectly flat. This can be checked with any metal ruler, special template or level.
The lid must be perfectly level
- The aluminum valve cover on 1.8-liter Lacetti engines can become deformed due to overheating or other reasons, mechanical damage, etc. It is very important to check the flatness of the cover .
- valve cover bolt tightening diagram must be strictly followed.
Of course, we will not store the tightening algorithm on the garage wall, but you need to know the pattern - we pull the bolts from the center to the edges, crosswise. Lacetti valve cover bolt tightening diagram - The tightening torque of the bolts is of great importance. For a 1.8 liter Chevrolet Lacetti cover it is a maximum of 10 Nm . Moreover, it is advisable to clamp the lid in two or three steps, gradually increasing the clamping force to a maximum of 10 Nm.
- The cover fastening bolts GM catalog number ) also, oddly enough, have their own resource and can lose their properties over time, that is, stretch. It is highly advisable to install new bolts each time the valve cover is removed. It's not that expensive, there are only a dozen and a half bolts, but you won't end up in trouble with old elongated threads.
- O-rings . Motor mechanics advise not to install branded GM rings GM 96353007 or 904 11 826 , they quickly lose their elasticity and begin to sweat.
KamAZ silicone sealing rings performed much better. They are cheaper and available in any general store or car depot. Original (right) and non-original rings - Sealant . Not every sealant is suitable for the Lacetti valve cover. The fact is that many of them necessarily contain vinegar. What does vinegar have to do with it? Very simply, its vapors enter the first oxygen sensor and slowly but surely kill it. For this case, we will use sealants marked on the SensorSave label: Permatex RTV Silicone High-Temp, Permatex Ultra Black, Loctite 5699, ABRO GRAY.
The sealant should read Sensor Save.
Sealant again. In addition, you need to know how to use sealant. It is not enough to read the instructions for use.
It seems that this is enough to responsibly approach the replacement of the Lacetti valve cover gasket or, in the end, entrust this task to a handy mechanic.
Let's move on to the cylinder block
We remove the pallet. Rotating the crankshaft as it is convenient for us, unscrew two bolts on each connecting rod cap. We use a TORX E10 head for this.
We take out the pistons along with the connecting rods. To do this, use the wooden handle of a hammer to press the connecting rod from below and lightly tap it to knock it up. We remove the old liners and buy new ones of the same size according to the markings on them. Here is another stone in AvtoVAZ’s garden, the owner has never climbed into the car from the interior or into the engine, but three pistons were of group “B” and one was “C”. It turns out that at the factory they re-sharpened one cylinder a little and simply put an enlarged piston there, no words. There are no options, we take group “C”, don’t sharpen the engine because of this. We will not touch the main liners either.
We buy a new piston group that does not bend the valves, connecting rods and connecting rod bearings.
Eliminating longitudinal play of the crankshaft
It was noticed on this motor. To eliminate it, replace the thrust half-rings. Standard and repair sizes are available. We take the first repair size, if they are too tight we sand them down a little. We unscrew the middle main bearing and gently push it with a screwdriver and move the half rings. The mark on it is in the form of three serifs, shown below.
When the half ring comes out a little, turn the crankshaft, it will push it out. There are two types of half rings: white at the front and yellow at the rear; the grooves on them should point towards the crankshaft cheeks.
We install them as we removed the new half rings; if they go in with great effort, you can grind them a little on a small abrasive stone, but not from the side of the grooves. Checking the play. We tighten the main bearing with a torque of 8 kgf*m.
Assembling the piston
There is an arrow stamped on the top of the piston; it should be directed towards the front of the engine. And there are marks on the connecting rod that should look the same way. Don't get confused!
We insert one retaining ring into the groove on the piston. We insert the connecting rod into the piston and, having lubricated the connecting rod and the piston pin with oil, insert it into place. Insert the second retaining ring. Although this operation seems simple, it will take some pains. We inspect the assembled structure; all retaining rings must be clearly in their grooves, otherwise a ring that has jumped out while the engine is running can cause a lot of trouble.
After assembly, you need to break off the connecting rod bearing cap, since the connecting rod is made in one piece. It's like that on our cars. First, unscrew the bolts. We insert the connecting rod into the cleats at the level of the mark shown in the figure with the black arrow and lightly clamp it, then break it off with a slight movement of the hand. The first time is very scary. We put the cover in place and tighten the bolts so as not to mix it up in the future.
Checking the thermal gap in the piston rings
We lay out each set of rings for each cylinder. In the future we will not change their places. In turn, we insert each ring into its own cylinder and push it a little with the piston approximately to the middle.
What is she?
This spare part can be seen immediately after you open the hood. The purpose of this element is to seal the neck of the gas distribution mechanism (so that oil does not penetrate into unnecessary places). The cover itself is secured with several bolts or nuts. And the VAZ valve cover gasket is made from special rubber, which does not lose its properties even with prolonged heating. However, nothing in the world is eternal, and even such material loses its elastic properties over time.
What is the best valve cover sealant? Recommended list
There are quite often disputes among car enthusiasts about which sealant is best for the valve cover. Since we are talking about a very important component of the machine, this is not surprising: the choice must be informed, and the purchased material must be of high quality. Let us immediately reject the attempts of not very picky car owners who believe that sealant for valve covers is an absolutely unnecessary thing.
They argue that tightening the screws leads to the squeezing of the sealant inside the engine, and not just out. They say that, under the influence of oil and temperature, the residues flow into the crankcase and over time clog the oil suction mesh.