What was used during the dismantling and service of the Chevrolet Cruze heater fan
- A set of keys
- Screwdriver Set
- Rags
- Silicone grease (heat resistant)
It is worth noting separately that the manufacturer of the Chevrolet Cruze strongly recommends repairing the heater fan only by replacing the worn unit with a completely new analogue. It is recommended to use the original fan as a replacement. The original article number is GM 5242710201 .
How to remove the heater fan without removing the front panel on a Renault Duster
If the previous option did not help, which is quite likely, you will have to take out the fan. The fact is that if you allow dirt to accumulate on the stove fan, it will accumulate more and more, faster and faster, leading to more and more noticeable vibration and clogging of the air channel. Therefore, if we missed the moment when the stove turbine was not yet too clogged, we will have to carry out cleaning by removing the fan, but without removing the front panel. This is quite possible, especially when there is an assistant nearby.
For those who have never disassembled the stove on a Duster, the operation may seem complicated. In fact, everything is quite simple. The main thing is to study the layout of the electric motor of the stove, the location of the terminal block and the motor latch, since you will have to work 90% blindly. If your build does not allow you to dive under the front panel on the passenger side, then it is better to remove the front passenger seat. At least this option is much preferable to losing hundreds of dollars.
Dismantling the Duster heater fan assembly
The operating algorithm is as follows:
- We set full airflow and summer mode on the stove control panel (all the way to the right).
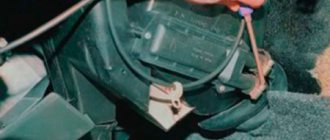
- On the left under the glove compartment we find the electric motor of the stove. We release the lock indicated in the photo and turn the engine a quarter turn clockwise (to the right).
- Disconnect the top terminal block by pressing the two latches on the sides. We do not touch the lower harness; it is removed along with the fan.
- You can try to remove the fan assembly with the engine from under the panel, but it will not fit through the gap between the bottom and the glove compartment.
- We remove the block, which is mounted on skids at the bottom of the glove compartment, without disconnecting the terminal block.
Diagnostics
At the first signs of a malfunction, it is important to carry out detailed diagnostics and identify the cause of the breakdown. If you suspect a heater fan failure, you must:
- Check the fuse and replace it if necessary.
- Check the power to the motor.
- If there is no power, then you need to check the power supply to the blower intensity regulator.
- If there is power to the regulator, but not to the fan, then you need to try setting the heater regulator to the last position. The rheostat may have failed, in which case the engine will only operate at the highest speed.
- Also, the lack of power to the motor is possible due to a broken wire or a short circuit in the wiring, the latter will be accompanied by a blown fuse.
Replacing the stove motor
The Achilles heel of the first generation Nissan Qashqai is the heater motor. The main problems that arise with it:
- Brushes and lamellas quickly wear out, and the winding burns. In this case, the stove stops “blowing”. If this is the problem, you can try to repair the motor.
- Failure of the transistors leads to the fact that the speed of the motor is not regulated. In this case, the transistors have to be changed.
- An extraneous hum or creaking noise during operation of the stove warns of an imminent replacement of the motor. The bushing wears out quite quickly, which causes suspicious sounds. Many people try to replace it with a bearing, but this is not the best idea: it will take a lot of time, and the result will still not be quiet operation.
Low flow rate or rapid loss of coolant may be associated not with the stove itself, but with the radiator or pipes. Before disassembling the stove, it is necessary to check the integrity of these elements. It may be necessary not to repair the electric motor, but to replace the heater radiator or broken hoses.
A clogged cabin filter may also be the culprit for poor heating of the cabin; before buying new parts for the stove, it is recommended to first replace the filter. Perhaps this will completely solve the problem.
Replacing a Nissan Qashqai heater motor is not the easiest procedure, so most Qashqai owners prefer to go to a service station, despite how much quality costs. The average cost of work will be 2000 rubles, to which the cost of the motor is added - 4000-6000 rubles. If you need to replace the transistor, you can buy a new one for 100-200 rubles.
If new spare parts are available, replacing the stove motor by professionals will take 3-4 hours. self-repair with skillful hands with all the necessary tools - twice as much. If you have never had to do this kind of work before, but you have a tool, a broken stove and a desire to fix it, you will have to spend at least two days on the problem. But next time it will definitely be faster and easier.
A motor for a stove is a spare part that is better to buy new rather than used, and you won’t have to look for it for a long time. The fact is that the motors on the Nissan Qashqai and X-Trail are absolutely identical.
Numbers of the original heater motor for Nissan Qashqai:
- 27225-ET00A;
- 272250ET10A;
- 27225-ET10B;
- 27225-JD00A;
- 27225-ET00B.
Numbers of the original heater motor for Nissan X-Trail:
- 27225-EN000;
- 27225-EN00B.
You can safely buy a motor with any of these numbers; it will be suitable for replacement.
How to change a stove motor with your own hands
Before you replace or repair the motor, you need to make sure that the problem is not a blown fuse.
List of tools required to replace a heater motor with your own hands:
- ratchet with extension;
- a T20 Torx screwdriver for it;
- heads for 10 and 13 or wrenches of the same size (but more convenient than heads);
- pliers;
- flat and Phillips screwdrivers;
- clip removers
Step-by-step work process:
- The car is de-energized (first the negative terminal is removed, then the positive terminal).
- The cable for opening the hood is disconnected.
- The following are removed sequentially: the left side part of the dashboard and the lower part of the panel under the steering wheel - all with rivets, the location of which is best determined in advance.
- The climate sensors and the connector from the left button block are disconnected.
- We find the upper chamber of the intake damper and remove the clamp from it that secures the wiring.
- The pedal assembly is removed (before this, the connector is removed from the brake and gas pedal ends).
- After this, the cabin filter housing snaps off.
- The power connector is disconnected from the motor, which is turned counterclockwise and removed.
After the motor is removed, it must be cleaned of debris and dirt and the winding and brushes inspected. If it is impossible to restore the functionality of the old heater motor, the new one is installed in the same place in the reverse order.
The heater fan is replaced after the electric motor is disconnected, removed and cleaned.
Replacing the heater fan
Constant fan speed, unusual squeaks and lack of air flow after turning on the heating may indicate problems with the fan. This does not necessarily mean that the furnace fan will need to be replaced unless the physical integrity is compromised.
The heater motor for Nissan Qashqai is sold complete with impeller and housing. In a Nissan Qashqai, replacing the heater fan is possible, but not rational - if the impeller is damaged or even slightly bent, the heater will make a strong noise and will fail quite quickly, and it is almost impossible to carry out balancing on your own.
The breakdown may concern a transistor in the speed controller or an overheated resistor - if it burns out, it is replaced with a new one.
Numbers of suitable transistors:
- IRFP250N – low quality;
- IRFP064N – high quality;
- IRFP048 – medium quality;
- IRFP064NPFB – high quality;
- IRFP054 – medium quality;
- IRFP044 – medium quality.
Installing heater handles from Ford
The third version of round heater handles Handles from Ford. Who likes this style better, look for them on Ali Express using the phrase “FORD FOCUS 2 focus 3 Mondeo AC Knob Car 3PCS/LOT Air Conditioning heat control Switch knob for focus 2 focus 3.” It is worth considering that the fastening of these handles is different and the design will have to be modified.
We take the standard Largus heater handle and cut off the top, along with the base. We glue the separated ring with clamps onto the heater handles from Ford. That's all!
By the way, the mounting of the Largus heater handles is exactly the same as on Renault Duster, Logan, Sandero or Lada XRAY cars. Choose any you like and install without any problems! Let us remind you that on our website you can find other instructions for modifying the Largus stove, for example, a report on installing a protective mesh for the cabin filter. Which option do you like best? Post a photo of your solution.
Photo: RAlexey logbook
Keywords: stove Lada Largus | Torpedo Lada Largus | interior lighting for Lada Largus | air conditioner lada largus
Found an error? Select it and press Ctrl+Enter..
- LADA car sales collapsed in April 2021
- Firmware for Lada Vesta radio (MMC) using a programmer/adapter
- Replacing and checking the variable valve timing on LADA
- Is it possible to install alarms and other equipment not from an authorized dealer?
Stove fan diagram
To get to the unit we are interested in, we need to remove the pedal block and begin disassembling the heater housing from the cabin filter side. This procedure is quite labor-intensive and requires certain skills. Therefore, it is better to trust those people who have experience in such things.
Qashqai J10 Heating and Air Conditioning System
1. Intake pipe rubber bushing 2. Air conditioning motor assembly 3. Heater pipe seal 4. Air conditioning filter 5. Air conditioning filter cover 6 . Mixing damper motor (left) 7. Mixing flap lever 8. Electric heater 9. Mixing flap 10. Intake air temperature sensor.
A short excursion on how to remove the heater motor to replace it. The information is condensed and is well suited for amateurs and craftsmen.
Plato personal account: login using login and password
“Platon” (short for “payment per ton”) is a system of collecting compensation for the movement of trucks on federal highways. The measure is mandatory and applies to heavy vehicles with a capacity of 12 tons or more. In simple terms, truck drivers must pay money to the treasury for damaging roads; this money goes towards repairing these roads. To make it convenient, owners of heavy trucks need a Plato personal account. We will explain in detail how to get it and why you need it in this article below.
Registration in your personal account
To register, the user will need a valid phone number and email. To start the procedure, you need to click the “Register” icon on the page lk.platon.ru
The system will prompt you to select your country of residence and type of client:
- individual
- individual entrepreneur
- legal organization
The package of documents required when filling out a personal application form will depend on the payer’s status.
By clicking the “Next” button, the user will be redirected to the “Vehicle Owner Data” section.
1) Individual When filling out a personal questionnaire, the Federal Law indicates the following information:
- last name and first name of the vehicle owner;
- TIN (indicated in the certificate of registration with the tax authorities);
- valid e-mail;
- contact number.
Upon completion of the registration procedure, an information letter will be sent to your email.
2) An individual entrepreneur also fills in his full name, contacts, and enters the current Taxpayer Identification Number (TIN) and OGRNIP.
The system requests the abbreviated name of the individual entrepreneur. If it is absent, this column can be left empty, or the surname of the vehicle owner can be indicated.
3) Legal entity The representative of the organization indicates the following data:
- form of organization;
- full name of the institution;
- abbreviated name of the legal entity;
- official e-mail of the institution;
- contact number;
- checkpoint;
- TIN;
- OGRNIP;
- Legal address of the company.
After filling out personal information, the user proceeds to specifying his location. Federal law and individual entrepreneurs choose the address at the place of registration, as well as the actual one.
Legal entities can mark that the location address coincides with the legal one, or fill out the fields manually.
The applicant also indicates the recipient's bank details, including:
- name of the recipient's bank;
- BIC of the recipient's bank;
- correspondent account;
- checking account;
- recipient's name.
If there is an official representative, the owner of the vehicle can register a Platon personal account in his name. Using the second account, the authorized person will have access to the client’s transactions and will represent his interests. This function is called “BTC Manager”. To connect it, the user indicates the name of the representative, his email and mobile number. Users who do not have trusted representatives o.
Login to your personal account Plato
To log into the Platon system, the applicant must provide a password with a sufficient level of complexity and upload scans of documents to the website:
- certificate of state registration;
- tax registration certificate.
Platon employees will check the uploaded documents for authenticity. The system user will be notified about the result of the check by email. mail.
By clicking the “Next” button, the applicant proceeds to the vehicle application form. To fill it out, the owner will need the following information:
- vehicle number (GRP);
- vehicle registration certificate;
- car make and model;
- car type;
- VIN number;
- maximum weight according to STS.
To confirm the specified information, the vehicle owner uploads scanned copies of the vehicle to the website and clicks the “Next” button. After that, by email. An email will be sent to your email address with a link to confirm your registration. If the message is not received within 5 minutes, double-check that the specified address is correct and click “Resend.”
By activating the link, the user will be redirected to Plato’s personal account and will be able to issue a route card.
To subsequently log into your personal account, the system participant must receive a message about account activation (no later than 24 hours). A new user can log into the site using a login and password, or through automatic data entry. To restore access to the account, its owner clicks the “Forgot your password?” link. After this, instructions for recovery will be sent by email.
How to register a second and subsequent car through your Plato personal account
Owners of several heavy trucks weighing more than 12 tons need to register each vehicle in the Platon system. The second and subsequent cars can be entered into the database through your personal account. For this you will need:
- log in according to the procedure provided for re-visiting your personal account;
- find the “Vehicles” section and go there;
- click on the “Register vehicle” button;
- fill in the data.
Upon completion of the procedure, the toll collection system operator (TSO) must check the information provided by the owner, after which he will send a letter confirming the registration of the vehicle in the register. The latter will only happen when the information is entered correctly. Reconciliation is carried out using scanned documents.
If the data is entered incorrectly, the user will receive a message indicating the need to re-register the vehicle.
It is important to remember that you will have to provide information only for the vehicle that could not be registered.
In addition to messages received from the operator, you can understand what stage the process is at by the status displayed in the personal account: “not verified” or “verified”.
If a response from the postal address does not arrive for a long time, the vehicle owner should take a few simple steps:
- check whether the designated letter is included in spam through the mail client settings;
- when using a corporate mailbox, make sure that the response is not filtered out by filters. This can also be done through settings;
- check if the message has been deleted from your inbox;
- exclude other factors on the part of the VTS that could affect the delivery of the letter from the specified mail.
If the indicated measures do not reveal the reason for the lack of response or the person encounters other problems, he can contact the hotline, where highly qualified specialists will help get out of the current situation. To do this, you need to call or 8 (495) 540-02-02
After completing the registration procedure, the car will appear in the general list of vehicles. If their number exceeds the permissible values provided for the window, then the user will be presented with a page-by-page list.
Why do you need a Plato personal account?
The Platon personal account gives vehicle owners access to the following services:
- “Profile” is a page containing information about the system user, scans of documents and personal account. An electronic wallet is required to pay transport fees and is topped up using a bank card;
- “Payments” – this section allows you to monitor the status of money transfers;
- “Routing maps” is a block that contains information about the received maps. Here the vehicle owner will also be able to apply for a new card;
- “Vehicles” – vehicle register. Using this section, the owner will be able to register new vehicles in the system, deregister vehicles, and form them into groups. Each group has a personal personal account from which money for paying Plato will be debited.
- “Appeals” is a form of feedback with system specialists.
Since 2015, the Plato system is mandatory. The absence or malfunction of the on-board device entails an administrative penalty in the amount of:
- 5000 rubles – for individuals;
- 40,000 rubles – for individual entrepreneurs;
- 50,000 rubles – for legal entities.
The repeated fine for individuals has been increased to 10,000 rubles.
Having a Platon personal account is necessary for owners of heavy trucks.
Contacts
Personal account - https://lk.platon.ru
Official website - platon.ru
24/7 support — 8 (800) 550-02-02,
Source: https://platon-lk.online/motor-pechki-largus-bez-kondicionera/
How to Remove the Heater Motor?
- Log in to reply to this topic
#1 earring
- Top
#2 earring
I took off the top one but I can’t remove the bottom one, tell me how to remove it
Post edited by [email protected] @: June 23, 2015 — 11:40
- Top
#3 Gek
- Gender: Male
- City: Altai
. I took off the top one but I can’t remove the bottom one, tell me how to remove it
Post edited by Gek: March 26, 2012 - 07:23
- Top
#4 earring
The tractor driver was changing the heater fan - the entire panel was removed for him. I tried to get to the heater motor connector myself - I came to the conclusion that the lower glove compartment was riveted (soldered) to the panel from the inside. It was good enough not to break everything there. . But on old Fabias the glove compartment is removable.
- Top
#5 earring
- Top
#6 Himik161
- Gender: Male
- Moscow city
The tractor driver was changing the heater fan - the entire panel was removed for him. I tried to get to the heater motor connector myself - I came to the conclusion that the lower glove compartment was riveted (soldered) to the panel from the inside. It was good enough not to break everything there. . But on old Fabias the glove compartment is removable.
To be honest, we were not happy. And I was looking everywhere on the forum to find out how to change it. As I understand it, this is from the category “to change a light bulb, you need to remove the bumper.” Rave. Is there really no way without removing the panel?
Elsa doesn't get used to them on the computer. Everything is one to one. By the way, on another forum there is also https://forum.skoda-c on replacing the fan. hp?f=14&t=88685
Skoda Roomster, 1.4 TDI
- Top
#7 Tractor driver
- Gender: Male
- City: Kemerovo
- Interests: 1.6 automatic transmission
- Top
#8 earring
There is no way to change it without removing it. By the way, if you shoot it yourself, see if there is an opportunity to make noise or not. They refused to do it for me, they said there was nowhere to glue it. Actually, it took me a very long time to change it, I think about a day (and they said they worked until 22-00)
- Top
#9 azim
- Gender: Male
- City: Verkhniy Tagil
. Actually, they changed it for me for a very long time, I think about a day (and they said they worked until 22-00)
- Top
#10 foy_frolov
- City: Yaroslavl
There is no way to change it without removing it. By the way, if you shoot it yourself, see if there is an opportunity to make noise or not. They refused to do it for me, they said there was nowhere to glue it. Actually, it took me a very long time to change it, I think about a day (and they said they worked until 22-00)
When replacing the heater fan, remove: 1. The upper glove compartment. 2. Front passenger airbag (if needed) 3. Instrument panel.
Let me clarify about the instrument panel:
There is no need to completely remove it, you need to release all the fastenings to the body, and simply move the panel as far as possible toward you. With this solution, there is no need to disconnect the wiring, remove the steering wheel, the panel with the tachometer and speedometer, or anything else.
You will just have to really “stretch out” in the front passenger’s foot space to replace it, because... Access will only be from below.
- 1
- Top
#11 earring
When replacing the heater fan, remove: 1. The upper glove compartment. 2. Front passenger airbag (if needed) 3. Instrument panel.
Let me clarify about the instrument panel:
There is no need to completely remove it, you need to release all the fastenings to the body, and simply move the panel as far as possible toward you. With this solution, there is no need to disconnect the wiring, remove the steering wheel, the panel with the tachometer and speedometer, or anything else.
You will just have to really “stretch out” in the front passenger’s foot space to replace it, because... Access will only be from below.
- Top
#12 [email protected]@
- Gender: Male
- City: Severodvinsk, Arkhangelsk region.
. I'll try to remove everything, it will be better to crawl up!!
Roomster 1.4 bxw comfort 2010
Stirlitz, walking along the alley, noticed how a painter was painting over swear words on the fence. “Moderator,” thought Stirlitz.
- Top
#13 foy_frolov
- City: Yaroslavl
THANK YOU, I'll try to remove everything, it will be better to get closer!!
- Top
#14 earring
There is no way to change it without removing it. By the way, if you shoot it yourself, see if there is an opportunity to make noise or not. They refused to do it for me, they said there was nowhere to glue it. Actually, it took me a very long time to change it, I think about a day (and they said they worked until 22-00)
Post edited by Gek: 07 April 2012 - 13:50 Edited post
- Top
#15 Tractor driver
- Gender: Male
- City: Kemerovo
- Interests: 1.6 automatic transmission
I rented a place there, not enough for noise, everything there is filled with foam, everything is tight,
- Top
News
- 12/31/2019
Opening hours of the company’s offices during the New Year holidays 2019-2020.
more details 12/24/2019
New Year's discounts on spare parts at Plentycar.ru!
Prices reduced by 5%. more details 12/11/2019
Change in the work schedule of the branch in the city of Verkhny Tagil. more details
In the Plenty Car online store you can buy auto parts for Japanese cars (Toyota, Mazda, Honda, Isuzu, Lexus, Mitsubishi, Nissan, Subaru, Suzuki), European cars (Ford, BMW, Citroen, Peugeot, Alpha, Lancia, Fiat, Land Rover, Mercedes, Opel, Renault, Rover, Volkswagen, Audi, Skoda, Seat, Volvo, Saab, Jaguar), American cars (Chevrolet, GM, Chrysler, Cadillac, Hummer, Infiniti, Jeep, Pontiac) and Korean cars (Daewoo, Hyundai, Kia, SsangYong). If you were unable to find spare parts for your car yourself, contact our specialists. All information on the site is for reference only and is not a public offer as defined by Article 437 of the Civil Code of the Russian Federation.
Motor repair and replacement
After determining the cause of the malfunction, it becomes clear what to do next. If the problem is in the collector (dirt, oxidation), then it is enough to clean it. Sticking of the anchor shaft or short-circuiting of its winding indicates that a new motor will have to be installed.
Worn brushes, damaged or oxidized wires need to be replaced, as well as a blown auxiliary resistor, broken switch and block fuse.
Heater motor for Passat. Photo source: https://www.drive2.ru/l/479060790708535487/
When the brushes began to hang, the wire in the armature winding broke, it is necessary to check the electric motor. Depending on the extent of damage, it needs to be repaired or replaced with a new one. It’s easy to determine if the motor is working properly: you need to dismantle it and connect the battery to the contacts in the connector. If the fan impeller remains motionless, then you need to purchase and install a new electric motor.
You can check the winding for short circuit in several ways:
- Start the engine and turn on the heater fan: if after 5 minutes the mechanism gets very hot, it needs to be changed.
- Smell the removed motor: if it smells burnt or scorched, it will also need to be replaced.
- Separately test each winding with a multimeter and compare the results.
- A megohmmeter allows you to check the motor for a short to the housing: connect one contact to the motor housing, the other to the winding output.
Before diagnosing an electric motor using the first method, it is important to measure the supply voltage at the input. Otherwise, you can confuse the interturn short circuit and the phase imbalance of the network.
How to remove a Volkswagen heater motor
On some forums, as well as on YouTube, owners of Volkswagen Passat cars (B3, B4, B5, B6, B7) say that you can remove the heater motor in 15 minutes, and they provide a video as proof. However, for an inexperienced driver who does not have the skills to repair a car, everything looks much more complicated.
Removing the Volkswagen heater motor. Photo source: https://www.drive2.ru/l/470454088564212751
Therefore, you need to act according to the following algorithm:
- Unscrew the 4 screws at the top of the niche (2 are publicly accessible on the sides, 2 are hidden in the center).
- The next step is to unscrew the 3 screws at the bottom of the glove compartment.
- Then you need to unscrew the two plastic clips and remove the foam pad.
- Below, under the glove compartment, there is a vertical slot in which you need to pry the latch to disconnect the lower part of the glove compartment.
- Do the same with the latch in the vertical slot above the niche.
- Then remove the safety block cover from the end on the right. Under it, carefully, so as not to break it, release the latches.
- Pull up the glove compartment a little, swing it in different directions, and remove it.
The next stage is dismantling the electric motor of the stove. First you need to unscrew the self-tapping screw that secures the torpedo to the amplifier on the right side. Otherwise, the wires will interfere with removing the heater motor in the Passat. And the speed regulator will rest against the torpedo. Then, on the left side of the electric motor, you need to carefully bend the long latch and turn it counterclockwise. Done: you can pull out the motor.
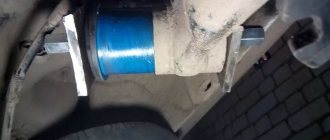
Disassembling and cleaning the stove fan
The most common problem is the appearance of a hum when the heater is on. Getting rid of the noise is simple: just clean the stove motor fan.
Cleaning the stove fan. Photo source: https://www.drive2.ru/l/475064890575290524/
- Remove the electric motor from the car.
- Pull out the 2-pin connector from the regulator relay.
- Unscrew the circuit breaker.
- Push out the 3 rubber bands securing the electric motor and pull it out.
- Remove the connector and unscrew the stabilizer.
- Release the regulator wires.
A large dense layer of dust and dirt is visible on the fan, which provokes an imbalance and the appearance of a humming sound. The further plan of action is to clean the electric motor, its housing, and the fan impeller. Any convenient method will do for this:
- a rag wrapped around a screwdriver;
- brush;
- vacuum cleaner;
- hairdryer
After thorough cleaning of the motor parts, before assembly, it is necessary to treat the lower shaft, fan impeller and electric motor housing with silicone grease (Litol-24, Litol-M, their analogues). The composition has water-repellent properties and remains effective at temperatures up to -50 / +230 ° C.
After manipulating the lubricant, connect the motor back to the car and check its operation. If everything is in order and the problem is fixed, the electric motor is mounted in place, the main thing is to get into the grooves and not break the latch. Then install the glove compartment, performing the dismantling steps in reverse order.
Replacing the heater motor in Passat B3, B4, B5, B6, B7
Sometimes owners of Volkswagen Passat cars, at the slightest unnecessary noise, without wasting time on cleaning and lubrication, replace the heater electric motor with a new one. The price of the unit varies depending on the manufacturer and place of purchase. An original engine from a car dealer will cost more than an analogue purchased in a regular store or ordered online.
Replacing the heater motor in the Passat. Photo source: https://www.drive2.ru/l/495591398276334104/
When buying a new engine, it is important to ensure that the part number matches. Replacing the heater motor on a Volkswagen Passat B7 yourself takes about an hour. To do this, you need to unscrew the old motor from the impeller, and lubricate the new one and install it in place. Then all that remains is to mount the system back (not forgetting the grooves and latch) and return the glove compartment to its place.
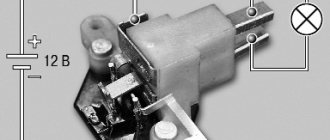
Troubleshooting the heating system
The functionality of the entire system immediately comes into question if the stove on Largus is not cleaned before use after a long break. This can also be affected by turning on its engine while the engine is not running: the coolant does not circulate and the interior stops heating. To somehow correct this situation, you can use one of two methods:
- synchronize the operating mode of the stove with the ignition turned on, that is, reinstall the wires of the control relay;
- Connect the thin conductor of the heater motor to partially protected wires located nearby.