In connection with the introduction of new toxicity standards for vehicle exhaust emissions into the atmosphere, AvtoVAZ has developed new, modified electronic engine control units. In addition, a brake pedal sensor was introduced for Granta. However, many car owners, after a short period of using their cars, complain about error “P0504”, which indicates a malfunction of the brake pedal position sensor.
Lada Priora Hatchback Strict SE Logbook Error P0504 Brake pedal sensor and its solution
Good evening everyone, nothing interesting happened to the car, and then bam, today it means I’m not touching anyone’s food, I didn’t pay attention to how often I pressed the brake, but suddenly the car begins to slow down to such an extent that it seems that it stalls while driving and then but after 1.5 seconds it starts, I couldn’t believe my eyes, at first I thought the gear was knocked out, when I press the gas at 40 km/h it just doesn’t go, so + besides, there are no revolutions at all! In a panic, I went and refueled (it was 5L at that time), I thought it was petrol, I refueled, I gave it a ***, I accelerated, like normal, I parked the car near the house, I started it an hour later, an error pops up, fortunately I have a friend Lyo with a cable and a program in next door, I rush to him. We do the diagnostics, and here’s the most interesting part:
Having read on the Internet that either the sensor is faulty ****, or the stoppers may burn out and because of this it is tripping, but the stoppers are all burning, the previous ones are intact. Someone also wrote that the sensor may be poorly adjusted, and it works too often when the brake is pressed. They cleared the error, now I’m driving and looking, so far everything is fine, so far there is no desire to change the sensor.
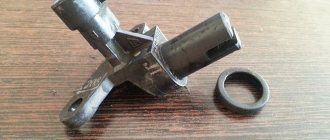
Today I went and bought a sensor, it costs 232 rubles, a little expensive IMHO) I installed it, it’s very easy to install, I unscrewed the nut and unscrewed the sensor itself, before of course disconnecting it from the power supply (which, by the way, only enters the sensor on one side, that is, by mistake you won't be able to connect it).
New, purchased
Old on the left, new on the right
The last photo shows that the spring of the old sensor has apparently stretched, because the limit switch no longer snaps off properly, but only moves halfway. I reassembled everything in the reverse order, adjusted it by eye
Then I cleared the error, and now everything is quiet, thank you all for your attention) And for those who will ever do this for the first time, there is no need to remove anything, I moved the seat all the way back, raised the steering wheel as high as possible, pulled out the rug (so as not to get dirty), took off the cover that covers the fuses (to let in more light) and lay right under the steering wheel, and everything is clearly visible there. I used the key for 19. The replacement took 10 minutes maximum
It became interesting, I disassembled the old sensor, everything is visible as is) The upper spring simply broke
All the best.
Carrying out work on dismantling and repairing the sensor
In most cases, repairing a sensor does not take a significant amount of time and does not require the car owner to have either specific knowledge or the use of complex tools. You can do it yourself without going to a repair shop.
First you need to disconnect the negative terminal from the battery, and then move to the driver’s seat in the car. Move the front seats back as far as possible and remove the interior carpet. The sensor is located next to the brake pedal; to remove it, you will need to disconnect the clamp and the block with wires from its connector.
Carefully loosen the fastening nut and carefully unscrew the body of the part, then disassemble it. This element is a two-piece element, and both parts are held in place with latches.
There is a spring in the inside of the sensor, which is often what causes problems. Replacing a faulty spring with a new one, having the same number of turns and suitable dimensions, most often helps to eliminate the problem.
Having completed the repair, reassemble the element by performing the manipulations you performed to disassemble it in the opposite sequence, and then install it in its original place, and if necessary, adjust it. The part is tightened until the brake pedal goes down, after which it is turned 90 degrees clockwise and secured with a lock nut. As a result, with the brake pedal lowered, the switch rod will be in a recessed position, and when you press it, it will go beyond the boundaries of the switch body.
Next, start the engine and wait at least ten minutes; if the error does not appear, you have correctly identified the cause of the problem. If error P0504 appears again, adjust the sensor; if this error continues to appear, the part will need to be replaced.
Removing the clutch pedal position sensor Lada Granta
Lada Priora Sedan Priora white cloud 163 Logbook Starts and immediately stalls in cold weather
Tools:
- Medium flat screwdriver
Medium Phillips screwdriver
Parts and consumables:
Clutch pedal position sensor
Note:
Remove the clutch pedal position sensor to replace it.
The sensor is located in a hard-to-reach place under the instrument panel.
Location of the clutch pedal position sensor.
1. Remove holder 1 of the sensor wire block from hole 2 in the pedal assembly bracket (for clarity, shown on the removed pedal assembly).
2. By pressing the latch of the instrument panel wiring harness block, disconnect the wiring harness block from the sensor wiring block.
3. Using a screwdriver, remove the hook of the pressure lever spring from the hole in the sensor holder.
4. Using a Phillips screwdriver, unscrew the two self-tapping screws securing the sensor holder to the pedal assembly bracket, and remove the holder with the sensor assembly.
Note:
Removed clutch pedal position sensor.
5. Remove the sensor from the two holder rods.
6. Install the clutch pedal position sensor in reverse order.
The article is missing:
- Photo of the instrument
Photos of parts and consumables
Removal and replacement
- We remove the “negative” mark from the battery, this is necessary to ensure safety during work, since the work is carried out on the electrical part of the car.
- Next, in the cabin, move the driver's seat back all the way and remove the mat. We find the sensor under the steering column, press the connector latch and remove it.
- Then use two keys to unscrew the locking nuts and remove the DPT from the pedal assembly.
- We install the new sensor in the reverse order with the correct adjustment (0.5-1mm between the stop and the sensor body).
Brake pedal sensor Lada Kalina
Lada Priora Sedan constructor, assemble it yourself Logbook Mileage and clutch replacement
The Kalina brake pedal sensor is a technical device that is used to monitor the degree of impact on the brake pedal. Quite often, car owners of the VAZ line complain about breakdowns or incorrect adjustment settings of the product.
Fortunately, the process of adjusting or replacing a part is not very difficult if certain nuances are observed.
Performance diagnostics
Checking the functionality consists of: 1. Testing the product with a multimeter. 2. Disassembly and visual inspection of the internal components of the part.
3. Replacement sensor is not known to be good.
The first method involves alternately measuring the contacts of the dismantled sensor. The point is to check each contact individually and in pairs (second and third contact). This is quite convenient to do, since at the place where the contact chip is connected, all connectors are numbered.
The second method is used to identify faulty or deformed internal elements of the product (in most cases, damaged springs).
There should be no traces of oxidation or contamination. If there are any, clean them out.
The third method is quite simple and trivial. Install a new part to replace the one whose serviceability you doubt.
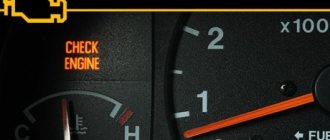
When the system is restored to normal operation, the malfunction indicator (check engine) should go out (if it does not disappear within 15 minutes, the error should be reset manually).
Signs of a faulty brake pedal sensor Lada Kalina
In order to understand that the Kalina brake pedal position sensor is the cause of the vehicle’s incorrect operation, pay attention to the following signs:
- presence of error “P-0504” on the dashboard;
- a significant decrease in power and engine responsiveness when pressing the gas pedal;
- increase in engine speed (short-term) when changing gears.
Main causes of sensor failure
In order to identify the reasons that interfere with the normal operation of the device, it is necessary to disassemble it and carry out a thorough inspection to identify deformations and damage. The following defects are most common:
- the internal (small) spring, which is located on the rod, shows signs of deformation or distortion;
- the contact terminals of the product have physical oxidation;
- backlash of the moving contact;
- Quite low quality of factory production (defective, flimsy internal elements of the device).
Adjusting the brake pedal sensor Kalina
If the sensor is in good condition, and incorrect operation of the internal combustion engine continues to bother you, try adjusting the product yourself
Please pay attention to the following features:
- The sensor must be screwed in clockwise until the brake pedal begins to move down. Then you will need to slightly unscrew the product and secure its position using the fastening nut.
- The result should be such that when there is no action on the pedal, the sensor rod is recessed into the housing, and when the pedal is applied, on the contrary, it is completely released from the housing.
- As for the working gap, it is adjusted using two nuts (one at the top, the other at the bottom). The adjustment is carried out using the upper nut, which is tightened, and the lower one, on the contrary, is unscrewed. The entire process is carried out until the button is completely recessed into the body when the brake pedal is applied. However, you should not overdo the adjustment; in other words, you should leave a small gap or travel margin (approximately 2 to 5 millimeters).
Removal and installation
Replacing the brake pedal sensor on Kalina is carried out using an adjustable wrench set to “19”. The sensor itself is located above the brake pedal under the steering column. Conventionally, the removal stages can be divided into 5 steps:
- Before starting electrical work, it is recommended to disconnect the negative wire (terminal) from the battery.
- Then you need to move into the car interior on the driver’s side. For ease of operation, it is advisable to move the driver's seat in the opposite direction from the dashboard.
- Find the location of the sensor. Find a contact chip with wires. Press and hold the 2 plastic fasteners located on both sides of the chip. Pull the connector out of the sensor connector.
- Take the wrench in your hands and loosen the fastening nut. After which the sensor can be unscrewed freely.
- The installation process is similar to the removal procedure, except that you will need to make adjustments (tuning), the process of which is described in detail in the previous section.
Causes of sensor malfunction and their symptoms
In most cases, the above error occurs because the sensor (frog) has not been adjusted properly. It is for this reason that the car owner notes the emergence of such problems as:
- instability of the engine: it starts poorly or stalls immediately;
- instability of speed.
The sensor combines two functions: it is both an element of the brake pedal position and a brake light switch. Most often, the malfunction is caused by the sensor misalignment already mentioned above, or by a broken spring. The problem that has arisen manifests itself by the “check” icon lighting up and error P0504 (implying a mismatch in the operation of this part).
So, we found out that error P0504 on Grants is caused by:
- malfunction of the part itself or its wiring;
- the element has not been adjusted properly;
- The ECM may need to be reprogrammed.
If problems occur, you can repair the sensor yourself by changing the spring, or change the element itself.
Grant's brake pedal sensor
Lada Kalina Sedan my first car Logbook Phase sensor
Problems with the brake pedal sensor are far from new, which, in turn, is the main cause of error P0504. Regardless of the mileage, the Granta brake pedal sensor causes almost every third owner of the Lada Granta to suffer.
The cost of the issue is 180 rubles, which is exactly how much a new sensor costs. If the car is under warranty, the replacement is free. Why exactly 180 rubles, and not a free replacement with entry into the car’s service book? In all cases, the waiting period for spare parts is at least 4 days, since they are never available (the bitter experience of Granta owners).
The frightening frequency with which the Check on the car's BC lights up forces you to either go to a service station or carry out the adjustment yourself by tightening the adjusting bolts.
A clear manifestation of the problem can be considered those moments when the car does not start with the key fob and shows a problem in the brakes. A temporary, fairly short solution to the problem is to press the brake pedal hard, after which the car starts, but the error on the BC remains.
Incorrect operation of such a sensor makes using the car unsafe, as some owners note freezing of the BC, during which the Granta begins to twitch or even stalls in traffic.
Causes of a malfunctioning brake pedal sensor
You can understand the reasons only by looking at the essence of the problem, namely by disassembling this ill-fated sensor. The obstacle on this path is three fastening clips, which in no way allow it to be disassembled. After the “protective barrier” is overcome, you can see the true causes of error P0504, namely:
• the smaller spring located on the rod is deformed, unlike the larger one;
• sensor contacts are different in height;
• terminals made of bad steel;
• backlash of floating contact.
At the first stage of identifying a malfunction, you can use a “continuity test”. It is necessary to ring each contact individually, as well as in pairs (3rd and 2nd contacts). If we rely on the experience of predecessors, then the specified group of contacts rings in a dull tone, which indicates their malfunction. The remaining contacts beep loudly and loudly.
The operating principle of the brake pedal sensor is as follows:
• the rod is inside and presses the floating contact to the upper group - the pedal is released;
• the rod is inside and presses the floating contact to the lower group - the pedal is depressed.
The principle of operation is quite simple, but as practice shows, it does not work. The whole problem lies in a crooked floating contact that could get caught on the spring, as a result of which a signal was sent to the BC to apply the brake.
Solving the problem by replacing the brake pedal sensor: How to replace the brake pedal sensor?
To replace the Grant brake pedal sensor, you need to get to the pedal assembly bracket, on which the brake pedal sensor is located, directly above the pedal itself. A high-quality replacement is the key to long-term operation, so it is necessary:
• remove the wire from the negative terminal of the battery;
• press out the plastic fastener (you will need a screwdriver);
• remove the wiring block;
• turn the brake sensor clockwise;
• remove the sensor.
Installing a new sensor is performed in the reverse order, but before doing this, you need to depress the brake pedal and insert the new sensor into the mounting hole, then turn it counterclockwise until it clicks.
Solving the problem through the use of alternative spare parts
Since domestic spare parts do not save the situation, you can resort to using others, namely the brake light switch (FACET 7.1126) for Volkswagens. Such a switch is slightly more expensive than a Lada Granta brake pedal sensor, namely 560 rubles. The device is of a similar type and has:
• four contacts;
• threaded leg with a similar diameter of 12 mm.
The only thing you need to use FACET 7.1126 is a terminal adapter.
About the sensor
The DPT is a conventional “frog with two contacts” for making and breaking. There are no complex electrical circuits in its device.
One of the contacts, which works to close, when you press the brake pedal, lights up the brake lights, which in turn signal the cars behind to brake.
The second contact, which opens when the brake pedal is pressed, opens its contacts and thereby sends a signal to the ECU to remove the load from the engine. This is necessary to reduce the fuel supply during the braking period, that is, when driving at high speeds (above idle) and when you press the brake pedal, the car begins to stop, and at this time the sensor sends a signal to the ECU to reduce the fuel supply through the injectors to reduce the speed and emissions of exhaust gases into the atmosphere.
The sensor is located on the pedal assembly under the steering column of the car; it is mounted on a plate with two nuts; they also carry out adjustment and control tightening.
The cost of a sensor in an auto parts store is up to 300 rubles.
How to change the clutch sensor on a Priora
Well, the widespread computerization of cars has reached such a unit as the clutch. No, the electronic unit does not yet control the process itself, but it already controls this process. To do this, a sensor is installed under the clutch pedal to monitor the progress of the clutch.
Operating principle of the electronic engine control system (ECM)
In a modern car, all process control, except for the rotation of the steering wheel, and even then, is entrusted to the computer, or Electronic Control Unit (ECU). It contains a program with many different tables.
In general, the ECU receives data about the state of the car, speed, revolutions, and activated mechanisms from a large number of sensors.
Based on the results of these observations, the ECU, using these tables, includes certain ignition modes, fuel supply and other executive functions.
The role of the clutch sensor
It would seem, what does the clutch have to do with it? And here's what it has to do with it. When the clutch engages, the most sensible thing to do is to reduce the engine speed. But not to idle, but according to the speed of the car. This is not always available to the driver, especially a beginner. And here the computer will come to the rescue. Reacting to the signal from the clutch sensor, it can independently adjust the engine speed.
Important! In addition, in accordance with the Priora speed sensor, the ECU can obtain information about the serviceability of the clutch. https://www.youtube.com/embed/cqgcTyUkMqg
Summarizing the above, we can say that the presence of a sensor on the clutch allows:
- saves fuel;
- make driving easier;
- monitor the serviceability of the coupling;
- increase its service life.
Therefore, its serviceability is an important factor in the Priora control system.
Design and location of the Priora clutch sensor
In principle, this is the simplest switch. In the position when the clutch is disengaged and the pedal is not pressed, the sensor circuit is open. If you press the clutch drive, the limit switch of the sensor closes and the signal “clutch is on” is sent to the ECU.
It is located on the clutch pedal mounting assembly, where the very tip of this pedal is located opposite the sensor end switch.
Symptoms of this part being faulty
Since this element is connected to the ECU, it reacts to its failure first of all. That is, it gives peculiar signals that are reflected on the instrument panel and are noticeable in the behavior of the Priora when driving.
- turning on the “Check Anger” light;
- twitching when starting to move;
- a sharp drop or, conversely, an increase in speed when the clutch is engaged.
There can be three malfunctions in total: a breakdown of the sensor itself, a break or short circuit in its circuit, and incorrect adjustment of the position of the limit switch on the pedal.
Attention! Only Prioras, which have an electronic throttle, are equipped with such a device. Cars with a regular throttle cable do not have one.
It is also available for all-wheel drive VAZ. It must be remembered that these are two types of sensors, and they are not interchangeable!
In general, the “Check” warning lamp lights up in cases where the ECU has not received a signal within 2 seconds when starting from a stop or during four shifts on the move without a signal. Accordingly, the signs mentioned above appear.
And only after that remove it. This is a simple procedure. The clutch sensor is attached with only two self-tapping bolts, and it is not difficult to remove it with a short, shaped screwdriver. Well, then, on the spot, decide whether to start going to retail outlets in search of a new unit, or try to restore the old part. Well, put it in its place.
After finishing work on the Priora, do not forget to reset the ECU error memory.
Performance diagnostics
Checking the functionality consists of: 1. Testing the product with a multimeter. 2. Disassembly and visual inspection of the internal components of the part. 3. Replacement sensor is not known to be good.
The first method involves alternately measuring the contacts of the dismantled sensor. The point is to check each contact individually and in pairs (second and third contact). This is quite convenient to do, since at the place where the contact chip is connected, all connectors are numbered.
The second method is used to identify faulty or deformed internal elements of the product (in most cases, damaged springs). Remove all internal elements and pay attention to their integrity and performance. In addition to the condition of the springs, pay attention to the metal contact plate. There should be no traces of oxidation or contamination. If there are any, clean them out.
The third method is quite simple and trivial. Install a new part to replace the one whose serviceability you doubt. Test the operation of the car by driving in various modes, when switching up and down gears. When the system is restored to normal operation, the malfunction indicator (check engine) should go out (if it does not disappear within 15 minutes, the error should be reset manually).
Lamps and wiring - causes of error 0504
And again about the components. If it were not for the reviews of Lada Grant owners, it would be difficult to accuse a working brake light of sabotage. But the fact remains a fact. The working spiral of a single-contact brake light lamp is stretched, and the antennae that hold it close with others. In this case, replacing the stop lamps will help get rid of error P0504.
Burnt contacts on the limit switch itself, poor contact on the lamp base, shorted wiring in the brake light power supply network - all these are possible causes of the error code and Check Engine message. This is easy to check. 0.12-0.05 Volts on the lead wires at the brake light , you need to look for a short circuit or oxidation on the boards or terminal blocks. There should absolutely be no voltage on the supply wires.