If you begin to notice rattling of the calipers on your car, then first of all you should pay attention to two things:
- On brake pad springs that may have weakened.
- On the caliper guide pins - they may have worn out due to lack of lubrication.
This article will consider the second option, when it is the wear of the guide pins that leads to similar problems. First of all, you should pay attention to the condition of the anthers. If they are torn or even cracked, they must be replaced with new ones, and the fingers themselves must be re-lubricated. But more on this below.
Necessary tool for inspecting calipers on VAZ 2110, 2111 and 2112:
- flat blade screwdriver;
- wrench for 13 and 17 mm;
- copper grease;
- lubricant for caliper guide pins;
- brake cleaner.
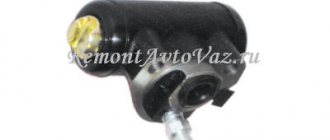
Procedure for replacing the front brake cylinder on a VAZ 2110-2112
Video instruction
The video was made using the example of a VAZ 2110 car and is equally suitable for both 2111 and 2112. The only way the car parts may differ externally is the brake discs: ventilated or not, as well as their sizes.
Photo report
First of all, we will need to remove the front wheel of the car, after first lifting the car with a jack. After this, using a hexagon, you need to unscrew the two bolts securing the caliper bracket.
Now you can remove the bracket and remove the pads:
Then you can rip off the brake hose with a wrench, but you don’t have to unscrew it completely.
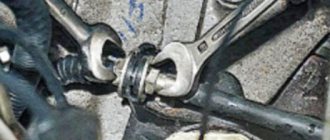
Next, we unscrew two more bolts securing the cylinder to the caliper, having previously bent the two locking plates under them using a screwdriver.
And we move the cylinder to the side, since nothing else holds it.
The hose can now be unscrewed completely by turning the brake cylinder itself several times counterclockwise.
To avoid excessive losses of brake fluid, it is advisable to fix the hose as high as possible, and always with the fitting facing up. You can also substitute a container if liquid suddenly leaks out.
A new front one costs about 500 rubles, so this price is quite acceptable. But the assembled caliper already costs about 2,000 rubles, which is already significant if you suddenly have to change the entire assembly. Installation of this part occurs in the reverse order.
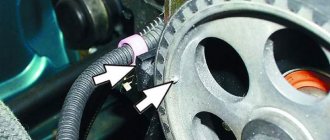
Replacing brake caliper guides for VAZ 2110, 2111, 2112
Lately, there has been a grinding noise when braking. An inspection of the brake system showed that the discs and pads were in good condition.
One of the reasons for grinding and rattling of calipers may be worn guides. Also, worn guides can lead to uneven wear of the pads (when one of the pads wears out faster than the other). This is exactly the wear that was on the old pads when they were last replaced.
Inspection of the guides showed that they are not jammed, but the lubricant has coked and thickened, and there is also noticeable play.
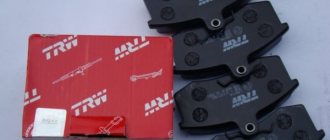
4 guides were purchased along with anthers, the price was 40 rubles per piece. And also a special lubricant for brake systems BOSCH SUPEFIT (5000000151) for 50 rubles. One bag is just enough for four guides.
It is important to know that not any high temperature grease will work for caliper guides. Do not use ceramic grease or copper-based grease.
These lubricants coke and cause the guides to jam. They can also be aggressive towards anthers. As it turned out later, BOSCH lubricant is not suitable for guides; the temperature range is only -25°C +130°C, which is naturally not enough for this unit. Although the manufacturer claims that this lubricant is universal and is exactly suitable for guides. I found supporting information in the official brochure about the use of lubricant.
We'll ride it for now, and we'll see.
Before replacing the guides, remove old grease and thoroughly wash the bracket. To remove the old grease I used 646 solvent.
Its disadvantage is that it is aggressive to the rubber from which the anthers are made, so after using the solvent, I washed the staples with a degreaser. New lubricant should be applied in a thin layer.
The boots on the new guides turned out to be complete crap, several tore at once, so I had to install the old ones, which turned out to be in good condition. By the way, when assembling, you should first put the boot on the bracket, and then on the guide. This makes it much easier and less likely to tear the boot.
After replacing the guides, the grinding noise when braking no longer bothers me.
https://www.drive2.ru/l/5112419/
next article:
Brake fluid
Replacing the caliper boot without removing the piston
Any brake fluid that is used in automotive systems absorbs moisture very well. It is hygroscopic, therefore it oxidizes the piston mechanism from the inside, which leads to failure of structural elements. This makes the piston stroke more difficult and the brake pads wear unevenly.
The front wheels may become jammed. For these reasons, it is necessary to replace the brake fluid. Its service life is about 90,000 km, but not more than two years. These solutions contain many useful additives that improve cooling and increase braking efficiency.
But over time, under the influence of high temperatures and pressure, these additives evaporate. And the consistency of the brake fluid becomes more like water, and this reduces the efficiency of the system.
Do-it-yourself dismantling of the caliper on a VAZ-2110
The very simple design of the product and the triviality of the process of dismantling it allow even a novice motorist to carry out repairs and maintenance. If you carefully follow the recommendations below, you are unlikely to encounter difficulties at any stage of the process. You will save a lot of money spent on a trip to a service station, and a considerable amount of time, because the service time is comparable to the time required to travel to the workshop.
Dismantling VAZ caliper
The sequence for dismantling the product is as follows:
- The first step is to jack up the car and remove the wheel. To be on the safe side, it can then be placed under the bottom of the car in case the jack fails;
- On a VAZ 2112, the caliper is attached to the bracket using two M17 bolts, which you should unscrew. Penetrating lubricant may be needed to strip the bolts;
- If you need to replace the VAZ caliper or carry out a comprehensive repair, unscrew the product from the brake hose. You seal the hose tip and you can begin further disassembling the product.
Main causes of malfunction
The VAZ 2110 caliper is structurally an element that holds the brake pads and is responsible for the degree of their pressure on the brake discs. It is also responsible for uniform wear of the brake pads and guarantees the driver reliable braking in extreme situations.
Thus, the importance of the caliper in the operation of the car is difficult to overestimate
If by this time you have a completely reasonable question, what can happen to the caliper on a VAZ 2110 (2112), we will be happy to answer you. The main cause of malfunctions is “acidification” of the moving elements, coating them with an oxide film, clogging due to the destruction of protective boots or the use of improper lubricant, namely:
- acidification of the main piston mechanism;
- acidification of guides.
Piston mechanism and caliper guides VAZ 2110
A clear sign of problems that the caliper can cause on VAZ cars is uneven wear of the brake pads and an increased braking distance. In this case, the VAZ pads must be changed, and the caliper mechanism itself must be subjected to comprehensive diagnostics:
- check the condition of the piston, its degree of freedom, the presence of moisture, metal oxide, oxide formations and build-ups, the condition of the protective boots;
- Similarly, check the condition of the guides, make sure that there are no uncharacteristic scuffs, abrasions or deformations of the rod on the surface.
We must also not forget about regularly replacing the brake fluid in the system. This should be done approximately every 40 thousand km. mileage of VAZ-2110.
Since brake fluid is hygroscopic, it easily absorbs moisture, thereby oxidizing the piston mechanism and causing it to fail. The piston stroke becomes difficult and uneven wear of the brake pads and wheel wedge occurs.
Diagnostics
To check the front brake caliper of the VAZ-2110, you will need to perform the following steps:
- Assess the condition of the metal piston and the ease of its movement inside the cylinder.
- Check for metal oxidation, oxide formations or build-ups, or moisture on the elements.
- Assess the condition of all rubber boots.
- Check the condition of the VAZ-2110 caliper guides. You must make sure that there is no abrasion, deformation or scuffing on their surface.
Any damage to the caliper body and its and other elements should alert the driver. In this case, it is necessary to change the mechanism.
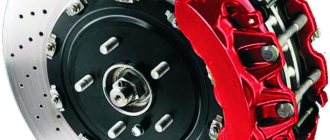
Installation of calipers from Volga on VAZ 2110
| There are never too many 'brakes', so many are trying to improve their efficiency by replacing the original brake discs and pads with alternative, imported ones. There are also more advanced modifications to the brakes, for example, installing GAZ 3110 brakes on a VAZ 2110. |
Brakes GAZ 3110 and VAZ 2110, what is the difference?
The negative aspect of switching to more massive calipers from the Volga is in weight. For example, the weight of a VAZ caliper with pads is 3.2 kg, and the weight of a Volga caliper with pads and adapter is 5 kg. That is, by replacing the standard 'tens' calipers with Volgov calipers, we increase the amount of unsprung mass of the car.
What does it mean? The smaller this value is, the less impact driving on uneven roads has on the smoothness of the ride. In other words, the heavier the body relative to the wheel, the faster the wheel will return to its permanent contact point after leaving the road. Therefore, designers of modern cars strive to reduce the amount of unsprung mass as much as possible.
The positive aspect of the Volga brakes is that the large pad area allows for better heat dissipation. Car enthusiasts also note their better efficiency compared to standard VAZ 2110 brakes.
Adapter for GAZ 3110 caliper for VAZ with front-wheel drive
Drawing of an adapter for the Volga caliper for VAZ 2108/2110/1118/2170 (AutoCAD format)
In the archive there is an adapter for brake discs R14 and R15, archive password: lada2111rf
Gas 3110 from storage. Automobile equipment surplus, used sale.nelikvidi.com
Installation of calipers from GAZ 3110 to VAZ 2110 (R15)
You will need: Volga calipers along with pads, an adapter for Volga calipers on a front-wheel drive VAZ (2 pcs), caliper hoses from a Chevrolet Niva (short).
Procedure:
Remove the caliper along with the bracket, and then disconnect the hose from the tube. Drill out the hole in the bracket on the body that holds the connection between the hose and the tube. This is done in order to thread the hose fitting. Connect one end of the hose to the tube. The other end is with a caliper.
Next, screw the adapter to the guide of the GAZ 3110 pads using M12x25 bolts with a pitch of 1.25 (it is advisable to use bolts with the letter 'X') and M12 bolts. Then screw the adapter with the guide to the steering knuckle using standard M10x25 bolts, pitch 1.25. Install the Volga pads, having previously cut off the wear sensor wires from them. Install the caliper. The bleeding fitting must be at the top, otherwise it is impossible to bleed the brakes. All that remains is to bleed the brakes, and here it is worth considering that with GAS calipers, more brake fluid is poured into the system.
Installation of calipers from GAZ 3110 to VAZ 2110 (R14)
In general, the installation is similar, but there are a number of points that are worth paying attention to: 1. Due to the fact that when installing R14 brake discs, the guide will move towards the steering knuckle, so we saw off the edges of the boot using a grinder
2. The adapter is used for R14 brake discs. Bolts should be used 5mm shorter, M10x20 pitch 1.25 with an M10 lock washer. Otherwise, the bolt will press the adapter against the brake disc and the disc will not turn.
3. The Volga’s caliper is larger than that of the “ten”, so you have to install a disc with a different offset, in this case the ET35 offset. An 11mm spacer for the wheel rim is also used. When installing disks, the seat may cling to the disk guide; in this case, you can grind the guide or use a spacer of the required thickness.
Conclusion
The negative point, which is the large weight, in practice does not affect the behavior of the machine. And the performance of brakes with GAZ calipers is significantly better.
By the way, this is not the only way to tune the brakes; rear disc brakes are very popular, as well as simply replacing brake discs from R14 to R15.
VAZ-2110 caliper maintenance and repairs
It is mandatory to service the VAZ caliper after each replacement of brake pads, as well as in the event of a forced inspection due to its malfunction, for which it is first necessary to check the condition of all rubber elements, shock absorbers and anthers. It is also imperative to replace the grease for the caliper guides. You need a good synthetic based silicone lubricant that can withstand high temperatures.
To remove the piston from its seat, it is necessary to create the appropriate force using an air compressor (pistons are repaired one at a time, the stroke of the second is blocked, for example, by a wooden block). With the same success, when removing the product from the car, you can press the brake pedal without disconnecting the VAZ 2112 caliper from the brake hose. It is advisable to use a rubber adapter in order to absorb the sharp impact of the freely moving piston and its “shot”.
VAZ 2110 caliper repair
The piston is pushed back using a special clamp. In this case, the boot should be bent to compensate for excess air pressure. The hole for the piston and for the guides are cleaned and washed with carburetor cleaning fluid, all gaskets, boots and seats are also thoroughly lubricated.
Replacing the caliper repair kit
The most difficult and responsible operation when repairing calipers is replacing the caliper repair kit. During this operation, all seals and rubber parts of the caliper are changed.
To begin with, you must purchase a repair kit for the caliper of your car. To do this, in a car store you will have to tell the seller the make and model of your car, the year of its manufacture and other information that the seller asks.
To carry out repairs using a repair kit, you first need to dismantle the caliper. After that, transfer it to the workbench and completely disassemble it. A very important note - the place where the caliper is disassembled must be as clean as possible. If even the smallest grain of sand gets inside the caliper, it can quickly fail.
When disassembling the caliper, it is recommended to write down or photograph the places and methods of installing certain parts.
In most cases, you will need to replace the following rubber products:
- Brake cylinder seal;
- Brake piston boot;
- Guide boots;
- Guide seals;
- O-ring of the bleeder fitting.
If there is deep corrosion on the working surface of the brake piston (with the formation of cavities), then the piston must also be replaced.
Reassemble the caliper in the reverse order of disassembly. After this, the caliper must be installed on the car, the guides lubricated and the brakes bled. As you already know, you will need an assistant or a special device for this.
VAZ 2110 | Front brake caliper
9.4. Front brake caliper
| GENERAL INFORMATION |
| 1. Dust cover 2. Pad holder 3. Anti-noise pad 4. Inner brake pad (with wear indicator) 5. Pad mounting plates 6. Outer brake pad 7. Anti-noise pad 8. Anti-noise spring 9. Pad mounting plates | 10. Mounting ring 11. Cylinder boot 12. Piston 13. Seal 14. Brake caliper 15. Gasket 16. Air release valve 17. Bushing 18. Pin |
| 1. Brake disc 2. Pad holder 3. Brake pad wear indicator 4. Mounting plates 5. Outer brake pad 6. Internal anti-noise pad 7. Anti-noise pad 8. Brake pad mounting plates 9. Inner brake pad 10. Anti-noise pad | 11. Cylinder boot 12. Retaining ring 13. Seal 14. Piston 15. Bushing 16. Dust cover 17. Gasket 18. Air release valve 19. Brake caliper 20. Dust cover |
Dust resulting from brake pad wear contains asbestos, which is hazardous to health. Do not blow it out with compressed air or inhale it.
If it is necessary to rebuild the caliper (usually due to a brake fluid leak), first find out the price of spare parts or the cost of an already rebuilt or new caliper. Before you start rebuilding, purchase a repair kit. Always repair both calipers together - never repair just one of them.
| EXECUTION ORDER |
| 1. Unscrew the wheel nuts, lift the front of the car and place it on supports. Remove the wheel. |
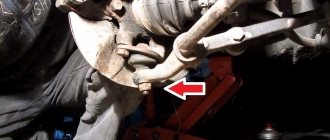
| 2. Unscrew the bolt (indicated by the lower arrow) and disconnect the brake hose (indicated by the upper arrow) from the caliper. |
| 3. Using a piece of rubber hose of the appropriate diameter, cover the hole in the hose to prevent dirt or moisture from getting inside and to reduce the loss of brake fluid. |
| 4. Following the instructions given in subsection 9.3, remove the caliper (removing the caliper is part of the operation to replace the brake pads). |
Bulkhead
| EXECUTION ORDER |
| 1. To rebuild the caliper, remove the boot mounting ring and boot. Before removing the piston, place a block of wood or some rags between the piston and the caliper to protect against damage during removal. |
| 2. To remove the piston from the caliper, connect an air hose to the brake hose connection to the caliper and press out the piston using compressed air. Do not apply too much pressure, just enough to push the piston slightly out of the cylinder. |
| Warning Be careful that your fingers are not between the caliper and the piston, as the piston may press them. |
| 3. Inspect the surface of the piston and the walls of the caliper cylinder. If they are scratched or show signs of corrosion or wear, replace the caliper along with the piston. |
| 4. If these items are in good condition, remove the piston seal from the caliper cylinder using a wooden or plastic tool. Metal tools may damage the surface of the cylinder. |
| 5. On the PD51 caliper, press the bushing out of the caliper and remove the dust covers on both sides. |
| 6. Clean all components using brake cleaning fluid. |
| 7. To assemble the caliper, you need to purchase a repair kit suitable for your car model. |
| 8. Dip the new piston seal and piston into brake fluid and install them into the caliper cylinder. Do not force the piston into the cylinder, check that it is installed correctly and push it firmly into the cylinder (do not use too much force). |
| 9. Install a new piston dust cover and mounting ring. |
| 10. Lubricate the bushings with silicone grease (included in the repair kit) and insert them into the caliper holes. Install dust covers. |
Installation
| EXECUTION ORDER |
| 1. Installation of the caliper is carried out in the reverse order of removal. Be sure to replace the copper sealing washers (gaskets) at the brake hose connection (new washers are usually included in the repair kit). |
| 2. Bleed the brake system circuit, following the instructions (see subsection 9.12). Check that the brake hose connections are not leaking. Check the operation of the brakes before normal operation of the vehicle. |
Repair
The first rule: if you don’t want further troubles, especially when one of the wheels jams, never repair only one caliper, always both together!
repairing a stuck caliper
To sort through, repair or replace individual parts, and possibly completely change the unit if it turns out that there is nothing left to repair, you need to follow the following algorithm:
Remove the ring securing the cover, and then the cover itself; To avoid damaging anything, place a piece of wood or a rag between the caliper and the piston, then remove the piston
Also watch your fingers - parts of the mechanism can press them; After removal, pay attention to the piston and cylinder. If you find any damage on them, then the entire assembly needs to be replaced; If everything is fine, using a wooden or possibly a plastic tool, remove the piston seal from the caliper cylinder; If you have a PD51 model, you need to squeeze out the bushing, remove the covers protecting from dust on both sides; All elements should be washed with a liquid intended specifically for cleaning brake mechanisms; You probably purchased a repair kit
From this, “push” a new seal onto the piston, then place it in the cylinder. This must be done without using brute force, otherwise the brake mechanism may subsequently jam; Install the piston dust cover - a new one, from the repair kit; The bushings must be lubricated with silicone grease, which is also included in the repair kit, then installed in the corresponding holes; Install the dust covers in their proper places; Before installing the caliper on the car, replace the copper gaskets on the hose connection.
Stopping support. Device and maintenance. Repair kit.
The front brakes can now be completely reassembled. A prerequisite after repair is to bleed the brakes.
All that remains is to check whether the wheels lock properly when you press the brake pedal, and whether the caliper is sticking. Everything is fine? So, you can hit the road.