You can, of course, order a replacement at a service station. But many motorists want to know how to do it themselves. Many car owners are interested in how to replace the windshield on a VAZ 2110, one of the most popular models.
Removing the windshield
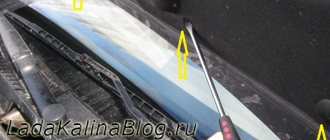
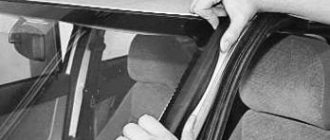
Having opened the engine compartment, remove the rubber windshield seal. To do this, you need to pull the molding by the edge. Removing the molding will make it possible to remove triangular-shaped rubber gaskets from under the glass.
Sawing is done as follows. The old hardened glue is pierced with a knife or some other sharp object. A string is carefully inserted into the resulting hole and pulled (into the cabin), at the ends of which handles are then attached.
At the bottom of the VAZ 2110 glass is cut under the hood. When performing this part of the operation, the necessary measures should be taken to avoid damaging the torpedo.
Removing old glass
Whatever you think, the biggest difficulty in removing old glass is the need to enlist the help of a second friend. Otherwise, the task is not particularly sophisticated and involves the following main steps:
- open the hood of the car, unscrew the top cover of the frill;
- tear off the sealing gaskets around the perimeter of the glass;
- We pierce the glue with a thin and sharp object and thread a thin steel string into the hole;
- From the interior and outside we place a handle on the edges of the string. This is where you will need the help of a friend.
Surely, you already realized that it is with the help of a string that the old “lobovukha” will be cut out. We carry out simple rhythmic movements and after just half an hour, in the place where the old windshield of the VAZ 2110 was located quite recently, only a large gaping opening should remain. The spectacle is far from aesthetically pleasing, but we don’t even think about stopping there; it’s time to get ready to install new glass.
Preparatory stage of work, a couple of useful tips for simple tuning
It will be useful to buy windshield seals from Priora (VAZ-2170-2172) for the following reasons:
- The set includes special drainage inserts along the edges of the windshield, which do a good job of protecting the side windows from raindrops falling on them;
- In addition, the windshield seals from the Priora are more accurate and the rubber does not stick out. This prevents the paint from rubbing off along the edges of the glass opening, which has a positive effect on the anti-corrosion properties of the VAZ-2110 body.
We prepare the product for installation. First of all, you should carefully clean the VAZ 2110 windshield along its edge with fine-grained sandpaper (the main thing, however, is not to overdo it). 350-400 grit sandpaper is best. The rough surface ensures deeper penetration and adhesion of the adhesive mass.
Special attention should be paid to the edge of the front niche of the VAZ-2110. It should be cleaned of debris, dust, dirt and old glue.
If in certain places there are obvious hints of corrosion, all of them must be ruthlessly eliminated by any possible means. The rust is cleaned off and the surface is coated, for example, with epoxy primer or enamel to prevent further oxidation. Next, you need to degrease the glass surface around the perimeter before applying glue to it.
Now is the time to take out the vaunted edging from the pre-purchased set of windshield seals from the VAZ-2170 and evaluate the depth of engineering thought of the plant’s designers with your own eyes. We will not twirl the drainage inserts in our hands for a long time, but use them for their intended purpose, placing them on the edges of our brand new glass. Now you can’t even say that they are not original on the VAZ-2110 - the product is worn exactly according to size.
Preparing the perimeter of the opening
First of all, you need to remove the old dried glue (if there is rust, be sure to remove it and prime the cleaned area). This should be done very carefully so as not to damage the paint on the machine body, using a sharply sharpened device (for example, a knife or spatula).
Having finished cutting off the bulk of the glue, the remaining layer is thoroughly degreased. At the same time, the edge of the new glass should be degreased. After the degreaser has dried for a short time, an activator is applied to the same places, which will subsequently provide improved glass adhesion.
Installation of new glass VAZ
When starting to install the windshield, you must always remember that when laying the panel on the frame, you must not disturb the fresh adhesive layer.
You should start by placing the windshield on the table with the outer side facing up. The rubber seal and molding are carefully placed on it. If these components were installed on old, dismantled glass, but remained in good technical condition, then they can be reused on a new panel. If the seal does not fit tightly to the edge of the windshield, it can be secured with tape.
In order for the installation to be of high quality and convenient for the performers, it is recommended to open the hood slightly and lower the windows on the front doors. Holding the bottom of the panel with one hand and sticking the other hand inside the cabin through the window opening, you should calmly control the entire process. The glass is brought with its lower part onto the lower edge of the frontal opening of the body and carefully lowered onto the frame with glued edges.
It should be remembered that the glue must dry to full condition within 12-15 hours. Only after this can you begin to operate the car.
Installing glass without using suction cups
If you did not buy special suction cups, then you can do it without them, but in this case the participation of an assistant is mandatory - he will direct the glass to the seat from the interior. This method of carrying out work is less convenient and simpler. There is no need to treat the glass itself with glue - apply the composition in a 1-centimeter layer to the frame. The rest of the DIY preparation is carried out according to the same principles and instructions.
First, guide the bottom edge of the glass into the frame and press it down. Then you need to gently press the top of it against the opening. After this, assemble the windshield components in reverse order. The car should not be touched for a day, as this time will be spent on drying the glue. During these 24 hours, you cannot slam doors or start the engine - any vibration may cause the glass to move.
Replacement features
All work on installing the windshield must be carried out in a closed workshop or garage. If dirt or dust gets into the adhesive joint, it will negatively affect its tightness.
Windshield replacement is carried out at temperatures of 15° C and above. At a lower temperature, the glue will harden more slowly and less efficiently.
The question of how to independently change the windshield on a VAZ-2112 is asked by many car owners. This is not surprising, since the service life of glass is affected by both its manufacturing quality and the quality of the roads. Many people can do this kind of work on their own if they have some experience and some skills.
Essential Tool for Windshield Replacement
An assistant and tools may be required to carry out the work:
- Set for gluing glass.
- Windshield.
- String with handles.
- Activator and primer.
- White Spirit.
It is not recommended to save on the materials and tools listed above, as this may cause the need to carry out such work again after some time. Glue plays a particularly important role.
Preparing for replacement
You should:
- Remove the wipers and frill.
- Remove the rubber seal from under the hood.
- Remove the frill. To do this, cut the windshield wiper hose. This must be done in an accessible place so that the adapter can be installed there after the work is completed.
- Take out the molding. You need to hook the edge of the glass at the bottom and pull it out.
To install new glass, you must initially properly dismantle the old one. To cut glass you need to use a string.
It is pushed into the hole between the glass and the body, then handles are attached to it and worked like a regular saw. The string should move along the edge of the glass.
After cutting, you should try to get the windshield out. To make cutting easier, you can heat the area where the glass is glued with a hairdryer.
Installation of new glass on a VAZ-2112
Before installing new glass, you must first prepare the surface for it. It should be cleaned of residual glue and other elements. Further:
- To ensure good adhesion to the frame, it is not recommended to cut off all the old glue. You should leave a small layer of it.
- All connection points must be cleaned.
- The opening is processed by the activator.
- New VAZ-2112 glass should also be cleaned of dust and degreased in the areas where it is glued.
- The windshield is placed on the device so that its outer part is at the top. Next, the molding is placed on the glass. If necessary, you can use tape to secure it.
- Along the edge of the molding where the activator will be applied, you need to walk with white spirit. To do this, you can use a rag soaked in solvent.
- The same steps should be done on the frame where the glass will be glued.
- The heated glue should be slowly applied to the prepared surface. The thickness of the layer should not be more than one centimeter.
- Secure the covered glass with masking tape.
In cases where there are no suction cups for picking up glass, glue should be applied to the frame itself. The steps should be rehearsed so that the glass can be installed in one go.
After installing the glass, you can start assembling the parts removed from the body (frills, windshield wipers). It must be done in reverse order.
How to replace the windshield on a VAZ 2170-VAZ 2172?
Note! Before buying new glass, look at the markings on your old windshield, they should match, also keep in mind that all glass comes with tints, if it is too dark (And this is a violation of traffic rules), then do not buy it, look for a lighter one, all the nuances before when purchasing, also take into account that if the windshield is of high quality and made by a good company (And not in the basement), then the marking (which is located in the corner) should not be erased if you rub it with a cloth soaked in alcohol, keep this in mind!
Removal: 1) First, lower the front windows of the car and then sit in the passenger compartment and remove their trim from the front pillars (see photo below), these trims are held in place by the plastic clips inside, to disconnect them, you will need to pry them off with a screwdriver, clips some will most likely break, replace all broken fasteners with new ones after disconnecting the facings.
2) Now you will need to remove the windshield trim from the windshield frame, it is secured with screws, but you will also have to remove the brushes, because they simply won’t allow the trim to be removed from the car otherwise (How to do this, read the article: “Replacing the cabin filter on a car") and by the way, if the cabin filter has not been changed for a long time, you can also replace it with a new one, so that after a very short time you do not have to climb under the trim again, it is better to do everything right away.
3) Next, remove all the rubber bands that interfere with the removal of the windshield, namely, remove the side trims (One of them is indicated by a red arrow), prying them off with a screwdriver, but for this you will have to open the door and also disconnect the door seals in the same place where the trims go, you will have to ensure that they do not interfere and you can easily get to the side trims with a screwdriver, and remove the seal itself that goes along the edges of the windshield (see small photo), you will need to clean it from dirt, and if it is damaged (torn, the rubber will no longer be elastic, and so on), then instead of it, when installing the windshield, install a new seal.
4) Next, remove two adjusting wedges, one is shown in photo 1 for clarity, and prying the windshield (Where is convenient for you), pierce it with an awl and insert a string into this hole (see photo 2) and you can start sawing the old glue, but just be be very careful not to damage the paintwork, otherwise the car will begin to rot; otherwise, to make sawing convenient, take a second person with you (sit in the cabin yourself) and attach screwdrivers to the ends of the cable (see photo 3) and move to the rear in Before (Like a saw) cut the glue in a circle and remove the windshield from the car.
Note! If you no longer need the glass and it will be disposed of later, then you can use another method, but you just need to do everything carefully, in general you will need to sit in the cabin, and an assistant should stand outside (For safety, lay a thick blanket on the hood so that it does not scratch), then lean two feet against the windshield (In different places) and with a sharp movement, push it out (Windshields are encased in films and therefore the glass will not crumble when you remove it in this way, but it can easily fall on the hood, but it all depends on the second assistant)!
conclusions
At this point the work can be considered completed. Now you will know how to install a windshield on a VAZ-2112.
"Kupisteklo" - the largest selection of rear, side and windshields for VAZ 2112 (Lada 2112) in Novosibirsk.
Come!
- Step one: call +7 (913) 374-44-96 and name the model and year of manufacture of the car.
- Step two: name the required glass (windshield, side, rear), agree on glass options.
- Step three: agree on a time to replace the glass. It will be convenient for us too.
What determines the cost of a windshield?
Model range Lada 2112

