Setting the Lada Vesta watch – Car repair and maintenance
It is impossible to imagine a modern car that does not have a computer. New cars are equipped with a Lada Vesta route or on-board computer.
The difference is that the MK has limited control functions, and the BC monitors the basic parameters of the car. Starting from the simplest ones, such as speed, and ending with monitoring and diagnostics of all engine systems.
Description of functions
A review of the Lada Vesta on-board computer shows which parameters are displayed on the display or front panel display. This makes the life of a Lada car enthusiast much easier. On Vesta, the standard on-board computer shows the following information, in addition to error codes:
- The magnitude of the vehicle network voltage;
- Cruising range on fuel in the gas tank;
- Current and average fuel consumption;
- Remaining fuel in the tank;
- Travel time along a specific route;
- Average speed;
- Watch;
- Total mileage;
- Controls the outside air temperature;
- Gives gear shift hints (with or without sound);
- On a Lada with cruise control, information about the installed parameters is displayed;
- If there is an AMT, the gear engaged or the auto - manual mode is displayed.
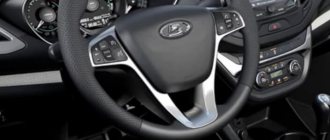
On-board computer Lada Vesta The on-board computer on the Lada Vesta is configured using two keys on the right steering column switch. Using the keys, entering the menu, you can control the readings of Vesta BC, displaying the necessary data on the control panel. Thus, the driver constantly has the opportunity to control the required parameters of Vesta.
Settings
After reading the operating instructions, operating the on-board computer will not seem difficult. In order to set or manage parameters, press the up key and hold for a while. We get to the settings menu, where you can:
- Set time;
- Reset previous mileage;
- Reset average flow and average speed.
Setting the clock
Some car owners have a question about how to set the clock. For this:
- Press the top key (hold it for about 3 seconds) to enter the editing mode.
- The previously set time is displayed on the screen.
- Again holding the top button for about 2 seconds.
- The first value, the clock, starts blinking. Use the arrows to set the required value.
- Hold up again and go to setting the minutes.
- After the time has been set, it is necessary to secure the readings. To do this, you again need to hold the up key for a long time.
The time setting is complete.
Additional functions
On-board computer The BC has a secret menu with which you can adjust the sound of the turn signal clicks. To do this, you need to hold down both buttons at the same time. We get to the additional menu.
We turn on the hazard warning lights and adjust the click sound using the up and down buttons. By briefly pressing both buttons, you can change the tone of the clicks.
Optional equipment
For Vesta that is not equipped with a BC, you can buy an additional on-board computer, and the service center will connect, configure and control it in the same way as the standard one.
All described functions are supported, and some models have a function for displaying error codes. The price of an on-board computer for Lada Vesta can range from 4,500 to 9,000 rubles. The cost depends on the manufacturer and the controlled functions. When surveying Lada owners, positive feedback was received about BC. We can conclude: it is quite convenient and displays the readings necessary for the driver.
The on-board computer has now become an integral attribute of a modern car. The promising domestic model Lada Vesta is also equipped with such a useful device.
Compared to a route controller, which usually has less advanced functionality, the computer is responsible for monitoring and adjusting a number of important options and parameters. These include not only common indicators, such as speed or consumption, but also diagnostic data about the presence of malfunctions. The main thing is to understand how to configure the device.
Source: https://avtomotiv-tomix.ru/vaz/nastrojka-chasov-lada-vesta.html
Deactivating daytime running lights
Daytime running lights on the Lada Vesta turn on automatically - you just need to turn the ignition switch to two extreme positions. DRLs were invented in order to increase traffic safety on the road, but we must admit that even, for example, at night they shine quite brightly and are sometimes completely inappropriate.
An example of this is an alarm system with auto start. If the owner activates this mode, then at night those around him will already know that the car’s engine is running - this increases the risk of vandalism or even theft. Therefore, some owners of domestic compact cars decided to turn off the DRLs.
This is done very simply. You just need to set the steering column lever to an intermediate position between 0 and the “dimensions” label. That's it, daytime running lights will not work for us when the ignition is activated.
Did you like the article? Subscribe to the channel to stay up to date with the most interesting materials
How to set up the on-board computer on the Lada Vesta
An on-board computer (OB) is installed on most modern cars. It can be standard (built in from the factory) or additional. The main task of the BC is to read information from sensors and the control unit and display it on the screen. Standard BCs are mainly built into the dashboard. Additional bookmakers are purchased separately and installed as a separate block.
The on-board computer makes life easier for motorists. It constantly keeps all the necessary information before the driver's eyes.
Of course, an on-board computer is not necessary; many drivers do just fine without it, but with it, driving becomes safer and more comfortable.
Basically, BCs show a lot of data: the total mileage of the car, the distance traveled since the last reset, average consumption, speed, etc. Bookmakers often show error codes and malfunctions.
On Vesta, the standard on-board computer does not show error codes. But it shows a lot of other useful information.
Here are all the readings of the standard BC: on-board voltage, remaining range on fuel in the tank, current fuel consumption, average fuel consumption, fuel consumed, travel time along the route, average speed along the route, hours, total mileage, outside air temperature, tips gear shifting (with or without sound). If the car is equipped with AMT, the gear engaged and the mode – auto or manual – are displayed. On a car with cruise control, there is an indication of the current cruise or speed limiter settings.
The on-board computer display starts when the ignition is turned on. The Vesta BC is controlled using two buttons on the end of the right steering column switch. Using them you can scroll through the BC readings, configure it, set the time and reset the readings.
At first, controlling Vesta's computer seems difficult. But you just have to figure it out and get used to it. Use the up and down keys to navigate between the readings in the top line of the second value:
Here the readings of the on-board network voltage, power reserve, current fuel consumption, average fuel consumption, fuel consumed per trip, travel time along the route, and average speed along the route change.
Simply by pressing the “up” key we change these values, by pressing “down” we change them in the reverse order. What we stop at showing is that the BC will always show in this window, even the next time the ignition is turned on.
That is, we expose ourselves to the information we need - and it will always be before our eyes.
If you briefly press both keys at the same time, the time readings change to the ambient temperature and the total mileage to the mileage along the route (since the last reset).
Now about the computer settings. By long pressing the “up” key, we get to the bookmaker’s settings menu. Here you can set the time, reset the route mileage, average consumption and average route speed.
Briefly press “up” to scroll between values. Long press "up" - reset the value or set the hours and minutes.
The first value is the mileage along the route.
The second (bottom) is time: hours and minutes.
And the third (above) is resetting the average speed, travel time and average consumption along the route.
If you scroll further, the gear shift assistant indication will turn on. You can turn on the sound indication in addition to the graphic one (an additional icon appears) or turn off the sound. By default, the sound is turned off.
Exit bookmaker settings – press the “down” key. You can exit at any stage of the settings. Here is the basic circuit for controlling the on-board computer and resetting mileage values, etc.
THIS IS INTERESTING: Rxx sensor VAZ 2110
There is also a secret menu of BC Vesta. There is no description of it at all in the user manual. In this menu you can configure the sound of the turn signal clicks. Press and hold both “up” and “down” keys. We get to the additional menu. We turn on the emergency lights in order to hear the sound, and customize it for ourselves.
Use the “up” or “down” keys to change the values, and the sound of the turns changes. By simultaneously briefly pressing both keys, we move to the next menu item. Maybe some people just don’t like the stock sounds. Someone may have hearing problems, then you can adjust the sound to suit you.
The values of P1 and d1 are the sound and tone of the first click of turns.
The values of P2 and d2 are the sound and tone of the second click of the turns.
If you hold down both keys for a long time on the “SET” inscription, the sound settings will be reset to the standard settings.
The main settings scheme in the bookmaker's secret menu:
That's it, Vesta's on-board computer is sorted out. Nothing complicated, just a matter of habit.
Next, we will consider the possibility of self-diagnosis of the Vesta dashboard. This is necessary if there are any malfunctions in the operation of the instrument panel (the arrow does not work, the indicator does not light up). Then you can carry out this diagnosis. In some cases, after self-diagnosis, everything miraculously begins to work.
Sometimes it doesn't help. But during self-diagnosis, you can see whether the arrow itself, the indicator, is working, or whether the problem lies further, in the wiring or in the sensors. You can also look at and find out what kind of indicators are present on the car. For example, does the cruise control indication work on cars without it?
Running self-diagnosis is very simple - you just need to hold down the “up” button on the right steering column switch. The same button that is used to navigate the on-board computer. Without releasing the button, turn on the car ignition.
After turning on the ignition (the button can be released), all indicators light up, and all pointer indicators move to the maximum reading and back several times. After this, the indicators go out, leaving those that always turn on when ignited.
Finally, a video showing control of the on-board computer on Vesta, a hidden menu, and self-diagnosis of the dashboard.
(2 ratings)
olade.ru
How to set the clock on Lada Vesta: photos and videos
Owners of a Lada Vesta car sometimes encounter difficulties using the on-board computer, as the software that monitors all the main functions of the car is proudly called. Using the BC, you can adjust the volume of the turn signal, find out the current fuel consumption, monitor the operation of the cruise control system, and even have a complete understanding of the voltage of the operating network.
To cope with this difficult task, it is enough to use the manual for regular use of the car, a copy of which is usually provided with the new Vesta.
Setting up the on-board computer on the Lada Vesta
We probably won’t find answers to all our questions there, since the menu is a service menu. It is necessary primarily for diagnostic specialists.
According to AvtoVAZ's plan, there is no need to provide the car owner with access to the functions of the Lada Vesta on-board computer. If the owner of the car mistakenly turns off the sound of the turn signal completely, then this mistake can be costly; in the event of an accident, it will be considered a breakdown.
Practice shows that many have independently figured out the hidden functions of the built-in software, adjusting the tone and volume when the turn indicators are triggered, and hazard alarm settings. The purpose of the review is not to unravel secrets that are inaccessible to the average car user. Our topic concerns the classical difficulty. What should I do if the current time is shown on the dashboard? How to fix it?
Introducing metrics display features
To select the control function of the parameter we need, we need to use a special joystick.
We are looking here!
It is located on the right side immediately under the steering wheel, attached to the steering column. This is the lever at the end of which our control panel is located. There are two arrows on it indicating the direction “up” and “down”, between them there are two rows of white dots, three in a line.
On-board computer functions.
If you briefly press the up or down pointer, the dashboard will sequentially display changes in various indicators: instantaneous, current fuel consumption, temperature, and the latest mileage indicators.
The display occurs on the right in the second row from the bottom of the main display. By briefly pressing the joystick in the middle with your thumb, you can switch the display in the bottom center line of the panel.
The readings of the ambient temperature, odometer and time can be changed sequentially in a circle.
Direct time setting
The time is set according to this scheme.
You need to enter edit mode. To do this, you need to press and hold the “up” arrow for about three seconds. At this moment, only the numbers “0.0 km” in the second line from the left of the display will start flashing on the screen. While in edit mode, you need to press the same arrow once. The clock indicator on the screen will blink, for example, “08:35”.
You will need to hold down the top key again for a few seconds to start changing the clock.
Only the first digit “0” from “08:35” will begin to pulsate. Now you can use the arrows to change the readings of tens, of which we only have two. To go to the hour units, hold down the “up” button again for a couple of seconds, after which “8” will begin to pulsate. Using the joystick we set the numbers we need from “0” to “9”.
Final nuances and completion of work
Using the same scheme, we change the values of tens of minutes and minutes.
The current time has been set, all that remains is to record it. To do this, it is important to correctly exit the editing mode without resetting the device readings again. You need to hold the arrow up not for a short time, but for a long time. Everything is ready, the time is set, the clock is set.
According to its principle, the procedure for setting the clock on the Lada Vesta is not very difficult. If you have basic skills in using “antediluvian” electronic watches from the end of the last century, then everything will work out great. You don’t have to turn to specialists, but set it up as needed with your own hands.
carfrance.ru
Lada Vesta. On-board computer settings. Bookmaker Settings - Large selection of ONLY interesting and cool videos from
1 year ago
Source: https://autoprivat.ru/remont_avto/kak_nastroit_bortovoj_kompyuter_na_lada_vesta.html
Lada Vesta on-board computer - functions and secrets
› Brains
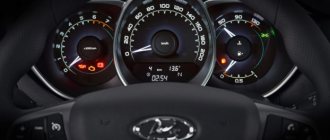
In a Lada Vesta car there is an on-board computer with a small screen located under the speedometer. This device increases engine efficiency, reduces fuel consumption, the concentration of harmful emissions, optimizes the operation of the gas distribution system, and synchronizes the interaction of units. Setting up the computer helps the Lada Vesta driver navigate the technical data/parameters. Read the article and find out more about the on-board computer.
THIS IS INTERESTING: Which fuse is responsible for the fuel pump
Parameters of the standard on-board computer - description of functions
BC Lada Vesta performs various functions - displays this data on the screen display.
The standard settings of the Lada 2180 computer reflect the indication of parameters on the monitor:• total mileage of the car in kilometers;• car mileage for one trip (km);• total travel time, including hours/minutes;• electronic clock;• average speed along the route (km /hour);• gear shift prompt;• gear number;• on-board network voltage indicators (volts);• current fuel consumption (l/100 km);• fuel costs per trip (l/100 km);• remaining fuel in terms of per kilometers (km);• speed limit indicator;• cruise control speed indicator;• outside air temperature.
The Lada Vesta instrument cluster has a built-in trip computer, with a number of useful functions not available in the BC of other competitive cars. For example, you can find out the voltage of the on-board network or the speed limiter.
Possible errors and methods for correcting them
When operating a car, sometimes malfunctions occur, information about which is displayed on the BC screen in the form of digital codes. The most common errors are:• 0217 – engine overheating;• 0230 – fuel pump failure;• 0301 – ignition malfunction;• 0351 – ignition coil damage;• 0654 – tachometer failure;• 1617 – bad road. The standard onboarder of the Lada 2180 not only shows failures operation of auto components, it is also susceptible to errors in operation.
These faults can be checked quite easily: if no information appears on the screen when the ignition is turned on, you need to check the connector between the ECU and the computer. Display of incorrect information appears when the protocol fails. To correct the error, you should reboot the bookmaker, in the menu that appears, select the protocol that matches the characteristics of Vesta and install it.
If more serious faults are detected, it is better to contact the warranty service.
Leaving a car in the open air and in the cold for a long time negatively affects the operation of the BC, so you can remove it for this time. It is also prohibited to operate the Lada Vesta on-board computer if water gets into the unit or if the electronic equipment is faulty.
Setting the clock on Lada Vesta
Vesta bookmaker is equipped with useful functions, such as a clock - a convenient function and always at hand. Let's learn how to configure them. To enter the clock setting mode, you need to press the top BC button (), and hold it for a while. Once we get into the required display mode of the on-board onborder, only numbers will remain that reflect the current time, and the right one will blink continuously.
Here you can set the clock. In the Lada Vesta BC, each of the time digits has a separate adjustment, and therefore does not depend on the neighboring one. To set the first digit, short presses of the buttons (,↓) of the on-board computer are used. After setting the first digit, you should move to the next one by long pressing the top BC button ().
In a similar way, you need to set each of the digits to the exact time, after which you can leave the clock setting mode.
Secret menu of the Lada Vesta on-board computer
Managing the secret menu of the vesta onboarder is not described in the manual. It exists to customize the clicks of the turn signals: you need to hold down both keys (,↓), then turn on the emergency lights to customize the sounds “to suit you.” Use the () or (↓) keys to change the values, and the sound of the turns changes.
When you simultaneously press the keys (,↓), you move to the next menu item:
• P1 and d1 values – setting the sound and tone of the first click; • P2 and d2 values – setting the sound and tone of the second click.
When you hold down the keys (,↓) on the “SET” bar for a long time, the sound settings are reset to standard.
The presence of an onboarder significantly simplifies the life of the car, providing assistance to the driver in difficult situations, signaling details of malfunctions. The data displayed on the device’s screen is essentially notes from the car’s logbook. Their analysis allows the driver to make objective decisions.
We are in contact: Ask a question - get an answer!
Lada Vesta on-board computer - menu functions and secrets Link to main publication
Source: https://vestaz.ru/lada-vesta-bortovoj-kompyuter-i-ego-funktsii/
Possible errors and methods for correcting them
During the operation of the vehicle, various malfunctions may occur. Information about breakdowns is displayed on the on-board computer screen in the form of digital error codes. The most common ones are:
- engine overheating, 0217;
- fuel pump does not work, 0230;
- incorrect ignition operation, 0301;
- ignition coil faulty, 0351;
- tachometer faulty, 0654;
- bad road, 1617.
In addition to malfunctions in the operation of individual vehicle components, errors may also occur in the BC itself. This is easy to check: if no information is displayed on the screen when the ignition is turned on, you should check the connector connecting the computer to the computer. Obviously incorrect information is displayed on the screen when the protocol fails. To correct the situation, you need to reboot the BC, select the protocol corresponding to the characteristics of the car in the menu and install it. In case of more serious damage, you must contact the warranty workshop. It should be borne in mind that when storing the car outdoors for a long time, especially in severe frost, it is necessary to remove the on-board computer. Also, you must not allow water to enter the BC unit or operate it with faulty electrical equipment.
The on-board computer greatly simplifies the operation of the car, helps the driver navigate difficult situations, warning about dangers and malfunctions. The information displayed on the device screen is essentially a vehicle logbook, the analysis of which allows the driver to make the necessary decisions.
Installing standard BCs on the Lada Vesta is significant progress, as they greatly facilitate management and minimize operating costs. In addition to its undeniable advantages, the standard device also has a number of disadvantages that can be easily eliminated by installing an additional on-board computer.
Lada Vesta setting the time on the on-board computer
It is impossible to imagine a modern car that does not have a computer. New cars are equipped with a Lada Vesta route or on-board computer.
The difference is that the MK has limited control functions, and the BC monitors the basic parameters of the car. Starting from the simplest ones, such as speed, and ending with monitoring and diagnostics of all engine systems.
New instrument panel
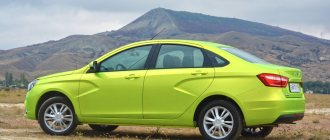
AvtoVAZ has improved the instrument panel combinations and took into account all the needs of Lada Vesta owners. This once again confirms the fact that the manufacturer cares about improving cars according to the wishes of customers.
Let's look at the distinctive features of the instrument panel for the new Lada Vesta.
- The instrument scale has acquired the original orange finish.
- There is a new daylight backlight for comfortable reading of readings on the screen.
- The numbers have become larger.
- Voice commands have become louder (a signal that the seat belts are not fastened, a signal about adjusting the direction indicators, a signal reminding of the external lights not turned off, a signal about a key forgotten in the ignition).
- New light signals have become available, for example, a sign showing tire pressure.
- Sound “accompaniment” appeared. Now the woman’s soft voice warns: “Fasten your seat belts” or “GPS system is active.”
- The GLONASS navigation satellite system appeared.
- Stepped display of coolant temperature.
Description of the standard on-board computer Lada Vesta
November 27, 2015 LadaOnline 63 328 The
Vesta instrument cluster has a built-in trip computer (MK), which has a number of useful functions that are not found in the on-board computers (BC) of many cars (including those of competitors). For example, you can find out the voltage of the on-board network or the speed limiter. Read the instructions for using the bookmaker.
Functions of BC Lada Vesta
- Odometer
- Trip odometer
- Time
- Travel time
- average speed
- Shift Prompt
- On-board voltage
- Current fuel consumption
- Average fuel consumption
- Fuel consumption per train
- Power reserve
- AMT operation and gear shift numbers
- Ambient temperature
- Speed limit indication
- Cruise control speed display
- Enable/disable audible gear shift guidance
On-board computer control algorithm
1. Selection of on-board computer functions (carried out using the keys on the right steering column switch).
2. Selecting trip meters and switching between clock and temperature.
3. Enter parameter setting mode, select parameter.
3.1. Setting the time.
When you exit the time setting mode, the seconds counter is reset to zero (reset without rounding). If there are no button presses within 60 seconds, the time setting mode will exit automatically.
4. Display mode of parameters of the “Cruise control” or “Speed limiter” functions.
In the mode of displaying the parameters of the “Cruise control” or “Speed limiter” functions, it is possible to switch the displayed function of the on-board computer (point 1) and the total and daily mileage counters (point 2), the indication of outside air temperature and time is not available, parameter setting modes (point 3 ) are not available.
General Notes:
- “short” – press for less than 1.5 seconds, triggered when released.
- “long” – press for more than 1.5 seconds, triggered by time.
- yellow color – the segment is blinking (square wave, 1 Hz).
- When resetting the route parameters (clause 3(d)), the following parameters are reset to zero: average fuel consumption, fuel consumed, travel time, average speed.
Bookmaker settings are also shown in the video:
To change the sound of the turn signals, you need to go to the secret menu (it does not work on the instrument cluster). To do this, press two BC buttons at the same time. More detailed instructions in the video:
Are you satisfied with the functions of the Lada Vesta on-board computer? Let us remind you that other operating instructions for this vehicle can be found in this section.
Keywords: Lada Vesta on-board computer | dashboard of Lada Vesta
8 5
Found an error? Select it and press Ctrl+Enter..
Similar materials
- Choosing the best on-board computer Lada Granta, Kalina, Priora
- Description of the standard on-board computer Lada Largus
- Decoding error codes Lada Kalina, Priora
Source: https://xn--80aal0a.xn--80asehdb/do-my-self/repair/repair-lada-vesta/808-opisanie-shtatnogo-bortovogo-kompyutera-lada-vesta.html
Secret settings of LADA VESTA:
Interesting information. Why isn't this in the car manual? There is also a special dashboard test - they could also indicate it in the article.
Lada Vesta was the first to receive the new Lada logo. Later, the modernized “rook” will appear on other models of the brand
On August 29, 2021, the head of AvtoVAZ, Nicolas More, said that the company abandoned plans to produce a hatchback.
September 17 I can't enter this menu.
Hello Andrey, try holding the button longer...
Andrey, have you gone to the menu? I have the same problem.
I have a Vesta classic with Conder, and I also don’t have these special settings (the car was purchased at the end of 2021.
When I was sorting out the on-board computer, it seemed like the turn signal sound settings menu turned on once, but now I can’t get into it. I held it for 5 seconds. two buttons and a minute, all to no avail. What could be the problem?
How to set up the on-board computer on Lada Vesta
The on-board computer has now become an integral attribute of a modern car. The promising domestic model Lada Vesta is also equipped with such a useful device.
Compared to a route controller, which usually has less advanced functionality, the computer is responsible for monitoring and adjusting a number of important options and parameters. These include not only common indicators, such as speed or consumption, but also diagnostic data about the presence of malfunctions. The main thing is to understand how to configure the device.
Vesta on-board computer functionality
The computer in Lada Vesta displays a certain set of parameters. Such information greatly facilitates the driver’s fate, since he has an understanding of the performance of some important electronic and mechanical systems of his car. Also, having information about error codes, you can quickly resort to measures to eliminate failures and malfunctions.
So, the computer displays the following indicators (without taking into account the codes):
To control the on-board controller in Vesta, you need to use two switches located on the steering column selector. By pressing the indicated keys we enter the menu, after which we select the required parameter, which will immediately begin to appear on the display. Through such simple switches, the driver will have operational information about the state of the systems.
Setting up the Lada Vesta on-board computer
Setup and management are easy. First, you should study the manual in detail. To be able to set or adjust parameters, press the up button and hold it for a while. The display will show the settings menu. Here the following functions are available to the driver:
- setting the correct time;
- resetting the previous mileage;
- reset the average speed and flow rate.
Setting up the on-board computer clock
This option raises questions among some Vesta owners, although the algorithm is quite clear.
For settings:
- Hold the top button pressed for about 3 seconds. The device will go to the editing menu.
- The screen displays the previously set time. Press the key again for 2 seconds.
- We observe the blinking of the first reading (hours).
- Using the arrows we achieve the required value.
- We repeat the procedure of pressing and holding until the menu switches to the minute selection mode. Set the required value again.
- We move on to storing the selected values by the computer. To do this, hold down the same key (up).
Additional information about Vesta's on-board computer
The on-board computer has an auxiliary menu that allows you to adjust the sound level when the turn signal is on. To adjust, press 2 buttons simultaneously and hold them until the device goes to the menu.
We activate the emergency signal button. The adjustment is made using the keys (up and down). Short presses change the tone of the click sound.
As you can see, setup and management are not at all complicated.
Installing a third-party computer
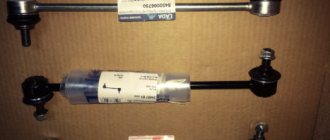
In the Lada Vesta model segment there are modifications that are not initially equipped with an on-board computer. Today this is not a problem, since a similar device is available for sale. The owner purchases it, and the station masters carry out the installation and connection. You can perform this activity independently, but this will require knowledge and experience.
Almost all models of on-board computers support the specified parameters, and some of them are capable of reading and displaying fault codes (errors).
Alternator belt Kalina 8 cl size
Towbar Kalina station wagon
Reverse gear does not engage on Kalina
Cost of a computer for Lada
The price of a computer for Lada Vesta can vary from 4.5 to 9 thousand rubles. This indicator is influenced not only by the eminence of the manufacturer, but also by the level of functionality of the device.