Automotive Dashboard - allows the driver to receive information about the status of vehicle components. The more complete this information is, the more comfortable it will be to drive the machine. The dashboard of the Lada Vesta car works efficiently - all icons are in plain view of the driver. The entire instrument cluster is harmoniously combined and distinguishes Vesta from its predecessors. The latest cars have a new instrument panel (control), it has undergone improvements and changes - you will find its article number below. The instrument panel of the Lada Vesta sometimes breaks down; in the article you will find a checklist of 11 instrument malfunctions. The price of a standard Vesta car panel is on average 6 times lower than that of analogues, for example ferrum gf-890LV
for Lada Vesta it costs from 32,000 rubles. Sometimes there is a need to remove the instrument panel in order, for example, to install an analogue one; in the article you will find disassembly instructions. On the first Vestas, the panel light turned on only when the headlights and low beams were on; later, dealers began flashing the Vesta panel with new firmware; of course, you can do this yourself. The factory version 1 of the dashboard firmware was numbered 026. Then version 038 came out, which was blinding at night, now there is a normal version 028, which lights up, less brightly, when the low beam is turned on. In the article you will find a checklist for flashing the device.
Updated dashboard - looks like this
ferrum for Vesta - looks like this
Designation of light bulbs and sensors
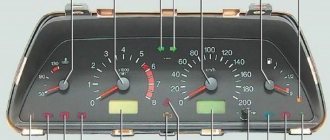
The tachometer is located on the left side of the instrument panel. Inside its scale, starting from the top center, there are eight indicators. If you list them from the top clockwise, it will look like this:
- pedal adjustment;
- seat belt indicator, which will light up if the driver or passenger is not fastened;
- airbag icon;
- backup indicator light, connected when installing additional devices and systems;
- brake failure icon;
- battery charge indicator;
- sign of engine malfunction;
- low oil pressure sign.
Behind the tachometer scale there are four indicators:
- turning on ABS;
- low tire pressure, receives data from tire sensors;
- gearbox malfunctions;
- electric power steering controller.
The speedometer is located in the center. Inside its scale, at the top, there are six indicators:
- trunk open icon;
- open hood indicator;
- alarm indicator;
- open door icon;
- cruise control indicator;
- speed limit icon.
Below the speedometer there is a liquid crystal display displaying the main functions and parameters. There are arrows to the right and left above the display that indicate the turn signals are on.
In the right block of the shield, at the top, there is a coolant temperature scale.
Important: It is prohibited to operate the vehicle if the temperature sensor is faulty.
It is also prohibited to drive a car with an overheated engine. When the 115 degree mark is exceeded, the indicator will remain constantly red and the driver will hear an intermittent beep. Below the scale is the immobilizer icon. Just below are two icons indicating whether the electronic stability control system is on/off. At the bottom of this part there is a fuel level scale in the tank. To the left of which there is an indicator for turning on the reserve fuel volume.
On the right, between these scales, from top to bottom are:
- indicator for turning on dimensions;
- low beam icon;
- front PTF turn-on indicator;
- rear PTF activation icon.
Floor mats and trunk of Lada Vesta
Products from the Dustershop77 range on the topic of the article:
| Name | Manufacturer | Price | Availability | Add to cart |
| DC709 | Gas pedal cover for Duster 2015 / Captur / Logan / Terrano / Vesta / Isk-Ray | Duster-Guard | 1000 / 800 rub. Discount: 700 rub. | >10 |
| DC985 | Clip for attaching the mat to standard fasteners | Original | 250 / 200 rub. Discount: 150 rub. | 3 |
| DC1198 | Floor part of fastening clip for interior mats | Analogue | 300 / 70 rub. Discount: 50 rub. | >10 |
| DC590-V053-1500403 | Carpet covers (6 pcs) Lada X-Ray | Pt GROUP | 2500 / 1900 rub. Discount: 1500 rub. | 6 |
| DC1901-99999210001282 | Fastening for interior mats Lada, Renault, Nissan 99999210001282 original 1 piece | Original | 150 / 100 rub. Discount: 70 rub. | >10 |
| DC494-1S.061.000 | Universal loading mat for trunk | Novline | 1900 / 1700 rub. Discount: 1500 rub. | 1 |
| DC1111 | Moisture-absorbing car mats with absorber, black, 60x40cm, 2 pcs. | 500 / 300 rub. Discount: 150 rub. | 6 | |
| V021-01400404 / LVE111703 | Tunnel pads for carpet (2 pcs) | Pt GROUP | 1500 / 1300 rub. Discount: 950 rub. | 2 |
| DC589-V054-1500404 | Tunnel pads for carpet (2 pcs) Lada X-Ray | Pt GROUP | 1900 / 1500 rub. Discount: 1000 rub. | 8 |
| V046 | Passenger carpet cover for Lada Vesta from 2021 | 1200 / 900 rub. Discount: 900 rub. | 1 | |
| DC1052 | Moisture-absorbing car mats 50x38cm (2 pcs) | 400 / 250 rub. Discount: 150 rub. | 4 | |
| DC1053 | Moisture-absorbing car mats 50x38cm and 25x38cm (4 pcs) | 500 / 300 rub. Discount: 200 rub. | 3 | |
| DC1624 | Driver's rubber mat with high side 2011-2015 2WD/4WD (Agatek) | Agatek | 1500 / 1300 rub. Discount: 1000 rub. | 2 |
| DC1036 | Interior moisture-absorbing mat 50×40cm (2 pcs) | 300 / 150 rub. Discount: 100 rub. | 2 | |
| V135 | Trunk mat for Lada Vesta Cross (for configuration without raised floor) | 1500 / 1100 rub. Discount: 1100 rub. | 1 | |
| DC1039 | Moisture-absorbing mat 40x45cm (2 pcs) | 300 / 200 rub. Discount: 150 rub. | >10 | |
| DC1623 | Driver's mat polyurethane with high side Duster 2011-2015 2WD (Element) | 1700 / 1400 rub. Discount: 1200 rub. | 1 | |
| V134 | Trunk mat Lada Vesta 2015-sedan | 1500 / 1300 rub. Discount: 1300 rub. | 1 | |
| DC882 | Carpet door sill covers Sandero 2014/Stepway 2014/ X-Ray | Duster-Guard | 2600 / 2000 rub. Discount: 1700 rub. | 4 |
| DC1708 | Tunnel linings for carpet Lada X-Ray 2015- | Duster-Guard | 2500 / 1700 rub. Discount: 1400 rub. | 2 |
| V045 | Driver's carpet trim for Lada Vesta from 2021 | 900 / 650 rub. Discount: 650 rub. | 0 | |
| V086 | Rear seat carpet covers | ArmAuto | 1000 / 900 rub. Discount: 900 rub. | 0 |
| V136 | Trunk mat for Lada Vesta Cross (for configuration with raised floor) | 1500 / 1300 rub. Discount: 1300 rub. | 0 | |
| V047 | Tunnel carpet overlay for Lada Vesta from 2021 | 900 / 650 rub. Discount: 650 rub. | 0 | |
| V133 | Floor mats for Lada Vesta (4 pcs) | Analogue | 2000 / 1700 rub. Discount: 1700 rub. | 0 |
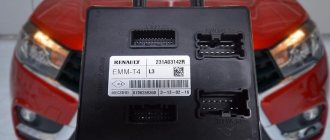
Standard dashboard and its part number, price
The new instrument panel from the manufacturer went on sale in 2017 under the original article number - 8450007022. During the development, all the requirements of car owners were taken into account, which made it more convenient than the model of the previous version. The font has been enlarged, daytime illumination of the scales has appeared, the backlight has been changed to orange, voice messages have been added for many indicator signals and their volume has increased, and the number of indicators has increased. Its price starts from 5000 rubles.
Prerequisites
The car constantly throws up problems that have to be solved either using independent knowledge, ingenuity and tips from experienced car owners, or by contacting a service center. In the latter case, the result will be more expensive, but not always of better quality.
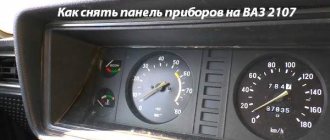
Even if you are not going to do this right now, it still doesn’t hurt to know how to properly disassemble the panel on a VAZ 2110, and even more so if you are one step away from this work.
Instrument panel VAZ 2110
Main 11 faults of the Lada Vesta instrument panel
While operating the car, problems may arise with the functioning of the instrument. An approximate list of main faults looks like this:
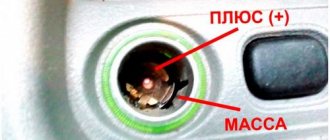
- Poor contact of the panel with the on-board network due to damage to the connector or its contacts;
- Failure of one or more sensors supplying information to the panel;
- Mechanical damage to the shield due to strong vibrations or strong impact;
- Lack of lighting due to burnt out light bulbs;
- Failure or malfunction of the main motherboard - if the motherboard fails, there is no point in removing or disassembling the instrument panel. You cannot repair this part yourself. It is better to entrust this matter to service station specialists;
- Burnt-out warning lights - There is a simple test to make sure the lights are burnt out. When you turn the ignition key, all devices start and all lamps light up. At this time, the operation of the lamps is checked. Particular attention should be paid to the red lamps, which indicate critical problems with the vehicle;
- The arrow indicators do not work - this may occur due to a failure of either the device or the sensor. Operation is checked with the engine running;
- The tachometer does not work - the reason is in the device itself;
- The speedometer does not work - the speed sensor has failed. This is indicated by the ABS lamp;
- The antifreeze temperature does not change - the reason is a malfunction of the temperature sensor;
- The fuel level is not displayed - the unit with the fuel pump is faulty.
Possible errors and methods for correcting them
During the operation of the vehicle, various malfunctions may occur. Information about breakdowns is displayed on the on-board computer screen in the form of digital error codes. The most common ones are:
- engine overheating, 0217;
- fuel pump does not work, 0230;
- incorrect ignition operation, 0301;
- ignition coil faulty, 0351;
- tachometer faulty, 0654;
- bad road, 1617.
In addition to malfunctions in the operation of individual vehicle components, errors may also occur in the BC itself. This is easy to check: if no information is displayed on the screen when the ignition is turned on, you should check the connector connecting the computer to the computer. Obviously incorrect information is displayed on the screen when the protocol fails. To correct the situation, you need to reboot the BC, select the protocol corresponding to the characteristics of the car in the menu and install it. In case of more serious damage, you must contact the warranty workshop. It should be borne in mind that when storing the car outdoors for a long time, especially in severe frost, it is necessary to remove the on-board computer. Also, you must not allow water to enter the BC unit or operate it with faulty electrical equipment.
Installing standard BCs on the Lada Vesta is significant progress, as they greatly facilitate management and minimize operating costs. In addition to its undeniable advantages, the standard device also has a number of disadvantages that can be easily eliminated by installing an additional on-board computer.
The Vesta instrument cluster has a built-in trip computer (MK), which has a number of useful functions that are not found in the on-board computers (BC) of many cars (including those of competitors). For example, you can find out the voltage of the on-board network or the speed limiter. Read the instructions for using the bookmaker.
How to remove the dashboard of Lada Vesta
Removing the panel will be necessary if you are sure that its elements are faulty, or for flashing. To do this, you will need a flat and figured screwdriver, and a hex key. This is done like this:
- Disconnect the power terminals from the battery to prevent short circuit;
- Unscrew two screws at the top;
- Pull the top of the shield towards you until the latches snap off;
- Unscrew the two screws that secure the devices. This must be done without touching the wires;
- Pull the part towards you and disconnect the connector with wires from it, remembering the pinout.
List of firmware for the instrument panel
You can send your Vesta instrument panel firmware via the feedback form, we will add it to the table. Help has already been provided by val9001tlt and RUPARADOX.
| Software version | Gearbox type | Transmission | SX format | BIN format | Note |
| 026 | s/o (8450007022) |
— KK and OS indication — Two modes of KP backlight. Bright illumination in DRL mode. In the dimensions mode, low/high beam, the backlight is slightly dimmed - Displays the actual temperature of the internal combustion engine (and not instantly)
Display of engine temperature is always 90° within the engine temperature range of 55° - 105°
Attention!
The firmware should be installed only on the instrument panel for which it is intended. That is, the firmware from the old panel will not work for the new one and vice versa. The VIN number in the firmware has been erased.
Determine which software version
on your instrument panel, you can follow these instructions
Lada Vesta dashboard firmware
Before installing the firmware, remember that it is quite possible that it will not work correctly. Therefore, it is better to do this from official dealers. If you decide to do it yourself, then you will need a Usbdm OSBDM V4.95 programmer and a computer or laptop.
Here are 12 step-by-step instructions for installing the firmware:
- Install the driver and firmware program on the PC from the disk that comes with the device.
- Remove the instrument panel, peel off the factory warranty seal and open the back cover.
- Open the device and set the switch to 3.3 volts.
- Connect the device to the panel and computer.
- Launch the HCS12 Programmer program on your PC and click on Detected.
- In the Target item, specify the folder in which the firmware is located. Check the Auto Reload box and click Detect Chip. In this case, the chip type is determined automatically.
- On the Security tab, check the Unsecure box.
- On the Advanced tab, check the Enable box.
- Go to the Device Operations section, on the Target tab, select Erase Selective. With this choice, mileage and immobilizer data are saved.
- Click on the Program Flash button to launch the firmware. This will take a few seconds.
- Refuse to connect the panel in the program.
- Now you can turn off the device and install the device in its place.
Important: For flashing, use firmware suitable for this version of the device. You cannot install an older version on a newer socket and vice versa to avoid malfunctions.
Functions and features of the Vesta panel device
The instrument cluster on the Lada Vesta is completely different from those used on the Priora, Grant and Kalina. It is now a completely redesigned multifunctional device.
The speedometer is located in the central well - this is the main element of any “tidy” in a production car. The scale implies acceleration to 200 km/h, although in fact the stated maximum speed of Vesta with the current engine is no more than 185 km/h. Next to the speedometer there is a small on-board computer display, on which the driver can see all the necessary information about the operation of the engine and other vehicle systems.
Inside the speedometer scale there are various indicators that inform the driver about different parameters: the hazard warning lights are on and the direction indicators are on, the brake pads are critically worn, the engine is malfunctioning and the engine oil level is low. On the left is the tachometer well, the scale of which is marked from 1 to 7 (1000-7000 rpm). The engine allows you to “spin” up to 5500 rpm - this way there is no harm to the motor. After this mark there is a red zone; prolonged operation of the power unit at such high speeds is not recommended. The tachometer also contains information indicators.
On the right side there is a well in which there are two indicators. One of them informs about the engine temperature, and the second – about the fuel level in the tank
In Grant, the temperature indicator was removed to reduce the cost of the car, but in the climatic conditions of Russia and the CIS countries, it is extremely important for the driver to know the current temperature of the engine oil in order to prevent possible overheating due to various malfunctions
In general, the instrument panel has an attractive design; the scales are backlit in green and orange with white numbers. The only drawback is the poor design of the arrow indicators. The intermediate divisions of the scales are not informative, and you need to get used to them. With a quick glance while moving, it will not be easy to read the readings.