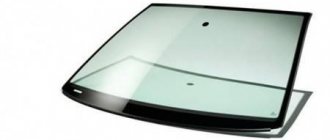
The windshield on any car has the same functions and purpose. The question of replacing it can always arise when chips or cracks make it impossible to operate the car, as well as when it has traces of deformation of a mechanical or natural nature.
The video shows the installation of a new windshield on a Lada Kalina:
We offer you a manual, after studying which you will be able to discover another new page on how to independently maintain your car.
Windshield replacement
It is not uncommon to replace a standard windshield with a similar one with heating
The work of replacing the windshield is similar to the replacement on most VAZ family cars (the only difference is in the adhesive base - approx.), so the question of whether to change the glass yourself or contact a car service center will have to be answered based on your own experience, or after a detailed study of the instructions.
Tool for the job
Before starting work, we need to prepare a workplace and all the necessary tools; they can be purchased either as a set or separately:
- New windshield.
- Liquid for degreasing surfaces.
- String.
- Knife for removing residual sealant.
- New windshield molding.
- Sealant for gluing glass.
- Masking tape for fixing the windshield.
Work should be carried out in a well-heated and ventilated room with an air temperature of 23-25 °C and a humidity of at least 50%. These recommendations must be followed so that the sealant dries quickly and its vapors disappear.
Preparation
Once all the tools are collected, some preparatory work needs to be done.
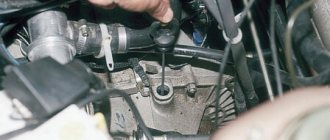
- We remove the wiper arms.
- We dismantle the air duct grille.
- We also remove the rear view mirror located in the cabin.
- If there is an alarm antenna or similar devices, they must also be removed.
- We snap off the trim on the front pillars in the cabin and the trim on the instrument panel.
- We remove the seal from the outer edge of the glass.
- We also remove the edging on the glass.
Thus, with very little effort, you can easily prepare a workplace for replacing the windshield.
Step-by-step procedure for replacing glass on Kalina
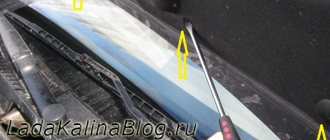
- By running a string along the very edge of the glass, we cut off part of the sealant.
With the help of an assistant, we cut the old sealant - Then we pass the string into the car interior, put special handles on the ends, and if they are missing, we wrap the ends on screwdrivers, and with the help of an assistant, we move around the entire perimeter of the glass in a reciprocating motion.
- When all the sealant is cut off, remove the glass from the seat.
- Using a knife, we remove all the old sealant; note that everything needs to be cut off, even the smallest particles.
We try to remove every last drop. - The next step is to treat the painted parts of the body with a special activator, and also degrease the entire perimeter of the glass.
The activator can be applied with a cotton swab or brush.
Please note that if there are traces of corrosion on the surface being treated, it must first be removed and treated with a rust converter. Only after this continue all work.
- We check the new windshield in place, making all the necessary marks for the best visual fixation in the future.
- We take a gun with sealant and apply it to the glass, moving no more than 7-10 mm from its edge.
The height and width of the adhesive layer should be about 8 mm. (Please note that the sealant layer must be continuous, excluding break points - approx.). The sealant layer must be both thick and continuous. - We place the new glass in its seat. We combine all the previously prepared marks and press the glass tightly. We make sure that the sealant lies very tightly over the entire surface.
- We fix the new glass with masking tape and ensure rest in this position for a period of at least 6 hours.
The glass is secured with masking tape.
We first glue the tape onto the glass, and then gradually stretch it onto the body, the length of each segment should be at least 30 centimeters.
Lada Kalina Universal Kesha › Logbook › Installation of heated glass part 1
ICE everyone! I apologize in advance for the dirt. Because The old windshield was already worn out by the wipers and had chips, so it was decided to replace it, but not with a regular one, but with heated glass. Installation + windshield cost me 8600 rubles. Lobovik Borsky. Immediately after replacing the windshield, I changed all the arms and wipers, because... The old leashes are already quite rusty.
Connection: We will need two 4-pin, “pass-through” relays 75.3777-10 (or -08″), one windshield heating relay from UAZ Patriot (in stores it is mainly sold under this name) 456.3747-02, a momentary button with an LED ,
4mm² wire (6 meters, it’s better to have some left than not enough), terminals with mustaches of 3 or 4 squares to repin the “pads” for the relay, if it is possible to get the same terminals as those installed in the mounting block, then you won’t need to buy at least 2 blocks for the relay, because the relays will fit in their standard places, colored wires 1.5/2 square, fuse 10A and 2x30A, fuse blocks
We disassemble the dashboard to the maximum (deflectors, central part, tidy)
And we lay a 4mm² wire inside, I’ll say right away, this is the Kama Sutra. (yellow in the diagram)
Look at this divine welding!)
I immediately eliminated the rattling noise that infuriated me, it turned out that the air duct pipes were knocking against each other, I don’t know what these holes in the metal bracket were originally intended for, but they were perfect for eliminating this problem!
Next, if you couldn’t find the mate for this fucking connector (I went to about 14 stores, I can’t find it anywhere)
Then we take 2 sets of male-female terminals for a 4 square wire and heat shrink for them.
And we crimp the ends of the wires that come from the glass, and the wires that were just laid under the dashboard. Next, we put heat shrink on the wire, connect the terminals and seat the insulation at the joint.
Next stage. We take the pads and colored wires. And we assemble the circuit according to the diagram,
I got it something like this:
But this is not the final version yet.
Most likely, I will replace the wires that go from 30A to the “+” battery with 4mm².
Don't forget about the wire (loop) under the lampshade.
It attaches perfectly to a stud (most likely “mass”, gray).
It seems that everything is simple, but taking into account running around the shops and searching for the necessary spare parts, it takes a lot of time and effort. That’s why this post is so short, I hope that the next one will be the last in this epic.
I apologize if the text seemed chaotic and not informative to you, if something is unclear, ask, I will be ready to answer questions. Criticism and advice are also welcome.
source
After the work
- After carrying out work to replace the windshield, it is forbidden to drive a car and sharply slam or open doors for the first 6-8 hours . Please note that the side windows on the front doors must be open so that when opening they do not create unnecessary pressure on the windshield.
- Any work related to impact on the windshield (fixing the rear view mirror, sensors and instruments - approx.) can be carried out only after 14 hours. The optimal strength of the adhesive layer is achieved only 3-5 days after the work (Given that during this entire period the temperature regime is maintained and the weather conditions are ideal - approx.), by that time the sealant crystallizes and becomes fully suitable for external factors .
- Checking the glass for leaks should be done at a car wash using a high-pressure apparatus, since a “spill” from the hose may not show a leak.
Windshield on Kalina
How to replace the windshield for Lada Kalina? This work is no different from replacing glass on other cars. It should generally be replaced when chips or cracks obstruct vision and make repair impossible. You also need to replace the glass if it has any mechanical or natural deformations.
How to do this - on your own or by contacting a car service? Everyone decides for themselves, but personal experience is always invaluable. Therefore, it is never too late to discover something new in car repair, for example, replacing Kalina glass.
Return to contents
Let's sum it up
Replacing a windshield is done after you have found out how much it costs, purchased and prepared the necessary tools. When the glass is fixed, the Lada Kalina car requires downtime for about 6 hours. During this time, polymerization of the sealing substance will occur. At first, it is recommended to move at low speed. Remember that the sealant is not able to harden at an outside temperature of approximately 0 degrees. Strive to ensure favorable temperature conditions for successful replacement activities.
Materials and tools
- the car glass itself;
- string (there is a set of string with a needle), you can use a knife;
- primer for preparation for sealant;
- a retractable construction knife to remove the remains of dried sealant;
- sealed glue with a gun specifically for gluing car windows;
- liquid for degreasing surfaces;
- masking or craft tape to secure the new windshield.
Glass replacement
You need to purchase a molding; it provides good fastening and does not allow noise and moisture to penetrate into the car interior. We buy the windshield along with it.
It is better to carry out the work in a ventilated area, since the chemicals that will have to be used have their effect on the body. You should work with gloves, preferably made of cotton, so as not to damage the skin.
Return to contents
Vertical seal RKI 19 and Grant thresholds
Review of lower door seals on Grant thresholds and do-it-yourself installation of vertical RKI19...
Welcome, Renault Logan car enthusiast to the blog AAuhadullin.ru!
Today we will install the self-adhesive seal RKI 19 for Chevrolet Niva and Kalina family cars. A product is manufactured to order from JSC SM-AvtoVAZ to seal the gap between the front and rear doors.
The kit with seals in the package contains a diagram and instructions for installation on the car.
But seals are also available for the bottom of doors. For example, a set of threshold seals "Grant", Joint Stock Company "Uralelastotekhnika", Yekaterinburg. The set consists of 4 seals for 4 doors.
Installation diagram for sill seal Lada Granta and Kalina
We will also try to install sill seals in the future operation of the car. Most likely, to install it on a LoganMachine you will have to drill holes in the doors for the clips of the seals themselves.
Grant's car has these holes drilled at the factory. You just need to remove the rubber plugs from the holes for the clips and install them in their place.
The door sill seals on Grant's car have color markings for their correct installation. For example, a red mark for right doors and yellow for left ones. I tried it on the back door of a Logan Car, all sizes fit perfectly, so you can use it if you wish.
I think you don’t have to drill the door, you just need to remove the clips and install a self-adhesive sill seal with double-sided tape.
Let's return to the RKI 19 seal. The product comes with installation instructions, where everything is written in detail step by step. The seals also have color dots - yellow on the left side and red on the right.
According to the instructions, work with the sealant is carried out in a room at least 15 degrees to ensure a reliable connection. In my case, now, it’s hot summer, the metal is hot, it’s the best time to stick the seals on. I was specially waiting for warm sunny days for installation; I’ve been carrying the kit in the trunk since winter. Back then, on cold days, this idea appeared in my head.
Before work, degrease the surface with a special liquid or inexpensive cologne. But you can also wipe it with alcohol or vodka, the main thing is to prepare the front of the work.
Apply degreaser to a clean rag and wipe the end of the door, starting from the top.
Everything is clearly visible in the video, watch:
We thoroughly wipe the end of the door and get to work.
The instructions say that it is recommended to use tweezers to remove the top protective film. I use scissors for work, which are in the tool bag of the motorist's kit.
We remove the outer film at the very beginning, hooking it with the end of the scissors, then you can remove it with your fingers. The seal is hooked onto the edge of the door on top; when sticking it, make sure it clings well and does not jump out.
We remove the protective tape little by little, while simultaneously pressing the seal to the edge of the door end. It's better not to remove the film all at once. Pressing firmly with your hand, we gradually move from the top edge down.
You must work efficiently and wisely, otherwise the seal will not hold.
Don’t forget about the end of the door, where the protrusion of the rubber insulation catches with its hook.
If you are very tired, you can take a smoke break for about five minutes and then continue pasting the opening...
At the end of the door we see that a piece of rubber remains; we need to cut it off at an angle with scissors. Then we check with our hands along the entire length, perhaps the elastic was not pressed enough, for example, at a bend.
After installation, we check the operation again. The insulation is installed evenly and the gap between the doors is completely closed, which is what needed to be done. The result was protection from dust in summer and from cold in winter. And from the outside it looks elegant, as if it emphasizes the car door opening with a bold line.
This RKI 19 kit can be found at the car market and in stores selling spare parts for Lada cars. If you don’t find it, order it from a familiar spare parts seller.
The installation on the other side is similar, I won’t show it, I don’t have enough free time, but I think I showed everything on video and explained it clearly.
This concludes editing the article. Goodbye.
Write comments, like. Car enthusiast, good luck!
Preparatory work
We have purchased everything we need, now we need to prepare the car for work.
- Remove the wiper arms.
- Remove the air duct grilles.
- Remove the interior rear view mirror.
- Remove the stripes of the drive pillars and the front trim of the instrument panel.
- With the front doors open on each side of the car, remove the outer door seals just above the windshield.
- Remove the packer (seal) from the outer boundary of the glass.
- Delete two adjustment clips.
A little effort and preparation will help the car enthusiast easily change the windshield on Kalina. If you go to a car dealership, such work will be quite expensive. Therefore, if you have free time and skills, you can replace the glass in your car yourself.
Return to contents
Removing the power windows
Let's start with the front mechanisms
Before proceeding with repairs, it is necessary to dismantle the defective device. But in order to remove the window regulator, you will first have to remove the door trim.
So, for work we need:
Now let's get down to business.
- The first step is to lift the glass all the way and secure it at the highest point with tape.
- Then, using a wrench, remove the two bolts that hold the glass in place (1 in the picture). Also, you need to unscrew the bolt of the inner handle of the lock.
- The next step is to disconnect the device motor and wires (2 in the figure).
- We unscrew all the nuts on the device (there are 11 of them in total) and remove the window regulator (2 in the figure).
The front window lifters have been removed, let's proceed to dismantling the rear ones (if the problem lies in them too).
Here we need:
- two keys, 10 and 8
- masking tape.
- Just as in the case of the front window lifters, raise the glass all the way and secure it with tape.
- Using a size 8 wrench, unscrew the three nuts securing the mechanism.
- Take a 10mm wrench and remove 2 bolts and 3 nuts.
- Now it will be easy to pull the device out through the hole at the bottom of the rear door.
Dismantling has been completed. Carefully examine the condition of the device; if it cannot be repaired, replace it with a new one.
Instructions for replacing the windshield on Kalina
How to remove glass correctly
- We take the string in our hands and pierce it with glue-sealant. One side of the string is inserted into the interior of the car, its ends are put on special handles, which are usually included in the kit. To make it easier to hold, the string can be wound around a screwdriver. Using a string or knife, cut off the old sealant over the entire area of the glass. An assistant is needed for this operation. The string needs to be worked inside and out. Carefully remove the glass.
- Using a construction knife, we get rid of the old sealant. Don't leave any pieces behind, clean everything out, even small particles. This way we prepare a place for new glass. The old molding is already damaged and will not be useful, so we install a new one.
- We try on the new windshield at the installation site. You can make the necessary notes using a marker or felt-tip pen, this will allow you to achieve maximum accuracy when installing the glass. Many car models already have marks for installing glass, which greatly facilitates the work.
- We degrease the glass groove with a special liquid. Be sure to read how to use it. Improper use can affect both health and future work. It should be noted that the liquid should not contain silicone. If there is corrosion where the glass is installed, it must be removed with an anti-corrosion agent until it is completely shiny.
- Prime the surface. Prime the area where the windshield is glued in and where it contacts the groove with a brush once. Remove excess sealant. You can use an activator to treat dried sealant.
- We take the sealant and an air gun and very carefully apply the glue in a uniform, continuous strip. This is the most important process in replacing glass.
- Attach the windshield. This should be done no later than 5 minutes after applying the glue. We monitor the coincidence with the marker marks. Very carefully, but firmly press the glass along the entire perimeter. The sealant is evenly distributed, ensuring contact between the glass and the groove. If some of the sealant comes out, do not rush to remove it, let it dry. Once dry, you can easily clean it off.
- Now you need to fix the glass. To do this you will need masking or stationery tape. Painting is better because it is easier to remove later. You can additionally use special attachments on the outside of the window opening for better glass fastening. We first glue the tape onto the glass, then tighten it a little and glue it to the body.
After completion of the work, the car must stand for at least 6 hours, this is necessary for polymerization. At first it is better to reduce your driving speed. You also need to remember that the sealant will not harden at an air temperature of about 0° and below, so it is important to ensure the appropriate temperature conditions in the room.
To complete the work you will need an assistant, as well as:
- sharpened knife;
- gun for applying glue;
— string for cutting glue-sealant glass;
— a heated room in which you can leave the car without moving while the glue dries;
— repair kit for gluing glass and a device for applying glue. The set consists of a tube with adhesive-sealant, an activator for degreasing the surface, a primer, a cloth for degreasing and a brush for applying the primer.
Since materials produced by different manufacturers may differ, you should read the instructions included with the repair kit before performing any work.
Kits (from different manufacturers) can be supplemented with spacers for glass and a string for cutting the adhesive seam. The string breaks very often. It can be purchased separately, but, as a rule, complete with handles.
As a last resort, you can use fishing line or welding wire with a diameter of 0.8 mm from a Kempi-type semi-automatic machine.
Execution Sequence
1. We prepare the car for work.
2. Remove the windshield wiper arms.
3. Remove the air intake grilles.
4. Remove the interior rear view mirror.
5. Remove the front pillar trim and the front instrument panel trim.
6. With the front doors open, remove the upper door seal on each side of the car to a level just above the windshield.
7. Remove the seal from the top edge of the windshield.
8. Using a screwdriver, remove the two adjustment clips.
9. Using wire cutters, bite off a piece of string about a meter long. We pierce the glue-sealant with a string and insert the end of the string into the cloak.
10. We put handles on the ends of the string.
In the absence of special handles, the string can be tied to the handles of screwdrivers or to wooden blocks.
11. Together with an assistant, use a string (like a two-handed saw) to cut the glue seam along the entire perimeter of the glass.
12. We remove the glass from the car and remove the rear view mirror bracket from it.
13. Using a sharp knife, carefully cut off the remaining adhesive seam from the body (the permissible residual seam thickness is no more than 2 mm).
14. Having laid the new glass on a flat surface, degrease the painted edges of the glass with an activator (from the repair kit).
15. Using a tampon, apply primer around the perimeter of the glass.
16. We repeat similar operations on the window opening of the body.
17. We place two spacers at the bottom of the windshield frame.
If the spacers have been replaced with new ones, make sure they are the same thickness as the old spacers. If necessary, cut off the excess with a knife.
18. We put a seal on the upper edge of the glass.
19. Apply glue-sealant evenly along the perimeter of the glass, retreating 8-10 mm from the edge. Apply the adhesive sealant with a roller 10-12 mm high.
It is allowed to apply adhesive sealant to the flange of the body window opening.
20. We lay it on the windshield frame so that the distance of the right and left edges to the flange on the frame posts is uniform.
21. We install wedges and press the glass with them so that the upper glass seal is pressed against the edge of the body roof.
22. Press the glass against the windshield frame.
23. Open the front door windows and leave the car motionless while the adhesive sealant dries (see instructions).
For 7-8 hours, avoid any activities associated with the risk of moving the windshield. It is advisable to increase the time before starting to operate the car to a day. The optimal strength of the adhesive layer occurs after 4-6 days (depending on weather conditions).
24. We install the parts removed during the preparatory operations. We glue the bracket to the new glass and install the rear view mirror on it.
BodyBody checkBody maintenanceRadiator grilleHoodHood lock rodFront bumperFront fenderFront fenderAir inlet grilleBattery shelfWindshieldExterior mirrorFront door trimFront door outside handleFront door lockWindow lifterDoor glassDoor stop Removing the front doorRear door trimRear window lifterRear door glassFor rear door mok Rear door Fuel filler flap Rear bumper Door gas stops Trunk door trim Door lock cylinder Trunk door lock Tailgate glass Trunk door Interior mirror Floor tunnel lining Console trim Panel devicesVentilation and heatingVentilation and heating filterAdditional resistorHeater radiatorEl. heater fan
The windshield on a Lada Kalina rarely needs to be replaced. But if there are defects on it that impair the visibility of the road, you cannot hesitate to replace it. In Russia, a windshield for a Lada Kalina can be purchased for 2400-7000 rubles .
Video
How to disassemble the side mirror on a VAZ 2110, see the following video:
- How to disassemble and repair a rear view mirror?
- What will be needed for disassembly
- How to remove a mirror
- How to disassemble a mirror, 3.2 methods
- Repair rules
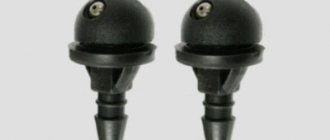
It often happens that the rear view mirror mount weakens and the mirror does not hold well, or in other words, falls off (you know, someone caught it while driving). It happens that the side mirror is broken or cracked - it needs to be replaced. The mirror angle adjustment drive will require repair.
Of course, contact a car service center, and they will attach a mirror to the area. If there is no service nearby, you will have to act independently
A rear-view mirror is important on the road: the driver can see the situation on the road in the viewing area behind the rear fenders and rear bumper. Mirrors on different brands of cars are different: internal mirror and side mirrors, regular, folding, electrically driven and others
In the process of removing and disassembling any mirror, you must be very careful not to destroy the mirror itself.
To disassemble the mirror, you need the following tool:
3.2 flat screwdrivers (they are used to unlatch the latches).
A narrow, long screwdriver and a piece of soft fabric (to be able to wrap the screwdriver).
A 10mm star wrench or a standard screwdriver with interchangeable bits.
How to remove the electric side mirror (assembled):
1. Remove the triangular trim from the front door.
3.5. Disconnect the mirror wiring connector. Do not damage the heated mirror wiring!
3. Holding the mirror, remove the 3 mounting screws.
4. Remove the mirror assembly.
5. We produce mirrors in reverse order.
Do-it-yourself mirror adjustment repair for Lada Kalina. Removing the mirror element
Removing the side rear view mirror with a mechanical drive:
1. Remove the mirror adjuster locking bracket.
3. Remove the mirror.
4. Installation is carried out in reverse order.
How to remove a rear view mirror in a car
A common option for fastening the rear view mirror to the windshield is 3.5 bolts. Such fasteners are found on Russian cars. To remove the interior mirror, follow these steps:
1. Remove the caps on the bolts (if any).
2.7. Holding the mirror, unscrew the mounting bolts.
3. Remove the mirror.
4. Wipe the area where the mirror meets the windshield with alcohol.
5. To install the mirror, you need to make sure that the mirror “sits” in the same place (the spot on the windshield).
On a foreign car, the rear view mirror is glued to the windshield. To remove the mirror from the windshield, we perform the following actions:
1. We remove with our hands what remains for our client to do are the plastic plugs.
3.5. Evenly pull the mirror up (towards the ceiling).
Apply force correctly (when you pull the mirror up). If you overdo it, the windshield may crack. If the mirror has already moved out of place (has come out of the runners of the bracket), and you are still pulling it with force, then there is an option to accidentally cut through the upholstery on the ceiling with a sharp edge. On some car models there is a special lock in the form of a button (you should press this address).
To replace a cracked mirror, you need to know how to disassemble a rearview mirror. Of course, disassemble only the removed mirror: it is both comfortable and harmless specifically for the mirror. Rearview mirror disassembly is performed using 2 methods:
Having previously removed the mirror from the door or windshield. This disassembly method is safer for the entire mirror unit.
Disassemble the mirror without removing it from its mounting location.
If you need to replace any element of the mirror unit, you will have to disassemble the rear view mirror. There is an option to completely disassemble the rear view mirror (the side mirror, in other words from the windshield), following the following diagram:
1. Warm up the mirror body with a hairdryer (in the heat, the glue where the mirror is held will soften, and it will be easier to pry it off).
3.2. Using a wooden spatula or a flat screwdriver wrapped in soft cloth, we try to separate the mirror itself from the body
For this purpose, carefully (up and down) pry up the mirror with a narrow tool
3. Now we disconnect the mirror heating wires (there are 4 of them).
What is this?
By windshield, motorists understand a transparent shield that is installed in a hole located in the front of the cab. Auto glass performs the function of protecting the driver and passengers from insects flying ahead, wind, dirt, dust, and precipitation.
You may need to purchase a protective windshield in the following cases:
- A crack appeared on the coating.
- The product was broken due to vandals.
- There are minor manufacturing defects.
- I would like to install a more reliable option.
The presence of chips, cracks, and holes in the windshield can impair the driver’s visibility of the roadway. This increases the likelihood of an accident on the road. The coating can be restored if it has a small scratch or chip. But if there is more significant damage, it must be replaced. High demands are placed on the windshield. Therefore, when purchasing, it is better to give preference to well-known brands that produce high-quality spare parts for cars.
Operation algorithm
Started:
The front door seal will need to be bent and pulled towards you very carefully; The decorated plastic casing must be removed from the front roof pillar. This is easy to do - just remove the 3 clips that secure the cover; Now you will need to find two screws securing the air vent grilles, as well as the trim in front of the glass. The screws are on both sides, and to unscrew them you will need a shaped screwdriver (preferably with a short handle); We turn them inside out and take out the ashtray; After that, putting your hand under the ashtray, use a screwdriver to pry off the two side plugs. They are located on both sides of the emergency system key;
This is done due to the fact that under the plugs there are two screws that are responsible for fixing the “beard” from below. We pull the lower part towards ourselves, but very carefully. You will also need to turn off all the chips, not forgetting where they were; We also remove the cover on the steering wheel and dashboard. The latter is held by 2 black self-tapping screws; We also unscrew the panel from above, using a 10-piece head. The panel is also secured with 7 or 9 screws, depending on the specific machine; At the windshield, the heater air duct sits on lock washers. It is better not to remove them, as the plastic rods will simply come off. For this reason, we tear them ourselves, and instead of them we use self-tapping screws during assembly; You don’t have to remove the steering wheel at all, although the panel comes out with some effort. But in order to reduce time, you can take such an adventure; The time has come to completely remove the torpedo, but we’re in no hurry yet. We carefully check all areas where the screws holding the panel could remain and unscrew them. We pay special attention to the side parts and niches; Carefully pull out the torpedo. It will come off easily if there is nothing holding it.
Let us note right away that it is easier to remove the panel through the passenger door. As for the method of draining the coolant and removing the stove, everything is done almost the same, except with some nuances.
After soundproofing has been completed, we install the panel in place. Don't forget to first pass the block with wires for the switch. We also insert the glove box light in advance using the appropriate holes.
Thus, the operation can be considered completed. Having learned how to remove a torpedo on Kalina, you can safely take on this work, even without the help of an assistant. On the other hand, an extra pair of hands certainly won't hurt.
Pricing factors
The choice of windshield for the Lada Kalina should be approached responsibly. Motorists who are accustomed to shopping wisely visit several points of sale and compare the characteristics and cost of the product. The price range for such spare parts is quite large. This is due to the influence of the following pricing factors:
- Type.
- Quality.
- Thickness.
- Strength.
- Manufacturer.
- Requires additional purchase of sealant.
- Originality.
- State.
- Place of purchase.
- The fame of the implementer.
- Purchase method.
- Delivery required.
How to install the seal?
Before installing door seals you will need:
- make sure that the appropriate temperature parameter is present, which should not be lower than 15 degrees Celsius;
- resort to heating the material for 3 minutes in order to give it the required elasticity;
- follow the algorithm, which implies an installation process in a top-down direction.
Now we move on to the following sequence of manipulations:
- carefully degrease the corresponding surface on the stern door where the sealing component will be installed and wait until it dries completely;
- Initially peel off the protective tape on one side to a length of 5-8 cm.
- At the top point of the door flange, we fix the upper edge of the seal;
- We gradually periodically peel off the indicated tape by an insignificant amount equal to 5-10 mm, and immediately apply the seal sticker at similar intervals (we proceed in this way to the bottom edge of the door).
Having completed the installation procedure with the seal, we make sure:
- in reliable fixation of the sealing component on the surface of the curved section of the door panel;
- there is a sufficient level of compression of the seal along the contour of the LADA Granta door;
- in the maximum density of the glued material in relation to the end of the flange.
Advantages of seals:
- providing improved sound insulation by reducing the level of noise penetrating into the interior of the LADA Granta;
- increasing the protective properties against dirt in the area of the rear door hinges and the lock area of the front door;
- the ability for additional sealing, which increases the thermal insulation properties of the interior.
No defects in the material were identified.
Varieties
The following types of auto glass are distinguished:
- Stalinite . This is single layer tempered glass. Has high mechanical strength and heat resistance. When destroyed, it breaks up into many small fragments with blunt edges. Therefore, this type of product can be called safe.
- Duplex . It is distinguished by the presence of a layer of transparent plastic. This gives the product strength and keeps fragments from breaking.
- Triplex . It consists of two sheets of glass connected by a layer of polyvinyl butyral film. The product is characterized by increased strength. When destroyed, the fragments remain glued to the film layer.
It is better to choose the latter option as a windshield for the Lada Kalina. It will cost more, but it guarantees a long service life, safety and durability.
Based on quality and price, the protective element is divided into three classes:
- Premium
- Business.
- Economy
The last option is the least expensive. Premium glass will be more expensive, but of better quality.
Depending on the marking there are glasses:
- With American type of marking.
- With Russian.
- With European.
Depending on the manufacturer, the spare part may be of the following brands:
- Pilkington.
- P.P.G.
- Saint Gobain Securit.
- AGC.
- C.S.G.
- Tamglass.
- Shatterprufe.
- Guardian.
- JAAN.
- KMK.
- Glass-Lux.
- Starglass.
- FYG.
- XYG.
Glass included in the package:
- Regular.
- With rain sensor.
- With seal.
- Heated.
There are products by color:
- Transparent.
- Tinted.
At the place of purchase there are glasses for the Lada Kalina:
- From the online store.
- From the car market.
- From a store that specializes in selling spare parts for Lada cars.
- Purchased based on an advertisement from car owners.
Viburnum instrument panel, sound insulation without removal
The main source of squeaks on the Kalina panel and indeed any other Russian car are panel elements (glove compartment, fuse box, panel trim, etc.), air ducts, wiring harnesses and connectors. You will not need to remove the dashboard assembly, but you will have to remove the attached elements. As a result, you should see something like this:
Sound insulation of Kalina's glove compartment takes place in two stages: 1) We glue all the places where the glove box comes into contact with the panel, using anti-creak. 2) We glue the insides of the glove compartment with bitoplast so that its contents do not rattle during the trip.
Sound insulation of Kalina interior plastic. We remove the central tunnel, plastic lining of the window pillars and side panels. Depending on the situation, we glue all the plastic with anti-creak or bitoplast
We pay special attention to clips
Sound insulation of the Kalina instrument panel. First you need to remove the panel. Then glue the mask and the instrument cluster itself with modelin.
Noise insulation of the central lining of the Kalina console
Here we pay attention to the wires and pads. We wrap the wires in anti-creaking material and, if possible, secure them with plastic clamps so that they do not dangle.
We fill all the connectors on the wire side with hot glue from a gun so that they don’t make noise. We also glue the edges and contact points with anti-squeak.
Sound insulation of the Kalina steering column casing
In addition to the wires, you should also pay attention to the ignition switch, which can make squeaks when it comes into contact with the plastic casing. Modelin tool, clamps
Sound insulation under the Kalina panel. Under the cover we secure all the wiring and cables with clamps. We cover the places of contact with anti-squeak or bitoplast. The whole procedure will take you no more than one day, as a result of which about 90% of the crickets will be “killed”.
Approximate prices
In Russia, you can buy a high-quality windshield for a Lada Kalina for approximately the same amount of money:
- KMK - about 2500 rubles .
- AvtoVAZ - from 2400 rubles .
- Glass-Lux - about 2300 rubles.
Approximate prices for different types of glass:
- Regular - from 2300 rubles .
- Tinted - from 2600 rubles .
- With a rain sensor - from 2600 rubles .
- Heated - from 3000 to 7000 rubles .
Types and prices of glass
Prices for auto glass for Kalina depend on several factors that influence the final cost of the product:
- model release period;
- car body type;
- glass producing country;
- presence of silk-screen printing;
- shade;
- presence/absence of a protective strip;
- Are there any extras installed on the glass? devices.
You can actually buy a windshield for Kalina for 2000-3000 rubles. The size of the rear window of the Kalina station wagon is similar to it, so the price is almost the same - about 3,000 rubles. Articles or Eurocodes are used only on original parts and are supplied by the manufacturer. You can track the quality of glass casting, transportation, and storage via the Internet.
With proper preparation and strict adherence to the work technique, it is quite possible to perform all the manipulations yourself. The savings will be approximately 3,000 rubles - the average cost of the procedure at a service station.
Step-by-step instruction
Replacing the windshield of a Lada Kalina comes down to several stages.
- Using a string, cut off the sealant and remove the part.
It is more convenient and faster to carry out the operation together. One side of the string is located in the Kalina's cabin, the other is outside. Using a reciprocating motion, the adhesive-sealant is cut off, then the part is removed.
After all procedures have been completed, the car should not be started for up to 6 hours.
Do-it-yourself installation is possible, especially with the help of a good assistant. With some nuances, replacing the rear window of a Lada Kalina occurs in a similar way.