Everything for the client, everything for the user. We installed the radio on the car, made the first settings, turned it off, but information messages continue to run on the display, the backlight is shining, and the radio is in a hurry to brag about all its abilities, except the ability to disable this Demo mode. Let's take an example of how to turn off a Pioneer radio yourself.
A modern Pioneer car radio is often a full-fledged multimedia center with a large number of options and various features, for a complete study of which you can create a separate course of lectures for teaching at a driving school. But sometimes half an hour is not enough to study the instruction manual. What to do if the leadership is completely lost? Or if you disabled the Demo mode on your Pioneer or JVC radio, but it starts up again.
Pioneer car radio
How to complete the demo
When supplied by the Pioneer manufacturer, the device is set to DEMO ON. Immediately after purchasing and connecting the car radio, it is important to understand and disable the demonstration, designed to advertise the device when selling. It is possible to use the Pioneer car radio in this state, but it does not seem comfortable, since when the device is turned off, the backlight does not go out and the creeping line does not disappear from the display.
Disabling Demo on the Pioneer radio is very simple:
- If long pressing on mute does not help, then you need to turn off the Pioneer radio, go to the engineering menu and long press the SRC (Source) key.
- In the settings, turn the wheel to reach the DEMO line.
- Switch from ON to OFF indication.
- Close the settings by pressing BAND.
Pioneer car radio engineering menu
Important: if the red wire (ACC) of the Pioneer radio is not connected to the contact that turns the ignition on/off, the car’s battery will be discharged.
Thus, after purchasing a modern Pioneer car radio, setting up the device is quite accessible for independent actions.
Demo mode disabled
Description of the Pioneer car radio
Modern Pioneer tape recorders came to us from the last century. Constantly improving, this technology meets the requirements of modern formats. Can read information from memory cards, USB phones, etc.
Radio Pioneer
The popularity of the device is not lost, but on the contrary, it is gaining strength. Since the quality is excellent, and installation is not difficult. Reliability, durability and excellent sound level continue to delight audio connoisseurs.
Demonstration on JVC car radio
The Japanese from JVC have a demo that turns on automatically if there is no sound playback for several minutes. But disabling the Demo is simple:
- Press the SEL (select) key and hold it until one of the setting items is displayed on the monitor.
- By going through the menu items, select the DEMO OFF item. On some models, select the DEMO ON item and press the button to switch to DEMO OFF.
JVC car radio
Please note: do not open the device case. There is a risk of exposure to laser radiation or damage to the player. There is nothing inside the case intended for user manipulation; servicing must be performed by a qualified technician.
Demonstration on a Sony car radio
To disable the Demo, which starts after turning off the Sony radio, you must follow the following sequence:
- Press and hold the Select key. The Setup Monitor appears.
- Turn the tuning dial until “DEMO” appears, then press the tuning dial.
- Turn the dial to select “DEMO-OFF” and press the dial again. The setup is complete.
- Press the (BACK) key. The monitor will return to normal music/video playback status.
It is important to know: if there is no ACC position in the ignition switch of the car, you need to make sure that the Auto Off mode is selected. When the car radio is turned off, its power supply will be automatically canceled after a while, which will protect the battery charge. If automatic cancellation (Auto Off) is not selected, then whenever the ignition is turned off, you must press and hold the (SOURCE/OFF) key until the monitor turns off.
By the way, many car enthusiasts complain about independently switching the player to another radio wave. The AF (alternative frequency) function is responsible for this. It is responsible for switching to a more powerful radio signal if the selected frequency, in the opinion of the device, is not strong enough.
It’s easy to disable it, for example, for a Pioneer DEH car radio, the procedure is as follows:
- Press the “TA” button and do not release it until the “AF” function turns on. The “AF” indicator will appear on the display.
- Press the “TA” button and do not release it until the “AF” function turns off.
In players of other brands, disabling the demonstration is carried out in a similar way:
- go to the engineering menu;
- by searching through the parameters, find the line DEMO and change OFF to ON;
- exit the menu.
Everything is elementary, the backlight will no longer disturb the driver and passengers, the battery will become more protected from discharge, and music on the road will be pure pleasure.
The Pioneer company produces car players and acoustics in various price categories. The products are intended for additional equipment of vehicles. The connection diagram for the Pioneer radio included in the operating instructions allows you to connect and configure the equipment yourself.
Instructions
To correctly connect all car radio connectors according to the diagram, you should read the operating instructions. First of all, let's start with the marking and pinout of the wires.
What you need to know about wire markings?
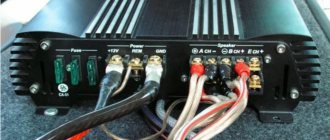
By studying the markings, you will prevent errors that may occur during the connection. The device package includes not only a circuit diagram, the necessary plugs and adapters, but also two main ISO connectors. These connectors are standard, so they come with the car radio. Each of these connectors contains a group of contacts consisting of eight elements. One of these connectors is intended for connecting electrical wiring, and speakers are connected to the second connector of the car radio with remote control and amplifier.
You can connect a wired car radio yourself - there are two methods. To make the connection without errors, you can purchase an adapter for installation. When connecting a device, car enthusiasts do it simpler - the connector is disconnected from the wires, and then these wires are connected to the mating part by twisting them. To properly connect the device, plugs, adapters and connectors are connected in accordance with the pinout and the diagram that comes with the kit. Please note that any car radio is equipped with wiring, the elements of which may have different colors.
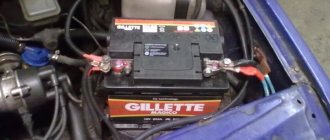
Universal battery connection diagram
We suggest you familiarize yourself with what functions the wiring has and how they are connected. The yellow wire must be connected directly to the battery; for proper connection, the circuit must be supplemented with a fuse. There is also a red wire in the car radio; it is necessary to turn on the system when the ignition is on, so the red cable is connected through the lock. Under no circumstances should these two wires be connected to each other, since as a result of this, the pinout circuit will contribute to the accelerated discharge of the battery.
The black wire is the negative wire, it is usually thicker than the others, and should be connected to the vehicle body. Each of the cables that comes with a car radio with or without an amplifier performs certain tasks. For example, if the wire is white and has a blue stripe on it, then when connected to the connector it will be responsible for the operation of the antenna, amplifier, and also the subwoofer, if available.
As for the gray wire, it needs to be connected to the positive connector of the speaker located in front on the right. A similar cable with a black stripe is connected to the minus of the same speaker. The same situation is with the white cable, as well as the white wire with a black stripe - they need to be connected to the left column (the author of the video is Anton Eremin).
Connecting the rear speakers of a car radio with an amplifier is carried out according to a similar scheme. In particular, the green wire (to the positive) must be connected to the rear left column, and the green element with a black stripe is connected to the negative plug of the car column. Following the diagram and pinout, the purple element is connected to the right column, in particular to the plus, and a similar wire with a black stripe is connected to the minus with your own hands. If the diagram and pinout are not followed, there is a possibility that the car radio may short out, so be careful.
How to connect?
After you have connected all the adapters and plugs of the radio with the remote control according to the diagram, let's move on to the issue of connecting the system. It is necessary to take into account that all plugs, as well as cable pinouts, are standard, so it will be difficult to make a mistake. Simply inserting the plug into the socket is not a problem, but sometimes car enthusiasts choose a more complex installation process when it comes to manual connection. To do this, the cables need to be disconnected from the plug and connected depending on their functionality.
How to install and remove
The Pioneer radio is installed using a rectangular hole made in the instrument panel or center console. To hold the body, a metal shaft is used, which is installed in the window and secured with folding tendrils of a triangular configuration. The head unit is inserted into the shaft all the way and is held in place by latches located on the sides of the housing.
To dismantle the car radio, you must remove the decorative frame located around the perimeter of the case. The clamps are disconnected using keys included in the device set or purchased separately. After removing the case from the shaft, you should disconnect the pads that connected the radio to the on-board network and car audio.
How to remove the panel
To dismantle the front panel, you need to press a separate button and then remove the assembly from the mounting socket. To store and carry the tape recorder panel, a plastic case with foam inserts is used to protect the unit from scratches.
Installation of 1 din radio
Before highlighting the installation features of various car radios, let's take a short historical excursion. The fact is that in the mid-80s, leading companies producing car audio systems came to the conclusion that it was necessary to unify all radios.
In other words, standardize the sizes of the presented devices. Thus, after some time, the so-called DIN appeared, which received the status of an international standard.
The fundamental parameters of this standard are the width and height of the radio. Thus, the 1 din standard corresponds to dimensions of 178×50 mm. 2 din differs only in height, which is already 100 mm.
How to connect correctly
To correctly connect the Pioneer car radio, you need to familiarize yourself with the diagram attached to the documentation. The cables are routed under decorative plastic body panels that protect the insulation from physical damage. For correct operation, it is necessary to ensure a continuous supply of positive power that supports the device’s memory. For switching, a yellow cable is used, which is led directly to the vehicle battery.
Wire marking
The Pioneer radio is connected using 2 ISO standard plugs, in which wires of different colors are mounted:
- red - to supply positive power after turning on the ignition;
- blue - supplying positive voltage to the amplifier and motor drive of the antenna;
- yellow - positive signal to support the memory block (does not depend on the position of the key in the lock);
- black - connection with the car body (negative signal);
- purple and purple with a black stripe - for connecting the speaker installed in the rear right door;
- gray and gray with a black stripe - for the loudspeaker located on the front right;
- white and white with black - for switching the loudspeaker in the left front door;
- green and green with black - to send a signal to the rear speaker on the left side.
On some of the radios there are additional cables designed to connect the steering wheel control panel or additional components of the multimedia system. When using component car speakers or amplifiers, the speaker cords are connected to the additional equipment.
Connection diagram
The connection diagram for the Pioneer car radio is given in the operating instructions. The cables are connected in accordance with the color of the insulation; cables coming from the battery and the ignition switch are used to connect power. If you connect the red wire directly to the battery, the head unit will discharge the power supply. To ensure reliable contact between the cords, soldering with tin-lead solders or crimping the joint with a metal tube is used, followed by wrapping with insulating tape.
Additional outputs for the subwoofer or steering wheel controls are connected in the same way. The pinout of the connector complies with ISO standards; a positive signal cable and a negative cord are used to connect the speakers. It is prohibited to twist the negative terminals into a single busbar that is connected to the car body. Acoustic cables from the loudspeakers are laid inside the passenger compartment and doors along the standard electrical wiring harnesses.
Kenwood radio ISO connector pinout
From this manufacturer (Kenwood) we were able to find several differences in the colors of the electrical wires and their purpose for the upper part of the connector block. The lower one, acoustic, fully complies with accepted standards. In order not to repeat ourselves, by default, the contact and option numbers we missed are also standard, as for all car head units. So, in our opinion, the following changes were minor:
- The yellow electrical wire goes to the car battery.
- The red cable goes to the ignition switch (ACC mode).
- Black braided wire - standard (grounding, ground).
- Blue and white wire - regulate power.
- A wire with a color combination of orange and white – adjusts the brightness of the car radio screen backlight (DIMMER).
Pinout problems
As a rule, no unexpected situations arise when connecting a car player via Euro connectors of the ISO 10487 standard. But only under the following conditions!
Your car is equipped with an ISO connection, both on the radio (a standard output for all global brands of this type of equipment) and on the side of the standard car electrics. This means that the previous owner (the car is not new) was not an experimental electrician, that is, he did not change the wires in the connection box or individual fragments of wires at his own discretion.
If the player was manufactured by someone unknown and where, like the connector itself, in such a situation you will need to arm yourself with a digital tester, brush up on your knowledge of electrical engineering and ring all the contact groups yourself. Based on the measurements, you can determine the power values of the wiring.
How to turn it on and off
To turn on the head unit, you must first provide voltage by turning the key in the ignition. The user then activates the device by pressing the SRS/OFF button. When turned on, the display shows the frequency of the radio station being received or the parameters of the track being played by the player. It is not recommended to leave the head unit on with the engine off, as there is a risk of draining the car battery.
When the ignition is turned off, the equipment stops working automatically.
With the engine running, you can turn off the Pioneer radio by removing the front panel. You can turn off the device by long pressing the SRS/OFF button; you must first go to the adjustment menu and disable the energy saving options. Tape recorders equipped with infrared control are turned off by pressing a button located on the remote control (implemented only on some models).
How to reboot
If the settings are incorrect or the operating algorithm of the microprocessor fails, it is recommended to return the player parameters to the factory values. To restart the head unit, you need to press the hidden RESET button located on the front panel with a thin object. Products with a removable panel are equipped with a button on the front of the case (next to the connection block). The button is held down for 4-5 seconds; for further operation you need to configure the tape recorder parameters.
How to control the radio
The radio is controlled by a rotary control and buttons located on the front panel. The purpose of the keys specified in the operating instructions depends on the modification of the multimedia device. Some head units support standard control buttons located on the steering wheel.
The remote control is connected through a special signal converter to the connector located on the rear wall of the case. Some products have an infrared remote control; the panel has a signal receiver covered with tinted glass.
Learn how to adjust the sound of speakers and subwoofer on a Pioneer radio with your own hands
Setting up the Pioneer radio in the car begins with resetting the current settings. As a result, the equalizer filters for the HPF speakers and LPF subwoofer will return to the factory settings. This can be done in two ways: find the corresponding section in the car radio menu or disconnect the ground terminal from the battery. Note that the following method for setting up the radio is designed for an entry-level user, and there is nothing overly complicated in it. But also, the quality of the reproduced sound depends only 33% on the composition and quality of the audio system components. Another third depends on the correct installation of the equipment, and the remaining 33% depends on the correct setup of the audio system.
How to setup
The Pioneer radio settings affect the quality of radio reception and music broadcasts. Changing the operating parameters is done through the menu; the settings are described in the instructions. The list of adjustable parameters depends on the modification of the player and the firmware version written into the control unit.
Disable demo
The microprocessor of the head unit supports a demonstration mode, which consists of broadcasting an information message to the display. To disable the parameter, press the volume control and go to the radio settings, then turn the knob to find the System section. Rotate the potentiometer crown to select the Demo Off parameter, then press the knob to confirm the selection. The user needs to turn the knob briefly again, select the Yes option and press the knob to make the change into memory.
Radio
To properly configure the radio receiver, you must:
- Use the SRS/OFF button to select the radio station reception mode.
- By pressing the BAND button, the user selects the range of received waves. The design of the equipment supports radio stations operating in the ultra-short, medium and long wave range.
- Then we set the frequency of the radio station by pressing the broadcast scan buttons. The user can preset the scanning step from 2 fixed values - 50 or 100 kHz. Additionally, you need to go to the settings menu and enable manual broadcast scanning (MAN parameter in the SEEK section).
- Record a wave into a memory cell by pressing and holding the buttons designated 1-6 (located under the screen or on the sides, depending on the modification).
You can automatically search for radio stations using the BSM parameter, selected through the setup menu. The equipment independently scans the airwaves and writes into memory cells the frequencies of stations with maximum signal strength.
How to set the time
The user can set the clock through the operating menu, which is called up by pressing the volume control. To adjust the clock, use the CLOCK SET section; changing the value of hours or minutes is done by rotating the volume control. The parameter is set during the general setup of the radio in the car, the time value is displayed on the liquid crystal display.
How to change language
To change the language settings on the Pioneer radio, press the rotary encoder to bring up the menu. Then you need to move the cursor to the required section by turning the potentiometer washer to the left or right. After finding the LANGUAGE section, the user clicks on the knob and enters a subsection that includes 3-6 languages (depending on the modification). The owner selects the required value by turning the corrector; the parameter is set by briefly pressing the knob.
How to turn off the backlight
The design of the equipment uses a step dimmer, which allows you to change the intensity of the backlight of the screen and buttons. Settings are made through the ILLUMINATION section; some models support automatic color switching and turning on the key backlight when a phone call arrives.
How to reset settings
Resetting the settings in Pioneer equipment means rebooting the microprocessor while simultaneously resetting the memory. To start cleaning, you need to press the rubber RESET button on the front panel with a toothpick. The settings are reset after disconnecting the battery from the vehicle's on-board network.
Features and Specifications
Before connecting and setting up the Pioneer MVH-150UB, you need to study the functions and technical characteristics of this radio.
The main functions include the following:
- adjusting the balance of the left and right speakers;
- independent change of equalizer parameters;
- disabling or setting tone compensation modes;
- changing the frequency cutoff value;
- bass boost;
- individual volume for each signal source.
Before purchasing a radio, be sure to study its characteristics. With their help, it will be possible to determine the quality of the device and the efficiency of its operation.
- case dimensions - 188x165x50 mm;
- weight - 0.7 kg;
- operating voltage - 14.4 V;
- FM tuner frequency range - from 87.5 to 108 MHz;
- MW tuner frequency range - from 531 to 1602 kHz;
- LW tuner frequency range - from 153 to 281 kHz;
- maximum current - 1 A.
Read more: Cooling system diagram for Opel Vectra b
Sound settings
In order for the radio to play juicily and reproduce low frequencies well, you need to adjust the equalizer curve and adjust the cutoff of low or high frequencies. The equipment supports adjusting the sound balance between speakers; there is a separate function for dynamic bass boost (BASS BOOST).
The sound quality is affected by the bitrate of audio recordings stored on laser discs or removable storage devices. If the recording quality is low, it is impossible to correct the sound picture using the settings.
Equalizer
Equalizer curves with standard parameters are stored in memory; to select the required value, use the menu (EQ Settings subsection). Radio tape recorders support creating your own sound picture by recording parameters in a separate memory cell.
High and low pass filter subwoofer
Setting up the slice is done through the menu, where you need to find the Crossover parameter. The function is supported only by some equipment; the setting algorithm depends on the modification of the acoustic device. Some models allow you to set individual characteristics for each speaker. The cutting height is selected from the list of suggested values.
Pioneer DEN MVH-150UB
Basically, connecting the Pioneer DEN tape recorder is similar to the standard algorithm. MVH-150UB is a device adapted to any car that has a landing pocket.
Pioneer DEN has the same settings. The only difference here is in appearance - in the shade of the backlight. You can see the difference in the photo. Settings are saved even if the battery is disconnected. There is a connector for connecting a regular phone or Android.
Radio tape recorder Pioneer 150UB
Every car radio comes with instructions. In it you will find detailed information, photos and a diagram without mistakenly connecting the sound system. And with the right approach, connecting the car radio can be easily done independently.
Also included are two steel plates with eyelets. These are special devices that make it possible to remove the tape recorder from your pocket if necessary. The plates are mounted to the sides of the tape recorder. The lugs are bent with a screwdriver and the panel is closed.
When purchasing a car radio, many users have questions about installing the device themselves and setting it up correctly. You can cope with such a task even without knowledge and experience - just study the instructions in detail and strictly follow the connection diagram for the Pioneer radio.
Possible problems and their solutions
The first problems may arise during the installation of equipment. If the radio does not fit completely into the landing shaft, then you should check the possibility of placing the housing in the instrument panel. Some cars require trimming of the internal structural elements into which the plugs or the rear wall of the device rest. The defect occurs due to jamming of the side latches (deformation or dirt ingress).
When using the device, there may be loss of sound from the speakers due to poor contact in the connecting cables. To restore functionality, you need to disconnect the plugs, inspect the connection points and reconnect the Pioneer radio. The defect occurs when the channels of an external amplifier break down; it is recommended to connect the speaker directly to the player. The damaged amplifier is repaired in a specialized service.
Doesn't turn on
If the head unit does not turn on when you press the keys, then you need to turn off the ignition and check the correct operation of the power circuits and the reliability of the cable connections, as well as the connection diagram of the Pioneer car radio. If you use an infrared remote control to start, the transmitter may not work due to dead batteries. Additionally, it is worth checking the functionality of the buttons; if dirt or moisture gets on the contacts, the transmission of signals that control the operation of the audio player is disrupted.
Connection
The Pioneer car radio can be connected in two ways. The first of them will be presented below. The first connection method involves using a standard connector, and the second involves connecting without standard connectors.
Note. It is worth knowing in advance that the use of the second connection method is not supported by car radio manufacturers and the warranty will no longer be valid. In addition, there is a slight chance of making a mistake in the process of connecting the wires.
Pioneer car radio instructions
On the other hand, the second connection method is popular among motorists due to the fact that there is simply no other choice. In particular, if the vehicle does not have an appropriate connector for connection, you have to use this method.
Attention. Even if you use the first connection method, you need to be extremely careful and do everything very carefully. It is first recommended to make sure that the wiring of the terminals on the connector is carried out correctly.
Wire marking
As a rule, when connecting any car radio, a standard connection diagram is used. Installing a Pioneer car radio is no exception. So:
- The yellow thick wire is communication with the battery through the fuse.
- The red wire is thick - connects to the battery through the ignition switch. The device will only function when the ignition switch is turned on.
Note. Some motorists who carry out the installation themselves prefer to connect the yellow and red wires to each other, but this threatens to quickly discharge the battery, which is unacceptable, because this can happen at the most unexpected moment.
- The black wire is thick - it goes to the car body, being a kind of “minus”.
- White-blue wire responsible for the functioning of the active subwoofer, amplifier and antenna. On this wire, after connecting the Pioneer car radio, a voltage of 12V appears.
- Gray wire – goes to the right front speaker, and is also connected to the “+” of the speaker.
- The gray-black wire goes to the right front speaker and to “-”.
- White wire – connects to “+” and goes to the left front speaker.
- White-black wire – connects to “-” and goes to the left front speaker.
- Purple wire – goes to the right rear speaker and to “+”.
- Purple-black wire - goes to “-” and to the right rear speaker.
- Green wire – goes to the left rear speaker and to the “+” speakers.
- Green-black wire – goes to the left rear speaker and to “-”.
Pioneer car radio connection algorithm
Pioneer instructions for car radio
ISO plugs are an internationally accepted connection standard for all car radios. So, to connect the car radio in the first way you will need:
- We cut the wires from the radio plug or car wiring.
- We connect the car radio according to the color pinout given above.
- All wires are carefully insulated with tape.
Note. Some experts believe that insulating wires will not look very aesthetically pleasing or even reliable. This is especially true in the winter season, when electrical tape on the wire does not provide adequate reliability. Such connections may cause a short circuit. On the other hand, you can use heat shrink tubing or specialized clamp terminals and solve the problem.
Installing contacts according to the ISO standard makes it possible to subsequently install a new pioneer car radio without laying wires. It will be enough to pull out the old radio on the slide, switch the plugs and that’s it.
Instructions for the pioneer car radio
If you have never connected a car radio to your car, you will have to do the following:
- Route the speaker wire for the speakers in accordance with the pinout above.
- Attach the car radio frame to the console panel.
Note. As a rule, modern cars already have places cut out by the manufacturer for connecting the car radio.
- After installing the frame in the finished slot, the metal petals on the frame are bent (this is done with a screwdriver and thus the frame sits securely in its place).
- We connect the radio to the plugs.
- We insert it into the socket until a characteristic click appears.
- We check the operation of the radio.
When dismantling the car radio, it will be enough to unclench the side lobes.
Note. The Pioneer car radio comes with special plates that are inserted on both sides of the radio until it stops. When you need to remove the car radio, they are used to move the side lobes to the sides, thereby allowing the device to move.
The above instructions for connecting a Pioneer car radio are not the only ones. Here the process is described in general terms, and for detailed information it is recommended to use not only step-by-step recommendations, but also photos and videos - materials where everything is carefully shown and explained. The cost of installing a car radio with your own hands will be very low, because you will only have to spend money on a couple of plugs and electrical tape.
Shutdown
This is done in the following order:
- Press button 2 and enter MENU. Then select SISTEM, at the next stage press PW SAVE
, all that remains is to turn off the radio with the OFF button. This is how we switch to energy saving mode; - Turn off the radio with button 1. At the same time, a clock indication should appear;
- We press button 4, eventually the display goes out.
Having completed this procedure once, you can subsequently turn off and turn off the radio with the standard button 1. Sometimes, resetting the settings can occur after disconnecting the speaker system from the power supply. In this case, you should repeat the steps described above.
Settings for basic functions on Pioneer
Disable "Demo"
Before making changes to the radio settings, turn off the “Demo” mode. The Pioneer radio and a number of other modern car audio systems have a functionality demonstration mode. Until it is turned off, any setting will be saved exactly until it is turned off. If you don’t want to set your preferences again every time you turn it on, you need to turn off the mode.
The main control knob on Pioneer radios with the signatures of the main control buttons
This is done as follows:
- Turn off the radio (press and hold the SRC key until the display goes out).
- Press the same key again and hold it until the start menu appears.
- Use the volume control to select the “System” option in the menu, and then “Demo”. The On position will be indicated to the right of it.
- Any of the arrows on the sides of the volume knob switches the position to Off.
- To save the settings, press the Band key. The mode is off, saved in memory, the radio turns off. You can move on to other settings.
The volume knob in the technology of this brand also functions as a joystick - in addition to rotation, it can be depressed and moved up and down or left and right to make certain settings.
Setting the time
- Repeat points 1–2 from the instructions described above.
- Then, by rotating the knob in the menu, select the “System” section.
- Press the knob and select the clock setting in the new menu.
- Use the right arrow to enter settings.
- Rotate “Volume” counterclockwise/clockwise to set the value.
- Click on it once to confirm.
- Use the left arrow to exit the settings.
You can set hours, minutes and seconds separately. The selected option begins to flicker.
Language and calendar
Like the clock, these options are located in the System menu. The setting principle completely repeats the clock setting. Like a clock, the calendar can be set individually - day, month, year.
Clicking noises when the engine is running
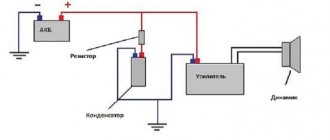
Many owners of standard radios are faced with the appearance of periodic clicks when the motor is running. To begin with, you need to understand the reason for the appearance of such a not entirely pleasant phenomenon. It's all about the car's energy system. When the power unit operates, small voltage surges regularly occur. This results in interference.
In principle, the radio tape recorder has protection against this. But the standard noise suppressor does not always cope with the problem. Sometimes this happens due to its failure, which is not a rare occurrence. You can fix the problem by simply connecting power to the radio through a noise filter. This is guaranteed to save you from clicking acoustics.
Size and types of car radios
Universal radios have a standard size, it can be 1 – DIN (height 5 cm, width 18 cm) and 2 DIN. (height 10 cm, width 18 cm.) If you change the radio from large to small (from 1 – DIN, to 2 – DIN), you will need to buy a special pocket that will cover the missing din. In terms of connection, these radios all have the same connector, its name is ISO or it is also called a Euro connector.
Standard radios are installed on cars from the factory and have a non-standard size; in this case, there are two options for installing the radio. The first is the simplest, you purchase the same standard radio and install it, it fits in size and connects to the standard connectors. But the cost of these radio tape recorders is often inadequate. And if you find a budget option, then with 100% probability it will be from China, which is not particularly famous for its sound quality and reliability.
The second option is to install a “Universal” radio in place of the standard one, but for this you will need an adapter frame, which is an adapter from the standard sizes of the radio to the universal ones, i.e. 1 or 2-DIN. the frame plays a decorative role, covering extra holes.
If your 2 din radio has an LCD display, then you can connect a rear view camera to it, and we discussed in detail how to do this in “this article”
Hint for TOYOTA owners. In most cars of this brand, the standard radio has a size of 10 by 20 cm. In this case, you can look for “Spacers for Toyota radios”, they are 1 cm in size and you can easily install a standard-sized radio, i.e. 2 – DIN, to install 1 – DIN you will still need to buy an additional pocket.
Speaker wheezing
Some drivers encountered a situation where the speakers began to wheeze. At the same time, this does not happen all the time, but only from time to time. Of course, the problem could be a faulty speaker. But, often the reason turns out to be unsuccessful configuration of the system itself. Therefore, troubleshooting should begin by viewing the settings. You are interested in the balance menu. Here you can evaluate how the sound is distributed between the speakers. Pay attention to the uniformity of its distribution. Most often, unbalanced low frequencies cause wheezing.
If everything is correct in the settings, then it makes sense to pay attention to the wire connections. There may be a bad connection somewhere. That is why the speaker wheezes. This may be indirectly indicated by the irregularity of wheezing. Especially if the speakers are in the doors. When you open the door, you move the wire, one time the contact may be normal, another time, not so much. The cause of wheezing may be a broken capacitor.
. In this case, you need to check it.
Take a radio component with the same capacity. You need to connect it in parallel with the standard one. After that, turn on the radio and check the result. The absence of wheezing indicates a problem with the capacitor. In this case, the current passed through the additionally installed part. Unsolder the faulty air conditioner and install a new one in its place.
Removing an old car radio
So, the treasured radio is waiting in the wings. It's time to get rid of your old audio system. At first glance, it may seem that this procedure is not complicated. By and large, this is true. However, there are a number of nuances that it is advisable to take into account during dismantling.
At the initial stage, in order to avoid damage to the panel elements, it is necessary to find out how the radio is secured in the niche.
Depending on the type of car audio system, there are several mounting methods:
As a rule, if we are talking about a standard radio, there is a last method of fixation. Often, the manufacturer, pursuing an aesthetic goal, masks the heads of screws or screws with plastic caps. Dismantling such a radio should not cause serious difficulties. To do this, it will be enough to unscrew the screws and gently pull it out.
The situation is somewhat different when the radio is located inside a metal casing. In this case, special keys will be required to remove the radio. Hardly anyone remembers their existence when this kind of need arises. However, all radios of the presented type are equipped with them.
The principle of fixing such a radio is not very complicated. Flexible metal tongues with a protruding part are attached to its side walls. On the casing, in a strictly verified place, there are special recesses. The aforementioned tabs go into them, rigidly fixing the radio in the casing.
If you don’t have a key, you can use two thin metal plates to remove it. To do this, you need to insert each of them between the frame and the radio, thereby squeezing out the metal tabs.
After this, you should pull the radio towards you, turning it slightly in different planes. It should be noted that this kind of tricks of manufacturers is nothing more than measures of protection against lovers of easy money.
In addition, radios can be installed in the panel using plastic clips. With this method of fastening, it is important to prevent distortion of the plastic frame. To avoid damage, the clips should be released gradually and evenly, avoiding distortions.
With any method of fixing the radio, its dismantling must be done carefully so as not to damage the integrity of the connecting wires and contacts.
Subwoofer doesn't work
In standard installed stereo systems with a Pioneer head unit, the sound from the subwoofer sometimes disappears. The problem is an unsuccessful output to the low-frequency speaker. The problem is treated in 2 ways. If the radio is new and under warranty, you can try to exchange it. But this does not always happen; more often it is repaired and returned.
Another option is to re-solder the output yourself. Perhaps the second option is the most optimal. Self-made repairs are much more reliable than warranty repairs. Moreover, no difficulties should arise there.
Conclusion
. Acoustics in a car often require quite a lot of attention. It needs to be configured correctly, this will allow you to make the most of its technical characteristics. How to turn off a Pioneer radio is a question often asked by owners of such equipment. In fact, this is done so simply that the manufacturers didn’t even mention it in the instructions.