Some owners of practical LADA Kalina have a problem caused by poor unlocking of the rear doors. This malfunction can occur not only in older LADA Kalinas, but also in completely new ones. This defect can rightly be characterized as a manufacturing defect. The manufacturer, it seems, has not yet taken measures to eliminate this defect in the handle mechanism, so the problem is still very relevant today.
Note that the front door handles do not suffer from such problems, but the rear mechanisms are much less fortunate.
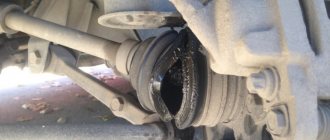
So on this particular Lada Kalina, after several attempts to open the rear door, applying increased force to the handle, it broke. It is unlikely that a repair kit for this mechanism can be quickly found, so the only rational measure would be to purchase and install a new handle. The price is not high - about 350 rubles. In this article we will tell you how to remove and replace a broken door handle.
Replacing the door handle of Lada Kalina
The door handle on Kalina is loose! How to repair the Kalina door handle , what should I do to prevent it from swaying? Thank you.
- Modification of the rear handle on the VAZ 1118 Kalina - 1 answer
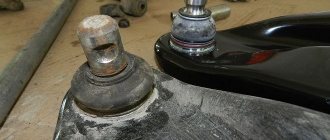
The handle begins to wobble due to the fact that the metal petal with the “groove” unbends during operation. This is the peculiarity of the mechanism.
To fix this, to repair Kalina’s door handle, you need to remove the door trim, and then tighten the screw with a Phillips screwdriver and then try to bend the shaped petal.
It happens that the thread on the handle breaks off (if you overtighten the nut). To fix it, you need to remove the handle and grind off the screw head, then drill out the remaining parts from the petal into a cone. Next, you need to select a suitable countersunk screw and solder it.
Removing the rear door trim on Kalina is quite simple. To do this you will need: a flat screwdriver, a small piece of rag, a knife or a super thin screwdriver. This work is not very difficult, you can easily do it without outside help, even if you have no experience in car repair.
And so, having obtained everything you need, you can begin to remove the casing. First, let's remove all the decorative trims - two on the handle and the cap on the lock lock. To remove the first ones, it is best to use a thin knife or flat-head screwdriver.
We gained access to the 2nd bolts - unscrew them. Now comes the fun part. You need to remove the window lowering/raising handle. It is secured with a plastic retaining ring. It's up to you to pull it out. This ring has a latch on the back. We insert a knife or screwdriver behind the locking ring, pull it towards you and pull it up.
Often, removing this handle causes difficulty for everyone. But, as you can see, it’s nothing complicated if you know the design.
Now all that’s left to do is to tear off the trim from the door. Wrap the screwdriver in a rag, insert it between the trim and the door itself and pull. The entire rear door trim on Kalina is attached using clips. So push on, don’t be afraid. It’s just advisable to have several of these clips in reserve, in case something goes wrong.
Once the rear door trim has been removed, you can perform basic repair work. This includes replacing the outside door handle.
Why is the door trim removed?
Most often, the trim of the rear or front doors is dismantled in order to get to the internal cavities where the window lift mechanisms are installed. Although during the entire period of operation of the car there are other situations when it is necessary to remove the trim:
- for installing acoustic speakers built into door cards;
- in case of failure of the electric window lift buttons;
- for dismantling glass for the purpose of tinting or replacement;
- to repair or lubricate window lift mechanisms;
- to replace facing panels that have become worn or scratched over the years of use of the machine.
Front door cards Lada Kalina
It is also necessary to remove the trim during body work, when it is necessary to weld rotten elements, renew the car’s paintwork, or carry out anti-corrosion treatment.
Note. Many motorists remove the upholstery to make additional vibration and sound insulation of the body themselves.
Lada Kalina rear door trim
Replacing the rear door handle Kalina
The handle is secured with one nut inside the door and one bolt outside.
We unscrew them. First, we pull out the part of the handle that is closer to the center of the door. Now we pull the entire handle towards the center of the door, lift it up a little, pull the bottom towards us and pull out the handle completely.
The new rear door handle and trim are installed in the reverse order.
We will show you how to replace the outside door handle on Lada Kalina and Lada Granta cars. I think many owners have encountered this problem: the front doors open from the outside without any problems, but to open the rear doors, you have to put in at least twice as much effort to get the lock to work. You have to pull the handle very hard, as a result the mechanism does not hold up and the metal tongue breaks off on the inside. In such cases, the entire handle assembly is usually replaced.
What exactly breaks down in the mechanism?
Before changing the door handle on Kalina, car enthusiasts disassemble the trim and dismantle the assembly.
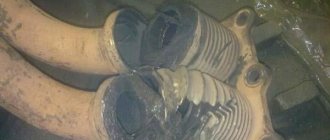
After disassembling the rear door and removing the outer opening handle, it most often turns out that the cause of the breakdown is the tongue that drives the lock rod. Part of it breaks, causing the part to no longer engage with the rod. The reason for this is the incorrectly selected material from which this tongue is made. The manufacturer claims that the lock mechanisms are made of high-strength steel. Craftsmen who repair cars claim that AvtoVAZ uses silumin as a material, an alloy of aluminum with silicon, which is more susceptible to corrosion than others.
A repair kit for the rear door lock for the Lada Kalina is almost never found on sale, so they purchase the entire unit assembled. The price of the unit is 330-350 rubles. In the event that the metal or chrome plating of the new part does not match the color of the rest of the car handles, disassemble both units and reinstall the tongue from the new handle to the old one.
Repair of the outer rear door handle of the Lada Kalina
Pull the retainer out of the outer seal and remove it.
We remove the outer glass seal by pulling it off the front decorative clamp and lifting it up.
Using a 8mm head, unscrew the two bolts securing the glass holder to the window lifter slider
We remove the glass from the door. Install the rear door glass in reverse order
Tools and Supplies
Reinstallation and repair of the part can be done in the garage; for the work you will need the following tools and consumables:
- Set of car keys.
- Set of heads, ratchets and cranks.
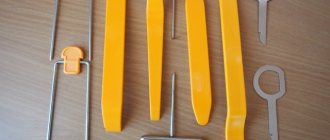
- Set of special plastic tools.
- Ruler for opening the door of a Lada Granta car.
- Phillips and flat head screwdrivers.
- Anti-corrosion lubricant WD-40.
- Litol lubricant.
- Rags.
New Lada: Fuel tank mounting clamp 1118 right, Spare part StroyKonstruktsiya DSK, PF LLC, Tolyatti 11180-1101126-10 AvtoVAZ. Wholesale and retail.
The work does not require special skills; the driver only needs to carefully dismantle and install new parts according to our instructions.
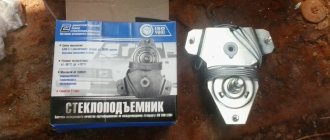
Replacing the rear door window lift mechanism
Remove the rear door trim.
Putting the handle on the shaft, set the glass to the upper position, and then remove the handle.
Remove the vibration damping element from the window handle shaft.
We fix the glass in the raised position by installing two wooden wedges between the glass and the inner door panel.
Using a 8-mm socket with an extension, unscrew the two bolts securing the glass holder to the guide slide of the window lift mechanism.
Using a socket or a size 8 wrench, unscrew the three nuts securing the window lift mechanism.
Using a socket or a 10mm wrench, unscrew the three nuts securing the guide of the window lift mechanism.
We remove the window lift mechanism through the lower technological hole in the inner door panel
Rear door window lift mechanism
Install the rear door window lift mechanism in reverse order
Install the rear door window lift mechanism in the reverse order.
How to disassemble the trunk lid on a hatchback and station wagon
The interior lining of the Kalina rear hatch in hatchback and station wagon bodies is held on by 4 regular clips, 2 special black plastic fasteners (installed after installing the panel) and 2 screws securing the handle. In addition, the panel is hooked onto a metal protrusion by two brackets located in the lock area.
Handle screws
The procedure for removing the upholstery is as follows:
- Unscrew the 2 screws with a Phillips screwdriver and disconnect the handle.
- Place a flathead screwdriver under the glass side of the panel and unlock the lock. Release the remaining latches with your hands, pulling the panel along the contour.
- Remove the trim, lastly releasing the staples near the trunk lock.
Replacing the rear door lock and outside handle
The outer handle can be changed without removing the lock.
Removing the door trim
Using a 8mm socket with an extension, unscrew the nut and bolt securing the handle
and, moving the handle forward, remove it.
To remove the door lock, disconnect the wire terminal from the negative terminal of the battery
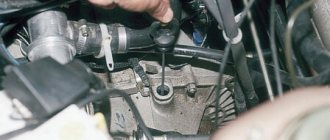
Using a Phillips screwdriver, unscrew the screw securing the intermediate lever of the locking rod, and remove the lever together with the rods from the rectangular protrusion, removing the locking rod from the plastic holder (shown by the arrow).
Using a Phillips screwdriver, unscrew the screw securing the base of the inner door handle and remove it. together with traction from a hollow pin.
Front door
The procedure for performing the work required to remove and install the outer front door lever on a LADA Kalina:
- Disconnect the negative terminal from the battery.
- Remove the inner trim of the exterior rear view mirror by prying it off with a screwdriver.
- Unscrew the locking lock.
- Using an awl or sharp knife, remove the plug.
- Use a Phillips screwdriver to remove the screw securing the armrest.
- Pull the inner handle of the lock and unscrew the screw using a Phillips screwdriver.
- Remove the inner lever.
- Unscrew the bolt securing the armrest located in the niche.
- Unscrew the two pocket screws.
- Wrap a flat-head screwdriver in a rag and insert it between the trim and the door frame. Carefully pulling the screwdriver towards you, unclip the first clip that holds the trim. Also unclip all the other clips, there are 8 of them in total.
- Carefully remove the trim from the steel door frame.
- Disconnect the two wire connectors from the power window assembly.
- Move the trim to the side.
- Disassemble the lower link of the outer door handle drive.
- Unscrew the handle fastening bolt located at the end; for this, use a 8-mm socket and a knob.
- Disconnect the upper link of the outer arm drive.
- Remove the faulty part and replace it with a new one.
Lubricate all moving parts of the lock drive and assemble everything in the reverse order. In most cases, the tongue or pawl breaks. Experts do not advise replacing the element separately; it is better to reinstall the unit completely, since the lock rod loses its operational properties over time.
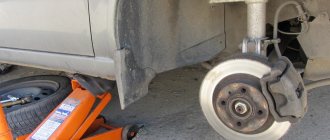
Removing and installing the rear door
It is more convenient to disassemble and reassemble the door when it is installed on the car.
At the same time, there is less chance of damaging the paintwork.
The sequence of disassembling the rear door is the same as when removing the front door. An assistant will be required to complete the work.
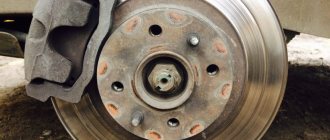
1. Remove the window regulator.
2. Remove the glass from the door.
3. Remove the outer door handle.
4. Remove the door lock.
Disconnect the corrugated hose of the wiring harness from the rack.
Disconnect the wiring harness connectors.
When disassembling the door, remove the corrugated hose from the wiring harness and remove the harness through the door opening.
Disconnect the door opening limiter from the pillar.
We turn the axles out of the hinges and remove them in the same way as shown on the front door. How to repair the front door of a Lada Kalina
Having coated the working surfaces of the hinges and axles with grease, install and assemble the door in the reverse order
To ensure reliable contact in the connecting block of the door wiring harness, we treat its terminals with a special agent for cleaning and protecting electrical contacts.
Causes
Replacing the Kalina door handle in the driver's seat accounts for less than 1% of all body damage to the first generation configuration. The mechanism for opening the rear element is less reliable; craftsmen note that every tenth Kalina has a problem opening the rear left or right door, this is about 10% of all body repairs. Reasons for handle breakage:
- mechanical damage to the latch;
- breakage of the lock cylinder;
- defective components.
In severe frost, due to the ingress and freezing of moisture in the lock drive, it is necessary to apply an inappropriately large force to the outer handle to open the door. As a result, its opening mechanism fails.
It is recommended to spray the lock with anti-freeze or anti-ice spray, which is used to clean the windshield, before opening the door.
The external elements of opening the rear doors of the Lada Kalina deserve attention. As practice shows, they break much more often than the front ones. And the reason for this is a factory defect in one of the parts of the handle mechanism.
How to tighten door handles on a grant
Tool:
- Small flat screwdriver
- Medium Phillips screwdriver
Notes:
Remove the inner handle to replace it, as well as when removing the glass, window regulator, or door lock. The steps to remove the interior handle are shown on the driver's door. The interior handle on the front passenger door is removed in the same way.
1. Remove the front door trim as described in this article.
2. Using a Phillips screwdriver, unscrew the screw securing the base of the handle to the inner door panel.
3. Remove the bent end of the rod from the hole in the lever of the inner handle (there remains a tightening rubber clamp on the rod, shown by the arrow) and remove the handle.
4. Install the inside door handle in reverse order.
Note:
When installing, the front tab of the handle base should extend beyond the edge of the service hole in the inner door panel.
The article is missing:
- Photo of the instrument
- High-quality photos of repairs
Door adjustment on the Lada Granta is necessary in almost every car in the interior. This problem also occurs in new Lada Kalina 2 cars, so the adjustment has already been perfected by real masters. They will tell us how to approach the problem comprehensively.
This is how poorly the Grant's rear doors open for almost every second owner.
Those who encounter this problem first try to solve it by lubricating the lock. This helps, but only for a short time. The following are methods that can completely eliminate the rear door problem.
Adjusting the rear door locks of the Lada Granta.
What tends to break down in a mechanism?
Sometimes the iron tongue breaks off. It is necessary to drive the lock rod. Through this action, the handle unlocks the door.
Lada Granta won't start
Tuning Granta sedan
Valve adjustment Lada Granta 8 valve
Visual view of the breakdown:
If you can find a repair kit, then only the part needs to be replaced, and there is no need to replace the handle assembly.
Preparation for dismantling
To unscrew the fasteners and remove the door trim, you need to prepare a simple set of tools:
- screwdriver with cross slots;
- long flat screwdriver;
- a pointed tool, such as an awl.
Door disassembly tool
Since the door card of the Lada Kalina car is held on by plastic fasteners (otherwise known as clips, pistons), there is a warning regarding the working conditions.
It is strictly not recommended to dismantle door trim in the cold, when the plastic becomes brittle and easily destroyed. Hence, there is a risk of breaking all the clips during the process of removing the decorative panel.
Therefore, in winter, perform this operation in a heated garage or box.
In the summer, there are no requirements for premises; remove the casing even in the open air. There is only one recommendation: in windy weather it is better to drive the car into the garage, otherwise a lot of dust will be brought into the interior when the doors are open.
Review of Manufacturer Prices
| Name/article | Price, rub.) |
| External handle 11180-6205151-00 | From 425 |
| RENAULT/LADA 11180-6205151-00 | From 385 |
| 11180-6205150-00 | From 420 |
| Internal handle 21900-6205181-00 | From 135 |
| 21900-6205180-00 | —/— |
| Bolt M5x10 00001-0038331-21 | From 10 |
| Nut M5 00001-0038318-01 | From 10 |
| Screw M6x10 00001-0032759-01 | —/— |
| Lock washer 00001-0026053-71 | —/— |
*prices are current as of November 28, 2020.
New Lada: Replacing the Lada door handle
Installation tool
You will need the most common tool, which is found in every home:
- A screwdriver or drill with a set of drills (including feather drills) and a hole saw.
- Chisel.
- Hammer.
- Awl.
- Square and soft pencil. The mark of a soft pencil is clearly visible on the veneer.
A marking diagram is included with the door latch, but it is easy to make marks for the holes without it. 1.0 meters are measured from the bottom edge of the canvas on both sides. You need to measure 6 cm from each edge of the door and make a mark. Using a square, draw a strictly horizontal line that will connect these two points. At the end of the canvas, a mark with a pencil and an awl is placed on this line in the center. The latch strip is applied and the veneer is cut with a sharp knife. We remember that the strip must be recessed into the door leaf so that it forms a single surface with the leaf.
Some experts advise starting drilling from the end of the blade with a feather drill. With this sequence of work, when drilling with a crown, the chips will fly into the hole already made, and not clog the teeth of the crown.
The feather drill should go to the depth of the shoulder blade, no more. The drill is pressed to a point at the end of the blade and a hole is drilled. Then, using a crown, holes are drilled alternately on each side of the canvas; there is no need to make them through. As soon as the tip of the crown appears on the opposite side, you must stop the drill and start drilling on the other side. This way the veneer will not be damaged when the crown comes out.
After the holes are ready, using a chisel and hammer, we make a selection along the line cut with a knife under the latch bar. Install the latch and tighten it with two self-tapping screws. It is better to take not the “standard” self-tapping screws that come with the latch (they are usually soft metal), but high-quality ones.
Using the key included in the kit, we disassemble the handle into two parts so that it can be installed. To do this, one mounting screw must be loosened and the other unscrewed. The central rod is inserted into the hole and the fastening screw is tightened tightly on one side. Then the second half of the knob handle is put on the rod, and the second screw is tightened. Self-tapping screws are screwed on both sides, which will cover the decorative trims and the screws will not be visible.
After installing the knob handle, all that remains is to install the “return” on the box. The door is closed, but not completely, and the upper and lower edges of the tongue are marked with a pencil. Using a square, the distance from the edge of the leaf to the center of the latch strip is determined, and this dimension is transferred to the door frame. Then a “return” strip is applied to the box, the veneer is cut with a knife, and a chisel is used to cut out the strip and tongue. The door is closed and the latch is checked.
Then the strip is installed on the box. Special “pockets” for recesses under the tongue are sold; they are made of plastic or metal. The screws that secure the return strip can be covered with self-adhesive plugs. After this, the installation is complete.
Why does a pen become unusable?
Statistically, door handles fail much more often than locks. Since the device for opening and closing the door is often directly related to the lock, repairs must be carried out immediately. Changing the handle alone will be much cheaper than buying a completely new lock.
There are two types of handles on the front door:
- Stationary (not associated with a lock);
- Push (as part of the locking mechanism).
In the first option, in the event of a breakdown, the front door handle is completely replaced. Buy a new handle, preferably similar to the old one. This is necessary so that the holes on the canvas coincide with the purchased product, otherwise you will have to drill new ones. In addition, if the purchased handle does not cover the old holes, they will ruin the entire aesthetics.
Push ones are more of a hassle, but replacing a door handle does not involve purchasing a new lock for a metal door. When the locking mechanism is working properly, it is possible to buy separate parts in stores that are only connected to the handle. After all, one of the reasons for replacing the handle on the front door is the loss of its attractiveness. The appearance deteriorates due to abrasions, scratches and deformations.
The material from which the handle is made may crack or even break. This is due to its quality. Under constant loads, one day the cheap product will simply end up in your hands, while all the fastenings will remain in place.
The cheapness of materials also affects the internal parts of the device. If the square responsible for opening the latch is made of silumin, then it will burst from daily heavy efforts when opening the door. A reliable manufacturer does not skimp on materials and makes this part from steel, so it practically does not wear out.
One of the reasons when a door handle needs to be replaced is dishonesty during installation. This is manifested in the operation of the mechanism only on one side of the iron door. The culprit is that the square is too short. When installed, it was positioned exactly in the middle, but over time it shifted to one side. One handle functions well, but the other cannot grip the part and open it.
It is not uncommon to see the handle sagging. This is due to the weakening of the return spring. But sometimes the reason lies in the lack of clear edges of the square or the lack of its length. The weakening of the entire unit occurs because the manufacturer decided to save money and used low-quality materials.
The door handle will need to be replaced if poor fastenings were used. The handle may fall off if it is screwed to the front door with self-tapping screws rather than screws. Under constant heavy load, the screws will become loose and come out of their grooves.