How much does it cost to overhaul a VAZ and foreign car engine?
If you maintain a domestic engine in a timely manner (change engine oil and coolant on time), then its service life is about 200,000 km. At a certain point, it becomes necessary to overhaul the engine. Experts from the magazine “Behind the Rules” determined the price of such an event.
The main signs of the need for major repairs
:
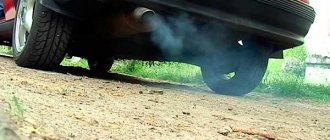
- high oil consumption;
- smoking;
- loss of power;
- low oil pressure.
What operations does engine overhaul include?
:
- Removing the engine.
- Disassembling the engine and washing all its parts.
- Measurement of basic parts (cylinder block, crankshaft, cylinder head). Check for cracks and tightness of the cooling system jacket. Checking the crankshaft and camshafts for bending. Checking valve mechanisms. Checking the condition of the oil pump.
- Boring of cylinders for repair size or liner. In the latter case - installation of sleeves. Grinding of main and connecting rod journals to repair size. Replacement of valve seats and bushings. Machining the plane of the cylinder head.
- Engine assembly with installation of new rubber elements, seals and gaskets.
Price
Such a major overhaul of a VAZ engine along with spare parts in the Moscow region costs no more than 50,000 rubles.
For comparison, overhaul of a naturally aspirated engine of a foreign car
will cost approximately 180,000 rubles if replacement of basic parts (cylinder block, crankshaft and cylinder head) is not required.
Diesel engine overhaul
will cost 220,000–230,000 rubles
Turbo engine overhaul
- this is a plus of 30,000 - 100,000 rubles to the cost of an aspirated engine, i.e. 210,000 - 280,000 rubles.
Have you ever had to overhaul a VAZ engine? How much money did the repair require?
Let us remind you that during the operation of the engine and gearbox, tiny metal particles enter the oil, which appear due to the rubbing of parts against each other. A crankcase drain plug with a neodymium magnet helps collect metal debris and extends the life of the units by allowing them to operate in clean oil.
Source
How to determine the wear of oil seals on a VAZ-2110
An oil leak from under the clutch housing cover can be seen if you drive the car into an inspection hole.
If oil leaks are found on the car engine housing, you should not immediately buy new oil seals and change them.
The oil seal itself is a product made of a combined material. In this case, it is rubber and metal. The purpose of the oil seal is to provide a tight seal between the rotating parts of the car. In another way, the oil seal is called the shaft cuff.
Before changing oil seals, you need to check the following engine parts and systems:
- Check the oil supply system for blockages.
- Oil filter.
- Hoses for their integrity.
- Crankcase ventilation system.
Cuff edges
If all these systems are in working order, and oil leaks on the engine do not disappear, it means that the seals have most likely become unusable. The most characteristic sign that indicates the deterioration of the seals is traces of oil smudges on the edges of the cuff.
Since the crankshaft pulley rotates at high speed, oil gets onto the entire front part of the engine, and the accessory belt also becomes oily. Such a belt will have to be changed, since its contact with oil is unacceptable. In addition, there is another sign indicating wear of the rear oil seal. These are traces of oil on the joints of the clutch housing and cylinder block.
Engine overhaul VAZ 2110 16 valves price
Free check using 54 parameters
1 year warranty on repairs
Every driver dreams of his car driving like new for a long time after purchase. But this is not always possible due to engine problems. What to do if the Lada 2112 engine did not meet your expectations and unwanted damage or extraneous sounds appeared? Try to contact our service department immediately, don’t delay, engine failure requires immediate repair. After all, at an early stage, you can eliminate the malfunction faster.
Chip tuning of VAZ 2112 engine
The most modern way to modify the engine is chip tuning of the VAZ 2112 engine. With this tuning method, the engine control unit is reconfigured - this allows you to change the standard, factory characteristics of the engine, without fear that after the changes you will have to repair the power unit.
Typically, car owners replace the standard support program with a sports one. So, software that was developed for the VAZ 2112 engine with 16 valves will work well. First, you need to use sensors to read the controller program from the control unit. Only after this will it be possible to change the program, taking into account all the characteristics and reserves of the motor. After reconfiguring the controller program, it is written to the control unit.
In order to do all this, you need certain knowledge, as well as engineering skills, so it is best to contact specialized companies with suitable personnel and equipment.
This method of changing engine power has only one drawback - it somewhat reduces the environmental friendliness of the exhaust.
Turnkey stages of Lada 2112 engine repair
- Visual inspection of the engine, as well as its diagnostics using a special computer stand
- Classification of breakdown, its nature and complexity of solution
- Search for the most optimal solutions
- Dismantling and disassembling the power unit
- Repair or replacement of failed elements
- Motor assembly and installation
- Functionality check (multiple levels)
All identified problems must be corrected under appropriate conditions:
| Professional tools | Original spare parts |
| We provide estimates for spare parts and labor | Experts have more than 10 years of experience |
Additional repair services for VAZ 2112:
| Engine diagnostics | Grinding the crankshaft | Adjustment of valves |
| Engine overhaul | Cylinder block boring | Connecting rod repair |
| Removing and installing the engine | Replacing hydraulic compensators | Changing the engine oil |
| Replacing crankshaft seals | Replacing camshafts | Engine flushing |
| Cylinder head repair | Replacing the timing belt | Replacing the engine pump |
| Replacing the engine mount | Replacing the timing chain | Replacing an engine injector |
| Replacing the cylinder head gasket | Repressing pistons | Replacing the engine filter |
| Replacing the valve cover gasket | Block sleeve | Replacing glow plugs |
| Replacing the oil pan gasket | Replacing the oil pump | Engine replacement |
| Replacing the fuel pump | Replacing valve stem seals | Replacing the engine mount |
Engine dismantling
To carry out repairs and modifications, in some cases you will also have to remove the engine. What can we say about the need or desire to change the power unit to a new one. There is no way to avoid this event.
To remove the engine you will need:
- Pit or overpass;
- Assistant;
- A set of all kinds of tools;
- The lifting mechanism is a winch or hoist.
When choosing a lifting device, pay attention to its load capacity. In the case of removing the engine from a VAZ 2110, this figure should be at least 200 kilograms
Having prepared everything you need, you can begin dismantling the engine.
- Remove the hood. Be sure to use a marker to make notes on the location of the four washers. This will make putting the hood back together much easier.
- Relieve pressure in the fuel system. To do this, turn on the starter for 15 seconds with the wiring from the fuel pump turned off. Or simply remove the fuel pump fuse.
- Remove the battery.
Dismantling the battery
- Remove the plastic cover from the motor.
- Move the air filter housing aside.
- Disconnect the throttle cable from the engine.
- Disconnect the wiring harness from the throttle position sensor.
- Disconnect the wiring harness from the idle speed control.
- Disconnect the brake booster hose from the intake receiver.
- Disconnect the wiring harness from the ignition module.
- Disconnect the block from the camshaft and crankshaft position sensor.
- Next, be sure to disconnect the wiring from the canister purge valve. Disconnect the wiring block and the injector block from each other.
- On a 1.5-liter engine, the wiring block from the oil level sensor located in the oil pan is disconnected. The wiring from the coolant temperature sensor is also disconnected.
- Disconnect the temperature sensor wiring and the knock sensor wiring. The latter are located on the intake module.
- The ground wires and the tip of the negative terminal wire of the battery are removed from the engine.
- Remove the block with wires from the emergency oil pressure sensor.
- Now the fuel lines are disconnected from the power unit.
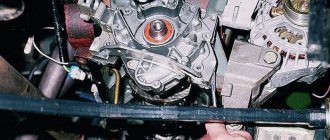
- Don't forget to remove the generator.
- Drain the coolant from the system.
- Remove engine oil from the system.
- Drain all oil that is in the gearbox.
- Disconnect the coolant hoses coming from the thermostat.
- On 1.5-liter engines (injectors), remove the exhaust pipe, and on a 1.6-liter injection engine, remove the catalytic manifold.
Removing the collectors
- Completely remove the gearbox.
- Remove the front wheel hub bearing along with the bolts, nuts and washers.
- One bolt securing the gearbox should be screwed into the upper threaded hole of the BC on the left together with a wide washer.
- A cable from the lifting mechanism you choose is tied to the bolt.
- The second lift cable is connected to the engine through a mounting eye. It is located on the cylinder head.
- Carefully lift the engine and secure it in a suspended position.
- Remove the upper and lower engine mounts.
- The right mount will be the last mount for your motor. Unscrew the top nut and lift the engine using the mechanism, completely removing it from the engine compartment.
- Remove it carefully so that the engine does not touch or damage anything along the way. Don’t forget, the engine on a VAZ 2110 weighs about 120 kilograms, and some versions weigh more than 130 kilograms.
Let's pull and pull
Make sure in advance that the winch can withstand a lot of weight by performing a test lift of some heavy object. Otherwise, the lift may fail at the most inopportune moment.
When installing a repaired or new motor, proceed in the reverse order of dismantling. Pour new oil into the engine, gearbox, and don’t forget about the coolant.
When changing the engine to a new one, you should understand that now engines from the “ten” cost from 60 to 100 thousand rubles.
Loading …
We repair the following Lada 2112 engine models
1999-2008
- 2112 1.5 i (91 Hp) , Mechanical, 1499 cc, 91 hp
- 2112 1.5 i 16V MT (92 Hp), Mechanical, 1499 cc, 92 HP
- 2112 1.5 i MT (78 Hp), Mechanical, 1500 cc, 78 HP
- 2112 1.5 MT (71 Hp), Mechanical, 1499 cc, 71 hp
- 2112 1.6 i 16V MT (89 Hp), Mechanical, 1597 cc, 89 hp
- 21121 1.6 i MT (80 Hp), Mechanical, 1597 cc, 80 HP
- 21122 1.5 i MT (78 Hp), Mechanical, 1499 cc, 78 HP
- 21124 1.6 i MT (80 Hp), Mechanical, 1597 cc, 80 HP
Our mechanics
| Viktor Nikolaevich | Vasily Ivanovich |
| Working with engines since 1979. |
Experienced senior mechanic.
The engine is the heart of the car. If you want to be sure of the quality of repairs, sign up for diagnostics and come to our car service center! Our technicians will advise you on all issues related to the operation of the Lada 2112 engine.
We guarantee high quality services and reasonable prices!
The model of the Volga Automobile Plant VAZ 2110, produced from the second half of the 1990s to the end of the 2000s, gained wide popularity among motorists. The updated design and aerodynamic properties allowed it to quickly win the hearts of its fans.
During the production process, several engine options were installed on the car in order to improve dynamic characteristics. But no matter how good the car is, the time comes when it is necessary to overhaul the engine. The average cost of its implementation in Russia is from 12,000 to 20,000 rubles .
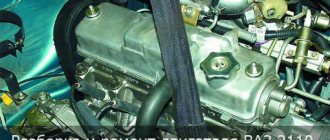
Timing device VAZ 2110 injector 8 valves
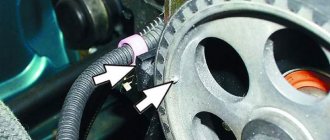
Many people are concerned about the question: Do the valves on the VAZ 2110 injection engine bend ? No, it doesn’t bend , the 8-valve injector does not suffer from this defect. But this does not mean that you should not monitor the timing belt. Because loosening and subsequent jumping of the belt by a certain number of teeth will lead to inevitable problems. It is worth paying special attention if engine oil gets on the belt; an oiled belt will not last long. Below is a detailed image of the timing diagram of the 8-valve injection engine “tens”. See the photo below.
When replacing the timing belt on a VAZ-2110, it is necessary to clearly align the marks on the camshaft and crankshaft pulleys; without this, the engine will not operate normally. Another important point is that when the tension roller moves to its original state, the marks shift as the belt tension changes. Therefore, carefully check whether the timing marks are clearly aligned before putting on the cover covering the timing belt.
Overhaul of 8 and 16 valve VAZ 2110 engines
The tenth model was created with extensive use of components and assemblies of the previous model - 2108. At the beginning, the car was equipped with a 1.5-liter VAZ-21083 8-valve engine with a carburetor. At the next stage, a more powerful VAZ-2111 engine with the same volume and number of valves, equipped with a direct fuel injection system, was installed.
On the next modification of the VAZ-21124 engine, the cubes were increased, which made it possible to increase the power to 100 hp. and show good performance. Finally, the sixth version of the VAZ 2110 car was equipped with an imported 2-liter, injection, 16-valve Opel X20XEV CTi engine, which allowed the car to accelerate to speeds of over 200 km/h.
Landing VAZ 2110 – photo, description on VAZ-2110.net
Lada 2110 Without springs.
URGENT SALE! I'm selling KiK Torus wheels with Yokohama 165/60 tires.
Photo of VAZ 2110 on landing.
VAZ 2110 planted photo.
ProPosadku Part 2 WITHOUT LANDING – AUTO.NET.
Photo of a VAZ 2110 landing.
VAZ Priora interior photo.
Tightly tinted (Bpan – basin – vaz – auto).
The landing at the moment is as in the photo! after some minor modifications the car lay down.
Recommendations from a Lada 2110 car owner.
Nya pictures – planted VAZ 2110 – Nyashki.
Bogdasha 2110. very happy)already torn panties around Krasnodar)Che is pne.
What determines the cost of overhauling a VAZ 2110 engine?
The cost of repair work depends on the following main factors:
- Models of the installed engine.
- The degree of wear of its components and parts.
- Number of spare parts to be replaced.
- Availability of additional work on repair of cylinder head, shafts, cylinders.
- Car mechanic qualifications and workshop equipment.
During the overhaul process, it may be necessary to replace or repair other engine-related components and assemblies, requiring additional financial costs.
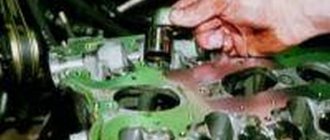
The main stages of overhauling the VAZ 2110 engine
The process of restoring the performance characteristics of the power plant takes place in several stages:
- Dismantling of the internal combustion engine, complete disassembly, washing of parts.
- Inspection of rubbing surfaces and abutment planes, identification of damage.
- Control of the geometry of the crankshaft and camshafts.
- Determination of replacement parts.
- Processing of crankshaft journals, cylinders, coating.
- Elimination of geometric defects of shafts.
- Refurbishment of cylinder head.
- Complete with new liners, piston rings, gaskets, seals.
- Assembly and return of the engine to the car.
- Replacement of filters, connection of all systems.
- Run-in and final adjustment.
The need for additional work may become clear during the repair process. So sometimes there may be a need to repair the fuel or oil pump, clean the carburetor, and in the case of injection, repair the injection system.
How much does it cost to overhaul a VAZ 2110?
Depending on the type of engine, the estimated cost of removing/installing an 8-valve engine is from 3,000 rubles , and a 16-valve engine is from 4,000 rubles . The approximate cost of cylinder head repair, excluding the cost of parts, is from 3,500 rubles and from 5,500 rubles , respectively. On average, boring a cylinder block will cost from 1,200 rubles. Replacing sleeves will cost from 2500 rubles .
The average cost of a major overhaul of a VAZ 2110 engine equipped with 8 valves will be from 12,000 rubles . Repairing an engine with 16 valves will cost from 19,000 rubles .
Replacement
The replacement procedure should not cause much difficulty for those who have independently repaired their car more than once, especially the suspension and chassis.
If you have no experience, then we recommend contacting a service station. Only proven and reliable.
Replacement has its own nuances depending on the pillows for each engine in question. We will separately talk about the repair of 8 and 16 valve engines.
8 valve engines
- Select a flat surface for repairs, place chocks under the rear wheels, and turn on the handles.
- Remove the engine protection.
- Unscrew the bolts of the generator belt tensioner, after which this belt must be removed. You will need a 13mm wrench.
- Place a jack under the car, place a strong wooden board on top and lift the engine until it releases the load from the supports.
- Using a 15 wrench, unscrew the central fastening nut of the worn pillow.
- Now use a 13mm wrench to unscrew the airbag fixing bolts mounted on the bracket.
- From below, near the right arch, 3 more bolts are unscrewed. They are responsible for connecting the bracket to the spar. You need a 17mm wrench.
- The bracket is removed, the pillow is removed and replaced with a new one.
- Next, perform assembly in reverse order.
- Place the jack under the transmission and then lift it up.
- Using a 15 wrench, unscrew the nut of the central fastening of the left pillow.
- Using a 13mm wrench, unscrew a pair of bolts securing the support, after which it is removed.
- Replace the damaged element, and then carry out the reassembly procedure.
- Remove a pair of nuts with a 17mm wrench. They secure the cushion to the body. Then a couple more nuts connecting the cushion to the gearbox are unscrewed.
- Remove the rear support.
- Using a 17mm wrench, remove the fastening nut connecting the bracket to the cushion. A new rubber part is installed in place of the old element.
- The rear support is returned to its original state by reassembly.
16 valve engine
If you have a 16 valve engine under the hood, then there are some nuances for replacement.
On 8 and 16 valve engines, dismantling and replacing the side cushions is carried out in a similar manner, there is no difference. But the front lower ones change differently.
To change the front lower mount on a 16 valve engine, you need:
- Unscrew the front lower support rod fixing bolts in relation to the front suspension cross member. For these purposes, arm yourself with a 15 key;
- Unscrew the fastening nut that holds the support to the engine bracket. You will need a pair of keys at once and both are 15. The bolt is removed;
- Remove the support, change the cushion on it or replace the entire assembly;
- Reassemble;
- In the engine compartment, unscrew the fastening bolt of the upper front support to the car body, while holding its nut by hand. This is where the key for 17 comes in handy;
- Remove the bolt and nut;
- Remove the fastening bolt of the front upper support in relation to the power unit bracket using 15mm wrenches. The bolt and nut are removed;
- The support can now be removed, the pillow or the entire assembly can be replaced;
- Assembly is performed in reverse order.
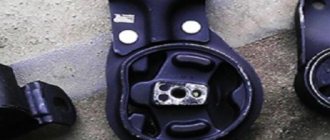
Additional support
To mount an additional support on the 8-valve power unit installed under the hood of your VAZ 2110, you will need to purchase a special bracket used to transfer the ignition module.
Reviews from those who have performed such operations claim that when starting off the car does not jerk, the engine does not become loose, which has a positive effect on the wear of the cushions.
There are a lot of opinions regarding reducing vibrations. Some consider this a useless exercise, while others, on the contrary, note significant improvements in the behavior of the car.
Prevention measures
To prevent breakdowns, it is best to carry out periodic maintenance. This way you will spend much less effort and time on repairs.
Preventive measures include:
- Periodic check of bolt tightness;
- Removing dirt and oil traces from the rubber elements of the engine mounts with a dry rag;
- Regular repetition of these activities every 4 months.
In practice, even a relative beginner in the field of do-it-yourself repairs takes no more than 5 hours to replace engine mounts. But this allows you to develop your own skills, as well as save a decent amount of money on the services of service stations.