You need to scald the stud as follows: screw in the stud, install the brake disc, wheel, tighten the whole thing with wheel nuts and scald it, this is done so that the stud is precisely centered, because it has play in the axle shaft and during the welding process it can move to the side.
We install the axle shaft and the sealed casing.
We install a spacer.
We install the brake disc.
We install the caliper bracket.
We install the pads.
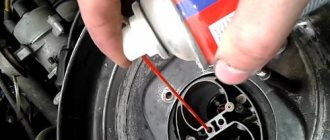
And the caliper itself. Don't forget to lubricate the caliper guide pins. Important Note: Due to a design change, the right caliper is installed on the left side and the left caliper is installed on the right side.
We screw the reinforced brake hoses to the caliper through copper rings.
And to the tee, also through copper rings.
We install the handbrake cable into the caliper so that the cable goes around the bridge. This bending does not affect performance
We screw the handbrake cable to the standard handbrake mechanism, bleed the brake system, adjust the handbrake, install the wheels and enjoy the work done.
Instructions for installing the HCD on VAZ 2101 – 2107
The package includes:
- Left caliper VAZ 2108 – 1 pc.
- Right caliper VAZ 2108 – 1 pc.
- Shoe guide VAZ 2108 – 2 pcs.
- Front brake flexible hose – 2 pcs.
- Faceplate – 2 pcs.
- Distance washer – 2 pcs.
- Brake disc boot – 2 pcs.
- Half ring – 2 pcs.
- Brake pads Ladasport VAZ 2108 – 1 set.
- Brake disc VAZ 2108 – 2 pcs.
- VAZ 2101 axle shaft, modified – 2 pcs.
Work order.
- Place the car on a level surface.
- We install wheel chocks.
- Loosen the rear wheel mounting bolts.
- We jack up the car, completely unscrew the wheel mounting bolts and remove the wheel from the car.
- Remove the brake drum.
- We turn the axle shaft until the large holes coincide with the two nuts securing the brake shield.
- Using a 17 mm socket wrench with an extension, unscrew the nuts securing the brake shield.
- Turn the axle shaft and unscrew the remaining 2 nuts in the same way.
- We remove the semi-axle from the car. This can be done with a special puller or by securing the wheel with 2 bolts to the axle shaft. With a sharp movement towards ourselves, we pull out the axle bearing from the flange of the rear axle beam.
- After unscrewing the bolts, remove the wheel.
- We take out the axle shaft.
- Remove the brake pads.
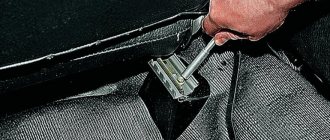
- Using a 10mm wrench, unscrew the brake pipe from the back of the brake shield.
- Remove the brake shield completely.
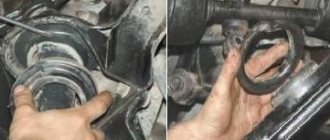
- We inspect the axle shaft seal and replace it if necessary.
- Take the modified axle shaft from the delivery kit.
- Install a half ring between the bearing and the oil reflective shield.
- Put the faceplate on and orient it so that the holes on the faceplate and the oil deflector plate line up.
- Place the brake disc boot on the rear axle beam.
- Install the axle shaft with the faceplate into the rear axle beam. Attention! The holes for attaching the brake mechanisms should be oriented so that the brake mechanism is located in front (in front of the bridge), the holes should be directed downward, as in the photo below.
- Tighten the 4 axle nuts.
- Attach the brake disc boot to the faceplate.
- Place the spacer on the axle shaft. Orient the washer so that the holes in the washer and the axle shaft line up.
- Install the brake disc and secure it to the axle flange.
- Install the caliper assembly onto the faceplate and tighten it with two M10 bolts. Attention. The fitting on the brake cylinder should point upward.
- Connect the brake hose to the brake pipe.
- Secure the brake hose with plastic ties. Secure in such a way that the hose does not have constant contact with other parts.
- Install the wheel. To secure the wheel, you must use extended bolts. Or replace the bolts with studs.
- Lower the car.
- Tighten the wheel bolts.
- Repeat steps 4-27 on the second side.
- Check the oil level in the rear axle gearbox. Add oil if necessary.
- Bleed the brake system.
What is needed for replacement
For a theoretical rework, the following elements will be required:
- Brake discs - parts from the front wheelset of a VAZ 2114 with a diameter of 240 millimeters are suitable. The only point is the diameter of the hub, which, using the appropriate equipment, needs to be changed from 58 mm to 60 mm.
- Pads, calipers and hoses are also suitable from Samara. It is worth remembering that in this system the VAZ 2114 is no different from the “nine”, so parts from 2109 will also fit.
- Plates for mounting calipers. You can find this part on the Internet or in the automotive market. Some motorists make plates themselves.
- Bolts M10x1.25 30 mm – 12 pieces.
- Distance washers from the timing belt of the VAZ 2114 or “nine” - 8 pieces.
We recommend: Repair of mono injection for Volkswagen Passat B3 with video and photo
Required materials and tools
To work you will need such a set.
| Element | Quantity |
| Brake calipers | 1 standard set for model 2114 |
| Brake pads | 1 set from a trusted manufacturer |
| Brake hoses | 1 set of front brake hoses (standard metal ones are too short) |
| Grovers and bolts | 12 pieces |
| Distance washers | 8 pieces |
| Standard diameter brake discs | 1 kit |
| Faceplates | 2 pieces (non-standard part) |
Rear and front disc brakes must necessarily differ in diameter, and the rear ones will definitely be smaller. Otherwise, travel will turn into a big risk.
Brakes
Front and rear disc brakes on VAZ 2107
If the car is not able to stop in time, there can be no talk of any safe driving. This rule applies to both trucks and cars. VAZ 2107 is no exception in this sense. The brakes of this car have never been famous for their reliability and have always caused drivers a lot of problems. And the most vulnerable point of the brakes on the “seven” have always been the brake discs, the service life of which was very short. Can a car owner change these discs himself? Yes maybe. Let's try to figure out how this is done.
Advantages of a disk system
If, nevertheless, the advantages of disc brakes prevail over common sense, then we will try to install a kit for replacing drums with discs. But you should select only certified parts, no amateur activities. Disc brakes will give your car the following:
- The braking distance may be reduced.
- More uniform distribution of braking force, subject to modification of the pressure distributor.
- The mass of disc brakes is less, as a result, the unsprung masses become smaller.
- Disc brakes are easier to maintain.
- Better thermoregulation.
- The pads do not stick or freeze.
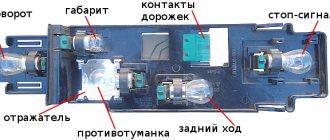
PURPOSE AND PRINCIPLE OF OPERATION OF BRAKE DISCS ON THE VAZ 2107
The VAZ 2107 has two brake systems: main and additional. The main one allows the driver to reduce the speed of the car while driving. An additional system allows you to lock the rear wheels of the car after it has stopped.
The brake disc is the most important part of the VAZ 2107 braking system; without it, normal operation of the car is impossible
Brake discs are part of the main braking system. They are located on the front axle of the VAZ 2107 and rotate with it. A caliper with brake pads and hydraulic cylinders is attached to the brake discs. As soon as the driver decides to brake and presses the pedal, brake fluid begins to flow into the hydraulic cylinders through special hoses. Under its influence, pistons move out of the cylinders, pressing on the brake pads. And the pads, in turn, compress the brake disc on both sides. The disk, and with it the front wheels of the VAZ 2107, begin to rotate more slowly and the car brakes smoothly.
Installation Quality Check
Ventilated
When you complete the assembly process, be sure to check how sealed the installation was on each of the wheels.
- Press the brake pedal. If you did everything correctly, pressing will be accompanied by tightness and effort;
- You or your assistant press the pedal again, while the second person begins to turn the new disc brakes;
- If you couldn’t move anything, it means the assembly was done efficiently and reliably.
BRAKE DISC MANUFACTURERS
As a rule, car owners, having discovered the wear of one or two brake discs, are in no hurry to replace them with standard VAZ ones, remembering their mediocre quality. But since the spare parts market is now literally flooded with discs from various manufacturers, a novice driver becomes completely confused by such abundance. Which companies should you prefer? Let's list the most popular ones.
ALLIED NIPPON WHEELS
Allied Nippon is a manufacturer very well known in the domestic auto parts market. This company specializes mainly in brake pads and clutch discs, but also produces brake discs that are suitable for “sevens”.
Allied Nippon wheels have always been distinguished by the optimal combination of price and quality
Allied Nippon wheels are made from high quality cast iron and undergo mandatory three-time sizing and balancing testing. The company produces both ventilated and non-ventilated discs, which are almost always supplied complete with brake pads. The manufacturer guarantees that the brake systems it supplies will cover at least 50 thousand km before the first failure. And finally, the price for Allied Nippon wheels is more than affordable, starting at 2,200 rubles per set.
ASP DISCS
The ASP company is widely known not only in Europe, but also among domestic owners of VAZ “classics”. The Russian market offers mainly non-ventilated brake discs, which are also suitable for the VAZ 2107.
ASP discs have the highest wear resistance and reasonable price
ASP discs are processed on high-precision machines and are triple checked for balancing and dimensions. They have the highest wear resistance: the manufacturer guarantees that they are able to travel at least 100 thousand km before the first breakdown. In fact, the only drawback of ASP disks is their considerable weight, but this drawback is more than compensated for by the attractive price, which starts at 1,500 rubles per set.
ALNAS WHEELS
Another large manufacturer of high-quality brake discs is Alnas. It produces mainly ventilated discs with a wide variety of perforations. Recently, the range has been expanded with radial discs with different notches. Alnas products are in demand primarily among drivers who tune their cars and among drivers who prefer an aggressive driving style. New discs can travel at least 80 thousand km before the first failure. They are lightweight, and the price, given their sporting purpose, is steep: the cheapest set will cost the driver 2,900 rubles.
Alnas wheels are designed for drivers with an aggressive driving style
These are, perhaps, all the major manufacturers of brake discs, whose products the owner of the “Seven” should take a closer look at. Of course, there are a lot of smaller companies that are very aggressively promoting their wheels on the auto parts market. But the quality of their products often leaves much to be desired, so there is no point in mentioning them in this article.
So which wheels should a novice driver choose?
When choosing wheels, you should consider two things: your driving style and your wallet size. If the driver prefers aggressive driving, reliable brakes and is not short on money, then the optimal choice would be Alnas products. If a person is used to driving carefully, and the main criterion for him is durability and reliability, it is worth purchasing ASP wheels. And finally, if money is short, but high-quality ventilated discs are still needed, the last option remains - Allied Nippon.
What should you prepare for?
Using the example of installing rear disc brakes on a UAZ, you can see that such a design change requires a large number of strictly individual solutions.
In the worst case scenario, you yourself need to take measurements of some components of the rear brake system; some of the information can be found by the vehicle’s VIN code and original spare parts catalogues. Having the necessary measurements, all that remains is to select standard disc brakes from another car. Some elements will have to be selected empirically in an auto parts store, at a car dismantling station, or even ordered from a turner. There are easier ways to replace drums. Judging by the reviews, not a single driver who has replaced drum mechanisms with disc brakes regrets the time and money spent.
Replacement options
- Your car model, but only with a more powerful engine or a later model year, could be equipped with rear disc brakes as standard. You need to check the interchangeability of hub assemblies, brake hose fastenings, and the alignment of the shield seats. We leave the interchangeable components, the remaining elements can be purchased at disassembly. When purchasing used elements, pay attention to the brake shield, which should not be heavily “eaten” by corrosion. Small lesions are acceptable. They must be thoroughly cleaned and painted before installation. It is better to buy brake system hoses, sealing washers and bolts new. All you have to do is remove the old drum brakes and replace them with disc system components. Most likely, the handbrake cable will have to be redone or replaced with a new one.
- Your car was developed on a common basis with models that were standardly equipped with rear disc brakes. This happens if a modern car is largely a redesigned model of older cars, and therefore has many standardized parts from other cars. For example, many components of the rear beam and brake system of Daewoo Lanos/Zaz Chance were equipped with some GM models of the 90s and 2000s (Opel Vectra A, Opel Astra G, etc.). Therefore, replacing drum brakes with disc brakes sometimes does not even require replacing the hub. Despite the available parts ready for installation, DIY replacement requires knowledge of some nuances, many of which are publicly available on specialized forums.
- There are no analogues ready for installation for your car, or you want to design an individual brake system by selecting the desired size of the caliper piston group, the diameter of the rear brake disc, the manufacturer of the components, etc. In this case, you will have to show technical improvisation to replace it. What elements are needed for installation, as well as how to replace the rear brakes with your own hands, we will consider further.
Disadvantages of TRT
Naturally, where there are advantages, there are always several disadvantages:
- First of all, it is worth noting the price, which is significantly higher than that of drum brakes.
- The need for high-quality adjustment, which may cause a call to the service center.
- Poor-quality installation leads to the fact that the safety of the car is reduced - the car skids.
- In the case of the VAZ-2109, like any other VAZ model, the installation of an anti-aircraft protection device is not a certified event and may result in a fine from the traffic police.
- If you get into an accident, most likely, the expert will find you at fault, since the improvements to your car will be illegal.
- The lack of high-quality tuning can lead to the fact that the rear wheels can brake much better than the front wheels, which is fraught with serious consequences and emergency situations.
In other words, self-installation of the HCD on the VAZ-2109 is recommended only if you are confident in your capabilities. Otherwise, it is recommended to contact a service center. Despite the fact that the safety of your car with such tuning will increase, you may encounter problems with the traffic police, since such improvements are not legal.