Print this article Font size 16
It is hardly worth reminding once again what a huge role the brake system plays in the functioning of the entire car. Therefore, replacing brake discs on a VAZ 2110 must be carried out in strict accordance with the vehicle repair manual. Deviations from the norm and attempts at amateur performance are not allowed here.
Let's get started
Pumping is carried out in a certain sequence. The diagram is criss-cross. First, the air is pumped out of the rear right wheel. Then - from the front left. Next they move to the rear left and then to the front right disc. So, we tear off the bolts from the desired wheel, put the car on a jack and install the stops. It is impossible to lift on clamped blocks. Next, open the hood and add fluid to the maximum. We will need an assistant who will press the pedal several times on command.
Today, for no apparent reason, when I pressed the brake pedal, it sank almost to the floor. The brake grabs, but weakly. When the pedal is near the floor, only then does the car slow down. I barely made it to the garage. It is not a happy prospect to be the victim of an accident. Tell me what could be the reason. How to fix?
The reasons for the failure of the brake pedal can be: Very often the simplest thing is a decrease in the quality of the brake fluid. The liquid is hygroscopic and absorbs moisture; it may be time to foam the liquid and also check its level. It may also be that the main brake cylinder (GTC) has failed. After replacing brake discs or pads, such troubles sometimes occur. Incorrectly adjusted gap between the GTZ piston and the pedal in the car. Sometimes the pedals and their rods are rusty. Vacuum pump, etc. is faulty. The main thing is not to panic, but to identify and eliminate the reason why the pedal fails.
I would first check the brake fluid level, then bleed the brakes. If that doesn't help, then look at the brake master cylinder.
Perhaps air has entered the system; this may be due to wear on the brake pads, drums, or discs. We need to check everything and take action. Brakes are no joke. It is best to contact the service.
Ten years ago, due to inexperience, I poured low-quality brake fluid into the system. As a result, the brake hoses swelled and separated from the inside. This also rendered the cuffs in the GTZ unusable. And similarly, I had problems with the brake pedal. Air got into the system and everything had to be changed. Maybe you have the same problem.
Correctly adjust the gap between the pedal and the piston. If the gap is large, the pedal rod does not reach the GTZ piston and the pedal fails. And on the other hand, with a small gap, the brake fluid does not allow the pedal to reach the end. Both the current and the other are not correct and lead to problems with the brakes.
If you recently changed your brake pads, this may well be the case. The pedal initially fails during break-in. Top up the brake fluid and bleed the brakes again. When bleeding, place a 3-4 cm block under the brake pedal so that the pedal does not rest on the floor and everything will be OK.
After replacing the brake discs, when braking, I felt as if the brake pedal was sinking and hitting my foot. I went to a mechanic who changed the brake discs. He reassured me and said that after running for about 400-500 km everything would work out on its own. And so it happened, everything gradually returned to normal and now everything is OK.
If the brake pedal sinks all the way to the floor, or only engages every once in a while, or does not return to its place, and the brake fluid and spring are fine, then there is no option but the problem is in the master cylinder. It is better to replace the GTZ with a new one. After replacing the brake cylinder, it is better to completely replace the brake fluid.
The brake pedal falls off. Why? The reason may be cracks in the hoses or a broken vacuum pump. As a result, air gets into the brake system. As a result, the brakes do not work well, you need to bleed the brakes, but it is best to contact a specialist. Brakes are no joke.
Without apparent reasons and proper maintenance, brake failure is very rare. If the brake pedal on your car has stuck (fallen) to the mat, you need to press it all the way. Modern cars have a dual-circuit braking system. Maybe one of them has failed, and the brakes are worse, and the brake pedal goes to the floor. If there is no result, quickly release and press the pedal 5-6 times, the pressure in the system should be restored and you will be able to stop the car.
The serviceability of the braking system on any car is, for obvious reasons, of paramount importance, since overall driving safety directly depends on the effectiveness of the brakes. Taking into account the above, any deviations from the norm (even minor ones) in the operation of this unit are a reason to immediately identify the cause of the malfunction. In this article we will talk about what to do if the brake pedal fails while the engine is running, problems arose after replacing the brake fluid, bleeding the brakes or other elements of the brake system, etc.
Read in this article
Article number and cost of good front brake pads for VAZ 2110 from third-party manufacturers
The front axle of the car experiences the greatest load on the pads when braking. Therefore, the efficiency of stopping the car and the safety of the driver directly depend on them.
Original consumables have mediocre characteristics. They are enough for moderate driving without intensive stops and prolonged braking on descents. There are many third party products that are better than the originals. Experienced car owners recommend installing analogues of the original pads shown in the table below.
Table - Good analogues of the original front pads
| Manufacturer | vendor code | Approximate cost, ruble |
| Ferodo | TAR527B | 550-700 |
| Road House | 222102 | 820-970 |
| TRW | GDB1446 | 1000-1200 |
| ATE | 13046029652 | 930-1100 |
| Profit | 50001325 | 480-600 |
Causes of a hard brake pedal
If the brake pedal is either soft or hard, or the pressure is too tight, there are also several possibilities for the problem. The main reasons here include:
- clogging of the air filter of the vacuum booster. Basically, here you need to replace the filter itself;
- increased sizes of sealing rings in wheel cylinders.
Typically, in this case, the pedal became hard after changing the brake fluid.
You should not use low-quality death; it is better to buy the liquid recommended by the manufacturer. As a result, such a problem will not occur; - presence of mechanical damage on the diaphragm. The element should also be replaced;
- problems with the functioning of the tip in the amplifier. It is necessary to replace it with a working part;
- check valve stuck. These components cannot be repaired, so they should be replaced;
- Vacuum booster valve sticking. You just need to replace this element;
- presence on the hose between the intake manifold and the deformation amplifier or loosening of the fastening. First, try tightening the fastening clamp. If this does not help, you need to change the hose.
We discussed why a soft or hard brake pedal effect occurs. Regardless of the cause of this problem, malfunctions of the braking system are quite serious, so you should take a very responsible approach to diagnosis and repair. If you cannot fix the problem yourself, you should immediately contact a professional - in no case is it recommended to get behind the wheel of a car in which the brakes do not work correctly.
Video about the car's braking system:
Why and when is pumping done?
The process, which drivers call “bleeding,” is based on the goal of removing layers of air from the cylinder and underwater hoses of the braking system. You can object by pointing out that the system is sealed
and only thanks to this technological feature does it function. However, under the influence of constant mechanical loads, as well as material fatigue, the tightness may be broken.
Conducting a daily visual inspection
Before leaving the road, in rare cases, a car may detect signs of hidden depressurization, which is a consequence of:
- Loose fluid supply hoses;
Tuning brakes without modifications for Lada Granta, Priora and Kalina
17 June 2021 LadaOnline 62 528
Depending on the configuration, the manufacturer equips Lada cars with different front brakes. We determine which brake discs AvtoVAZ installs on Priora, Granta and Kalina, what is the difference between the front brake mechanisms, and how to very easily improve the brakes without modifications.
What kind of front brakes does AvtoVAZ install on the Lada?
| Where are they installed? | Lada Kalina and Granta from 8th grade. engine | Lada Priora (8 and 16 grades), Kalina, Granta (16 grades) | Lada Kalina and Granta sport |
| Visual differences | The brake disc is significantly smaller than the boot | The brake discs are completely covered by the boot | Installed only on sports versions of Lada cars |
| Front brake part numbers |
|
|
|
| Suitable wheel rims | R13 and more | R14 and more | R15 and more |
Installing R14 brakes instead of R13
According to the data from the table, you can see that to switch from R13 to R14 brake discs, no modifications are required and the cost of modification is low (buy R14 brake discs and fixed caliper brackets).
Don't forget to check that the rims are at least R14 in diameter. We improve the brakes using the familiar instructions for replacing brake discs.
Most car owners, after installing R14 brake discs, feel a noticeable difference when braking and remain satisfied. However, this is not the limit, the brakes can be made even better!
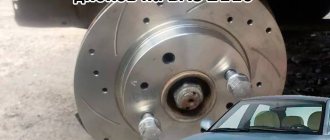
Replacing brake discs on a VAZ-2112
To replace brake discs you will need:
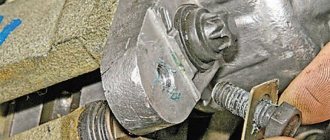
- Place one side on a jack and remove the wheel.
- Bend back the caliper locking plate.
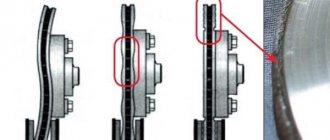
- Unscrew the two caliper bolts with a 17mm wrench.
The diagram shows two brake caliper bolts - Remove the brake mechanism.
In this case, do not disconnect the brake hoses from it. Getting ready to unscrew the brake disc guide pins - The mechanism must be suspended from the car body using holders. Here you will need to make sure that the brake hoses are not twisted or crushed.
- Sprinkle WD-40 or an equivalent into the brake disc cavity. Clean the disc using lubricant. After applying it, you need to wait a while for the lubricant to dissolve the dirt.
- You can remove the disk by unscrewing two pins, which also serve as guides. If necessary, you can use a hammer here, applying gentle blows to the places where the disk is welded to the hub.
The brake retaining pins are marked with arrows.Removed the brake disc
- Reassemble in reverse order.
Brake problems
Failure of the brake system can cause various problems. Wear, if sensors are not installed on the car, can only be checked by visual inspection.
Discs need to be replaced only when they become heavily used. The reason for replacement may also be a crack in the disk.
Replacing a disk is not that complicated. Therefore, it can be produced on your own if you adhere to the rules given above.
Brake disc standards and thickness
Brake disc thickness measurement
The thickness of the disk on a VAZ-2112 should not be less than 10.8 mm. If this indicator is less, then it is worth replacing the disk. Also, axial runout should not exceed 0.15 mm.
When the surface of the disc becomes scuffed or cracked, braking performance will also deteriorate significantly.
Grinding old brake discs
The service is gradually becoming obsolete. It was popular during times of shortage of spare parts, but now there is no shortage. This is more than a half-measure, which allows you to slightly extend the life of the brake discs.
These brake discs have been sharpened several times
Please note that after grinding they were almost even, the steering wheel did not hit when braking, but the working surface was almost completely erased. In this case, it is imperative to replace the disks on the car.
Some service stations can provide the driver with a grinding service. But here we must remember that the thickness of the disk should not be less than recommended
In this case, it is imperative to replace the wheels on the car. Some service stations can provide the driver with a grinding service. But here we must remember that the thickness of the disk should not be less than the recommended one.
Disks are:
- With perforations and grooves.
- Collapsible.
- With gas outlets.
- Ventilated.
- Not ventilated.
Ventilated
A ventilated disk is an element that consists of two disks connected to each other. Due to the blades, heat is removed. Also, the weight of the disk is significantly reduced.
Ventilated brake disc
Discs with gas outlets
When the discs heat up, they cannot fit tightly to the pads due to the gases. In such cases, disks with gas outlets are needed.
Perforated discs
Perforated discs are designed to allow you to independently remove a layer of carbon deposits from the working surface, thereby increasing the braking effect. Here you also need to remember that such discs will wear out quickly.
Brake disc with perforation and grooves
Also, using the grooves on the disc, dirt, dust and water are removed from it.
Non-ventilated brake discs
Appearance of non-ventilated brake discs
Non-ventilated brake discs are the cheapest, they help the worst when braking.
Collapsible disk
A collapsible disc is a standard disc that can be bolted together. In this case, these discs will not heat up very much, since the temperature from them will be transferred to the hub.
Results
At this point the work can be considered completed. If the instructions are not enough, you can watch the video above.
carfrance.ru
Replacement steps
The entire replacement process can be divided into several stages:
- Removing wheels;
- Removing the old brake pad;
- Frame disassembly;
- Cleaning the hub and checking it;
- Removing coating from new disks;
- Runout check;
- Installation of new brake system elements.
Now let's talk about this in more detail.
Removing the wheel
In fact, dismantling the wheel for subsequent replacement of the brake elements is not difficult.
But a certain sequence of actions will have to be followed.
- Place a jack under the car.
- Lift it up so that it doesn't tip over, but still allows you to easily remove the wheels.
- Unscrew the wheel fasteners.
- Remove the hubcaps and the wheels themselves.
As you can see, the procedure is really simple, but it requires attention and accuracy.
Removing the pads
- Try to move the piston as far as possible from the brake mechanism. But do not exceed the distance beyond that which will allow you to comfortably remove the brake pads.
- Take out the block.
- To make the job easier, you can disassemble the brake frame. To do this, unscrew the two bolts securing the block and disconnect the device.
Hub
It must be cleaned, since all accumulated debris, dirt, and rust will negatively affect the effectiveness of the new brakes.
Dirty
For cleaning, alcohol-based solvents and metal brushes are used. If cleaning is not performed, the operation of the brakes will be accompanied by beating - this should absolutely not be allowed.
Be sure to check the hub for runout. Normally it does not exceed 0.1 mm. There is a special tool for checking. If the indicator is within normal limits, then a full assembly is performed.
Working with new disks
Many owners of the “Ten” are interested in which brake discs are best to choose for the VAZ 2110. The question is quite logical.
Choose certified replacements from reputable manufacturers such as Bosch, or stay true to factory parts. These are the two best options in terms of quality and compliance with the car itself.
New
Some take similar discs that partially fit the “ten”, sharpen them, and adjust the design. This is a dubious undertaking, since it requires serious skills in such a matter, additional time and financial costs. At the same time, it is far from a fact that such brakes will work better than those offered by the AvtoVAZ plant.
You've already figured out how to remove the brake element, so it's time to work on a new one. It’s not enough to just buy another brake disc and put it in place. First, it is prepared and a runout check is performed. Let's talk about this in more detail.
- The coating must be removed from a new disc.
- This coating serves as a kind of preservative.
- The layer is removed using any solvent.
- Clean thoroughly and wipe the part dry after finishing work.
- Now you can put the disk in a new place and check the runout.
- The permissible runout is no more than 0.15 millimeters.
- If the value is exceeded, this can lead to an increase in the sensitivity of the brake pedal, as well as the formation of vibrations during braking.
Installation and testing
Before changing brake discs, make sure that the problem with the brake system lies precisely in them. There are a number of other problems that are typical for the “ten” and all cars in general. A full diagnostic will be required so that the replacement is not in vain.
Adjustment
In fact, installation is performed in the reverse order of disassembling the brake discs. Therefore, there should not be any special problems.
But checking functionality is a more important and, to a certain extent, complex issue.
The first thing that experts advise is a full running-in of new discs. To do this, you need to travel about 500 kilometers. In this case, you need to brake smoothly, without making sudden impacts on the brake pedal. If this is not done, defects may form on the disks, and the cause will be simple overheating.
Signs you need to replace drives
Not all car owners pay attention to the condition of their brake discs, which is why the problem of their failure occurs at the most inopportune moment. We recommend learning from the mistakes of others rather than making your own
To determine whether the condition of the brake discs is close to the need to replace, it is recommended to do the following:
- Check the thickness of the brake disc. The normal size is 17 millimeters. This is when we are talking about ventilated discs;
- Non-ventilated elements have their own indicator, and it is 10 millimeters;
- Check runout. This parameter is normally 0.15 millimeters and does not exceed it;
- Runout indicators should be measured at professional service stations that are equipped with appropriate equipment. Independent measurements do not always give accurate results;
- Examine the surface of the brake disc. If you find any damage, defects, chips, or cracks, be sure to replace parts immediately;
- As for choosing new items, purchase them exclusively from certified stores that have permission to provide the appropriate services. Buying on the market can lead to fakes that do not meet strict safety standards. Alas, there are now more than enough such discs;
- You should buy ventilated discs, the shelf life of which is significantly longer than their non-ventilated counterparts, plus their efficiency is better. The air flow that cools the brakes approximately doubles the lifespan of a simple non-ventilated brake system.
The process is complex, but possible to do it yourself. Follow instructions, observe safety regulations, and use only high-quality, proven parts. Still, reliable brakes are a guarantee of your safety and the safety of all other road users.
Withdrawal procedure
1. Remove the desired wheel and brake pads.
2. Unscrew the 2 bolts securing the shoe guide to the steering knuckle and remove the brake mechanism assembly. At the same time, we do not disconnect it from the wheel cylinder. 3. We hang the removed brake mechanism to the front suspension spring. Do not twist or strain the brake hose.
4. Clean the disk from dirt and apply WD-40 to the connections between the disk and the hub and to the guide pins.
5. Unscrew the 2 guide pins and remove the brake disc. You can knock it down with a rubber mallet. 6. Install the brake disc in the reverse order. If you are replacing an old disk, you need to use a file to remove the beads that have formed during wear.
pros
Let's look at why disc brakes are better than drum brakes:
Braking becomes more reliable, braking distance is reduced; Braking forces are distributed more evenly, given that the VAZ 2110 is a front-wheel drive car; There is an effect of faster response after pressing the pedal; Unsprung masses are reduced; Heat dissipation occurs better, which is especially important when driving on a mountain road or during active acceleration/braking. For this reason, the brake system is cooled better; Disk ones are much easier to dismantle and replace; There is no need to adjust the handbrake after each repair of the rear brakes, although this will have to be done the first time; They do not freeze in winter after washing, like drum ones; Rear disc brakes installed on the VAZ 2110 are much more convenient to control and timely notice pad wear
Stages of tuning the brake system of the VAZ 2109
After correctly selecting the necessary brake discs, every car enthusiast asks the question: “Can I do the installation myself?”
The average cost of such tuning without the involvement of service center workers will be about 5 thousand rubles. The main expenses will go to the purchase of a brake disc, calipers and a set of faceplates.
Tuning the brake system of a VAZ 2109 car can be done independently and in a garage. The financial side of the issue also does not seem too burdensome for the family budget of auto-tuning fans.
But there is also a small fly in the ointment in this barrel of honey - such design changes are not provided for by the manufacturer, which entails great difficulties when passing technical inspection, re-registering the vehicle and other possible contacts with traffic police officers. So, each owner will have to decide for himself whether to make such changes to his pet.
How do car brakes work?
Picture description: When your foot presses the brake pedal, the brake fluid in the brake system is squeezed from a narrow cylinder into a wider cylinder. This system is known as a hydraulic system. This allows you to significantly increase your braking force.
Theory…
Imagine how much strength you need to stop a fast car. Simply pressing the brake pedal would not create enough force to activate all four brakes to stop your vehicle quickly. That's why brakes use hydraulics: a system of brake fluid-filled tubes that increase your braking force. Also, thanks to hydraulics, braking forces can be transferred easily from one place to another in a short time.
When you press the brake pedal, your foot essentially moves a lever that forces a piston in a long, narrow brake cylinder (brake master cylinder), which in turn moves hydraulic fluid (brake fluid) toward a narrow tube located at the end brake cylinder.
As a rule, pipes of the same diameter that go to each brake of the car are connected to this tube. Next, the brake fluid flows through narrow tubes into larger cylinders located on the wheels.
Because the brake cylinders located on each wheel are much larger than the cylinder located in the brake system immediately after the brake pedal, the force you initially applied to the brake pedal is greatly increased. As a result, this force compresses the brake pads in each wheel brake.
On practice…
- 1. Your foot presses the brake pedal.
- 2. When the pedal moves down, it pushes a lever that is connected to the master cylinder piston.
- 3. The lever pushes a piston (blue in the picture) into a narrow cylinder that is filled with hydraulic brake fluid (shown in red). As the piston moves in the cylinder, it compresses the brake fluid and pushes it into a narrow hole located at the end of the cylinder, to which a tube is connected. This works in much the same way as a hand pump squeezes air from a cylinder into a thin hose.
- 4. As a result of the resulting pressure, the brake fluid enters a long brake line, consisting of brake pipes that go to each wheel. As a result of the pressure generated by the brake master cylinder, the brake fluid eventually reaches each wheel.
- 5. Next, the fluid under pressure enters the brake cylinders located in the wheels, which are larger than the main brake cylinder (the cylinder in the wheel is indicated in blue).
- 6. When fluid enters the brake cylinder, which has a larger volume compared to the main brake cylinder, the braking force increases greatly due to the difference in the volume of the cylinders in the brake system.
- 7. As a result of the increased fluid pressure, the piston in the wheel brake cylinder clamps the brake pad, pressing it against the brake disc/drum.
- 8. As a result of friction between the brake pad and the brake disc, the wheel disk begins to slow down, which ultimately stops the car.
Our simple example shows the basic operating principle of a hydraulic braking system; in practice everything is a little more complicated.
In fact, the brake pedal actually controls four separate hydraulic brake lines going to all four wheels. In our example, we show the principle of operation of brakes on one wheel of a car.
For safety, all vehicles typically use two separate hydraulic brake circuits. This is necessary in case one brake circuit suddenly fails due to some malfunction. In this case, the second circuit of the entire brake system will continue to function.