Replacing brake discs on VAZ 2110, VAZ 2111, VAZ 2112
Welcome! Brake discs are very important for a car, it is thanks to them that the car slows down, although if you think about it, thanks to every element that is in the braking system, the car stops, it all starts with the main brake cylinder and ends on the brake discs, which are the very last ones in the brake system.
Note! There will be no significant difficulties with replacing these discs, the main thing is to remove all the elements that prevent access to them, and to remove them you need good tools, which cannot be dispensed with at all during any car repair, these tools include: All kinds of keys, wire will still be needed or some kind of strong short rope, in addition to this you will need a metal brush, WD-40 liquid or something similar, some kind of penetrating lubricant!
Summary:
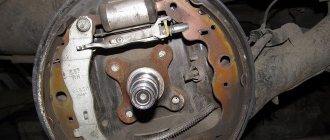
Where are the brake discs located? They are located under the wheel and attached to such an element as the hub, by the way, few people know, but the hub is a very important element of the car and when you hang the wheel, be sure to rock it, checking for the presence of play, which absolutely should not be present (It may be present, but minimal), and when the wheel and brake disc will be completely removed, check the hub, what condition it is in (there should absolutely be no defects on it), for clarity, the brake disc is indicated by a blue arrow, and the hub on which this disc is located (It covers it) is indicated by a red arrow .
When do you need to change brake discs? When its thickness becomes less than a certain one (we’ll talk about thickness later), the disc must be immediately replaced; there have already been cases when the disc fell apart while driving and one wheel on the road stopped braking at all (This happens because the brake disc was not changed in time ), so you shouldn’t pull to such an extent, but it’s better as soon as you feel that when braking the car doesn’t really slow down, vibrations, jerking, etc. occur, then it is recommended to check the brake system and start with the brake discs, which should not have cracks and various types of deformations.
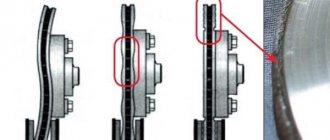
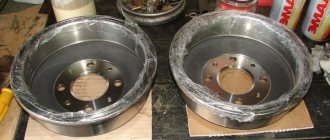
Note! Let’s say a few words about the thickness, firstly, it can be measured using a ruler or a caliper, and secondly, depending on what kind of rims you have in your car, the minimum permissible thickness of each is different, for example, if they are ventilated (They can be understood according to the grooves, if the disk is purely solid as shown in the right photo below, then it is not ventilated, but if it is double or has grooves, they are also called pits, then this is a ventilated disk and it is shown in the photo on the left), then for them the minimum permissible the thickness is 17 mm, if not ventilated, then 10 mm, and best of all before purchasing, or read the information about the brake disc if the leaflet with them is in the box, or check with the seller at what minimum thickness the discs you buy are subject to replacement and always remember one thing, the brake system does not have a certain mileage and therefore if the seller tells you that every 30 thousand km, the disc must be replaced, do not believe him, because each car is used differently and there are people who do not use brakes at all , the gearbox only slows down even after 30 thousand km.
Their brake discs are 100% wear-free!
How to replace brake discs on a VAZ 2110-VAZ 2112?
Note! We recommend replacing brake discs in pairs, because when installing two new discs on both wheels, firstly, the car brakes normally and does not pull to the side, and secondly, they wear out evenly, thereby the effectiveness of the braking system is greatly reduced by replacing the disc only on the one hand, it will give practically no result if, on the other hand, the brake disc is worn out, but on the contrary, it will aggravate the situation, because during braking, the new disc will stop the wheel much faster than the old one, because of this the car will be pulled to the side constantly!
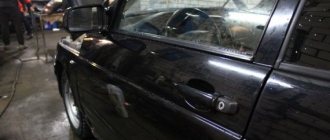
Removal: 1) To remove the brake disc, you will first need to remove the brake caliper (Indicated by the red arrow, how to remove it, read the article: “Replacing the brake caliper on a VAZ 2109”) and place it either on the lever as shown in the photo below, or hang it by a wire or a rope to a spring (This is much better, because the caliper can fall from the lever and the brake hose will break because of this), after which you just have to monitor the condition of the brake hose (Indicated by a blue arrow), it should not be too tight, and because of this it can also tear, due to which you will also have to change the hose and bleed the brake system, and this is already extra work and a waste of money (in this case you will need to buy brake fluid) and time.
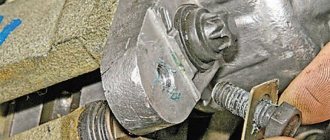
2) When the caliper is removed, proceed to cleaning the old brake disc, it is cleaned with a metal brush and pay special attention to the place where the disc with the hub is attached (This place is indicated by a blue arrow), this place, in addition to cleaning, also contains penetrating lubricant Treat with WD-40, but don’t forget to remove the plastic cap with a screwdriver (It’s clearly visible in the photo, if you look at the blue arrow, you’d think it’s directed at it too) and when all operations are completed, unscrew the two guides studs (indicated by red arrows) securing the brake disc (while holding the disc turning) and then remove the worn disc from the car, pulling it towards you with your hands.
Design Features
It is better to purchase rear disc brakes as a complete set.
The VAZ 2110 fits 13 or 14 inch brake discs (ventilated or non-ventilated). Try to purchase certified discs so that they do not have to be modified. Rear disc brake kit with necessary components
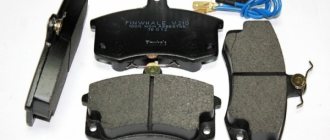
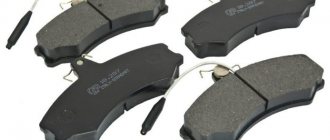
You also need a caliper, which comes in three types, so you need to select it to match the disc. The caliper comes with a hose and brake pads. The kit includes a universal clamp suitable for all calipers - a faceplate.
Before installing disc brakes, you need to dismantle the old rear brake mechanisms of the VAZ 2110.
This is done like this:
- Remove the wheel;
- Remove the brake drum;
- Remove the pads;
- Remove the hub from the wheel, having first unscrewed the brake pipe.
You should prepare for the fact that dismantling will not be easy. Not only do the brakes have the unpleasant tendency to stick during operation, but the bolts are also “welded” by corrosion. Therefore, it is advisable to treat the nuts and bolts themselves with a special agent (for example WD 40) so as not to tear off their edges.
It is important to plug the removed pipe with something so that brake fluid does not leak out and air is not sucked into the system. After that - knock down the hub
This works best if you attach a board or lath to the back of the support disk and hit it with a hammer, moving the blows: one from below, the other from above. This will prevent you from causing serious damage to the disk.
It's time to install disc brakes instead of the removed rear drum brakes.
Having knocked off the hub, we will put it back, but in a different way:
It should be installed through the plate into which the caliper is already mounted. Carefully ensure that all holes line up
Particular attention to alignment; Next, use a hammer to straighten the corner of the beam so that the caliper does not rest against it; Now you can put the brake disc on the hub, placing spacers between these parts, and secure the disc with a bracket; We install brake pads from VAZ 2110; First, carefully and securely attach the brake hose to the caliper, and then to the tube; To reduce the braking force of the rear brakes compared to the front, you need to partially grind off the friction material of the pads.
Rear beam Grinding protrusion on the hub Grinding protrusion on the hub Grinding protrusion on the hub Grinding protrusion on the hub Grinding protrusion on the hub Axle with a blunt Adjustment plate on the axle with a hub Installing the hub We grind the corner of the beam that prevents the caliper from getting into place Installing the brake disc through 2 washers Attaching the caliper to special plate mounted rear disc brakes
Having carried out all the above operations - first on one wheel, and then on the second, you also need to check the system for leaks. The first phase is to simply press the pedal.
The fact that everything is done normally is indicated by the fact that the pedal is pressed with force, quite tightly.
But this is not enough. Have someone else press the brake pedal while you try to rotate the parts that make up your new rear disc brakes.
If nothing moves, it means that your VAZ 2110 now has new rear disc brake systems - better and more reliable than the previous ones.
Replacing brake discs on a VAZ 2110
No one will argue that a car is a high-risk device. If the operation of the car is characterized by stable reliability, then it will be safe not only for the driver, but also for the people around him. In this regard, one of the safety components is the condition of the car’s braking system, which includes VAZ 2110 brake discs.
When a seasonal replacement of tires occurs, the driver must pay attention to the condition of the brake discs and the degree of wear. A situation may arise in which it is necessary to replace the brake discs of the VAZ 2110. A legitimate question is what kind of resource does the brake disc 2110 have. It must be said that not only on this model, but also on other representatives of this family it has quite high performance. It happens that they have to be changed only after the car has “run” almost 150,000 km. But, nevertheless, the time will still come when you need to replace the brake discs.
It should be said that the discs on the front wheels wear out faster than on the rear wheel drive. This is due to the fact that the 2110 model is a front-wheel drive car. Of course, when braking occurs, the main load falls on the front wheels. With the standard configuration, the manufacturer installs a drum design on the rear-wheel drive wheels, which has long been obsolete. Foreign manufacturers have been equipping all wheels with brake discs for a long time.
On models with a sixteen-valve engine, R14 wheels are included as standard. On models with an 8-valve engine, R13 wheels are installed. When purchasing this part, it is almost impossible to determine the degree of its quality. What matters is how accurately the part is made and the quality characteristics of the material used for manufacturing. In the case of ventilated disks, the thickness of the bulkheads and the design features themselves are important. Therefore, good advice would be to purchase brake discs only from proven, reliable brands.
What types of brake discs are there?
The part in question can exist in the following forms:
- Ventilated disc. Its design includes two rotating parts that have blades. They are necessary to remove excess heat from the wheel.
- A disk having gas outlet holes.
- Perforated wheel rim.
- Option with collapsible discs. This disc has holes through which dirt and water trapped in the wheel are removed.
How long does it last
Typically, the first replacement of discs coincides with a similar procedure for brake pads. The wear of a disc is judged by its thickness, and how quickly the discs become unusable depends on your driving style. As a rule, this takes not even months, but years. There is also a dependence on which manufacturer the pads are installed. Some of them wear out discs faster.
The permissible wear of the brake disc on the “ten”, according to the manufacturer, is 17.8 millimeters for ventilated ones and at least 10.8 for regular ones. Disc wear can be determined visually by the presence of abrasions or by hearing (suspicious noise begins in the wheels). Experts recommend immediate replacement of discs if scratches or cracks appear on their surfaces, and the thickness of the discs becomes less than acceptable. The main thing is that brake discs are replaced only in pairs, since they wear out approximately equally on both sides. Failure to comply with this rule is fraught with loss of vehicle controllability (the car will noticeably drift to the side).
On the VAZ-2110, wear on the front axle discs occurs faster than on the rear ones, since this car is front-wheel drive, and most of the energy during braking is transferred to the front wheels. In addition, as standard, the rear brakes on the “ten” are not disc, but long-outdated drum ones. They are outdated, since most automakers in other countries install brake discs on all wheels. It is worth noting that there is no specific wear and tear time frame for them, so their condition must be monitored by the owner of the car himself. They are supposed to be inspected during scheduled technical inspections. There is nothing difficult about this, since, unlike brake drums, it is easier to inspect the disc on the rear axle; you just need to remove the wheel. It makes no sense to change disks early, and not changing them when the need arises is dangerous.
Types of brake discs on the VAZ-2110
Sports brake discs in various formats.
As you know, there are several types of brake discs (ventilated and non-ventilated), but the changing process is no different . Chips, scuffs and scratches reduce braking efficiency. In this case, the brake disc must be replaced.
It is recommended to change elements in pairs so that their thickness is the same.
The output is 2 mm, this is no joke, change it soon!
Thickness:
- non-ventilated brake disc must be at least 10.8 mm ,
- and ventilated 17.8mm .
Replacement algorithm
Let's consider the sequential process of changing a brake disc:
- First you need to dismantle the wheel and remove the brake pads
We dismantle the pads and guides.
The brake pad guides are retracted from the brake disc.
The arrows indicate the bolts securing the brake disc to the hub.
Unscrew the guide fastening nuts.
The disk has been removed and we inspect the hub.
This is the beauty we have now.
Don’t forget to stretch everything well so that an emergency doesn’t happen.
Withdrawal procedure
1. Remove the desired wheel and brake pads.
2. Unscrew the 2 bolts securing the shoe guide to the steering knuckle and remove the brake mechanism assembly. At the same time, we do not disconnect it from the wheel cylinder.3. We hang the removed brake mechanism to the front suspension spring. Do not twist or strain the brake hose.
4. Clean the disk from dirt and apply WD-40 to the connections between the disk and the hub and to the guide pins.
5. Unscrew the 2 guide pins and remove the brake disc. You can knock it down with a rubber hammer.6. Install the brake disc in reverse order. If you are replacing an old disk, you need to use a file to remove the beads that have formed during wear.
Articles (original)
The VAZ-2110 offers a fairly wide selection of brake discs.
- The original catalog number of the disk is 2110-3501070 (ventilated) or 2110-3501090 (non-ventilated).
- The average cost of a set of two products is 5,000 rubles.
New brake disc on the car.
Analogs
In addition to the original parts, the automotive market offers a fairly wide range of analogues, which in terms of quality and cost can cover the needs of any motorist.
Let's look at the table of manufacturers, catalog numbers and average prices for VAZ-2110 brake discs:
| Manufacturer | vendor code | Price in rubles for 1 piece |
| Profit | 5010-1142 | 1000 |
| Denckermann | B130406 | 1000 |
| Ferodo | DDF1142 | 1200 |
| LPR | L1053V | 1200 |
| Brembo | 09.8894.14 | 2000 |
| ABS | 17339 | 1500 |
| Metelli | 23-0553 | 1500 |
| Bosch | 0 986 479 082 | 1500 |
| Cifam | 800-553 | 1600 |
| Trialli | DF 135 | 1750 |
| Pilenga | 4221 SPORT | 1750 |
| Pilenga | V221 | 1200 |
| QML | BD1003 | 1300 |
| Valeo | 297781 | 1500 |
| TRW | DF4108 | 2000 |
| Allied Nippon | ADC1710V | 2000 |
| Hola | HD904 | 2000 |
| Textar | 92109200 | 3000 |
As you can see, the automotive spare parts market is quite wide, and if original wheels are expensive, then there is always the opportunity to buy an analogue.
Bleeding and adjustment
After any manipulations with the brake system (it doesn’t matter whether you repaired the rear, front or parking), on a VAZ 2110 it is vitally important to bleed the brakes so that an air plug does not form anywhere in them, which can negate the ability to brake at the right moment.
It is convenient to do this together, but you can do it yourself, although this requires some additional equipment. Many people know how to bleed the brakes on a VAZ 2110. The main thing is not to forget to do this diagonally, always starting with the front wheels, and pump the right one first.
After bleeding, you still need to check the braking forces. This requires an outside observer. You accelerate and brake sharply, and he watches as the brakes apply. The front ones should work first, then (with a small gap) the rear ones, and the braking force should be greater for the front ones.
Replacement steps
The entire replacement process can be divided into several stages:
- Removing wheels;
- Removing the old brake pad;
- Frame disassembly;
- Cleaning the hub and checking it;
- Removing coating from new disks;
- Runout check;
- Installation of new brake system elements.
Now let's talk about this in more detail.
Removing the wheel
In fact, dismantling the wheel for subsequent replacement of the brake elements is not difficult.
But a certain sequence of actions will have to be followed.
- Place a jack under the car.
- Lift it up so that it doesn't tip over, but still allows you to easily remove the wheels.
- Unscrew the wheel fasteners.
- Remove the hubcaps and the wheels themselves.
As you can see, the procedure is really simple, but it requires attention and accuracy.
Removing the pads
- Try to move the piston as far as possible from the brake mechanism. But do not exceed the distance beyond that which will allow you to comfortably remove the brake pads.
- Take out the block.
- To make the job easier, you can disassemble the brake frame. To do this, unscrew the two bolts securing the block and disconnect the device.
Hub
Dirty
Use alcohol-based solvents and metal brushes for cleaning. If cleaning is not performed, the operation of the brakes will be accompanied by beating - this should absolutely not be allowed.
Be sure to check the hub for runout. Normally it does not exceed 0.1 mm. There is a special tool for checking. If the indicator is within normal limits, then a full assembly is performed.
Working with new disks
Many owners of the “Ten” are interested in which brake discs are best to choose for the VAZ 2110. The question is quite logical.
New
Some take similar discs that partially fit the “ten”, sharpen them, and adjust the design. This is a dubious undertaking, since it requires serious skills in such a matter, additional time and financial costs. At the same time, it is far from a fact that such brakes will work better than those offered by the AvtoVAZ plant.
You've already figured out how to remove the brake element, so it's time to work on a new one. It’s not enough to just buy another brake disc and put it in place. First, it is prepared and a runout check is performed. Let's talk about this in more detail.
- The coating must be removed from a new disc.
- This coating serves as a kind of preservative.
- The layer is removed using any solvent.
- Clean thoroughly and wipe the part dry after finishing work.
- Now you can put the disk in a new place and check the runout.
- The permissible runout is no more than 0.15 millimeters.
- If the value is exceeded, this can lead to an increase in the sensitivity of the brake pedal, as well as the formation of vibrations during braking.
Installation and testing
Adjustment
Essentially, installation is performed in the reverse order of disassembling the brake discs. Therefore, there should not be any special problems.
But checking functionality is a more important and, to a certain extent, complex issue.
The first thing that experts advise is a full running-in of new discs. To do this, you need to travel about 500 kilometers. In this case, you need to brake smoothly, without making sudden impacts on the brake pedal. If this is not done, defects may form on the disks, and the cause will be simple overheating.
Signs you need to replace drives
Not all car owners pay attention to the condition of their brake discs, which is why the problem of their failure occurs at the most inopportune moment. We recommend learning from the mistakes of others rather than making your own.
To determine whether the condition of the brake discs is close to the need to replace, it is recommended to do the following:
- Check the thickness of the brake disc. The normal size is 17 millimeters. This is when we are talking about ventilated discs;
- Non-ventilated elements have their own indicator, and it is 10 millimeters;
- Check runout. This parameter is normally 0.15 millimeters and does not exceed it;
- Runout indicators should be measured at professional service stations that are equipped with appropriate equipment. Independent measurements do not always give accurate results;
- Examine the surface of the brake disc. If you find any damage, defects, chips, or cracks, be sure to replace parts immediately;
- As for choosing new items, purchase them exclusively from certified stores that have permission to provide the appropriate services. Buying on the market can lead to fakes that do not meet strict safety standards. Alas, there are now more than enough such discs;
- You should buy ventilated discs, the shelf life of which is significantly longer than their non-ventilated counterparts, plus their efficiency is better. The air flow that cools the brakes approximately doubles the lifespan of a simple non-ventilated brake system.
Brands
As for the brands of brake discs, they are of great importance, since this is a direct indicator of quality, on which the service life depends. When choosing a brand of brake discs for a VAZ 2110, you need to focus on popularity and customer reviews, this is due to the fact that more popular models, of course, have better quality, you also need to pay attention to the country of the manufacturer and the pricing policy, which do not always correspond to each other. Before purchasing, you need to clearly define the characteristics of each brand, namely strength, reliability, capabilities; it is advisable to compare several brands with each other in order to choose the best one. The most popular and popular brake discs on the VAZ 2110 are: - ATE, Continental Teves; — Allied Nippon; — Lucas, TRW Automotive; — Kraft; — Transmaster; — Ferodo; — MasterSport, Automobiltechnik (MS) GmbH; - Zimmermann - Pilenga; — Brembo; — Alnas (standard brake discs VAZ-2110-70);