When you turn the ignition key of a Priora car, all electronic systems are checked and the check light comes on for a few seconds, this is normal, as it should be. It’s bad when the check light doesn’t light up when you turn on the ignition, which means the check system isn’t working.
If the checkbox on a Priora comes on and is lit when the car is started, the owner immediately falls into panic for some reason - at least in most cases. There's no need to panic, but I wouldn't recommend not paying attention. The engine has 16 valves - Priora is equipped with sensors in many components and this may indicate a breakdown. The check light is on on the dashboard of the Priora car, bottom left. Sometimes the check light comes on, you look, and it just drove through a puddle and the knock sensor got wet. The check light is on, it blinks when cold, but there is no need to panic, we need to look for the reasons. Let's make a reservation right away: there are false positives. Read the article and find out all the reasons why the check engine is triggered.
check engine on a Priora - looks like this
Questions discussed in the article
What is a check engine?
“Check Engine” is translated from English as “Check the engine.” On different cars, on the dashboard there is either such an inscription, or simply “Check”, or an engine icon. On the Priora, it is the yellow icon that lights up, resembling an engine in shape. “Check” lights up in two cases:
- Checking the functionality of the sensors. When you turn on the ignition, all the icons on the dashboard light up, indicating that there is a signal from the ECU and the system is ready to operate. After 2-3 seconds of turning on the ignition, the icon will go out.
- Malfunction of the engine operating system. There are several important aspects. Firstly, the ECU does not receive data about all breakdowns: it cannot technically record any mechanical damage. Secondly, the appearance of this icon may be erroneous. But you shouldn’t trust the opinion “it’s all for nothing” - a problem with the engine can grow like a snowball and cost a pretty penny if you ignore it. Regardless of whether the “check” on the Priora is on or flashing, the problem needs to be solved.
What are the error codes for Lada Priora 8 and 16 valves?
The ECU and on-board computer of cars allow the driver to quickly detect faults. To understand what error information the electronics provide, the car owner must know the decoding of the codes. The most common of them will be discussed below.
Decoding errors
Each error code consists of five characters. The last two characters indicate the serial number of the specific error.
The first character changes based on the fault system in the car:
- P – malfunctions in the operation of the power plant or defects in the operation of the gearbox.
- U – disruption of interaction between system units.
- B – electric lifts, airbag and other defects in body systems.
- C – faults associated with the EUR.
- 3 – reserve;
- 1 and 2 – manufacturer codes;
- 0 – general code for on-board diagnostics.
The third character indicates the nature of the malfunction:
- 1 and 2 – inform about the appearance of defects in the operation of the fuel system or malfunctions during the air supply;
- 3 – breakdown in the ignition system;
- 4 – additional control;
- 5 – incorrectly operating components in idle mode;
- 6 – electronic unit, as well as its circuits;
- 7, 8 – gearbox malfunction.
Error 1602
If the standard on-board computer of the Lada Priora 16 valves showed error 1602, then this indicates that the on-board voltage in the controller has decreased.
As practice has shown, this error 1602 does not affect the performance of Priora in any way.
If you remove the terminal from the battery, the problem disappears for a while, but it will definitely appear again. There may be more than one reason for this error to appear:
- Generator malfunction. To determine accurately, you need to measure its voltage in operating condition, it should be within 14 V.
- A large voltage drop when starting the engine also leads to this error. First of all, you need to check the ground and the ECU.
- This error code also appears when the security system blocks one of the electrical circuits.
Error p0504
Many drivers do not understand what the appearance of code p0504 on the display means. This error appears when the brake pedal sensor is faulty. To determine the exact reason for the appearance of this code, you need to disassemble the sensor and carefully examine it. Perhaps one of the springs has burst or the contacts have simply burned out. In some cases, error p0504 on a Priora appears due to the incorrect position of the brake pedal sensor. It must be installed in the correct position, then error p0504 will disappear.
Error p0422
This error informs the owner of the Priora that the effectiveness of the neutralizer has been reduced below the permissible level. Practice shows that error p0422 appears on the screen of a 16-valve Priora quite rarely, but if it does happen, you must:
- Inspect the catcollector. Its body must be free of mechanical damage.
- If any defects are found, it must be replaced.
- If the cause of error p0442 is not in this element, you need to contact specialists, since in some cases the catalytic collector will need to be re-flashed.
Error p1558
It often appears when the throttle valve is not operating correctly, the quality of which leaves much to be desired. It does not interfere with the proper functioning of the engine, but you should still try to remove it. Some people prefer to solve this problem by flashing it, but there is another way.
To do this, you need to remove the throttle valve, disassemble it and lubricate the plastic gear, which is the working part of this element. In most cases, after lubricating the gear, error p1558 disappears.
Self-diagnosis
Once the main code errors have been studied, you can perform self-diagnosis of the car.
The Lada Priora has a special controller that allows you to perform diagnostics. If an on-board computer is installed in the car interior, then diagnostics are performed with its help. In addition, there is special equipment that allows you to more accurately perform this procedure. Diagnostics begins with activation of the test mode. The procedure is performed as follows:
- Turn off the ignition and hold down the mileage reset button, then turn it on again without releasing the button.
- When the ignition is turned on, all components located on the instrument panel will begin to glow. All devices will begin to move to the maximum mark, and then back. This behavior of the car indicates the beginning of the diagnosis.
- Next, we move on to the right steering wheel switch, on which there is a button for switching the settings of the on-board computer. After clicking on it, an information message with the software version will appear on the screen.
- After pressing the button again, error diagnostics will begin. Error codes will appear on the display, which can be deciphered using the corresponding table.
- Once the diagnostics are complete, you can reset the error data. To do this, hold down the mileage reset button for five seconds.
ABS fault detection
You can find out about problems with the ABS by looking at the indicator light on the instrument panel. If it lights up for no reason or does not go out after the required period of time, you need to go to a service station and undergo computer diagnostics. Modern Priora ECUs have a diagnostic connector through which you can easily connect a portable scanner or a stationary motor tester.
All ABS electronics are connected to the mechanical part of the car, so only an experienced diagnostic technician can accurately determine the error that the system produces. ABS error codes start with 0035 and end with 0800. In order to deal with them correctly and determine the reason for the light bulb to light up, you need to have a table of error decoding on hand or resort to qualified help.
Error 4
Every third owner of the Lada Priora encounters error code 4 - coolant temperature sensor error. In most cases, replacing the sensor and resetting the error does not lead to anything, and after a while it appears again. In this case, you can flash the factory installation again or just accept this problem.
Priora: why the check is blinking or on - the main reasons
The diagnostic connector will help you “talk” to the electronic control unit and find out why the check light is on. Well, before you start diagnosing, check out the list of the most common Priora “errors”:
- Low Oil Level – Low oil levels ultimately lead to increased engine wear. If the oil level turns out to be normal when checked, then it needs to be replaced and the integrity of all Priora components checked. Faulty fuel pump or fuel filter. You can’t always “hear” this, but diagnostics, replacing the filter, and checking the fuel pump will “cure” the breakdown.
- An error in the operation of the exhaust gas system - this is not something to joke about - it is better to start repairs as soon as possible.
- The ignition coil does not produce a spark / the catalytic converter is unstable.
- Wiring problems - high voltage wires can give an erroneous signal to the ECU - "Check" will light up on the dashboard.
- False sensor activation due to high humidity
- The engine starts running when cold and the check light comes on.
The reasons for the “Check” fire on a Priora (16 valves), as we see from the list, can be serious. There is no need to panic: when the “Check” light comes on, you need to immediately reach for the diagnostic connector. It’s funny, but earlier diagnostics were carried out in the service with special software, but today any error code can be displayed on your smartphone, deciphering it using a mobile reading device.
There is another reason for engine malfunction - low-quality gasoline.
If this causes the spark plugs to flood, you will see the “check” blinking. Low-quality gasoline can be sold at any gas station; experienced car enthusiasts advise carrying a couple of candles with them. Sometimes the “Check” light comes on due to gasoline and the engine stalls. If he continues to work intermittently, things will be bad.
“Check” should light up when the ignition is turned on. A malfunction is also considered to be the case when the check light does not light up when the ignition is turned on, that is, the ECU does not send a system check report stating that “the system is ready for operation” - there is a problem in the wiring. You need to get rid of the chek icon not so as to “hide all the problems”, but so that the process of processing the fuel mixture occurs in order. Otherwise, you will have to seriously repair the car.
Deciphering faults in the fuel and air systems
- P0030 - the oxygen sensor heater wire to the exhaust gas converter has broken;
- P0031 - the same electrical wire has shorted to ground;
- P0032 - the same wire has shorted to the on-board network (BS);
- P0036 - the wiring of the oxygen sensor heater is broken, after the converter;
- P0037 - the same wiring has shorted to ground;
- P0038 - it has shorted to BS;
- P0102 - weak signal in the mass air flow sensor network;
- P0103 - very strong signal in the network of this device;
- P0112 - weak signal in the air temperature sensor network;
- P0113 - very strong signal in the network of the same device;
- P0116 - antifreeze temperature sensor signal is out of operating range;
- P0117 - poor signal from the antifreeze temperature sensor network;
- P0118 - very strong signal from the antifreeze temperature sensor;
P0122 - poor signal in the throttle position sensor circuit;
- P0123 - very strong signal in the same circuit;
- P0130 - the oxygen sensor before the converter does not work;
- P0131 - weak outgoing signal on the network of this device;
- P0132 - signal too strong on the same network;
- P0133 - slow response to changes in mixture quality in the network of the same device;
- P0134 - oxygen sensor circuit inactive;
- P0136 - the oxygen sensor after the converter is broken;
- P0137 - poor signal in the circuit of this device;
- P0138 - signal too strong in the same circuit;
- P0140 - the same sensor circuit is inactive;
- P0141 - the oxygen sensor heater after the converter is broken;
- P0171 - there is a lot of air in the fuel mixture;
- P0172 - there is a lot of gasoline in the fuel mixture;
- P0201 - injector wire No. 1 is broken;
- P0202 - injector wire No. 2 is broken;
- P0203 - injector wire No. 3 is broken;
- P0204 - injector wire No. 4 is broken;
- P0217 - engine overheated;
- P0230 - failure in the electric fuel pump relay network;
Here we are looking for an electrical problem that has arisen.P0261 - the injector circuit of cylinder No. 1 has shorted to ground;
- P0263 - injector driver No. 1 does not work;
- P0264 - the injector circuit of cylinder No. 2 has shorted to ground;
- P0266 - injector driver No. 2 does not work;
- P0267 - injector circuit No. 3 has shorted to ground;
- P0269 - injector driver No. 3 does not work;
- P0270 - injector circuit No. 4 has shorted to ground;
- P0262 - the injector circuit of cylinder No. 1 is shorted to the BS;
- P0265 - injector circuit No. 2 is shorted to BS;
- P0268 - injector circuit No. 3 is shorted to BS;
- P0271 - injector circuit No. 4 is shorted to BS;
- P0272 - injector driver No. 4 does not work.
Return to contents
How to reset "Check Engine" on Priora
If the check light is on, then there are two solutions to the problem: fix it, or reset it. The engine icon that lights up is evidence that the ECU has received information about some kind of malfunction in the engine and is informing the driver about it. All errors remain in the computer's memory, so in order to get rid of them without repair, they need to be reset or erased. You can reset a check by following these steps:
- Turn off the engine, secure the car, and open the hood;
- Find the fuse box, in the yellow group, remove F1 (30 Amperes) and wait about 20-30 seconds;
- Put the fuse back and close the hood. Start the engine and check if the signal disappears.
Check light on Priora - you need to know the reasons
When you turn the ignition key of a Priora car, all electronic systems are checked and the check light comes on for a few seconds, this is normal, as it should be. It’s bad when the check light doesn’t light up when you turn on the ignition, which means the check system isn’t working. If the checkbox on a Priora comes on and is lit when the car is started, the owner immediately falls into panic for some reason - at least in most cases. There's no need to panic, but I wouldn't recommend not paying attention. The engine has 16 valves - Priora is equipped with sensors in many components and this may indicate a breakdown. The check light is on on the dashboard of the Priora car, bottom left. Sometimes the check light comes on, you look, and it just drove through a puddle and the knock sensor got wet. The check light is on, it blinks when cold, but there is no need to panic, we need to look for the reasons. Let's make a reservation right away: there are false positives. Read the article and find out all the reasons why the check engine is triggered.
What to do if the Lada Priora check engine light is on
There is an interesting icon on the Priora instrument panel. Upon closer examination, it is clear that this is the silhouette of a car engine. Every experienced driver, looking at him, will casually say, “Ahhh, Check.” But at the same time he will not be able to clearly explain what kind of “Chek” this is, and what it serves and why it caught fire.
You can hear many interesting versions. The most common one is that if it lights up, this is a signal of a breakdown of the mass air flow sensor (mass air flow sensor). Well, and a dozen more equally exotic versions. So what is this alarm? And in what cases does it light up? And most importantly, what to do in this case?
PRINCIPLE OF OPERATION OF CARS WITH ECM (ELECTRONIC ENGINE CONTROL SYSTEM)
Cars with conventional carburetor engines have been replaced by cars in which fuel enters the cylinders through a system of nozzles (injectors). And sparking occurs not in the distributor (distributor), but in a special ignition module. This rather complex system is controlled by a special intelligent unit. You could say it's a computer. It is he who sends signals to trigger all actuators. Therefore, the entire ECM system can be divided into three parts.
- Computer (ECU).
- Actuators (injectors, spark generators, etc.).
- Sensors (Air, oxygen, throttle opening, crankshaft position, etc.)
PURPOSE OF THE CHECK ENGER WARNING LAMP ON PRIOR
What does the “Check” indicator light have to do with this system? The most direct. The fact is that this lamp is directly connected to the ECU (electronic control unit). This warning light comes on when the ignition is turned on. This gives a signal that the main unit is ready for operation. After starting the engine, after 2-3 seconds, the lamp goes out. This means that the motor and all devices are operating normally. And you can safely continue moving.
IF THE LIGHT IS ON
But when the warning light does not go out while the engine is running, or lights up while driving, this means that one of the computer-controlled components is not working correctly, or has generally failed. Literally, “Check Anger” means check the engine.
It is a mistaken opinion that the “Check” lights up when one sensor breaks down. You need to know that this signal can appear for a very large number of reasons! In general, if you read it correctly, from English, this signal, “Check Angier,” means “Check Engine.”
HOW TO DIAGNOSIS THE ECM
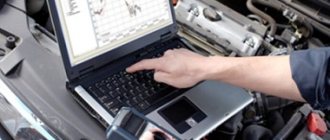
Of course, the most correct action if the “Check” signal lights up on the instrument panel is to go to a service center for diagnostics. There, through a special adapter, a desktop computer or laptop equipped with a licensed program will be connected to the Priora ECU. And they will be able to “talk” to the Priora ECU.
However, at the moment, small mobile devices have appeared in the car accessories market. Of course, they are not able to conduct a full-scale diagnosis of the Priora. But they are quite capable of reading error codes from the ECU memory. Then you just need to decipher the codes correctly. This is the case if the diagnostics provides them in digital format. In this case, you can turn to the Internet.
THE MOST COMMON REASONS WHEN THE CHECK ENGER LIGHT COMES ON ON A PRIOR
But the Priora has the most common breakdowns. To begin with, it is worth listing the main sensors included in the Priora ECM.
- Mass air flow sensor (MAF).
- Throttle position.
- Camshaft positions.
- Crankshaft.
- Knock sensor.
- Oxygen sensor (2 pcs.).
- Speed.
- Rough road sensor.
And also the actuators can make the “Check” light up.
- Idle air control (IAC).
- Fuel injectors (4 pcs.).
- Ignition modules (4 pcs.).
- Canister valve.
- Electric fuel pump.
All these components are activated through the computer, and therefore, if their operation fails, the “Check” light immediately lights up.
MOST COMMON ECU ERRORS THAT CALL THE “CHECK LIGHT”
In the first place, of course, there will be malfunctions of the oxygen sensor. These devices are installed in the exhaust manifold (sensor No. 1) and after the fuel afterburner (catalyst), No. 2. They read the percentage of CO content in the exhaust gases. Due to soot from burnt fuel, they most often deteriorate. The car begins to lose power, the “Check” light comes on. After all, the computer receives a signal that there is too much fuel.
Alas, it is only possible to accurately determine the reason why the signal may have come on using software diagnostics.
On the second place, the mass air flow sensor deservedly stands. A thin thread made of a special alloy changes resistance depending on the amount of air passing through the nozzle. The malfunction is characterized by severe engine malfunction. The revolutions “float”, the power drops, and, of course, the “Check” light comes on. And also checking only with diagnostics through the program.
And the camshaft sensor closes the top three. Its malfunction is characterized by an increase in startup time. Sometimes there may be slight jerks when accelerating. Again, there is no way to determine a breakdown without a program.
PRIORA ACTUATORS
Here in the first place is the IAC, a device that regulates the supply of additional air bypassing the throttle valve. It works by means of a micromotor that extends and retracts the shutter mechanism. If there is a malfunction, the engine will not start at idle. Or, conversely, it increases the speed to 1500-2000. "Check" lights up
Then the ignition modules. When it fails, the motor “troubles” and the speed “floats”. Power is lost. And as a result, the “Check Anger” icon lights up.
Faulty injectors give similar symptoms. It is interesting that all breakdowns of actuators, with certain skills, can be diagnosed without a computer. At least they will make the “Check” signal light up. This is done by either replacing it with a known-good unit, as with IAC, or by replacing it in places, as with ignition modules or injectors. And only the adsorber valve requires connecting equipment.
So what can we say. There is only one conclusion. If the “Check” indicator light on the instrument panel lights up, you need to do computer diagnostics in any case. This is the surest way out.
What is a check engine?
“Check Engine” is translated from English as “Check the engine.” On different cars, on the dashboard there is either such an inscription, or simply “Check”, or an engine icon. On the Priora, it is the yellow icon that lights up, resembling an engine in shape. “Check” lights up in two cases:
- Checking the functionality of the sensors. When you turn on the ignition, all the icons on the dashboard light up, indicating that there is a signal from the ECU and the system is ready to operate. After 2-3 seconds of turning on the ignition, the icon will go out.
- Malfunction of the engine operating system. There are several important aspects. Firstly, the ECU does not receive data about all breakdowns: it cannot technically record any mechanical damage. Secondly, the appearance of this icon may be erroneous. But you shouldn’t trust the opinion “it’s all for nothing” - a problem with the engine can grow like a snowball and cost a pretty penny if you ignore it. Regardless of whether the “check” on the Priora is on or flashing, the problem needs to be solved.
Priora: why the check is blinking or on - the main reasons
The diagnostic connector will help you “talk” to the electronic control unit and find out why the check light is on. Well, before you start diagnosing, check out the list of the most common Priora “errors”:
- An error in the operation of the exhaust gas system - this is not something to joke about - it is better to start repairs as soon as possible.
- The ignition coil does not produce a spark / the catalytic converter is unstable.
- Wiring problems - high voltage wires can give an erroneous signal to the ECU - "Check" will light up on the dashboard.
- False sensor activation due to high humidity
- The engine starts running when cold and the check light comes on.
The reasons for the “Check” fire on a Priora (16 valves), as we see from the list, can be serious. There is no need to panic: when the “Check” light comes on, you need to immediately reach for the diagnostic connector. It’s funny, but earlier diagnostics were carried out in the service with special software, but today any error code can be displayed on your smartphone, deciphering it using a mobile reading device.
There is another reason for engine malfunction - low-quality gasoline.
If this causes the spark plugs to flood, you will see the “check” blinking. Low-quality gasoline can be sold at any gas station; experienced car enthusiasts advise carrying a couple of candles with them. Sometimes the “Check” light comes on due to gasoline and the engine stalls. If he continues to work intermittently, things will be bad.
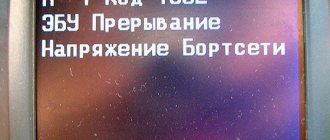
Video “Control unit error 1602”
In this video, the author talks about the power failure error on the ECU of a VAZ Priora car.
I replaced the DTOZH, the error is still on, where can I look for the cause?
- The parking light indicator of the VAZ Priora is flashing on the instrument panel - 10 answers
- How to solve “error 4” in Priora? – 6 answers
- Error 789E on Priora – 4 answers
- What could cause an error - a malfunction of the knock sensor on a Priora? – 4 answers
- Engine shutdown at idle, VAZ Priora – 3 answers
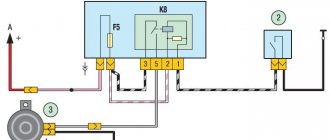
That's right, it should ring in several places 17, 34, 35. The signal is orange at pin 39. Diagram
Replace the terminal. The one that fits onto the sensor. If it's old and dirty. If not, then tighten it up. If it doesn’t help, connect the wire from the sensor to the panel.
Thanks for the answer, I will try your options.
Don’t you have two DTOZh sensors, one for the control unit and one for the control unit? You could replace the one on the ECU. When you remove the terminal from it, is it reflected on the instrument panel?
It is not displayed on the panel when I remove the terminal, I remove the terminal from the battery and then put it back in place, the error is not displayed, I drove 15 kilometers and the check light comes on, error 4, which means a malfunction in the coolant temperature sensor system.
LADA 2170 Priora
DTOZH 8 – coolant temperature sensor, on the thermostat.
DUTOZH 9 – coolant temperature indicator sensor. In the block, under the thermostat.
Errors that are displayed on the instrument panel are related to the instrument panel and the sensors that are connected to it.
There is also such a problem when I start it cold, on. radiator cooling fan. Maybe look somewhere else? Please tell me.
If the cooling fan turns on regardless of the engine temperature, it means the sensor is broken (either the sensor itself or the wiring, most often there is a problem with the connector). The same thing as if you remove the connector from the sensor, emergency operation is activated.
It's not brown, according to the diagram it's orange and green, they go to the control unit connector.
Yes, below, to the left of the glove compartment, behind the panel, there is a metal box with a large connector.
The green wire rang from this connector, so it rang in several places on this connector.
After checking the wires, I reset the error by holding the button, drove 200 km and the check still did not light up. Thank you for your advice and help.
Subscribe
to our channel in
Index.Zen
Even more useful tips in a convenient format
How to reset "Check Engine" on Priora
If the check light is on, then there are two solutions to the problem: fix it, or reset it. The engine icon that lights up is evidence that the ECU has received information about some kind of malfunction in the engine and is informing the driver about it. All errors remain in the computer's memory, so in order to get rid of them without repair, they need to be reset or erased. You can reset a check by following these steps:
- Turn off the engine, secure the car, and open the hood;
- Find the fuse box, in the yellow group, remove F1 (30 Amperes) and wait about 20-30 seconds;
- Put the fuse back and close the hood. Start the engine and check if the signal disappears.
Date: October 15, 2021
Check Engine Light comes on when your vehicle's computer detects a problem with the powertrain. This may indicate a serious or minor complication, but ignoring it will definitely make the problem worse, leading to significant damage and costly repairs. You can avoid all troubles if you know the reasons for the signal. However, it sometimes does not turn off despite solving the problem. In this case, it won’t hurt you to find out how to reset the “check”.
Most drivers get annoyed if the check light still does not go off, even if the car problem has been corrected. In this case, your car's computer is faulty and a little intervention is required to resolve the issue.
How to fix the problem
To resolve the error, do the following:
- Check the sensor for functionality. If it breaks, you simply need to replace it.
- Make sure there is no plaque on the contact. If it is there, you need to clean it.
- Check the operation of the on-board circuit and make sure that it has contact.
- A random error can only be corrected by flashing the on-board computer, but to do this you need to go to the nearest service station.
So, you can solve this problem yourself, however, as practice shows, this does not always work out. It is worth noting that this code often appears in winter, if the car has been standing outside for a long time and not in the garage. It is noteworthy that it does not matter which engine is installed - 16 valves or 8 valves.
After reading this article, many Lada Priora owners will be able to independently find and eliminate the cause of error 4. And despite the fact that special knowledge is required to decipher the error code, all the necessary information can be found in this article.
Using the Scanner
Using a scan tool is the easiest way to reset your check engine light. Here are 5 simple steps:
Connect the scan tool to the OBD connector under the steering column. A laptop or tablet with the appropriate software is installed in the holder; Then turn on the car’s ignition and, accordingly, turn on all the gadgets; On the mobile device, in the appropriate section, by pressing the “READ” button, we look through the engine error codes. We write down the codes with a pen in the order in which they were received. This will be necessary for subsequent repairs.
We delete the error code. Press the “ERASE” button on the scanner. The Check Engine light will turn off when all error codes are cleared. Some scanning tools have many options, such as freeze frame, which captures the sensor readings. When deleting codes, these readings will also be deleted. Note: in some scanners, the option to clear codes may be automatic and use the “CLEAR” or “YES” button instead of the “ERASE” button. Don’t forget to turn on the ignition before clearing codes.
Failures in the idle speed system (IAC) and ESC
- P0500 - speed sensor is broken.
- P0506 - very low engine speed at idle.
- P0507 - too high speed at idle.
- P0511 - the XX regulator network is faulty.
- P0560 - BS voltage is below the minimum threshold.
- P0562 - very low voltage in the BS.
- P0563 - very high voltage in the BS.
- P0601 - ROM checksum error.
- P0615 - the wires of the additional starter relay are broken.
- P0616 - the same wires are shorted to ground.
- P0617 - they shorted at the BS.
- P0627 - the fuel pump relay wires are broken.
- P0628 - the same wires are shorted to ground.
- P0629 - they shorted it to the BS.
- P0645 - break in the wiring of the air conditioning compressor clutch relay.
- P0646 - the same wiring has shorted to ground.
- P0647 - she shorted to BS.
- P0650 - Malfunction indicator light circuit does not operate.
- P0654 - Tachometer control circuit is faulty.
- P0685 - the main relay electrical wire is broken.
- P0686 - the same electrical wire has shorted to ground.
- P0687 - he shorted it to the BS.
- P0691 - the electrical wiring of the fan control relay is shorted to ground.
- P0692 - the same wiring has shorted to the BS.
Note: in cases where the computer displays error codes that indicate a break in the electrical wiring of a device, before troubleshooting the problem and purchasing spare parts, you must first see if the electrical wiring plug has come out of the connector of the corresponding device. Such incidents happened. Testers and computers are, of course, good, but nothing can replace the eyes of a car enthusiast. Good luck with the repair.
Battery disconnect method
Disconnecting the battery is an old way to reset the check engine light. Here are three steps to clear the check using this method: Step 1: Disconnect the cables from the battery. At this point, you should use a wrench to unscrew the positive and negative cables.
Step 2: Discharge the remaining electricity. The next thing you should do is press and hold the car horn for about 30 seconds. This action will help drain the car battery.
Step 3: Wait and reconnect the battery. After disconnecting the battery cables and draining the remaining electricity, all you have to do is wait about 15 minutes and then plug the battery back in. Error codes will be cleared. (Note: This method may not work on some vehicles.) If after this procedure the “check” lights up again, this may mean that the problem is still much more serious.
Allow the check engine light to go off on its own.
Wait until the “check” goes out on its own. The simplest method because you don't have to do anything. The computer system in most vehicles will automatically recheck for problems that may activate the error light. If it is a minor problem, it will automatically correct itself and the check will go off. However, if the check light is still on after three days, you need to apply the methods mentioned above to reset it.
If this continues to happen despite the following reset procedures, you should take your vehicle to your nearest auto repair shop and have it diagnosed by a professional mechanic. Professional diagnostics use more sophisticated tools and can identify precise problems.
REMEMBER: You can always contact our car service center, where your car will be happy to receive professional technical assistance. You can also make an appointment with us for a scheduled technical inspection! Please familiarize yourself with our car repair and diagnostic services.
Content
Tachometer, speedometer, on-board computer indicators, light bulbs - all this is represented by the Priora instrument panel. The “tidy” is designed to display the current state of various Lada Priora systems. An experienced motorist will immediately notice that one of the components requires repair; a certain icon will inform him about this. If you are a novice driver, then it will be useful for you to study the Lada Priora dashboard. This material provides a detailed description of each element of the tidy.
Causes of 4 errors
Error 4 came on on the on-board computer screen ( marked with a red arrow )
There are several reasons why error 4 appears in the ECU. Let's consider all possible options:
- The coolant temperature sensor has failed.
In the process of replacing and repairing the coolant sensor on Kalina
Checking the wiring and voltage supply to the sensor
All of these reasons are fairly easy to fix and are not a cause for serious concern.
How to view errors on the on-board computer?
The video shows the “self-diagnosis mode” of the Lada Kalina car, in which you can find out if there are any errors:
Elimination methods
In order to eliminate the cause of error 4 in the Kalina ECU, you should perform the following operations:
- Check the sensor for functionality. If it “died”, then it should be replaced.
- Check if there is contact and if there is any plaque. Clean the seat and replace the sensor.
- Check the on-board circuit and make sure there is contact in it.
- But a random error will have to be treated only by flashing the ECU and resetting all errors. To do this, it is recommended to contact a car service.
Thus, you can solve the problem yourself, but as practice shows, this does not always work out. Error 4 occurs quite often in the cold season, when the car is parked in the fresh air for a long time, and not in the garage.
Dashboard indicator symbols
When starting up, almost all the icons on the dashboard light up - this way the operation of the light bulbs is checked. Some drivers believe that these are messages about malfunctions of some Lada Priora systems.
| No. on the diagram | Indicator designations |
| 1 | Tachometer. The device measures the engine crankshaft frequency (revolutions per minute). If the arrow goes beyond the red value, it means that the Lada Priora engine is operating in a dangerous mode; |
| 2 | Brake force distributor indicator. Reports defects in the operation of this node; |
| 3 | Battery charge. If the lamp lights up while the engine is running, the battery is discharged; |
| 4 | Left turn signal. The sign flashes when there is an alarm or the left indicator is on; |
| 5 | Speedometer. The device reports the speed at which your Lada Priora is currently moving; |
| 6 | Emergency lubricant pressure in the engine. If the sign lights up during operation of the power plant, it means the pressure in the system is low; it is highly not recommended to operate the engine in this condition; |
| 7 | Right turn signal (see No. 4); |
| 8 | Handbrake indicator. Lights up yellow if the Lada Priora is in the handbrake; |
| 9 | Antifreeze temperature in the cooling system. The operating temperature of the motor starts from 90° and above to the red mark. If overheating occurs, turn off the engine; |
| 10 | Gasoline level in the tank. If the fuel level approaches the minimum, the fuel pump may break; |
| 11 | Reserve gasoline level. The indicator lights up when there are less than 10 liters left; |
| 12 | Key for resetting the daily mileage and switching between display modes; |
| 13 | Alarm. If you have triggered the emergency lights, the lamp will flash along with the turn signal arrows; |
| 14 | Malfunctions in the electric amplifier. If defects appear in the EUR, the lamp will light up while the engine is running; |
| 15 | High beam designation. An active indicator indicates that you have switched to distant; |
| 16 | Outdoor Lighting. The system notifies the driver about the operation of the headlights or low beams; |
| 17 | Airbag malfunctions. If the lamp lights up after starting, then there is a high probability that the airbags will not deploy in a collision; |
| 18 | Immobilizer. An audible signal and flashing indicate that the immobilizer system is faulty; |
| 19 | Computer screen. Here you can view information from the bookmaker, as well as find out the total and daily mileage; |
| 20 | Indication of unfastened seat belts. The buzzer will signal a violation for 90 seconds; |
| 21 | The brake system is in disrepair. Most often these are worn pads or insufficient fluid in the system; |
| 22 | Disabling a specific airbag; |
| 23 | Indicator of defects in ASB operation, the braking system is operating normally; |
| 24 | Check Engine – there is a breakdown in the engines; diagnostics and subsequent repairs are urgently required. |
Diagnostics and decoding of codes on Lada Priora
Like any modern car, the Lada Priora is equipped with dozens of various sensors, the functioning of which determines the condition of the main vehicle systems. Diagnostics of the machine for errors allows you to detect all sensor faults in order to eliminate breakdowns. Now you will learn how Priora error codes are deciphered and how to independently diagnose the on-board computer (hereinafter referred to as BC).
Various breakdowns of sensors and other devices can cause increased gasoline consumption, incorrect engine operation, and increased wear of car system components. Despite the presence of errors, the VAZ Priora will drive until the driver has to make expensive repairs because of them.
VAZ Priora car
So that the motorist does not suddenly have to face the need for repairs, a special controller is installed on the VAZ Priora, with the help of which the driver can diagnose breakdowns. This can be done either using special additional equipment or an on-board computer installed in the car.
In fact, to carry out diagnostics, the car owner will only need to press a few buttons and count combinations of faults.
For example, you do not have a special tester, so we will look at diagnosing the vehicle for errors using the on-board computer. The BC is built into the dashboard and can be used to read combinations of faults. To do this, you need to activate the auto test mode.
The arrows on the dashboard move to maximum values when performing self-diagnosis of the vehicle
- First, turn off the ignition. After this, hold down the daily mileage reset button and turn on the ignition. Please note: the button must be held down.
- There is an LCD indicator on the vehicle's dashboard, keep an eye on it. When you turn on the ignition, all icons will begin to light up, and all arrows (speedometer, tachometer, antifreeze temperature sensor, gasoline level status) will begin to move to the maximum values and back. That is, if all the arrows behave as described here, this means that the sensors and indicators are functioning correctly.
- Now you need to find the button for switching BC functions - it is located on the right steering column switch. By clicking on it, the software version (1.0 and higher) will be displayed on the screen.
- Click on this button again. Combinations of faults will begin to appear on the screen. If necessary, you can reset error data here. To do this, press and hold the daily mileage reset button for about three seconds.
The appearance of a fault combination on the LCD screen during self-diagnosis
Decoding codes
Well, if you succeed in checking your car for faults, then you need to decipher the combinations of errors, otherwise why do you need diagnostics at all?
Self-diagnosis
Let's look at the decoding of combinations of faults that you can read when checking the Lada Priora yourself.
| Number | Malfunction |
| 2 | When independently checked, this code indicates an increased voltage level in the on-board network. It is recommended to check the main electrical circuits. |
| 3 | Errors have been reported in the operation of the gasoline level control sensor in the fuel tank. |
| 4 | This code indicates a malfunction in the refrigerant temperature level control sensor. |
| 5 | Malfunction of the ambient temperature sensor. The information sent to your device may not be accurate. |
| 6 | The engine is reported to be overheating, and antifreeze may boil. |
| 7 | The BC informs the car owner about the emergency lubricant pressure. |
| 8 | Malfunctions in the brake system were detected. This may indicate defects that may subsequently affect the safety of the driver and passengers. |
| 9 | Low battery reported. |
| E (EEPROM) | Faults have been detected in the data packet. |
The arrows on the dashboard move to maximum values when performing self-diagnosis of the vehicle, and all icons on the panel are lit.
Please note: if the button for switching functions of the on-board computer is not pressed for more than 10 seconds, the dashboard will return to the operating state.
Failures in the ignition system
If you were unable to check your VAZ Priora yourself, you can do this using a special tester. In this case, the error code will be a combination of a letter and four numbers:
- P - means a breakdown in the operation of the electronic systems of the internal combustion engine;
- C - malfunction of the chassis;
- B - breakdown in the electronics of the car interior;
- U - indicates an error in the joint operation of different systems;
- the number 0 indicates the OBD-2 code;
- 1 and 2 - enterprise code;
- 3 - reserve code.
| Combination | Description of the breakdown |
| P0300 | The control unit transmits a signal that there is no spark in all cylinders of the 16-valve car engine. |
| P0326 | Incorrect signal received by the control unit from the knock sensor. It is recommended to perform a more thorough check of the device. |
| P0327 | There is an open or short circuit in the knock sensor circuit. The circuit should be checked. |
| P0335, P0336 | There are errors in the operation of the crankshaft sensor. In addition, such combinations may indicate an incorrect signal coming from the device to the on-board computer. |
| P0337 | The crankshaft position monitoring device shorts to ground. |
| P0338 | There is a short circuit or open circuit in the crankshaft sensor circuit. |
| P0342 | The signal in the headlight sensor circuit is too low |
| P0343 | A too high signal has been detected in the circuit of the same device. |
| P0422 | The neutralizer has broken down; it is recommended to replace the device. |
| P0444 | The Lada Priora control unit detected a break in the wiring of the canister valve. |
| P0445 | The canister valve has shorted to ground. |
| P0480 | There is a break in the wiring of the fan relay; the relay should be checked and, if necessary, replaced. |
| P0481 | There is a short circuit in the cooling fan wiring. |
Connector for self-diagnosis of a VAZ Priora car
Fuel and air system error codes
| Codes | Description |
| P0030 | The control unit detected an open circuit from the oxygen sensor heating device to the exhaust gas converter. |
| P0031 | A short to ground is reported in the oxygen sensor circuit. |
| P0102 | An incorrect signal level was detected in the electrical circuit of the mass air flow control device. |
| P0116 | An incorrect signal is received from the coolant temperature monitoring device. You should check the electrical circuit and the condition of the device itself. |
| P0122 | The on-board computer receives an incorrect signal from the TPS. |
| P0130 | The oxygen level control sensor has failed. |
| P0171 | The control unit has detected an excessive amount of air in the fuel mixture. |
| P0172 | The on-board computer detected an excessive amount of gasoline in the fuel mixture. |
| P0201 - P0204 | The Lada Priora control unit detected a break in the wire of one of the four injectors. |
| P0217 | This fault code means the motor is overheating. |
| P0230 | A malfunction has been detected in the electrical circuit of the electric fuel pump relay. It is necessary to carry out a complete diagnosis of the electrical circuit to identify breaks and short circuits. |
| P0261 | There is a short circuit in the wiring of the injector of the first cylinder. |
| P0263 | The driver of the first injector has failed. |
| P0266 | There was a breakdown in the operation of the second injector driver. |
| P0269 | The control unit has registered errors in the functioning of the third injector driver. |
| P0272 | The fourth injector driver has failed. |
| P0264, P0267, P0270 | One of these combinations indicates a short circuit in the second, third or fourth injector circuit. |
Video “Control unit error 1602”
In this video, the author talks about the power failure error on the ECU of a VAZ Priora car.
Was this article helpful?This article was helpfulPlease share the information with your friends
The exclamation mark is on - what to do?
We have noticed that new topics often appear on car forums where drivers ask about the exclamation marks that are displayed on the Lada Priora panel. They rarely specify where it is lit and what is depicted on the icon. In this section we have collected a small FAQ Below are all the exclamation marks that can light up on the instrument panel of a VAZ 2170 car. The designations of these icons are as follows:
- The red exclamation mark in the circle (bottom) is lit. The indicator indicates that there is a problem with the vehicle's brake system. This is usually a low brake fluid level. Add it to the tank and, most likely, the sign will stop lighting. If this does not happen, then it is worth checking the system for damaged components. When igniting, the indicator lights up for 4 seconds and then goes off.
- The red exclamation mark in the triangle/circle (above) is lit. Modern versions use a triangle instead of a circle. The indicator tells us about defects in the operation of the brake force distributor. Use extreme caution if the light comes on while driving.
- Exclamation mark next to the steering wheel icon. When illuminated for a long time, it indicates a malfunction in the electric power steering (EPS). Like other icons, it lights up when ignited and goes out after a few seconds if the system is working properly.
If the red triangle lights up while the engine is running, then you should diagnose the brake force distributor.
Sometimes the cause of the indication is a malfunction in the electronics. Terminals are coming off, contacts are oxidized, defects in the on-board computer are a few reasons for the random appearance of icons. To avoid damaging one of the systems, check the electronics first. To do this, it is enough to dismantle the device on the Lada Priora and see if the terminals are securely seated in the sockets. If the brake system indicator lights up, first check the fluid level in the reservoir, and only then fill in new antifreeze.
Checking using a connected computer or tester
Driver Information Panel
Checking system malfunctions using connected devices gives more accurate results, but at the same time requires deciphering special codes. For example, the monitor displays code p0441 or p0130 or error p0422. Oh, these car manufacturers, in human language they could write “replace the oxygen sensor” instead of P0130 or “check the canister valve” instead of P0441. But nothing can be done, the Lada Priora is also intended for export, so it is easier to write p0441 in the program than to give explanations in Russian, Kazakh, Arabic, Armenian and 10 other languages. And then attach special tables that indicate the meaning of certain codes. Just look at them and everything will become clear. But these tables are not included with the operating instructions. Either way, you can check them out below.
All fault codes for Lada Priora car systems consist of 5 characters. Here is a breakdown of Prior's errors.
The Latin letter comes first:
- P - error in the electronic systems of the motor;
- C - error in the electronic systems of the chassis;
- B - error in interior electronics;
- U is an error in the joint operation of different systems.
In what cases is it necessary to remove the instrument panel?
Dismantling the Priora tidy is required for tuning or replacing burnt out lamps. The VAZ 2170 is a modern model, so there are not many fastenings on the panel. To disassemble you will need a set of screwdrivers. Don't forget to turn off the negative battery.
The process begins with removing the mounting block. To do this, you need to turn the latches on the fuse cover and then remove it;
Turn the marked clamps to remove the cover. It is not necessary to remove the steering wheel, just lower the steering column down. Using a Phillips screwdriver, unscrew the screws of the trim; use the same tool to unscrew the screws of the instrument cluster. Tilt the top towards you and then remove the combination from the slots. Now you can turn the lock;
Pull the cover out to remove it from the groove Sources used:
- https://priorik.ru/gorit-chek-na-priore-prichiny-nado-znat/
- https://inkam-auto.ru/raznoe/kak-sbrosit-chek-na-priore-samomu.html
- https://www.veber-service.ru/blog/4-sposoba-kak-sbrosit-oshibku-dvigatelja-check-engine.html
- https://remontvazov.com/panel-priborov