Errors on the VAZ 2110 on-board computer: note to owners of “Ten”
VAZ 2110 error codes are presented numerically on the display, and they are transmitted from phase sensors to the on-board computer. This is convenient, but a novice driver will not understand much and will not be able to figure out how to use this equipment. But you need to know and be able to do this, since the system, thanks to the built-in self-diagnosis function, will help to identify a malfunction in the early stages, which means it is possible to eliminate it in a timely manner.
Diagnostics
There are two ways to diagnose the condition of car systems. Let's start with the first one, which does not involve the use of additional equipment.
To start the self-diagnosis function, you need to press a button that resets the mileage for the day. Turn on the ignition. You will see how the arrows on the instruments begin to move from one position to another. This means that the diagnostics of the VAZ 2110 has been launched and information has begun to flow from the phase sensors to the ECU. After the process is completed, the RAM will transmit numbers to the display that will show the state of the car’s systems.
VAZ 2110 car
Decoding combinations
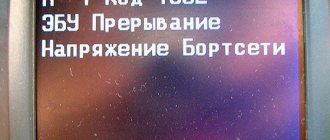
When the self-diagnosis is completed and the number 0 is displayed, this means that everything is in order with the vehicle and all systems are working as expected:
- if 1 is displayed, this indicates that there are problems with the microprocessor or the RAM is failing;
- 4 — high voltage in the network, more than 16 V;
- if 8, then low.
If there is not one fault, but several, then a figure equal to the sum of faults will be displayed. If 6 lights up, then this will mean the sum of the numbers 2 and 4. If 14, then most likely there are three malfunctions at once, namely 2, 4 and 8.
The simplest diagnostics that is available to the driver without the use of additional equipment. It will, of course, help identify some faults, as well as show the condition of the components and systems of the VAZ 2110 as a whole. But to specifically identify all faults and decipher information coming from phase sensors, additional tools are needed. For example, the on-board computer STATE, which provides more data.
Daily mileage reset button
Engine error reset check VAZ 21099, 2110, 2111, 2112, 2113, 2114, 2115, Kalina, Priora, Granta
Published on August 29, 2016
Engine error reset check reset VAZ 2109, 21099, 2110, 2111, 2112, 2113, 2114, 2115, Kalina, Priora, Granta, etc.
You shouldn’t recommend such things to anyone, because... The light on the dash does not always light up. Better go and buy the cheapest bookmaker and dump it. and no matter how much you disconnect the error label from the ECU, you will not remove it, you just need to remove it.
On the Priora, the error reset occurred for me even without the ignition on, only I disconnected the lower (negative) terminal. Can you explain why the ignition should be on? And yet, I read somewhere on the forum that there is such a method: Both terminals are disconnected from the battery and short-circuited with each other. What do you say to this?
Doesn't the check light come on when something is wrong with the engine? Well, reset it, and then repair?
The frame change at 1:21 is especially disturbing.
The computer is on fire, you're hanging out, Clem's brains don't like such changes, I don't recommend it, there's no one to do it
Only a service station will help, otherwise a new computer
Resetting the error in this way will help in exceptional cases, for example, if the error was caused by poor quality fuel. Or the car was started from the pushrod, and the camshaft sensor could have malfunctioned. But in most cases, it is necessary to find out exactly the true cause of the error - either diagnostics at a service station or reading error codes using an on-board computer, such as State, will help with this. There were problems with the sensors, an error code and a decoding are displayed on the BC - you change the sensor to a new one and everything is solved. And removing the terminal will not help if in fact there is a problem with the ECM.
thank you, everything is ok, I started jumping around different gas stations for gasoline
Your generator doesn't work; if you turn it off, the car won't run.
Shit this doesn't help
Bitch, are there really sheep who wouldn’t think of doing this purely logically?! This is electronics and sometimes it drives you, you reboot your home computer even if it works around the clock and by the way, don’t write and scare that you can’t do that, that something will burn out and so on, if you don’t know, don’t write, nothing will burn out and will burn out It can’t, you won’t be disconnecting this terminal 100 times a day. This method works, but not for all errors; if something more or less serious, the check will not disappear or will disappear for a minute and light up again. I used to also go and feed the guys with diagnostics, then I gave up and bought an on-board computer for a hundred bucks and you reset everything yourself when you need it, and you immediately see what exactly is knocking out the check.
Diagnostics using additional tools
To diagnose cars, including the VAZ 2110, various equipment is used, which is connected to a special connector. Thanks to this equipment, which is not particularly complicated or expensive, you can get a complete picture of the condition of the car.
The service station uses a personal computer to which data from phase sensors is transmitted via a special cable.
Adapter for car diagnostics
Bluetooth devices have appeared on the market that allow diagnostics using a smartphone, tablet or laptop.
They work according to the scheme. The device is connected to the connector, the ignition is turned on and the diagnostic process begins. The data comes from phase sensors to the ECU. From it to a mobile device on which specialized software must first be installed.
This makes it possible not only to obtain more data, but also to present it in a more visual form. This method allows a driver, even with little experience in operating a car (in our case, a VAZ 2110), to obtain all the data about his car.
But most drivers prefer to carry out diagnostics at a service station. So that you are aware of the data that the on-board computer produces through RAM from the phase sensors, we will present the transcripts of common errors.
Decoding combinations
If problems arise with electrical equipment, they must be corrected immediately. Error code 1602 will indicate that not everything is in order in this matter.
Sometimes error 1602 can simply be reset and does not appear in the future. Socialists call such data “good.”
Error 1602 sometimes appears if:
- the battery was disconnected for some time;
- there was a voltage surge when starting the engine, for example, in cold weather.
But if error code 1602 appears all the time, you need to check the entire network. Perhaps there is a break. If error code 1602 constantly appears, you can try cleaning the battery terminals. Check if they are securely fastened. Didn't help, error 1602 still appears? Check the circuit. You need to start from the positive terminal of the battery. Start with the electrical fuse and fuse link.
Check the ground of the ECU, TPS. Sometimes it happens that the cause of error code 1602 is an alarm that can block the controller circuit and affect the readings of the phase sensors. In such a situation, you need to file a claim with the company that installed the alarm.
Error 0102 indicates a low signal level, which is reported from the mass air flow phase sensor.
Code 0102 will be stored in RAM memory in the following situations:
- low air consumption, which depends on the speed of rotation of the crankshaft;
- how open the throttle is;
- Several cycles have passed since the problem appeared.
If the error appears periodically, then you need to:
- check the condition of the air barrier;
- fastening the wiring block to the ECU;
- check IAC;
- clean the throttle pipe.
Another error that may occur is 0300. 0300 appears in cases where the RAM detects frequent misfires.
If error code 0300 is displayed constantly, then you need to check the following components:
- spark plug;
- nozzles;
- ignition system;
- increased or decreased compression levels may be the cause of code 0300;
- Also, code 0300 may appear in case of wiring failure.
You cannot ignore the appearance of error 0300. In the future, this may lead to deterioration in the performance of other nodes.
It is not difficult to master car diagnostics, in particular the VAZ 2110. It will extend the service life due to timely detection of faults detected by phase sensors.
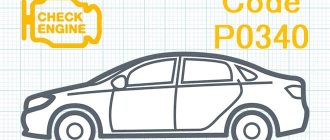
“CHEK ENGINE”, self-diagnosis codes, Reading self-diagnosis codes on your own.
The controller continuously performs self-diagnosis on certain control functions. The language of the VAZ 2110, – 2111, – 2112 controller is used to indicate the source of the malfunction using diagnostic codes. Codes are two-digit numbers ranging from 12 to 61. For different controllers, fault codes may differ slightly from each other. In table 9-3 shows a breakdown of the “error” codes for the “January-4” type controller installed on VAZ 2110, VAZ 2111 or VAZ 2112 vehicles, for a distributed fuel injection system without feedback and with domestic components. When a malfunction is detected by the controller, the code is stored in memory and the “CHECK ENGINE” indicator light turns on. This does not mean that the engine should be stopped immediately, but the reason for the “CHECK ENGINE” warning lamp to come on should be discovered as soon as possible.
Table 9-3 Fault codes for controller type “January-4”
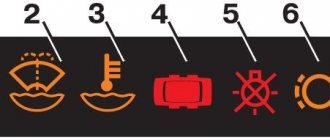
Indicator lamp diagnostic circuit fault
High signal level of the coolant temperature sensor
Coolant temperature sensor signal low
Increased voltage of the on-board network
Reduced voltage on-board network
Incorrect crankshaft position sensor signal
Throttle position sensor signal voltage too high
Insufficient throttle position sensor signal voltage
There is no signal from the vehicle speed sensor
High signal level of the CO potentiometer
Low signal level of the CO potentiometer
Incorrect signal from the mass air flow sensor (high frequency signal at the sensor output)
Incorrect signal from the mass air flow sensor (low signal frequency at the sensor output)
Idle speed deviation
Invalid knock sensor signal
Programmable read only memory (PROM) error
Controller error (RAM error)
Electrically programmable memory (EPROM) error
Immobilizer communication error
“CHECK ENGINE” lamp
The lamp is located in the instrument panel combination of VAZ 2110, VAZ 2111, VAZ 2112 cars and performs the following functions: informs the driver that there is a malfunction in the engine control system and the car needs to be checked as quickly as possible; issues diagnostic codes stored in the controller's memory to help a technician find a malfunction. When the ignition is turned on, the “CHECK ENGINE” lamp lights up and, while the engine is not running, the lamp and systems are checked for serviceability. After starting the engine, the “CHECK ENGINE” lamp should go out. If the lamp continues to light, then the self-diagnosis system has detected a malfunction. If the fault disappears, the lamp usually goes out after 10 seconds, but the fault code will be stored in the controller’s memory. In the case of an “intermittent” malfunction, the “CHECK ENGINE” lamp will light for about 10 seconds and then go out. However, the corresponding fault code will be stored in the memory of the controller installed on VAZ 2110, VAZ 2111, VAZ 2112 cars until its power is turned off. When unexpected codes are detected during the reading of error codes, it can be assumed that these error codes are caused by an intermittent malfunction and can help in diagnosing the system.
Reading error codes on VAZ 2110, VAZ 2111, VAZ 2112 cars
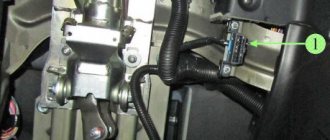
A diagnostic block is used to communicate with the controller. It is located under the instrument panel console on the left side. Fault codes stored in the controller's memory can be read either with a special diagnostic tool or by counting the number of flashes of the “CHECK ENGINE” lamp. To read error codes using the “CHECK ENGINE” lamp, you must connect contact “B” (Fig. 9-31) of the diagnostic block to ground. The easiest way is to short it to ground by connecting it to contact “A”, which is connected to the engine ground. When contacts “A” and “B” are connected to each other, the key in the ignition switch must be turned to position III (Ignition), but the engine should not run. Under these conditions, the “CHECK ENGINE” lamp should flash code 12 three times in a row. This should happen in this order: flash, pause (1-2 sec), flash, flash - long pause (2-3 sec), and so on. twice (Fig. 9-32). Code 12 indicates that the controller diagnostic system is working. If code 12 is not displayed, then there is a problem with the diagnostic system itself. After code 12 is displayed, the “CHECK ENGINE” lamp flashes fault codes three times if they exist, or simply continues to display code 12 if there are no fault codes. If more than one fault code is stored in the controller’s memory, they are displayed 3 times each. Attention! Upon completion of the diagnostics, it is allowed to open contacts “A” and “B” of the diagnostic block 10 seconds after turning off the ignition.
Erasing codes
Codes are erased from the controller’s memory either after repairs are completed or to see if the malfunction occurs again. To erase, you must turn off the controller's power for at least 10 seconds. Power can be turned off either by disconnecting the wire from the negative terminal of the battery, or by removing the controller protection fuse from the fuse box. WARNING To avoid damaging the controller, turn its power off and on only with the ignition off.
Source: autopeople.ru
The engine error light came on: what to do and how to erase it
An error in engine operation causes the check engine warning light to light up on the dashboard. The indicator will remain on until the normal operation of the failed or malfunctioning element is restored. On some cars, after the operation is restored, the “check” stops lighting by itself; in addition, a so-called “reboot” of the controller may be required, which we will consider below, as well as a software reset of errors in the ECU.
Note that in some cases, even after eliminating the cause and attempting to reset, the “check” still continues to light. Often such errors are critical. In other words, it is impossible to remove such an engine error using simple methods. The fact is that a critical error is recorded in the memory of the electronic control unit and is not erased on its own. In this article we will talk about how engine errors are diagnosed, as well as how to reset the engine error yourself.
Read in this article
Possible reasons for the “check engine” icon to appear on the dashboard when the engine is working properly
Check Engine icon on instrument panel
Many car enthusiasts and VAZ-2114 owners have heard that “Check Engine” may appear on the panel for no reason . There can be quite a lot of reasons. At the same time, the strangest thing remains the fact that the engine shows no signs of malfunction: there is no jerking, loss of power and no other problems have been identified.
So, where could the fault still be located, and how can it be diagnosed? In any case, the first thing you need to pay attention to is the electronic control unit; this is where you should look for a fault. Since the “Check” icon indicates a malfunction in the motor, the control unit knows exactly where to look for it and which sensor signals a malfunction.
If you connect to the ECU, you can see the error that served as an alarm signal, and then deal with the problem.
But, since it is not always possible to connect to the engine control unit, let’s consider where the malfunction may be hidden:
- Error in the ECU or software problems.
- Ignition system: spark plugs, wires, injector, ignition coil.
- Fuel system: bad gasoline, injectors (see “replacing injectors”), fuel pump.
- Lambda probe and catalyst.
- Mass air flow sensor (see “checking the mass air flow sensor using a multimeter”).
Troubleshooting Methods
CHECK icon options
So, the main reasons for the appearance of the “Check Engine” icon on the dashboard have been identified, and it is necessary to move on to methods for eliminating problems. Of course, not all motorists know the design features of the VAZ-2114, so many faults and solutions will become an impossible task. In this case, in order not to take risks, you should contact a car service.
Well, for those who are already experienced, this material will be very useful. So, let's move directly to solving the problem.
ECU and related faults
It often happens that the appearance of the “CHECK” icon is associated with a malfunction in the “brains” of the car. There are many reasons for this effect, but the main one is a malfunction in the software and the accumulation of errors.
The remedy is “zeroing” or resetting the settings to factory settings. Of course, if this does not help, you need to change the software to a new one. For January class ECUs, there are Custom firmwares in which many software “bugs” are corrected. To perform the action you will need a special K-line cable, a tablet (laptop), software and a little knowledge of automotive electricals.
Time to change the oil
Engine oil change process
Another reason for the appearance of “Check Engine” on the dashboard is a signal that it is time to change the oil or there is not enough oil in the system. So, the motorist must check the condition of the lubricating fluid , as well as carry out scheduled engine maintenance.
Spark plugs and high voltage wires
Also, the reason for the appearance of the “Check Engine” icon may be a malfunction in the ignition system, namely a breakdown in one of the spark plugs or explosive wires. In this case, the engine can operate normally and show no visible malfunctions. So, to find a fault, you need to ring the wires and check the functionality of the spark plugs. If necessary, replace damaged elements.
Injector and ignition coil
An injector or ignition coil (see “checking the ignition coil on a VAZ-2114”), which has malfunctions, can also cause the “Check Engine” to appear. In this case, it is necessary to diagnose the elements, as well as repair or replace damaged elements.
Bad gasoline
Caricature of low-quality fuel
The most common reason for the “CHECK” icon to appear on the dashboard is bad or stagnant gasoline.
At the same time, diagnosing it is quite difficult and practically impossible. Therefore, as practice shows, motorists completely drain the fuel from the tank, and also “bleed” the residue from the system.
After filling in new fuel, let the car run and then turn it off . After some time, start it and see if the warning light appears on the panel. If it disappears, then the cause of the malfunction has been eliminated; if not, then it is hidden in another place.
Fuel pump
Dismantled and dirty fuel pump
Often, a faulty fuel pump causes the “Check Engine” to appear on the dashboard. Thus, insufficient pressure in the fuel line can serve as a signal of a malfunction. In fact, this problem should be shown in errors of the electronic engine control unit, but as practice shows, not always. Therefore, it is worth diagnosing the fuel pump and possibly replacing the repair kit, since the filter mesh on it may be clogged.
Injectors
Clogged injectors can also send a signal to the ECU, which in turn will “turn on the check”.
In this case, the malfunction can be eliminated by cleaning the elements. This should be done on a special stand, but if one is not available, the operation can be done at home.
Lambda probe and catalyst
New lambda probe and old catalyst
A faulty oxygen sensor or catalytic converter can also cause the problem. In this case, it is worth carrying out diagnostic work and, if necessary, replacing damaged elements. So, an indirect additional sign may be a slight increase in fuel consumption.
A faulty mass air flow sensor causes the “Check Engine” to appear on the dashboard.
This element is diagnosed quite simply using a tester, and eliminating the cause is replacement . In this case, it is necessary to reset all errors after replacing the ECU.
Additional diagnostics
Diagnostics and repair of gas equipment
If gas equipment is installed on the car, then additional diagnostics will be required, since in any case, it is connected to the electronic control unit.
In this case, the cause of the malfunction may be a pressure drop in the fuel line or a gearbox malfunction.
How to clear an engine error
Let's start with the fact that engine errors can occur for various reasons, since the control system includes a large number of sensors and controls the operation of individual components, systems and mechanisms. It should also be taken into account that different vehicles may differ in terms of the complexity of a particular system. On some cars, the “check” lights up, for example, only in the event of serious or critical errors (malfunctions in the operation of the air flow control valve, engine detonation error when the knock sensor is faulty, etc.).
What is an ECU reset with VAZ initialization?
Already a large number of people leave questions “How to reset the ECU with initialization.”
In this place I will point you in the right direction. A reset is sometimes required for various reasons, the sensor was replaced with a working one, the car began to behave inappropriately, the check light is on (does not always help), the controller was reflashed, so sometimes it is necessary to reset the adaptation of the unit.
We will need a k-line adapter, elm327 adapter, OpenDiagFree
(You can download from their official website)
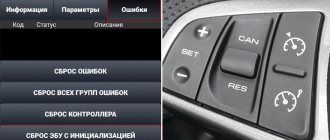
Next, we connect to the diagnostic socket and go into the program. Turn on the ignition.
Click on the configuration definition, then click the “Play” button next to the inscription “Proceed to block diagnostics”. Sometimes after flashing the program cannot determine the ECU itself, it must be selected manually in the “Block Selection” section.
After all this was done, we went into diagnostics and connected. Go to the "Errors"
and press the
“ECU reset with initialization” . Then turn off the ignition. The reset should be performed with the engine turned off, that is, just with the ignition on.
Next, turn on the ignition and start. The reset can also be performed by the On-Board Computer if it has this function. V
Omega T14M has such a function. In some BC models it is called the “Fast and Furious” function. You can also reset it using the mobile version of OpenDiagMobile.
Comments 182
Tell me about a few questions, Grant's car, block M74, 8 valve: - after resetting the controller, the car accelerates poorly, the dynamics are bad. Benz. 95. Does it get better later? — after training the controller (engine braking 6 times), the controller trained flag appears, but after a delay on. ignition with the engine off, the controller is not trained again? — what does the flag mean in openiag controller is blocked? — when teaching the controller to misfire, does the knock channel learn from engine noise, or does it happen at a different time, or does not happen at all? — is everyone with E-gas limited in throttle opening by 62%?
I won’t give you any advice on any issue, I don’t do training on the M74, I don’t provide training, it will learn itself while driving, whether it drives better or worse is the fatigue factor of the sensors or the motor... usually I only see the opposite: after a reset it drives better, but after training it’s worse, regarding 62 % opening, try to see while driving, it should be 99%, the detonation channel has not been trained previously, that is, even the knock of unregulated valves can be recognized as detonation, and also unevenness and vibrations from the road also affect the knock sensor if there is no rough road sensor.
How to check engine errors and erase the error in the ECU memory
To carry out engine diagnostics and read error codes, as well as to reset them, many drivers prefer to go to a service station where there is a scanner. Service station specialists, at the owner’s request, can issue a printout that will display the error codes recorded in the control unit’s memory. Note that this procedure is optimal in the case when the check is constantly on. If the error is “floating” (the check periodically lights up and goes out), then a visit to the service may not yield anything.
In such a situation, you can buy a scanner for personal use, but its cost and the need to study the features of the software make this method impractical, especially when it comes to diagnosing only one car. Let us add that the scanner is used in parallel with a laptop or personal computer, which creates additional inconvenience.
All kinds of third-party BCs (on-board computers) also rightly belong to similar ones in terms of ease of use, cost and feasibility of purchase. The solution is capable of reading and deciphering error codes and displaying additional information about the parameters and operating modes of the internal combustion engine. At the same time, the BCs require proper connection and separate installation in the cabin.
Among the main advantages of such adapters is that the device is a small, compact “box” that is inserted into the diagnostic socket of your car. This means that the need to connect, lay wires, place the device itself in the cabin, use a PC and perform other additional actions is completely absent.
The adapter in the connector remains almost invisible and connects to a tablet or smartphone “over the air” thanks to bluetooth/wi-fi technology. This is especially convenient when the engine error lights up periodically. In other words, you can drive with the adapter in the connector as long as you like, and at the moment the check light comes on, immediately read the fault code. You only need to secure your smartphone or tablet to a stand or holder to be able to monitor the readings on the screen while driving.
As for the software, it may be supplied with the adapter. The necessary programs are also available in the Play Market for Android and similar solutions for devices on other operating systems. The software must be installed on a smartphone/tablet. Note that among the various available solutions, the Torque program is very popular (a free version of this application is available in the Market for Android). The program allows you to flexibly customize the interface, has the ability to not only read, but also decipher errors, and has the ability to reset engine errors.
Using the solution looks like this:
- The adapter is inserted into the vehicle's diagnostic connector;
- A smartphone/tablet with installed software is installed in the holder;
- Next, the car starts;
- Bluetooth is turned on on your smartphone or tablet;
- A program (for example, Torque) is launched on the phone/tablet;
Now you need to wait for the adapter and device to synchronize with the program, after which the parameters of the operating power unit are displayed. To determine why the check is on, you need to go to the appropriate subsection on your mobile device. Error codes will be displayed there, and it is also possible to provide options for decoding them. At the same time, it is possible to collect individual errors or all of them at once, as a result of which the check engine light goes out.
What's the result?
Ease of use and accessibility allow adapters for the diagnostic connector to significantly simplify the procedure for checking a car, reading and decoding ECU errors. It is also worth noting that the error can be quickly reset without having to disconnect the battery terminals, erase a critical error, etc.
Finally, we would like to add that among the commercially available adapters, there are devices that may not read errors recorded in the ABS unit and Airbag airbag modules. In other words, information on these items may not be available. For this reason, before purchasing an adapter, it is necessary to separately clarify the possibility of reading errors from the memory of the above and other ECM modules by one or another device.
Why does the check light light up on the dashboard? Is it possible to continue driving a car if the check engine light is on? What should you check first?
The main signs by which you can determine problems with the DPKV crankshaft position sensor. Causes of failures, breakdowns, self-check.
For what reasons may misfire of the fuel-air mixture occur in one or more cylinders? Fault diagnosis, recommendations.
Table with errors
A complete list of faults with explanations and recommendations for troubleshooting:
Sensor malfunctions
To check the flow meter, perform the following steps:
Engine malfunctions
Possible causes of the problem:
- regular use of low-quality fuel;
- violation of air intake tightness;
- lack of spark;
- damage or physical wear of cylindrical devices.
If replacing the fuel does not help, it is necessary to diagnose the air intake system. You should tighten the fastening clamps, change the air filter element and check the pressure in the rail (the normalized value is no more than 2.8 atm).
It is also necessary to perform diagnostics:
- high-voltage wires connected to the defective cylinder;
- spark plugs;
- check for possible oxidation at the cable connection points.
Diagnostics of high-voltage wires is carried out using a tester; it is necessary to check the resistance. If the obtained value is more than 10 kOhm, then the cables must be replaced. You also need to check the integrity of the spark plugs and make sure there is no carbon deposits on their tips.
Possible causes of the problem:
- breakdown of the mass air flow sensor;
- lean or enriched air-fuel mixture in the engine cylinders;
- malfunction of the electronic engine control system unit.
To fix the problem, you can try to relearn the throttle valve, to do this, perform the following steps:
Possible solutions to the problem:
Electrical faults
When this combination appears, the following problems are possible:
Possible signs of problems:
- the car engine does not start or stalls for no reason;
- fuel consumption increased;
- electronic devices and mechanisms do not work correctly;
- the power of the power unit is lost, etc.
If you do not have the appropriate equipment and skills, you can follow these steps to resolve:
Using the Scanner
Using a scan tool is the easiest way to reset your check engine light. Here are 5 simple steps:
- Connect the scan tool to the OBD connector under the steering column. A laptop or tablet with the appropriate software is installed in the holder;
- Then turn on the car’s ignition and turn on all the gadgets accordingly;
- On your mobile device, in the appropriate section, press the “READ” button to view engine error codes. We write down the codes with a pen in the order in which they were received. This will be necessary for subsequent repairs.
- We delete the error code. Press the “ERASE” button on the scanner. The Check Engine light will turn off when all error codes are cleared. Some scanning tools have many options, such as freeze frame, which captures the sensor readings. When deleting codes, these readings will also be deleted. Note: in some scanners, the option to clear codes may be automatic and the “CLEAR” or “YES” button instead of the “ERASE” button.
- Be sure to turn the ignition on before clearing codes.
Battery disconnect method
Disconnecting the battery is an old way to reset the check engine light. Here are three steps to clear the check using this method: Step 1: Disconnect the cables from the battery. At this point, you should use a wrench to unscrew the positive and negative cables.
Step 2: Discharge the remaining electricity. The next thing you should do is press and hold the car horn for about 30 seconds. This action will help drain the car battery.
Step 3: Wait and reconnect the battery. After disconnecting the battery cables and draining the remaining electricity, all you have to do is wait about 15 minutes and then plug the battery back in. Error codes will be cleared. (Note: This method may not work on some vehicles.) If after this procedure the “check” lights up again, this may mean that the problem is still much more serious.
If you decide to remove the terminal
When disconnecting the battery terminal, you must follow the following basic rules:
After connecting the battery back, do not be alarmed by the highlighting of new symbols that were not previously displayed when the engine was running. Following the reboot, the system performs adaptation, and the icon only confirms this. In addition, after a few minutes it will go out.
For example, on a VW Polo, after rebooting the “brains” with a disconnected terminal, the electric power steering icon lights up. This is a signal to turn the steering wheel to the left all the way, and then all the way in the opposite direction.
Source
Allow the check engine light to go off on its own.
Wait until the “check” goes out on its own. The simplest method because you don't have to do anything. The computer system in most vehicles will automatically recheck for problems that may activate the error light. If it is a minor problem, it will automatically correct itself and the check will go off. However, if the check light is still on after three days, you need to apply the methods mentioned above to reset it.
If this continues to happen despite the following reset procedures, you should take your vehicle to your nearest auto repair shop and have it diagnosed by a professional mechanic. Professional diagnostics use more sophisticated tools and can identify precise problems.
REMEMBER: You can always contact our car service center, where your car will be happy to receive professional technical assistance. You can also make an appointment with us for a scheduled technical inspection! Please familiarize yourself with our car repair and diagnostic services.
Self-diagnosis and decoding of error codes on the VAZ 2115
Many domestic cars are equipped with on-board computers, which greatly facilitate the search and identification of faults using a code. The possibility of diagnostics and self-diagnosis on the VAZ 2115 appeared with the beginning of the installation of an 8-valve injection engine.
Meaning and decoding of codes
Self-diagnosis codes
Video “Self-diagnosis of VAZ 2115”
Comments and Reviews
Car diagnostics
The appearance of a lit “Check Engine” lamp on the instrument cluster signals the driver that a problem has arisen in the vehicle’s electrical system. You need to understand that checking the vehicle yourself and at a service station can give different results. Special equipment available to professionals will allow more accurate detection of faults.
Self-diagnosis
On a VAZ 2115, the owner can do independent diagnostics and find out what errors are stored in the memory of the engine control unit. The procedure is carried out by calling up fault codes on the dashboard or using a diagnostic adapter.
To carry out diagnostics on the electronic instrument panel, you must perform a certain sequence of actions:
- Sit in the driver's seat of the car, insert the key into the ignition and press the daily mileage reset button located on the instrument cluster.
- Turn the lock key to the ignition switch position.
- Release the key, starting the self-diagnosis process. Visually, this will look like turning on the backlight, all signal lamps, possible symbols on the LCD screens and testing the instruments (the arrows will move across the entire scale in both directions).
- Press the key again and release. The second press displays the software version of the instrument cluster on the screen located under the speedometer (inscription like Uer x. x).
- Press the key again, after which the errors in the memory will be displayed on the screen.
Instrument cluster VAZ 2115, the button is located on the right side of the speedometer
The driver can perform self-diagnosis on the electromechanical panel and the “January-4” control unit according to the following sequence:
- Turn off the ignition.
- Open the diagnostic connector cover located on the center console.
- Connect contact B to the negative terminal of the battery (to the body). Contact A, connected to the engine crankcase, is suitable for this.
- Turn on the ignition. The “Check Engine” lamp will flash code 12, which means the diagnosis has begun. The light signals are given as follows - a long flash, then a pause (about 2 seconds), two short flashes, a long pause (about 3 seconds). Signal 12 is sent three times. If there is no signal, the diagnostic system is inactive or faulty. After this, the Check Engine light will flash and list the errors in memory. Each code is repeated three times. If there are no errors in the memory, code 12 will continue to be transmitted.
Diagnostics using special equipment
The diagnostic process using special equipment consists of checking the car using a laptop. To connect to the diagnostic connector you will need a cable with an adapter. Using this cable, we connect the computer to the connector via USB output. For testing you will also need software; the power of the computer used is not important. There are many versions of different testing programs on the Internet.
Diagnostics is performed as follows:
- It is recommended to inspect the vehicle before starting the inspection. Check the volume of consumables - engine oil, brake fluid, coolant.
- Find the diagnostic connector and connect your laptop to it. If you have a special scanner, then that's even better. But since finding a scanner is not so easy, and buying one is not cheap, you can use a laptop. Before testing can begin, the ignition must be activated. There is no need to start the power unit.
- After connection, the testing utility starts. The software interface may vary. When you launch the software, graphs or a list of parameters with numbers may appear. This information will allow you to draw conclusions about the operation of the power unit.
- The scan starts. Fault codes will appear on the laptop screen. To decrypt, use the information provided in this article. We could not describe all the codes, but we deciphered those that occur most often. Usually, when downloading a program to a computer, users are provided with a separate file describing the faults.
- After decryption, the problem is repaired.
Meaning and decoding of codes
During self-diagnosis of a VAZ 2115 with an injector, only numbers or flashes that code the error will be shown on the instrument panel. When reading trouble codes from an electromechanical instrument cluster, it is necessary to record the number of flashes and calculate error numbers from them. Their purposes can be deciphered using a special list. Most of these faults can be resolved independently by replacing failed sensors.
Self-diagnosis codes
When performing diagnostics, it is necessary to take into account that the number on the screen may indicate two summed errors. For example, 9 indicates the presence of two faults - numbered 1 and 8.
| Numeric combination | Decoding |
| 1 | ECU problem |
| 2 | Incorrect data from the fuel level sensor |
| 4 or 8 | Network power problems |
| 12 | Malfunction of the error lamp circuit in the instrument cluster |
| 13 | No signal from lambda probe |
| 14 or 15 | Incorrect data from temperature sensor |
| 16 or 17 | Problems with the network power supply, it is necessary to check for short circuits |
| 19 | Motor shaft position sensor error |
| 21 or 22 | Throttle sensor error |
| 23 or 25 | Incorrect operation of the intake air temperature sensor |
| 24 | Speed sensor faulty |
| 27 or 28 | No signal from lambda probe |
| 33 or 34 | No air flow data available |
| 35 | Idle speed control sensor is faulty |
| 42 | Ignition control circuit problem |
| 43 | Knock sensor failure |
| 44 or 45 | Violation of the composition of the mixture |
| 51 or 52 | ECU memory errors |
| 53 | Error in CO setting sensor (installed on cars without converter) |
| 54 | Octane corrector sensor (installed on cars without a converter) |
| 55 | Violation of the composition of the mixture |
| 61 | Failure of the lambda probe |
An example of error 14 appearing on the panel
Table of decoding codes for flashes calculated during diagnostics.
| Error code | Flash combination | Decoding |
| 12 | Long-pause-two short | Diagnostic circuit malfunction |
| 14 | Long-pause-four short | Engine temperature sensor malfunction |
| 15 | Long-pause-five short | Likewise |
| 16 | Long-pause-six short | Abnormally high mains voltage |
| 17 | Long-pause-seven short | Abnormally low mains voltage |
| 19 | Long-pause-nine short | Crankshaft position sensor failure |
| 21 | Two long, pause, one short | Incorrect data from the throttle position sensor |
| 22 | Two long, pause, two short | Likewise |
| 24 | Two long, pause, four short | Problem with the speed sensor |
| 27 | Two long, pause, seven short | Lambda probe failure |
| 28 | Two long, pause, eight short | Likewise |
| 33 | Three long, pause, three short | Air flow meter needs to be checked |
| 34 | Three long, pause, four short | Likewise |
| 35 | Three long, pause, five short | Idle speed outside the tolerance range |
| 43 | Four long, pause, three short | No signal from knock sensor |
| 51 | Five long, pause, one short | Memory error in block |
| 52 | Five long, pause, two short | Error in controller |
| 53 | Five long, pause, three short | Memory error in block |
| 61 | Six long-pause-one short | No signal from the immobilizer |
The data obtained allows you to quickly find the faulty element and eliminate the cause of the error.
The video from the Garage channel shows diagnostics on a VAZ 2115 using a scanner and laptop.
Controller errors
The most common controller errors encountered during diagnostics are listed in the table.
| Program error number | Decoding |
| R 0030-0038, 0141 | Malfunction of the lambda probe heating system |
| R 0102 and 0103 | Incorrect signal from the air supply sensor |
| R 0112 and 0113 | Error in data from intake air temperature sensor |
| R 0115-0118 and 0217 | Problems detecting engine temperature or overheating |
| R 2122 and 2123, 0222 and 0223, and 2138 | Incorrect signal from the gas pedal and throttle position sensor |
| R 0171-0172 | Incorrect mixture parameters |
| R 0201-0204 | Faulty injectors (each cylinder has its own code) |
| R 0261-0272 | Problems with injector control |
| R 0130-0134 | Problems with the functioning of the lambda probe before the converter |
| R 0136-0140 | Problems with the functioning of the lambda probe after the converter |
| R 0300 | Multiple misfires |
| R 0301-0304 | Cylinder misfires |
| R 0326-0328 | Knock sensor failure |
| R 0351-0352, 2301 and 2304 | Monitoring the operation of ignition coils |
| R 0422 | Failure of the neutralizer |
| R 0691-0692 and 0693-0694 | Failure of the first and second cooling fan start relays |
| R 0560-0563 | Problems with power supply |
| R 0627-0629 | Indicates incorrect operation of the fuel pump control circuit |
| R 1602 | Malfunction in the engine parameters control controller |
Reset errors
After self-diagnosis, finding out the cause of the problem and correcting the breakdown, the errors can be reset.
To do this, go to the error viewing menu, press the odometer reset key and wait a few seconds. The number 0 will light up on the screen - the error has been reset. In this case, data about problems is stored in the unit’s memory and must be deleted. If left, the “Check Engine” light will light up in the instrument cluster. In addition, self-diagnosis may not read all electrical system errors; the error removal procedure will show whether a more detailed analysis of the vehicle’s electronics is needed.
To reset the error, do the following:
- Turn on the ignition.
- Open the hood and remove the negative terminal from the battery. Wait about a minute, connect the wire back and close the hood.
- Turn off the ignition.
- Turn on the ignition again and start the engine. The Check Engine light may come on briefly and then go off.
If the symbol remains illuminated, there is an ongoing problem with some sensor or wiring in the vehicle. It can only be found out using a special scanner. It is necessary to conduct additional diagnostics to determine the problem node. Then carry out repairs and clear any existing errors using a computer diagnostic program for the ECU.
Resetting errors on cars with an electromechanical instrument cluster is carried out by disconnecting the negative terminal of the battery from the on-board network for 10 seconds. The ignition must be turned off.
Error codes in Mercedes-Benz models
Today's cars are equipped with various electronic devices that allow problems to be detected more quickly. Any malfunction in the injection system will not go unnoticed, you just need to be able to decipher it.
Mercedes are equipped with a powerful BC, to which you need to connect a device to detect error codes. For example, such as VAG. This tester is reliable and inexpensive.
Having purchased the tester, you need to activate it:
- transfer drivers for the device to your computer or automatically adjust all parameters;
- connect the laptop to the tester;
- connect the reverse side of the tester to the port for diagnostics;
- turn on the ignition and launch the utility;
- Click on connection and check.
You should know that Mercedes-Benz fault codes include a 5-digit combination of letters and symbols.
Decoding
| Literal values | |
| R | This means that the error received is related to the functioning of the engine or transmission system. |
| IN | The combination is related to the functioning of body systems, that is, central locking, airbags, seat adjustment devices, and so on. |
| WITH | Indicates a malfunction in the suspension system. |
| U | Malfunction in the operation of electronic components. |
| Digital values | |
| 1 | Failure in the fuel system. |
| 2 | Ignition malfunction. |
| 3 | Auxiliary control. |
| 4 | Certain idle speed problems. |
| 5 | Errors in the operation of the control unit |
| 6 | Gearbox malfunctions. |
| Some combinations | |
| P0016 | Code P0016 means the position of the crank pulley is incorrect. If combination P0016 appears, we may be talking about the control device, so first of all you need to check it. P0016 may also indicate a defect in the wiring. |
| R2001 | A breakdown in the functioning of the exhaust gas emission system was registered. Reports incorrect operation of system channels. It is necessary to check the pipes for leaks and clogging. If necessary, you need to clean it. The problem may be the wiring, the need to adjust the pipes, or valve failure. |
| R2006 | It is necessary to replace the right air flow temperature control regulator behind the compressor. |
| Р200С | Incorrect operating range of the oxygen regulator of the first bank. It makes sense to test the electrical circuit. |
| P201D, P201E, P201F, P2020, P2021, P2022 | Thus, the driver is notified of unstable operation of one of the six engine injectors (1,2,3,4,5 or 6). The essence of the defect may lie in a bad electrical circuit, which should be checked, or in a malfunction of the injector itself. It is necessary to carry out detailed testing of the wiring, as well as check the connections of the contacts. |
Reset
On Mercedes cars there is a convenient opportunity to reset the error or reset it. This is done using a program or a special button. There is also the following method:
- start the engine;
- bridge the 1st and 6th contacts with a piece of wire;
- wait exactly three seconds and close the contacts again, but now for six seconds;
- The error code should be erased.
The old, proven method almost always helps - you need to remove the negative terminal from the battery.