Replacing Heater Backlight Lamps Lada Granta
How to replace running lights on a Lada Grant
On a Lada , the dimensions are combined with daytime lights in one lamp. The ignition also turns on the DRLs, and when the headlight turns on, it turns off and the side lights turn on. The main advantage of light sources is efficiency compared to low beam headlights, as well as lower fuel consumption.
Don't confuse DRLs with side lights. This is much less bright and indicates the size of the car when parked at night. If you compare this light with other methods of car lighting, it is the safest (no glare, equipped with sufficient brightness) and consumes the minimum amount of fuel.
Factory equipment assumes that Lada Grant has the simplest incandescent lamps.
Their characteristics are well known to car enthusiasts - the light in the lamps dims, and if they turn yellow, they have a short service life.
to replace for this and other reasons .
Standard DRL lamps
The characteristics of external light sources are established by Russian legislation. To travel safely on Russian roads without breaking laws, you need to:
- place the bulbs on the front of the Lada Grants body at a height of 25 to 150 cm from the ground;
- maintain the minimum distance between the bulbs (60 cm);
- buy products from 40 to 200 cm 2
Lamps used on the Granta Lada car
Install new lighting
The required increase in brightness or bulb life can only be achieved by replacing existing bulbs. Motorists often replace the halogen light sources installed in Lada with LEDs. As a rule, this task can be solved even by a person who has no experience in replacing a lamp. However, you need to know a few nuances. It is not enough to simply place a new diode in the right place - the process has its own characteristics.
They are:
- it is often necessary to disconnect the previous base from the diode in order to move its parts into the desired holes;
- The driver will need to check the polarity of the light sources to the "Fuse" Grant to the fuse. Failure to comply with this requirement will result in the explosion of the fuse responsible for the mains voltage. The fuse installed in this car model is capable of shutting off the safe operation of the electrical circuit.
Before replacing light bulbs, ensure that the procedure complies with applicable laws.
Also be sure to undergo a routine inspection. This will indicate whether the change process is dangerous. Once the old light source has been removed, it should not be disposed of immediately. If you fail the test with the new lamps, it would be logical to replace the old ones. Also, keep in mind that Russian Federation laws only allowed white and yellow vehicle lighting—other colors were outlawed.
Changing the lighting on the Lada Grant to the recently popular LEDs has many advantages:
- less electricity and therefore fuel consumption;
- longer service life (some Lada Grants have a service life);
- excellent visual effects, bright asphalt;
- These models do not place a large load on the generator and do not overload the fuse.
To replace the correct headlight, follow the algorithm:
- Remove the cartridge by turning it counterclockwise.
- Remove the broken product by pulling it towards you.
- Make sure the lamp antennas match the lamps in the carriage and push them into place at a 45 degree angle.
Correct placement of the diode antenna
Installing lighting in the left headlight has its own characteristics, since it is more difficult to reach.
Before the replacement process, remove the air filter by first unscrewing the antifreeze hose. Then remove the 3 rubber supports that the machine is mounted on. The following steps are the same as replacing the right headlight.
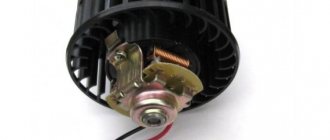
Principle of operation
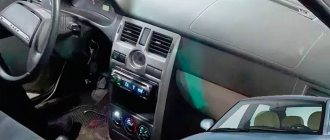
The Priora heater control unit, the repair of which we are interested in in this article, receives a signal from the cabin temperature sensor. This mechanism is located in the ceiling light. After receiving this signal, a comparison is made with the temperature value that was set by the driver. The difference is compared with the acceptable value. If the difference between temperatures is greater than the permissible value, the control unit will send a signal to the damper gear motor.
Due to such a complex system that Priora is characterized by, the stove unit may exhibit malfunction due to other elements. Therefore, you should not initially sin with self-propelled guns. The problem may be with the dampers or the temperature sensor. To determine this, it is necessary to measure the resistance on the sensors.
Refinement of the backlight of the heater control unit Lada Granta and Kalina
It is no secret that the Lada Kalina heater control unit has migrated to more modern Lada Granta and 2nd generation Lada Kalina cars. Along with it came some shortcomings, for example, dim lighting. There are many ways to improve interior lighting, but we will focus on only one of them, which in our opinion is the best.
The reason for the poor illumination of the stove control unit is the green filter on the sticker. Most often, car enthusiasts simply erase it, thereby making the backlight a little brighter, but this does not solve another problem - uneven glow.
We propose to approach the issue comprehensively, improve the backlight and the scale itself on the heater control unit, and for this you will need:
- Layout of scales in Corel Draw x5 - To download files you need to log in to the site (password: lada.online).
- Matte film with adhesive layer, 0.5 m - 350 rub.
- White translucent film 0.4 m. - 250 rub.
- LED modules for illumination.
- Plotter cutting services - 180 rub.
We remove the central trim of the instrument panel (dashboard), to do this, use a screwdriver to pry up all the handles of the heater controls, and then the plastic trim itself, snapping it around the perimeter, starting from the lower right corner. Then we install the LED modules on double-sided tape. We are guaranteed bright illumination.
We carefully glue the cut out models; the first layer is a light filter for red and blue temperatures. The second layer is a white translucent film, and the third is a black matte film. The reflectors on the plastic can be aligned so they are out of the way, but the reflectors on the inner rings can be left alone.
As a result, we get uniform and bright illumination of the stove control unit. You can compare with how it was and how it became:
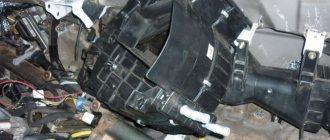
How to remove a panel on a viburnum
Removing the instrument panel assembly with heater Lada Kalina
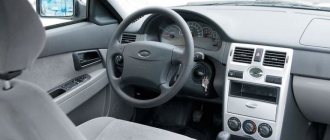
How to remove the panel on Kalina? This question is asked by almost all car enthusiasts who have purchased a new or used AvtoVAZ car. Lada Kalina is an almost legendary car; there are a lot of jokes and stories about it. Of course, listening to all this is quite exciting, but when you yourself are faced with one of the comic problems, it’s no longer funny.
Kalina has many different flaws, and one of them is the dashboard. At the factory, its installation is carried out manually, which can later cause squeaks, unpleasant noise and other annoying sounds during a trip.
They check exclusively the gaps, and rarely pay attention to the quality of the torpedo connection. Because of this, many owners try to remove the panel themselves to eliminate the source of the noise. But this is not so easy to do either.
But this is not so easy to do either.
Removing the instrument panel is carried out in several stages, and everything should be disconnected extremely carefully
Disassembling the panel
To dismantle the instrument panel in Kalina, you should arm yourself with a set of high-quality screwdrivers and patience. To work you will need:
- crosshead screwdriver;
- slotted screwdriver;
- 10mm wrench with round head;
- marker or tape to indicate disconnected wires.
Disassembly begins from the sides. How to remove a torpedo? The sequence is:
- The first step is to disconnect the rubber seal that prevents the panel from being removed. Using a flat-head screwdriver, bend it to make room for dismantling.
- Next you need to remove the plastic casing with three clips. It is located on the front pillar of the cover. Again, a flat-head screwdriver will come in handy, which can be used to pry off the socket.
- The next step is to detach the trims in front of the glass. You can unscrew them using a Phillips screwdriver by unscrewing the fasteners on both sides.
- After this you will be able to remove the black trim under the glass. It is secured with iron clips and screws, so there is no need to rush. Slowly pull towards you until it comes loose. It may happen that the clips get stuck under the panel or some of them will be missing altogether.
- We unscrew all the screws that are nearby and remove the covers from the side air ducts.
After removing all the side and side elements, you can begin to dismantle the central part.
Removing the console
Now we need to start sequentially disassembling the panel in Kalina into parts. How to disassemble the panel?
- Remove the ashtray: pull it towards you as far as it will go and unscrew the 4 screws that secure it.
- After this you can get to two plugs. They are located on the sides of the emergency lights. Use a flathead screwdriver to pry it off and set it aside.
- We unscrew the screws that are located under the plugs. These fasteners from below hold the console.
- After the two screws are removed, pull the console (shield) towards you, but slowly so as not to break the wiring. We disconnect the wiring, first marking the wires so as not to confuse which is which later.
- Now unscrew the steering wheel cover. It is held in place by 2 bolts, for which a 10mm wrench is useful, and 5 self-tapping screws.
- Next, disconnect the instrument panel cover. There are only 2 screws here.
- The top panel is secured with nuts. There must be at least 7 of them.
- As you can see, the stove air duct is tightly fixed. What to do? You will have to rip off 2 lock washers and unscrew the remaining screws, which, in fact, secure the panel in place. Only self-tapping screws are enough for fastening.
- Next, you can try removing the steering wheel. If it doesn’t work out, you’ll have to work a little harder and find the remaining fasteners. In any case, we look for all the hidden screws and unscrew them to the last.
- Pull the panel towards you. If it gives in, it means everything is unscrewed. If somewhere she doesn’t want to move away, we arm ourselves with a screwdriver and unscrew the hidden fasteners.
- After this you can disconnect it.
That's all the instructions on how to remove the instrument panel in the Lada Kalina.
Tuning the instrument panel is one of the main reasons why a torpedo and its adjacent parts are disassembled. Lada Kalina is not distinguished by its bright design and interesting design. What can you do about it? Install panel lighting. This solution will help improve the visibility of indicators. In addition, the perception of the interior will change. You can also change the panel to another one or repaint its parts. Such tuning of the instrument panel is a radical measure, but absolutely justified. The plastic the panel is made of is simply terrible.
Dismantling the panel is a painstaking task, but the hardest thing is to then put it all together so that the panel does not creak.
You need to fit the parts well and tightly, then no sounds will occur. If you first mark the wiring, then connecting all devices should not be difficult.
Replacing switches and backlight lamps on the Lada Granta instrument panel
Tools:
- Open-end wrench 10 mm
- Pliers
- Medium Phillips screwdriver
- Set of plastic mounts
- Small flat screwdriver
Parts and consumables:
- Trunk release button
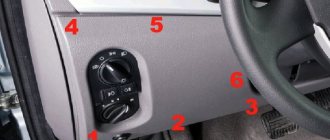
- Outdoor Light Switch
- Hazard switch
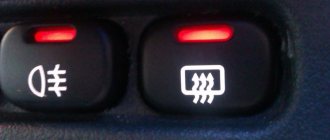
- Heated rear window switch
- Switch for operating modes of the heating fan and interior ventilation
- Lamp W1.2W - 2 pcs.
Replacing the trunk lock actuator button
1. Disconnect the wire terminal from the negative terminal of the battery.
2. To replace the trunk lock actuator switch, remove the mounting block cover from the instrument panel.
3. Using pliers, squeeze the two latches of the switch and remove it from the cover of the mounting block.
4. Install the trunk lock actuator switch in the reverse order.
Replacing the Outdoor Light Switch
1. To replace the exterior lighting switch, remove the mounting block cover from the instrument panel.
2. Using a Phillips screwdriver, unscrew the screw securing the switch.
3. With the top of the switch tilted toward you, squeeze the two connector clips (indicated by arrows) of the wiring harness and disconnect the connector from the switch.
4. Remove the exterior light switch.
5. Install the exterior lighting switch in reverse order.
Replacing the hazard warning switch
1. To replace the hazard warning switch, remove the center trim of the instrument panel.
2. Squeeze the two switch latches (indicated by arrows) and remove it from the instrument panel trim.
3. Install the hazard warning switch in reverse order.
Replacing the rear window heating switch
1. To replace the rear window defroster switch, remove the center trim of the instrument panel.
2. Squeeze the two latches of the switch and remove it from the instrument panel trim.
3. Install the rear window heating switch in reverse order.
Replacing the heating and interior ventilation fan operating mode switch
1. To replace the heating and interior ventilation fan operating mode switch, remove the central trim of the instrument panel.
2. Squeeze the two latches of the switch and remove it from the instrument panel trim.
3. Set the fan operating mode switch in the reverse order.
Replacing the backlight lamps of the heating and ventilation control unit regulators
1. To replace the backlight lamps for the controls of the heating and ventilation control unit, remove the central trim of the instrument panel.
2. Turn the lamp socket clockwise and remove it with the lamp from the instrument panel trim.
3. Remove the lamp from the socket.
4. Install the new W1.2W lamp in the reverse order.
5. Replace the other control lamp in the same way. The layout of the backlight lamps is shown in the photo below.
6. Reassemble everything in reverse order.
Replacing the backlight bulbs of the heater control unit Lada Granta, removing the front console
Removing the center console trim of the Lada Granta More details
Replacing the backlight lamps of the Lada Kalina heater Read more
Analysis of the central panel of the Lada Granta Fly Read more
Replacing center console lamps (heater panel). Lada Kalina More details
Kit for overexposure of the interior on Grant. More details
INTERIOR RELIGHT WITHOUT SOLDERING FOR 30 RUB FOR ANY CAR Read more
Heater control knobs Lada Granta More details
COMPLETE overexposure of the interior on GRANT! EVERYONE can do it! More details
Removing the heater panel on Kalina. Replacing light bulbs in a beard on Kalina. More details
Cool COOL stoves for Lada Granta WITHOUT MODIFICATIONS! More details
Overexposure of the Lada Granta (Kalina-2) tidy More details
How to remove the center console trim of the Lada Kalina instrument panel Read more
Top 5 modifications to Lada Kalina. More details
20 PRODUCTS FOR LADA GRANT FROM CHINA WITH ALIEXPRESS COMPETITION Read more
Ali express for Lada Grants and Kalinas Read more
remove the console on Kalina 2, and change the backlight on the stove adjustment Read more
Turning the heater on the Lada Granta with Ali Express Read more
Kalina LED heater Read more
Replacing light bulbs in the heater block for Renault Logan before 2010. Read more
Quick repair of the heater regulator on the Lada Kalina Read more
How to remove a torpedo on a Lada Kalina
Owners of a Lada Kalina car sometimes think about how to remove the dashboard in order to remove unnecessary noise or replace the heater radiator. Today I want to show you detailed photographs of the process of removing the panel with my own hands.
I would like to immediately clarify that I will remove the torpedo without draining the antifreeze (without removing the stove).
How to remove a torpedo on a Lada Kalina with your own hands:
1. Bend the front door seal. We pull carefully.
2. Remove the decor (plastic casing) from the front roof pillar. It is held on by 3 clips. In the photo I have already pasted over the lid.
3. Here are the actual mounting points.
4. Find two screws that secure the trim in front of the glass and the air duct grilles, and unscrew them on the right and left sides
Attention! You will need a short-handled Phillips screwdriver
5. Then you can remove the black plastic trim in front of the glass. We carefully pull it towards us. This front cover is attached to these iron clips.
Attention! When I removed these clips, almost all of them went under the panel. Some were found, the rest were either behind the panel or not all of them were installed at the factory
6. Now you can remove the side nozzles on the air ducts. There you need to interestingly unscrew the screws. Those who understand it will understand.
7. Now we remove the “beard”.
8. Open the ashtray, unscrew the four screws, and take out the ashtray. Now we pry two side plugs from under the ashtray, which are on opposite sides of the emergency light button.
9. Unscrew the two screws that are under the plugs that secure the “beard from below.” Well, let’s carefully pull the “beard” towards ourselves. We turn off all the chips, not forgetting where they were.
10. Remove the cover on the steering wheel. There should be a total of two bolts and five screws.
11. Remove the cover on the dashboard by unscrewing the two black screws.
12. The end result should be something like this!
13. Unscrew the panel from above. We will need a 10mm tubular wrench. Unscrew all the nuts (there are about 7-9 of them).
We see that the air duct of the stove near the lobovuha is mounted on peculiar lock washers. What are we doing? Are we trying to remove them in the hope that we can put them back together later? I do not advise! The plastic rods will come off anyway. It’s better to tear them off right away, and then you can connect the panel with the air duct simply by using self-tapping screws (there is a regular place for them).
14. It is not necessary to remove the steering wheel. The panel will be slightly inconvenient to remove, but it is possible. Who wants to remove the steering wheel - please! I couldn't get it off.
15. Now we are looking for the remaining screws on which the panel is attached in all places (in all sides, niches).
16. Pull the panel towards you. She must come off. If it doesn’t work, it means some screws are not unscrewed. We look for these places and unscrew them.
17. Remove the panel by pulling it out into the right opening of the passenger door.
When you have already started repairing, I advise you to at the same time adjust the clutches on the Lada Kalina with your own hands.