Purpose and characteristics of TsBKE
The central unit of body electronics Kalina 2 controls:
- alarm system;
- windshield wipers;
- heated windshield and rear windows;
- heated side mirrors;
- lighting system;
- direction indicators;
- central locking;
- trunk opening drive;
- electric windows;
- heated front seats;
- electric side mirrors.
When the alarm is turned on, an automatic check occurs, accompanied by a short flashing of the direction indicators. In security mode, the immobilizer light on the instrument cluster blinks. The security mode is disarmed by pressing the remote control button.
The central electronic unit automatically turns on the windshield wipers if:
- a signal was received from the rain sensor;
- sensitivity regulator in position from 1 to 4;
- The wiper switch is in the intermittent position.
If a malfunction is detected in the operation of the windshield wiper, TsBKE Kalina 2 switches it from automatic to manual control mode. When the windshield heating function is turned on, the body electronics monitor the on-board voltage and limit the heating duration to 6 minutes. When the voltage drops below 12 V, the CBKE switches off the heating mode.
When the voltage drops to 9.6 V, the central unit limits the operation of the rear window and side mirror heaters. This prevents the engine from going into emergency mode. When the voltage is restored to a level of 10.8 Volts, the heaters turn on automatically.
The driver is also assisted by body electronics when working with the lighting system. When the engine starts, the daytime running lights turn on, and when the engine stops, they turn off automatically. The low beam headlights and side lights turn on when a signal is received from the light and rain sensor. At the same time, the daytime running lights turn off. If during automatic diagnostics a malfunction is detected, the absence of a signal from the light sensor, then the TsBKE turns on the low beam and dimensions.
General diagram of electrical equipment of Kalina
On the electrical circuit of the Lada Kalina model, the pinout of connectors is carried out in several stages. According to the factory drawings, the general position of the elements is initially revealed, then each node is deciphered separately.
- Right front headlight assembly.
- Sensor indicating the position of the hood lock.
- Powering the horn.
- Starter terminal block.
- Battery power cables.
- Generator working unit.
- Voltage supply terminal for the wiper drive.
- Left head optics contact block.
- Right door lift chip.
- Likewise for the glass lift gearbox.
- Output to driver's door speaker.
- Driver's door lock drive.
- Windshield washer reservoir motor.
- Overboard temperature meter sensor output.
- Standard ECM connection connector.
- Same as 12 for the front passenger.
- Indicator of the remaining brake fluid in the expansion tank of the system.
- Same as 11 for the front passenger.
- The front passenger door power window switch, located in the driver's control unit.
- Driver's door window lift key.
- Lock button.
- Power supply for the lift gearbox for the front passenger door.
- Input of the mounting assembly.
- Anti-theft control unit.
- Likewise for signaling.
- Pinout on the dashboard.
- Right turn.
- Glove compartment lighting.
- Glove box light switch.
- Stop key switch.
- Anti-theft ignition switch terminal.
- Headlight design.
- Supply current to the steering column lever connector.
- Left turn signal.
- Right rear speaker block.
- Rear right door electric lock drive.
- Window window heating unit.
- Reverse blocking.
- Hazard breaker.
- Adjusting the stove fan.
- Auxiliary resistor for the stove.
- Stove motor.
- Power supply for rear left speaker.
- Rear left door lock terminal.
- Power supply for fuel pump and float.
- White reverse lamp switch.
- Stop button.
- Cigarette lighter power supply.
- ZX blocking – solenoid power supply.
- Chips for a tape recorder or speaker system.
- Illumination of used ventilation and stove.
- Supplying voltage and signals to the EUR.
- Interior lighting lamps.
- Rear right lampshade.
- Power to the trunk lid lock.
- Cargo compartment lighting drive.
- State license plate illumination.
- Auxiliary stop lamp.
- Directly heated windshield.
- Cargo compartment illumination lamp.
- Left stern light.
Possible breakdowns of body electronics and their elimination
CBKE allows you to free the driver from routine work and focus his attention on driving and managing the traffic situation. Despite this undeniable advantage, persistent failures of some nodes often occur. One of the most common malfunctions is the failure of turn signals and hazard warning lights. This most often manifests itself in the fact that the lamps simply burn continuously on the left side of the car. Before you begin repairing the TsBKE, you need to make sure that the lights are not burnt out, their contacts are not oxidized, the emergency stop button is working, and the wires are not charred.
The reason for the failure of the power windows may be a breakdown of the electronic control unit. There are other options: problems with the window regulator built into the driver's door, poor wire contact, incorrect installation of limiters.
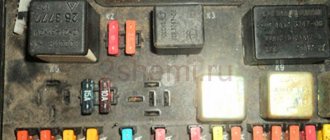
You can repair the electronic unit yourself. To do this, you need to remove it from its regular place, open the cover and carefully inspect the circuit for the presence of soot or melted parts of the controllers. If you find obvious defects in the controllers, you should replace them and reinstall the software through a special connector on the electronic unit. In order to correctly replace burnt-out components, you need to have a “pinout” - information about connectors, wiring, input and output ports, various adapters and plugs.
Personalize existing features
The manufacturer has provided for the timing of regular technical inspections, which are mandatory. For non-compliance, the company reserves the opportunity to deprive the car owner of the right to free service.
The most vulnerable is the comfort block, which includes many logical circuits. Its purpose boils down to the following functions:
- activation of interior lighting;
- adjusting the operation of car alarms;
- turning on the heated rear window;
- automatic mirror adjustment;
- control of electric windows;
- remote control of locks.
The manufacturer has provided the ability to personalize each element. To do this, the electrical package control unit must be recoded at an authorized automotive center. Using official software, the wizard will add or remove certain features. If everything is done correctly, 20 minutes after requesting the appropriate service, you can safely use the “iron horse”.
Replacement instructions
First you need to remove the instrument panel on the center console, then remove the lower part of the dashboard trim under the steering wheel. Now you need to unscrew the fuse box and turn it so that it takes a horizontal position. You need to stick your hand into the freed space until it comes into contact with the shelf on which the TsBKE is installed.
By unscrewing the fixing bolt, you can pull up the control unit and, after disconnecting the two electrical connectors, carefully pull it out. After dismantling the device, it is repaired or replaced with a new one. Installation of the device is carried out strictly in reverse order.
The introduction of modern technologies in the field of control of electronic equipment of a car makes the driver’s work easier, frees him from unnecessary loads and reduces the likelihood of road accidents. Along with the positive aspects of the implementation of CBKE, there are also a number of disadvantages associated with the unreliability of some nodes. Factory engineers are working hard on this problem. According to recent reviews from car enthusiasts, the number of malfunctions of the central unit of body electronics and the frequency of their occurrence are decreasing.
Replacing the comfort unit on Kalina
#1 Student
- Users
- 22 messages
- City: Volgograd
- Gender: Man
Hello, dear forum users. I read and read the instructions, but “I look in the book and it’s clear what I see.” In general, I need help. Question 1. When replacing a block, what actions are needed? IMMO is not active in the engine ECU. The power windows do not work either every once in a while or spontaneously; when the ignition is turned on, the driver's window goes down.
2. If you buy a new key fob, you need to bind it (register it) to the comfort unit. The old key fob doesn’t even blink the LED. The battery is new.
Of course, the first thing I'll check is the wiring from the block in the driver's door to the block under the rear seat.
I’ve never encountered this, please treat it with leniency because... I’m just getting into it. But I will endure kicks in the right direction. Thank you.
Yes, I forgot to clarify, there is no training key.
Post edited by Student: 02 June 2015 — 13:36
#2 Vavan
Work is our life.
- City: Stavropol
- Gender: Man
1. New keychains always need to be “tied”!
2. check the block in the driver's door!
3. replacement of the comfort block!
#3 Student
- City: Volgograd
- Gender: Man
The block in the driver's door is new, I bought it yesterday. The comfort unit is still in question; we need to sort out the wiring. But the key fob is a problem, there is no training one. There is another type that works, but it’s just a blank without a transponder. As an option, what AVA suggested in a similar topic “The easiest way, since you do not have a training key, is to transfer the PCF microcircuit from the old to the new.” But the old one does not breathe, maybe this microcircuit is dead. In general, it’s still a dead end for me.
And according to the manuals that I dug up, the binding is only possible in the combination Keychain-APS-Comfort Block-training. But how do comfort units work with physically detached APS, or is this only possible when everything is already registered, and a separate key fob cannot be paired with comfort?
#4 krav
- City: Nikolaevsk, Volgograd region.
- Gender: Man
Let's start with the question, fellow countryman, do you have experience working with ECUs and what equipment do you have for the chip? and then we'll see.
#5 Student
- City: Volgograd
- Gender: Man
Yes, I have some experience. I sewed almost all ECUs of our brands except ME17.9.7, the module is expensive for me, there is an official Combiloader, nothing else yet, but sorry, external TLE
#6 krav
- City: Nikolaevsk, Volgograd region.
- Gender: Man
Well, that's good. As an option, you buy a new key fob, clean the Eprom in the ECU, seal new Eproms (or clean the old ones) into the APS and Norma. I won’t say for sure whether it’s necessary to do this, maybe someone will clarify, the dumps can be taken here https://www.chiptuner. content/immobil, you take a training key from a good friend, tie it (with a jack) with electrical tape to your key (a blank without a chip), carry out activation, train the key fob. Clean the Eprom ECU again. You have a working key fob and a working key without a chip. But! we have twin cars, or to avoid this, we’ll have to buy a lock with keys (I don’t know if they come separately) all subsequent steps are clear. Here’s another hint https://yadi.sk/d/KxDIGxYCh3PcY Learn to use the search for information that’s not secret, everything is in the public domain .
#7 Vavan
Work is our life.
- City: Stavropol
- Gender: Man
There is no need to solder new or clean microcircuits into APS and Norma. Yes, and from personal experience: Car key fobs trained with the same training key do not open each other.
#8 Harry
- City: Adygeisk
- Gender: Man
But! We have twin cars, or to avoid this, we’ll have to buy a lock with keys (I don’t know if they come separately), all subsequent steps are clear.
There will be no twins! And the “red” key from the previous car will come untied, so you’ll do a dirty trick on the friend from whom you took the key!
#9 Edua d76
- City Ufa
- Gender: Man
Why on earth would this come off? everything will work)))
Post edited by Edua d76: 03 June 2015 — 05:09
#10 Student
- City: Volgograd
- Gender: Man
Dear Gurus, thank you for the tips, they were presented right on a silver platter. I understand that you only need to prepare the injection system ECU, and the rest of the units will be retrained, i.e. there is no need to change anything. It’s probably better to buy a training manual anyway.
#11 rovbok
- City: Smolensk
- Gender: Man
You need a clean ECM unit (make it clean and trained). Need a NEW remote control, Need a red key. Working car system.
You teach if you have everything.
The Norma block or other blocks are retrainable. If you change the driver's door module, the system also needs to be retrained. If a red one learns with a different system, then he has unlearned the old one forever. In theory, PDU and Red are a couple that cannot be separated.
Post edited by rovbok: 03 June 2015 — 09:00
#12 Harry
- City: Adygeisk
- Gender: Man
Why on earth would this come off? everything will work)))
Have you tried checking?
#13 Student
- City: Volgograd
- Gender: Man
Yes, I don’t have enough theory. Honestly, I don’t understand how he will get rid of the previous car, will the code in the transponder change when learning another one? I always thought that you can train as many cars as you want with just red, but I see opinions are divided. I’ll speculate a little, well, I took a red one from a friend, trained the car I needed. Let’s say he got rid of the friend’s car, but he didn’t stop being a trainer, again we retrain the friend’s car with it and everything works again for him and he has a training key. Is that right? it won’t be for a friend, as Harry warned in post 8?
#14 Vavan
Work is our life.
- City: Stavropol
- Gender: Man
Everything is correct!! The maximum is to retrain again (from a friend) and that’s it!!
Purpose and characteristics of TsBKE
The central unit of body electronics Kalina 2 controls:
- alarm system;
- windshield wipers;
- heated windshield and rear windows;
- heated side mirrors;
- lighting system;
- direction indicators;
- central locking;
- trunk opening drive;
- electric windows;
- heated front seats;
- electric side mirrors.
When the alarm is turned on, an automatic check occurs, accompanied by a short flashing of the direction indicators. In security mode, the immobilizer light on the instrument cluster blinks. The security mode is disarmed by pressing the remote control button.
The central electronic unit automatically turns on the windshield wipers if:
- a signal was received from the rain sensor;
- sensitivity regulator in position from 1 to 4;
- The wiper switch is in the intermittent position.
If a malfunction is detected in the operation of the windshield wiper, TsBKE Kalina 2 switches it from automatic to manual control mode. When the windshield heating function is turned on, the body electronics monitor the on-board voltage and limit the heating duration to 6 minutes. When the voltage drops below 12 V, the CBKE switches off the heating mode.
When the voltage drops to 9.6 V, the central unit limits the operation of the rear window and side mirror heaters. This prevents the engine from going into emergency mode. When the voltage is restored to a level of 10.8 Volts, the heaters turn on automatically.
The driver is also assisted by body electronics when working with the lighting system. When the engine starts, the daytime running lights turn on, and when the engine stops, they turn off automatically. The low beam headlights and side lights turn on when a signal is received from the light and rain sensor. At the same time, the daytime running lights turn off. If during automatic diagnostics a malfunction is detected, the absence of a signal from the light sensor, then the TsBKE turns on the low beam and dimensions.
Steps from “Norma” to “Lux”. Part 1. — Lada Kalina Sedan, 1.6 l., 2006 on DRIVE2
Good day, FRIENDS.
It all started when I broke the passenger rear view mirror. And since I never liked them, this is an excellent reason for Tuning))
I chose mirrors from Granta Liftback, with electric drive, heating, and collars.
Mirrors.
To connect the electric drive I decided to use the ESP control unit from Kalina Lux
ESP control unit
I know that there are extra hemorrhoids, and that it could have been done simpler. BUT! I want to do everything well, as close to standard as possible! Well, rear windows are planned in the near future! But as it turned out, this block communicates with the comfort block via one wire, which is not supported by the comfort block from Norma. I decided to replace the standard block with a block from Lux. They have different connectors, which means you will have to redistribute the contacts. After reading the Internet I found these diagrams.
Comfort Block Diagram Standards
Full size
Luxury Comfort Block Diagram
XP1 1st - ? — New — To the ESP engine of the front-right door. 2nd - ? — New — +/- on all doors. 3rd - Yellow - from pin 14 - To the motors for closing all doors (to all doors). 4th - Orange-Black - New - to the ESP engine of the rear-right door. - No need for a while. 5th - Red-Blue - from the 17th contact - opening the passenger doors. 6th - Black - from the 6th contact - To Ground. 7th - ? — New — to the ESP engine of the rear-left door. - No need for a while. 8th - Blue - from pin 24 - Control of starboard turn signals. 9th - Red - from pin 23 - to terminal 30 (+12V?) 10th - Reserved 11th - ? — New — +/- in the driver’s and rear left door and trunk. 12th - Black - wire from pin 6 - To Ground. 13th - Green-black - New - connect the ESP of the front-left door to the engine. 14th - Blue-Black - from the 16th contact - Control of the left side turn signals. 15th - Red - from pin 23 - to terminal 30 (+12V?)
XP2 1st - Pink-Red - from pin 19 - to the trunk opening motor. 2nd - Reserve 3rd - ? — New — To the power window button of the Rear-Right door. - No need for a while. 4th - White-Black - from pin 25 - Trunk opening limit switch. 5th - ? — New — Passenger mirror up and down. 6th - Red-black - from pin 18 - Opening the driver's door. 7th - Brown-Red - from the 11th contact - Front right door limit switch. 8th - ? — New — Illuminated power window buttons. 9th - ? — New — Passenger mirror left and right. 10th - Red-Blue - from the 15th contact - K-Lin bus. 11th - ? — New — ESP button for the front-right door. 12th - ? — New — ESP button for the rear-left door. - No need for a while. 13th - Gray - from the 5th contact - Heated rear window. 14th - Reserve 15th - Reserve 16th - White-Red - from the 10th contact - Opening the rear doors. 17th - Reserve 18th - Black and White - from the 9th contact - Opening the hood. 19th - Reserve 20th - to the siren - No need.
XP3 - Not used
Attention Questions: - Has anyone ever engaged in such masturbation? Or am I the first to decide on this? — In the diagrams there is a reference to Terminal 30, does anyone know what kind of terminal this is? I'm guessing it's a constant +12V, am I right? — The normal unit is connected to terminal 71 of the ECM/terminal 18 of the APS, but the Lux unit does not seem to be connected to the controller at all, or am I missing something? — The normal unit was connected to the instrument cluster (Terminal 8), but the Lux unit is not connected to the combination at all, do I need to connect it and where? — The standard unit has an output for the rear window heating relay, but the luxury unit does not, will it work? Or how is control implemented in Lux? — If anyone can help with the color palette in the lux connector, I would be grateful
Possible breakdowns of body electronics and their elimination
CBKE allows you to free the driver from routine work and focus his attention on driving and managing the traffic situation. Despite this undeniable advantage, persistent failures of some nodes often occur. One of the most common malfunctions is the failure of turn signals and hazard warning lights. This most often manifests itself in the fact that the lamps simply burn continuously on the left side of the car. Before you begin repairing the TsBKE, you need to make sure that the lights are not burnt out, their contacts are not oxidized, the emergency stop button is working, and the wires are not charred.
The reason for the failure of the power windows may be a breakdown of the electronic control unit. There are other options: problems with the window regulator built into the driver's door, poor wire contact, incorrect installation of limiters.
You can repair the electronic unit yourself. To do this, you need to remove it from its regular place, open the cover and carefully inspect the circuit for the presence of soot or melted parts of the controllers. If you find obvious defects in the controllers, you should replace them and reinstall the software through a special connector on the electronic unit. In order to correctly replace burnt-out components, you need to have a “pinout” - information about connectors, wiring, input and output ports, various adapters and plugs.
Granta and Starline - all options
0 people signed up. Next goal: 100
From the very beginning of sales of the new Lada Granta family, owners began to experience inconvenience when using the central locking (CL). The fact is that in some car versions, when the engine is running, the central lock only closes the driver's door. Closing all doors is only possible when the ignition is turned off. This algorithm for the operation of the central lock complicates life for owners when installing an additional car alarm with auto start.
Here's what Lada Granta FL owners write in one of the VK groups:
The new FL grant has a strange locking mechanism. 1. if you lower the driver's flag when the car is turned off, then all the others will lower and close, everything is fine. 2. If the engine is running, then when the driver's flag is lowered, the rest remain open. Well, God bless him, maybe the thieves won’t get caught in the traffic jam. BUT! When you arm the car with a manual transmission and get out of the car, the engine naturally runs before arming...you arm it and...since the engine is running, one driver's flag goes down. Three passenger doors remain open. Pressing the close button again does nothing. You have to disarm and re-arm, and this already resets the autorun. Indeed, such an algorithm for the operation of the central locking is indicated in the car’s operating manual:
Central locking and unlocking of side doors from the passenger compartment (in a variant). To lock the side door locks from inside the vehicle, press the lock button into the driver's door or (in the optional version) press the lock button in the driver's door module. In versions with a driver's door module, locking the side doors using the button in the driver's door is only possible when the ignition is turned off. At the moment, this information has already been conveyed to AvtoVAZ. It remains to be hoped that this feature of the central locking system will be corrected in the near future.
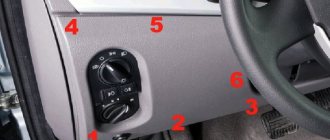
Finally got around to installing a new power window switch assembly. I started by inserting a new block from Kalina 2 in place of the original one. Using plastic spatulas to remove the trim, I removed the Granta power window switch block.
On the website where I ordered the block (see part 1), there is a template for marking.
I removed the original block and marked the casing for the new one.
I cut out the seat with a utility knife.
Installed a new block.
The next step was to remove the casing and conduct +12V, which I took from the fuse of the factory central locking unit (it seemed logical to me
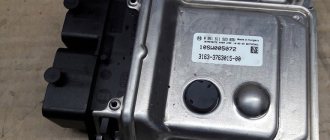
Replacement instructions
First you need to remove the instrument panel on the center console, then remove the lower part of the dashboard trim under the steering wheel. Now you need to unscrew the fuse box and turn it so that it takes a horizontal position. You need to stick your hand into the freed space until it comes into contact with the shelf on which the TsBKE is installed.
By unscrewing the fixing bolt, you can pull up the control unit and, after disconnecting the two electrical connectors, carefully pull it out. After dismantling the device, it is repaired or replaced with a new one. Installation of the device is carried out strictly in reverse order.
The introduction of modern technologies in the field of control of electronic equipment of a car makes the driver’s work easier, frees him from unnecessary loads and reduces the likelihood of road accidents. Along with the positive aspects of the implementation of CBKE, there are also a number of disadvantages associated with the unreliability of some nodes. Factory engineers are working hard on this problem. According to recent reviews from car enthusiasts, the number of malfunctions of the central unit of body electronics and the frequency of their occurrence are decreasing.
The electrical package control unit (pictured below) Kalina Lux does not work. Or rather, it does not respond to my presses. It is illuminated, when I press the buttons, click, I hear a single short sound in the area of the speedometer/heater (you can hear it in the video below). This thing appeared in the morning, I walked away for an hour, everything worked. By evening everything stopped responding again and it’s been like this for the whole day. Neither the central locking, nor the mirrors, nor the power windows respond to my presses.. What's the matter? I disconnected the terminal for 15 minutes, it didn’t help, the alarm was starline.
Megapolis-Auto provides warranty and post-warranty support for professional anti-theft and security systems and AlarmTrade .
The company was awarded the status of "Industry Leader 2014"
New articles in the section
- Using a polarized relay in a car.
Material from Maxim from the site: https://www.drive2.ru So, another useful modification of minimal complexity. With frequent and not very long trips during the day, you have to turn off the dimensions and the radio every time you get out of the car, and when you return, turn everything back on. So I thought about it
Checking the range of the Pandora DX 90B communication channel
One of the clients complained about poor communication, or rather about the short control distance and periodic loss of communication, that is, the key fob “complains” about the lack of communication (in this case it plays the melody of the lack of communication) And we had a great opportunity to deal with the problem of range,
Stealing a Lada Vesta with a magnet. How to protect yourself?
Many times in conversations with clients we discussed the issue of unlocking standard ignition locks using modern powerful magnets. And, frankly, few people believed that this was possible in principle. provided us with and also posted a video online demonstrating this method of opening
New articles in the section
- On the illegality of dealers' statements about removing the car from warranty
The issue of the legality of dealers using threats to cancel the warranty has been discussed more than once. But there is still no clarity in the minds of consumers. Discussions sometimes flare up on our YouTube channel. A few excerpts from the comments below, as well as an information letter from FLIM,
Is it possible to install alarms and other equipment not from an authorized dealer?
During the warranty period, AVTOVAZ undertakes to eliminate malfunctions that arise during the operation of the vehicle, subject to the customer’s compliance with the rules. To the question “Is it possible to install an alarm system, parking sensors, a video recorder, a towbar, a radio tape recorder and other equipment not from an official dealer with
Granta - pinout of the body electronics unit and description of work
Customers ask for information on the body electronics unit of Grant and Kalina cars 2. CENTRAL BODY ELECTRONICS UNIT (CBEC) - PURPOSE, FUNCTIONS, DIAGNOSTICS (technological instructions).
Article rating:
Lada Kalina comfort blockLink to main publication
Related publications
- 2 din dimensions in cm
Control units for Lada Kalina, Kalina FL | Motorring online store
Product groups
- Freebie!
- New items
- Appearance
- Salon
- Engine
- Exhaust system
- Intake system
- Steering
- Transmission
- Suspension
- Brake system
- Fuel system
- Electrical and electronics
- Climate system and ventilation
- Alarms and anti-theft systems
- Windshield wiper and accessories
- Car accessories
- Special tools Roller cutters, countersinks, cutters, countersinks
- Cutting tool
- Those. engine maintenance and repair
- Chassis repair and maintenance
- Fuel pump pullers
- Special auto tools
- Special tools "AvtoDelo"
- Flaringers, pipe cutters, pipe benders
- Crescent keys
- Glass repair
- CV Clamp Pullers
- Steering rod and ball joint pullers
- Measuring instruments and tools
- Torque wrenches
- Tire inflation guns
- Mini ratchets
- Car jacks
- Spray guns
- Tools miscellaneous
- Technical hair dryers
- Tool sets
- Body work
- Stripping wires, crimping terminals
- Extractors, Nut Cutters, Hairpin Drivers
- Oil filter pullers
- Universal pullers
- Oilers, plunger syringes
- Impact and reinforced screwdrivers
- Hub pullers and wrenches
- Ties, cables
- Milling cutters for cylinder head modification
- Honing the cylinder
- Working with interior trim
- Retaining Ring Pullers
- Metal brushes
- Lada Granta
- Tuning for hunting and fishing
Shipping reports We accept
The group contains 33 / 33 positions
by popularity
by price
A modern car is a means of transportation that includes all the functions for a comfortable and safe ride. And the more expensive your car, the more and more various functions it has. And all these functions are controlled by blocks called control units.
There are a lot of control units in a VAZ car, starting from the heater control unit and ending with the control of the window lifters. Control units can be either mechanical, that is, a particular function is controlled by the driver himself, or electronic. Let's look at the VAZ 2110, 2111, 2112 heater control unit using an example.
The name of the block speaks for itself; this block controls the temperature inside the car. On the front side of the block, depending on the year of manufacture of the car, there are two or three regulators. Older models have a temperature controller and a motor speed controller. And on newer models, units are installed under the Euro panel; they also have an air flow direction regulator.
But absolutely all blocks have a scale with a choice of temperature, which starts from 16 and ends at 28 degrees; if necessary, you can select the highest or lowest degrees by switching the regulator to a circle with a blue or red designation. It is also possible to select an automatic mode to maintain the set temperature in the cabin. That is, data on the temperature in the cabin will be taken from the temperature sensor, which is located on the ceiling, near the interior lamp. The second regulator is responsible for the speed of the electric motor, the scale starts from 0 and ends with 3 (depending on the model, there are also regulators with 4 positions).