The instrument lighting on VAZ series cars in the factory version has a green speedometer and tachometer scale and red arrows. Many are not happy with this combination, given that the panel buttons are also highlighted in green. If the car is with one driver for a long time, this color scheme begins to get quite boring, and then there is a desire to make the VAZ-2114 buttons overexposed non-standard.
After the decision is made, the question arises: how to do it yourself or seek help from a service station. Replacing the backlight on the dashboard is a simple process, so most car enthusiasts prefer to overexpose the buttons without resorting to outside help.
VAZ button illumination
I haven’t written for a long time, but somehow I don’t have much time.
The other day I was looking through the drive and noticed a rather beautiful implementation of the VAZ button illumination, which is installed in the nine. The article was written by Akim007, but I just revised it, so everyone who likes the article about the illumination of buttons on a VAZ, go to his page and put +1. All owners of VAZ classics know how difficult it is to find the button to turn on the lighting, backlight and other devices. In models starting from the VAZ 2108, they began to install buttons on which the pictogram was illuminated. This greatly facilitates the search and improves the information content.
But if you want to make the lighting more beautiful and brighter, then you can start installing SMD LEDs.
SMD LEDs are ordinary LEDs, but they are designed differently, they are more compact in size, the wire legs are replaced by contact pads, for which they are soldered into the board.
To install LEDs in the backlight buttons you will need:
- Buttons in which you need to change the backlight.
- Soldering iron, flux, tin.
- SMD LEDs, which can be purchased separately or with an LED strip.
- Screwdriver, tweezers, awl.
Replacing the backlight of VAZ buttons
First of all, the buttons are removed from the car. Next, you need to disassemble them and remove the standard backlight. To disassemble the button, you need to pry up the top part and remove the cover from it. Two LEDs are soldered into the button in the figure - one for the pointer (red), the second for illuminating the pictogram (white).
- According to the author, it is worth pointing out that changing the backlight is easy in the window lifter buttons, but much more difficult in the others.
- source drive2.ru
Lada 2114 TurboParovoz › Logbook › Relighting the dashboard with RGB tape
Connecting the buttons on the steering wheel to a non-standard radio
For a change, I decided to dilute my BZ with a cute modification!)) Why cute? Well, it doesn’t really bring any benefit, like a turbo, for example!))))) But it’s still pleasant and unusual.
We will talk about overexposing the tidy with an RGB strip.
At some point, the standard light bulbs in the dashboard began to burn out, and in order not to dismantle half the interior each time for the next light bulb replacement and to prolong the pleasure, so to speak, I decided to dim the backlight with regular white LEDs. And when I arrived at the store, I saw there an RGB strip and all the additional gadgets for controlling color switching! I decided to have fun, even if I don’t use it often, it still won’t be unnecessary!
An RGB strip, controller and remote control were purchased. There were 2 types of controllers: infrared and radio. The difference is that the infrared has a sensor for receiving the signal and you need to point the remote control at it, the radio does not have this inconvenience and the signal will be received by the controller wherever the remote control is directed, while the signal receiving sensor is built into the controller block and is not needed anywhere output accordingly. But... the difference in price was decent, I didn’t want to bother too much with this function and I took something simpler, i.e. infrared!)
Now I've been surfing the Internet, there's so much out there, even built-in RGB controllers with a glass touch-sensitive panel, and the prices don't seem so high anymore, it would be cool to embed one of these into the dashboard of a car.)) Maybe I'll redo it somehow out of nothingness do!)
In general, I removed the tidy, disassembled it, and wiped off the green filter from the trim with nail polish remover!
To illuminate the scales, I cut the tape into minimal pieces - 3 LEDs each, glued them to the main frame of the device and soldered the corresponding contacts together.
There is one more thing left - the illumination of the arrows. I like the red color the most, so I decided not to change anything about it. I didn’t want to bother with separate LEDs, resistors for them, etc., so I came up with this thing: I bought a strip with small red LEDs.
But you can’t cut them off one by one, at least 3 pieces each. I made this topic:
Next, I soldered the + and - wires to each arrow light.
I attached the board itself and the back cover and brought out the wires through suitable holes from the lamps that were no longer needed.
The only thing I didn’t capture was what I fed this whole thing from. In general, I soldered the + and - wires for the backlight of the arrows and the + and - wires of the controller to the lamp socket of the tidy itself, which was no longer needed (I removed the lamp itself from the socket). I brought the sensor into the panel under the BC, drilling a hole there, like this:
Here is a photo of the backlight in white at maximum brightness:
Here is a video of the backlight working with different colors and brightness levels:
I didn’t do anything with the backlighting of the screens, and I didn’t do any inversion either. I have an AP unit and it is structurally quite different from VDO and Schetmash. And there are many pitfalls in it that there was no desire to deal with.
By the way, I change the colors almost every day, I change the intensity of the backlight every day - bright during the day, dim at night, everything is very convenient!
Operating procedure
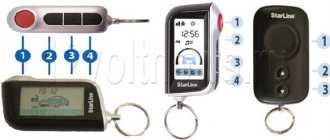
Sherkhan Magikar 7 button operating instructions
Replacing the factory backlight should begin with purchasing a set of LED lamps in the color you like. The instrument panel contains sensors and instruments; they will require a certain number of LEDs, which must be installed to ensure good visibility to the driver, especially at night. Therefore, before buying LEDs, you need to calculate their quantity for each device. For example, 3 LEDs are enough to illuminate the brake sensor.
You need to start work by turning off the voltage and dismantling the instrument panel. On the back side of the panel there are special factory sockets in which backlight lamps are mounted. They need to be carefully removed, and LEDs placed in their place. There is a possibility that the LEDs will not fit into the slots. If this happens, you will have to grind down the LED lamp head a little. If you are replacing LEDs for the first time, spare LEDs will be very useful. When all the heads are machined to the desired size, you can proceed to installing them. Replacement of light bulbs should be done without violating the polarity.
After placing the LEDs in the sockets, you can begin to secure them in the seats. Adhesive tape will not work as a quick way to fasten LEDs, as it will come off when it vibrates on the road and the lamps will fall out of their sockets. Therefore, it is advisable to use silicone glue to attach LEDs. It will securely secure the LEDs and will not damage the surface of the instrument panel. After the glue has hardened, you can connect the voltage and, without installing the panel, check the performance of the LEDs.
When everything is ready, turn on the ignition and observe the result. If any diode does not light up, it means the polarity is reversed. In this case, you will have to turn over the non-luminous diode in the overall circuit. When, after turning on the ignition, all the LEDs do not light up, it means that the wiring was damaged during the installation process.
Panel assembly
Once you have verified that all the LEDs are working, you can assemble the panel. To do this, you need to bring all the wiring from the backlight onto the board and solder it securely. Soldering the wires must be done in a certain sequence, otherwise the LEDs will not light up. If there are long wires left, it is advisable to shorten them so that during installation they do not fall into the grooves of the latches. When all errors have been eliminated, you can put the instrument panel in place and screw it in place.
Using a similar principle, it’s time to replace the buttons for turning on the low beam, the dimensions of the power windows, etc. But you need to take into account some of the features of the buttons. The VAZ-2114 car may have strictly standard buttons and a newer modification.
In order to get to the LED in the old version of the button, it will have to be completely disassembled, and it is important not to lose the springs, which are conductors. Assembling old samples will also require a lot of time and perseverance. With the new type of buttons, everything is much simpler, since they are attached using latches, and metal plates are installed inside instead of springs.
Next is the last check: turn on the ignition and check: if all the LEDs are on, it means the replacement process was successful, and the work can be considered completed. If one of the diodes does not light up, you will have to disassemble and redo it again.
Where to begin
VAZ 2112: how to replace thresholds correctly
Before starting work, we recommend that you carefully study the dashboard structure. If you understand what and how, then it will be much easier for you to remove the torpedo. If you have already become familiar with the structure of the shield, you can begin work. You should start by dismantling the screens. This is done as follows.
- We take a positive screwdriver and carefully remove the three screws that secure the left screen. If you have a tool with a short tip, it is better to use it, it will be more convenient.
- We remove the lower part of the lining from the mounting on the body.
- We do the same with the screen on the right side. The only difference is that it is fixed with 5 screws. While working, carefully hold the pad with your hand.
Now that all the fasteners have been removed, you can remove the screen. But be careful that it doesn't get caught on the wires underneath it. Otherwise, you may simply break the cables.
Next, you should disconnect the ground from the battery. This is done by disconnecting the pads. If a radio is installed in the car, it must be disconnected from the wiring. If you do not have any audio devices installed, you can simply remove the wires (they are closed with a plug). Then the cigarette lighter and the socket that illuminates the ashtray are turned off.
So, the first stage of work has been completed. You can proceed to the next steps.
Disassembling the console
Initially, you need to disassemble the dashboard: remove the protective glass, then the arrows, but keep in mind that they are very fragile, and in order not to damage them, it is better to slip thick paper under the screwdriver; it does not require much effort.
And to remove the dashboard backing you will need a knife, with its help you need to cut through the layer of sealant around the entire perimeter.
After removing the “cover”, use a knife to carefully scratch the filter; it is a special paint. Then degrease this area with acetone or alcohol.
Low beam indicator
Now, in accordance with the current rules, it is necessary to drive in the daytime with low beams or fog lights on. If your VAZ 2109 does not have fog lights installed, in this article you can see how to install them. And if an indication of turning on the PTF is usually present in the car (in a Lada Samara with a high panel it is a light next to the button for turning on the PTF, with a Europanel - on the button itself), then turning on the low beam is not displayed in any way on the dashboard. The light spot from the low beam on the road when it is light outside is also not visible, so you can quickly determine whether the low beam is on during the day only by the position of the button to turn them on, which is not informative enough.
Let's set ourselves the goal of installing an indication for turning on the low beam headlights on the Lada Samara ourselves.
Let’s immediately make a reservation that in this article we will consider the option of installing an indication for turning on the low beam on the Samara europanel, where the following button is responsible for turning on the dimensions and low beam:
Let's get started. To modify the button, we will need the same donor button, since it lacks the indication LED itself, the contact antennae and the contacts themselves.
The antennae and LED are removed from the donor button and installed in the button being modified quite easily. But you will have to tinker with the contacts, since they have teeth that do not allow the contact plates to be freely removed from the button. You'll have to use a tool. You may have to cut the donor button to remove them.
The modified button looks like this:
Now we need to finalize the connection, we need to solder these wires to the contacts on the button on the contact side, either on the button itself or in the connection connector.
However, the window for the LED indicating that the low beam is on is painted over, and practically no light penetrates through it. You need to remove the paint from it using a thin screwdriver.
Here is the result.
Improvement of the illumination of the low beam key for the VAZ 2109
A slight modification of the dimensions/low beam switch button can also be done on a VAZ 2109 with a high/low panel, namely, you can make the backlight of the button itself (light bulb icon) light up when the ignition is turned on. This makes it easier to find the button by touch in the dark, especially on a low panel.
In the picture we see the low beam button of the VAZ 2109 on the reverse side. In order for the backlight of this key to light up when you turn the key, you need to place a jumper on the “+” bulb from pin 3 (power supply from the ignition switch), if you do this without a diode, then the low beam will light up even when the ignition is off. Next, so that the entire panel does not burn, we disconnect the wires that previously came to the “+” bulbs (2 wires are white with black a and b), and everything is fine, but now if you turn on the headlights and turn off the ignition, the button illumination will also disappear To this end, we also connect wires a and b through a diode to the plus of the light bulb. As a result, when you turn the key, the button lights up, and when the ignition is turned off, the button does not go out until it is turned off. For ease of installation, all operations are performed on the connector to which the button is connected.
tuning-lada-2109.ru
Reasons for replacing the interior courtesy lamp
As a rule, most drivers do not pay attention to the interior lamp as long as its operation completely suits them.
Therefore, the procedure for dismantling the lampshade may be due to the following reasons:
- The interior lighting has stopped lighting - this occurs both due to a burnt-out light bulb and due to a lack of contact at the input of the lamp itself.
- Insufficient lighting - in most cases is due to the fact that low-power or outdated devices are installed in the ceiling, producing a weak luminous flux. It can also occur due to the burnout of any part of the lighting devices in the ceiling.
- Flickering of the lamp - occurs due to poor contact or malfunction of the LED lamp driver. To diagnose the cause, it is necessary to remove the ceiling light.
- A broken lens glass or a cracked lamp housing is caused by careless actions of both the driver and passengers. It also occurs during the natural aging of plastic and the loss of its mechanical properties.
Regardless of what reason led to the need to dismantle the lampshade, you should take this procedure as carefully as possible, since careless actions can easily cause damage to both the lamp itself and the ceiling lining. Which will entail additional costs for their repair and restoration.
INTERIOR OF THE CAR
The interior lighting is worth a separate discussion. The interior of the VAZ 2114 is illuminated using the following devices:
- Interior lighting;
- Individual light lamps;
- Instrument lighting on the control panel;
- Light in the glove compartment, cigarette lighter and separate bulbs for some buttons and switches.
The general light in the VAZ 2114 is located in the car interior and illuminates it. The engineers decided that it would be optimal to place it above the heads of the driver and front passenger, so it is simply built into the headliner and bolted there. Usually this lamp lights up when one of the doors is open, and goes out when it is closed. This is familiar to us from the classics, where a similar system was organized with light bulbs on the door pillars.
Interior lighting
Here the lamp lights up when the VAZ 2114 door limit switch, which stands on the racks and is pressed by the door itself, is triggered. There are also separate buttons for the passenger and driver to turn on this lamp if desired.
FakeHeader
Comments 84
Who can tell me, I changed the tidy to blue, how to make the arrows bright red, otherwise they are not visible at night
I borrowed scarlet nail polish from my wife and painted the arrows with a thin layer on all sides.
normal, 7000 on the tachometer 180 on the speedometer
goes to the point
Cool! But why do the temperature and fuel level needles rise and then fall?
so checking the tidy in action
Cool solution, but where did you get the board for the SMD diodes?
buzz! I just haven’t moved in yet. Why do the arrows change color when moving?
Different LEDs on the arrow illumination board.
Definitely bookmarked, the best I've seen so far!
What did you use to glue the film back on?
Cool. We need to organize mass production and installation.
Kleva did it, I overexposed it with a diode strip) are these boards sold somewhere or did I make it myself?
Kleva did it, I overexposed it with a diode strip) are these boards sold somewhere or did I make it myself?
They can be ordered.
How do you understand “the arrows are taken counterclockwise”?
You twist it counterclockwise and pull it towards you)
Just counterclockwise, you just press it in. I did that
good work, I don’t understand how the arrows change color if there is a regular SMD 3528?
Different LEDs on the arrow backlight board
They are connected in series, I assume they give different glows due to the difference in voltage of the diodes themselves? when the shim decreases, the red one lights up at full strength, and at the same time the blue one does not have enough voltage and it dims, do I understand correctly?
Simply when the arrow moves, the pointer illumination area moves smoothly above the LEDs. That’s why the color of the arrow changes smoothly. There, the color change does not depend in any way on electronics.
damn you =)))) I see difficulties everywhere) thanks for the clarification)
You're welcome :-) everything ingenious is simple :-)
Simply when the arrow moves, the pointer illumination area moves smoothly above the LEDs. That’s why the color of the arrow changes smoothly. There, the color change does not depend in any way on electronics.
And another question about the controller: does it remember the brightness settings?
Can not say. This is to the author of the topic.
YOYYYYYYYYYYYYYYYYYYYYYYYYYYYYYYYYYYYYYYYYYYYYYYYYYYYYYYYYYA place to say, you’re also a fellow countryman))) well then, finally Handsome))
I want to do it on a scorpion but I can’t get around to it)) well, I’m not really good at it))) that is, with smooth backlighting! can you make a fuss?
I'll definitely do it when I have time)
well done, looks great
what happened to the tachometer?) why only large instruments have arrows?
I mean, what's with the tachometer? I wanted it that way
The rubber bands are not pressed tightly on the display
incredibly cool! I just can't find the words! Well done !
thank you ! people like you make us strive for something more)
Will I get such a kick out of this? How much will it cost?
Very cool! Respect and envy!
I couldn’t remove the arrows, I pulled and pulled and broke it.
oooh (should have been more careful)
Pass! but the light still passes a little through the polarizer filter
This is how the phone sent it. everything is fine live)
Bliss! Please advise where to get it and how to make backlighting of the arrows for a classic shield with similar arrows in single-color SMD - is it necessary to make a printed circuit board?
On classics, only the speedometer and tachometer can be illuminated this way. Unfortunately, I didn’t do a review specifically about the arrow because I was in a hurry to put everything in place. I simply glued the SMD diodes under the arrow, the arrow itself was made from a plastic red transparent ruler, the black cap on it was from a 7Ah uninterruptible power supply battery, and a lead counterweight was inserted into it so that the readings were correct
The instrument lighting on VAZ series cars in the factory version has a green speedometer and tachometer scale and red arrows. Many are not happy with this combination, given that the panel buttons are also highlighted in green. If the car is with one driver for a long time, this color scheme begins to get quite boring, and then there is a desire to make the VAZ-2114 buttons overexposed non-standard.
After the decision is made, the question arises: how to do it yourself or seek help from a service station. Replacing the backlight on the dashboard is a simple process, so most car enthusiasts prefer to overexpose the buttons without resorting to outside help.
Reasons for the failure of the instrument panel
Any component and unit on a used domestic car becomes unusable after a certain time. Poor road and climatic conditions, poor quality materials, untimely maintenance - all this leads to gradual wear and tear of all elements of the car. In a situation with a breakdown of the dashboard, everything is more complicated, because... There are no special rules for maintaining the panel. The only thing that can prevent early failure is to prevent moisture from entering the instrument body. If the tidy on a VAZ 2114 does not work, it is worth carrying out a quick repair. The main reason is a non-working coolant temperature indicator. If the engine overheats, there is a high risk of getting it repaired. Let's consider each of the possible causes of the malfunction.
Fuse blown
In the absence of mechanical impact on the panel, its sudden breakage is very surprising. An inexperienced driver will rush to contact a service center, or will try to disassemble the body on his own in order to find out the location of the breakdown. Note that the first action that needs to be performed when all elements on the panel are inactive at the same time is checking the fuse. Depending on the year of manufacture of the vehicle, the mounting blocks with fuses may differ. In the old style block the fuse is located in the bottom row. If you count from left to right, then the desired element will be the ninth in a row. On later 2114 models, cars began to be equipped with modified mounting blocks. The safety element responsible for the tidy is located on the right side, the first in a row (from top to bottom). In the photo it is located directly under the sliver. Regardless of the year of manufacture, 7.5 Ampere elements were installed in the right place. If the instrument panel fails, first carry out the procedure to replace the fuses. As a recommendation, we point out that kits with spare parts are sold in all automotive stores.
Damage to the board
The most important part of the design is the board. Even partial damage to its surface causes serious disruptions in the readings of the tachometer, speedometer, temperature and fuel level. The board burns out due to a short circuit. Re-soldering contacts on the VAZ board is a waste of time. The fact is that after such a repair the board will not last long and will fail again. The solution to the problem is to completely replace the element with a new one.
The entire fuse box is faulty
Another reason why the instrument panel does not work may be a malfunction in the mounting block. Burning of the contact point leads to permanent burnout of the safety element. This interferes with the correct operation of the device. This problem is eliminated by replacing the entire block assembly. There is nothing complicated in this procedure, and the cost of ready-made replacement options is low. You can also try to restore the fuse box by resoldering the tracks. A non-working VAZ 2114 dashboard is a problem for the driver. When it malfunctions, it happens that the wipers do not work. All of these are links in one fault chain, so if you observe a simultaneous failure in two of these nodes, carry out diagnostics.
Fix problems immediately after they are discovered, because... If the instrument arrows do not show, it is difficult to determine some indicators of the car’s condition.
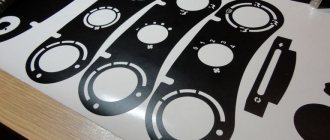
How to overexpose the buttons of a VAZ 2114
Hello everyone. Well, as promised, I made a short photo report on replacing LED bulbs in the instrument panel buttons of a VAZ 2114, etc. I hope this material will help someone.
So, let's begin. To replace the LED light bulbs, I needed: 1-tweezers (preferably not from my wife or girlfriend, otherwise you can get “gratitude”), 2-knife or thin screwdriver (for opening buttons), 3-LED light bulbs 12V 3mm in the desired colors (I have white and red), 4 hands and a little time.
https://youtube.com/watch?v=SrrcjnRSD9E
As I understand it, the buttons were produced in three versions and, as the happy owner of a domestic designer from AvtoVAZ, I have all three of these damn versions in my car. Of course, there may be even more of them, God forbid, but I have counted three so far. I’ll tell you about two performances that were released a long time ago.
The first button is disassembled from the front from the side of the bulbs, the second from the back from the side of the contacts. In both cases, be careful when disassembling the buttons, do not lose the springs inside and pay attention to the small bracket that fixes the button in the pressed position, it must be in place when assembling the button . Pay GREAT attention to the lamps because
they are polarized. My “+” lead is longer than the “-” lead, basically the same as other lamps of this type. When installing light bulbs in the “+” button, the long lead should be on the LEFT (see Fig. 1) (if you look at the button as it is installed in your car)
Pay GREAT attention to the lamps because... they are with polarity. My “+” lead is longer than “-”, in principle, the same as other lamps of this type
When installing light bulbs in the “+” button, the long lead should be on the LEFT (see Fig. 1) (if you look at the button as it is installed in your car).
And then look at the photo.
don't mix up the polarities
Button of the first version: use a knife to pry it from both sides and pull out the insides
half disassembled, do not lose the springs
The bracket that fixes the button in the pressed position walks along this groove (this button is not fixed)
Now you need to carefully push the contacts out to pull out the light bulb
the contact can be removed, it is important not to forget how it stood later
Now we bend the contacts of the light bulb
and remove it with tweezers
This is what my new light bulbs look like (white and red)
and this is what they look like ready for installation (bent with tweezers)
first installed
we bend the contacts so that they fall into special grooves (you will see when you take them apart)
the second one is in place
"title="bite off the extra mustache with side cutters or carefully break it off with tweezers (the metal is very soft) and you can assemble the button">
Source: www.drive2.ru
Window control unit from Kalina in VAZ 2114 + window closer Falcon WR-400
Finally, everything was won, the wiring was stretched and everything was connected!
The goal was to lengthen the wires of the power window buttons and connect them to the ESP unit from Kalina, connect the central locking and illuminate the mirror joystick (I don’t have electric mirrors). During the work, I came across a Falcon WR-400 glass closer, it has 4 glasses, but for now they installed two, with a reserve for the future)) And so, everything in order:
Connecting power window buttons.
I hope the author won’t mind, I took this blog entry as a basis, as well as several others.
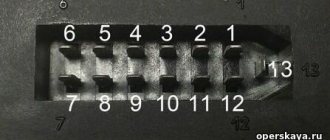
Pinout for connecting power window buttons.
1) +12V for the driver's window (Window moves down) 2) +12V for the driver's window (Window moves up) 3) Ground 4) +12V for the driver's window 5) Ground 6) +12V for the passenger's window 7) None Dimensions 9) +12V for passenger window (Window moves down) 10) +12V for passenger window (Window moves up)
Pinout of the native ESP 2114 button
Accordingly, I extended all the wires and attached small terminals at the end, because... I couldn’t find the connector (oh, that is, I didn’t look...) Also, wires from a Falcon WR-400 were embedded into these wires. I can’t tell you about connecting it, our installer volunteered to help me and did everything himself)) But I think there won’t be any problems there! I know for sure that they pulled one wire from the alarm unit and another wire pulled the positive one, so that without the ignition the unit could raise the windows.
Falcon WR-400
Connecting the central lock button
I also can’t tell you exactly where the two wires came from that are responsible for opening and closing the doors if you apply ground to them. But I assume they come from the central locking unit that was installed at the factory. On my car it is located at the driver’s left foot, a little higher under the dashboard.
This is the standard central locking unit
Pinout for central locking connection.
1 closing 2 ground 3 missing 4 dimensions 5 backlight ground 6 missing 7 opening
We also connected all this, and also ran the wires for the joystick backlight:
2 dimensions 5 weight dimensions
Well, as I said, I messed around with the hard door trim until I solved the problem and installed it as is.
Here's what the bundle turned out to be:
All that remains is to pass the successful testing stage and I am satisfied!)
Jamb...
In place of the original buttons, I bought plugs at Yuzhny Port
Well, here’s a video of the central locker working:
I apologize for such quality, but we take what we have)
Also a video of the Falcon WR-400 working
Sources
- drive2.com/l/9798471/
- 2shemi.ru/shema-podklyucheniya-i-raspinovka-knopki-steklopodemnikov-vaz/
- drive2.ru/b/1254756/
- ladaprofi.ru/vaz-2114/poshagovaya-raspinovka-knopki-steklopodemnika-vaz-2114.html
What's next
After all devices are disconnected from the car, you need to remove the handles from the heater switches. This can be difficult to do, because they are fixed quite firmly. To install the handles, special latches are used, which are installed inside. There is a small protrusion on each handle that will help us remove them. You just need to get into this hole with the tip of a minus screwdriver, then pick up the latch and lift it up.
The further procedure is as follows:
- The handle of the stove motor is removed. It is enough just to slightly pull it towards you;
- The torpedo is fastened to the instrument block using several self-tapping screws. They are removed using a “plus” screwdriver;
- Next, you need to remove the plug. It is fixed with a single self-tapping screw that needs to be removed;
- The cover is held in place by two fasteners. And again the screwdriver comes to our aid;
- Let's move on to the cables that are connected to the switches. They must be carefully removed, having previously marked each of them;
- Next, remove the steering mount bracket bolts;
- remove the fasteners from the bottom of the bracket. The key to 8 will help us here;
- remove the light guide;
- Next in line is the heating system control unit. Unscrew the fasteners and remove the cartridges;
- in front of us is a decorative insert. We also don’t need it, so we temporarily get rid of it;
- remove the hydraulic corrector;
- The last step is to dismantle the upper and lower fasteners.
That's all, actually. Now the torpedo is carefully removed, and you can perform any necessary actions with it. Assembly is carried out in reverse order. The procedure is quite complex and troublesome, filled with various little things, so please spare yourself time and patience. If any points remain unclear to you, you can watch the video on our website.
Do-it-yourself overexposure of buttons on a VAZ 2114
Replacing the standard button backlighting on a VAZ 2114 will require the preparation of certain tools, materials, as well as some time. To work you will need the following list of necessary things:
- soldering iron with a thin tip;
- solder;
- tweezers;
- small knife or flat screwdriver;
- LED elements of the desired color.
Which LEDs and in what quantities should I buy?
The buttons installed on the dashboard of the model in question come in old and new styles. In the first case, small light bulbs or LEDs are used as a backlight element, and in the second, boards with sealed SMD LEDs are used.
Bulbs, LEDs and SMD elements can be used as backlighting elements in buttons.
Each button is equipped with two LED elements: one is responsible for illuminating the button itself, and the second indicates the activation of a particular function. The exception is the low beam headlight button - it does not have a power indicator LED. Therefore, if you plan to replace the LEDs on all five buttons, you will need to purchase 9 backlight elements. The type of the latter can be determined only after disassembling the button. The old model requires 12 V LEDs with a diameter of 3 mm. The new sample uses elements marked 0805. When using standard LEDs, it is recommended to additionally install a resistor with a resistance of 500 Ohms to 1 kOhm along the power circuit (directly in the button), which will prevent the element from burning out.
To prevent the LED from burning out, it is recommended to install a resistor in series
How to remove buttons
To remove the buttons on the front console, do the following:
- Remove the negative terminal from the battery.
- We take out the plug of the on-board computer or the BC itself, if it is installed. To do this, just hook it with your finger and pull it towards you.
- We put our hand into the hole formed and feel the back of the buttons.
- Carefully press the buttons out.
- We remove the blocks with wires.
- Having completed the necessary actions with the buttons, install them in the reverse order.
Replacing the backlight of the front panel buttons
Since replacing LEDs on old and new button versions is somewhat different, each process should be considered separately.
Overexposure of old-style buttons
After removing the buttons from the instrument panel, perform the following sequence of actions:
- Pull the top of the button and remove the lid that is pressed.
- Insert a flathead screwdriver into the button and remove the inner part. You need to remove it carefully so as not to lose the springs.
- Use a multimeter to determine the polarity of the LEDs.
- We bend the leads and dismantle the LED element.
- We bend the leads of the new LEDs and insert them into the button body, observing the polarity, after which we shorten the leads with side cutters to the required length.
- Reassemble the button in reverse order.
Overexposure of new buttons
On modern buttons we change the LEDs this way:
- We disassemble the button, as in the previous paragraph.
- After opening we find a board with installed LEDs. We determine the polarity of the elements and solder them with a soldering iron with a thin tip.
- In their place, we carefully install new SMD LEDs of the desired glow color.
- We reassemble the button.
Video: overexposure of VAZ 2114 buttons
Modernization of the buttons for turning on the headlights and low beam
The buttons for turning on the headlights and low beam headlights are made as a single element. The absence of an LED indicating that the headlights are on low beam causes inconvenience to many motorists. This is due to the fact that it is often unclear whether the headlights work or not. To solve this problem, they resort to modernizing the button. In addition to the tools listed above, you will need a similar button from which the necessary parts will be removed. The finalization process itself consists of the following steps:
- Remove the button from the panel.
- Using a minus screwdriver, we pry up the keys, take them out and see that the LED is initially missing.
- We disassemble the button housing by pressing on the latches with a screwdriver. At this stage the buttons should be in the pressed position.
- We remove a couple of pins and contacts from the spare button, and then install them in the body of the element being modified.
- We take out the board with two LEDs from the spare button and replace it with the board with one LED element.
- Using a soldering iron, we connect the board to the new terminals.
- To supply power to the new contacts, we connect the contacts with copper wire according to the photo.
- Using a sharp knife or screwdriver, make a hole in the button cover.
- We assemble the part in the reverse order and install it in place.
features of replacement, modification of the power button, electrical diagram, photo
According to traffic regulations, when driving on the highway in the autumn-winter period, even during daylight hours, you must turn on the low beams. Therefore, it is necessary to monitor the performance of the car’s lighting fixtures and change the lamps in a timely manner so that an emergency situation does not arise on the road. In this article we will look at how to replace a low beam lamp on a VAZ 2114, and also get acquainted with some malfunctions of the lighting system and how to eliminate them.
Headlight of a VAZ 2114 car
Replacing the lamp
So, if the low beam on a VAZ 2114 does not work, then most likely the reason lies in a burnt-out lamp. Most often this happens if the lighting elements have been replaced a long time ago. Although, new lamps often burn out, which is due to the large number of low-quality products on the auto parts market.
Of course, before replacing a light bulb, you will first have to deal with its choice. On the VAZ 2114 car, double-thread paws of the h5 standard are used, which are responsible not only for near, but also for distant lighting.
Halogen lamp h5
Comparison of light from halogen and xenon lamps
Lamps on the market may differ in their operating principle, on which many of their characteristics depend. Below we will take a closer look at all their types:
| Lamp type | Peculiarities |
| Halogen | Currently they are the most common. Among the advantages of halogen bulbs are the following:
The disadvantages include fragility, as well as a relatively low luminous flux power - no more than 1550 Lm. |
| Xenon (gas discharge) | Provide a more powerful luminous flux - up to 3300 lm. In addition, they have other advantages:
However, along with the advantages, they also have disadvantages, which include:
|
| LED | They are a new type of lighting elements. Their advantages include durability and low energy consumption. As for the power of the luminous flux, it is somewhat inferior to xenon. LED lighting elements are also quite expensive and require the installation of ignition units, which is a disadvantage. |
Layout of headlight screws for VAZ 2114
Replacement procedure
Replacing the low beam bulb on a VAZ 2114 (also high beam) is carried out in the following sequence:
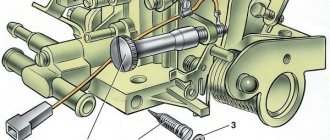
First of all, you need to open the hood and unscrew the screws (3) that secure the casing (4).
Diagram of a headlight with the cover removed
- Then you need to press down and remove the spring antennae (3) from the grooves.
- Next, you should pull out the block (4) along with the old light bulb.
- After this, you need to press on the lamp (5) and turn it, after which it can be easily removed from the socket.
- Install a new one in place of the old bulb, and then reassemble the headlight in the reverse order.
Here, in fact, are all the instructions for replacing the light bulb. Using the same scheme, the lighting element in the second headlight should be replaced.
Common faults and their solutions
If, after replacing the bulbs, the low beam on the VAZ 2114 still does not light up, then there may be several reasons for this:
- Faulty fuses;
- Faulty headlight switch button;
- Broken wiring.
Below we will look at how to troubleshoot these problems.
Fuse box
Replacing fuses
The fuses are located in a special block, which is located on the left side near the windshield. To replace them yourself, you need to open the plastic cover and find fuses F12 (responsible for the left headlight) and F13 (responsible for the right headlight).
If the light comes on after replacing the fuses, you need to leave it on for a while to make sure the new fuses don't blow. If they quickly melted, you need to look for a problem in the wiring of the VAZ 2114.
Low and high beam electrical circuit
Why change the backlighting of individual buttons on the VAZ 2114 dashboard
On the VAZ 2114, the illumination of the buttons for controlling the dimensions, low beam, front and rear fog lights, as well as the rear window heating is green from the factory. Over time, many owners get tired of this glow and there is a desire to replace it, make it non-standard. After making a decision about such modifications, you need to decide: do this work yourself or contact the service. Since the process of replacing button backlighting is not a complicated procedure, in most cases, car owners carry out such an upgrade with their own hands.
The standard green backlighting of the buttons gets boring over time.
IMPROVEMENT OF INTERIOR LIGHTS
The interior lighting of the VAZ 2114 can be customized with your own hands to suit your purposes and needs. The most interesting option is considered to be the complete removal of the standard lampshade, and the installation of a programmable analogue along with integrated LEDs instead. It is better to do such an upgrade as soon as it was noticed that the light in the VAZ 2114’s interior does not work - why repair an already broken old lamp if you can replace it with a new and much better one.
In addition, the new lamp will have the following functions that the standard version does not have:
- The ability to select brightness from three possible options, adjusted by pressing a button;
- Automatic shutdown after a certain time if the door is not completely closed or just open. This will prevent the battery from draining overnight;
- Smooth extinguishing of the lamp, switching off occurs within 10 seconds.