Checking the device with an ohmmeter
It is not always necessary to immediately replace the sensor with a new one. It happens that the problem lies in a completely different component of the car, for example, an injector. Also, if the meter is faulty, it may be possible to repair it. Before replacing, check the sensor:
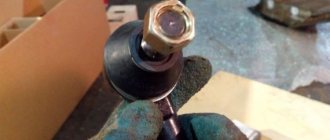
- To test the device, connect a resistance meter to its terminals. This indicator must be measured when the lever and float are in extreme positions or in the middle.
- In the lower position, meaning zero fuel level, the resistance should be 285–385 Ohms.
- In the central position, which means the tank is half full, the ohmmeter should show 100-135 ohms.
- The highest position is a 100 percent filled tank. The ohmmeter should read 7–25 ohms.
If in at least one position the readings obtained diverge from normal, repair or replace the sensor. After installing the new meter, make sure that the installation arrow on the module cover is directed towards the trunk. Otherwise, you will need to dismantle the system again and repeat the replacement.
VAZ 2114: replacing the fuel sensor yourself
Fuel level meter VAZ 2114, also known as FLS
A jumping arrow on the fuel level indicator on the dashboard, or indicating the wrong amount of fuel in the tank (there is still gasoline, but the arrow is at zero, or even worse, when it’s the other way around!) are symptoms of a malfunction (of the fuel level meter). You can replace the VAZ 2114 fuel level sensor yourself, without using the expensive services of a service station. Our instructions will help you with this.
General information about FLS
Cars from the VAZ family produced in recent years are not completely technically advanced, although at first glance their appearance and design largely reflect the trends of the European automotive industry. However, there are many minor technical flaws that do not allow VAZs to be classified as excellent quality cars:
- A striking example is the fuel level meter on the VAZ 2114.
- During the first period of its operation, it works well and copes with the task.
- However, due to the imperfect design and fragility of its body, as well as due to temperature changes, the formation of condensation in the fuel tank, and the use of low-quality fuel, this simple device constantly fails
- Since its tightness is broken, the contacts from the condensate oxidize and become completely unusable
- Therefore, owners need to carry out regular maintenance of this device.
- To carry out preventive maintenance, the sensor is removed, its contacts are cleaned and replaced, sometimes it is necessary to replace the VAZ 2114 fuel level sensor
- To replace the fuel sensor, you need to remember the markings on it, because without knowing the markings, choosing a suitable device will be very difficult
- Markings are often rare, and only knowledgeable specialists from a company specialized in servicing can correctly select a replacement (equivalent).
- The original factory equipment of the car contains a fuel level meter with an analog output to the control panel
- It is very imperfect, it is much better when the fuel meter already has a digital output
- Already connected to the on-board computer control and monitoring system
- The computer is able to promptly diagnose the onset of a problem or incorrect operation of the meter and inform the driver about it
Design and principle of operation
The fuel level meter is designed to determine the fuel level in the car tank and transmit the resulting measurements to the instrument panel; it consists of:
- resistor
- float with lever
- and a sliding shutdown contact - turning on the fuel level warning lamp
The sensor works by moving the float as the amount of gasoline in the tank changes:
- In this case, the resistance of the variable resistor changes and, as a result, the resistance in the circuit also changes
- Based on this resistance, fuel level readings are displayed on the instrument panel
- On VAZ cars, BM-150 sensors are mainly installed
How to replace the fuel level sensor in a VAZ 2114
Owners of even the most modern VAZ model often have complaints about the reliability of measuring the amount of gasoline in the tank, and there is an urgent need to dismantle the fuel level meter.
Required Tools
- A set of heads or open-end wrenches
- Screwdriver Set
- Ohmmeter
- New meter
We carry out replacement
Everyone understands that in order to quickly and competently carry out this technological operation with your own hands, you need to know where the sensor is located that determines the fuel level in the VAZ 2114 tank, how to check it and how to replace it if such a need arises.
Attention: When starting work, you should remember that replacing the VAZ 2114 fuel sensor is carried out in direct contact with gasoline, which means that for personal safety, you should first disconnect the battery (to do this, just disconnect the negative power cable from the battery terminal) . In addition, it is recommended that the fuel tank be less than half full when replacing the meter.
- The gasoline level meter for the VAZ 2114 is located in a single module, together with the fuel pump; it will not be possible to dismantle only the sensor without removing the entire module
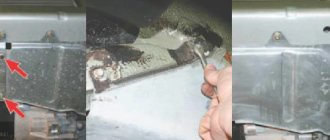
- To access this unit, you need to remove the rear seat bottom cushion and peel back the luggage compartment trim
- Using the key to “7”, we turn out from right to left two screws that hold the fuel tank cover (they also serve to attach the side trim)
- And then eight more screws that press the front and back edges of the cover
- To remove the tank cover completely, you need to move it slightly forward.
- We disconnect the electrical connectors from the fuel pump, using open-end wrenches size “17”, and unscrew the fuel supply hose nut from the fitting.
- This operation is performed slowly, first we make one revolution and bleed the pressure from the system
- We unscrew the eight nuts located along the diameter of the fuel pump cover using a spanner (or open-end wrench), a ratchet head is also appropriate here
Unscrew the nuts along the diameter of the fuel pump cover using a ratchet socket
- When removing the pump, it should be lifted and turned clockwise, then tilted slightly (so as not to inadvertently damage the float part of the fuel level meter, otherwise the cost of the issue may increase)
Replacing the fuel sensor on a VAZ 2114 in the fuel module is performed in the following sequence:
- Using a flat-head screwdriver (slotted) with a narrow blade, move the retaining ring
- Then you have the opportunity to remove the cover from the fuel module
- Remove the tip of the connected wire from the fuel pressure regulator terminal
- We press the corresponding clamps from the module cover and disconnect the connectors with wires from the pump
- We release the sensor latches and slide the sensor itself along the grooves of the housing (photo below)
- Then remove the meter from the module
We move the meter itself along the grooves, then remove it
We check
- To check the fuel level meter, connect an ohmmeter to its terminals, measure its resistance at the extreme positions of the lever with the float, and at the middle position
- In the lower extreme position, meaning an empty tank, the resistance should be 285-385 Ohms
- In the middle position, corresponding to filling the tank halfway, the resistance is 100-135 Ohms
- And with a full tank, in the uppermost position, the resistance is 7-25 Ohms
- If the resistance value does not correspond to these limits in at least one position, then the meter is faulty and requires repair or replacement
- Install the sensor and fuel module in the reverse order
- Upon completion of assembly, be sure to check that the installation arrow located on the module cover is pointing towards the trunk
Tip: If you discover a malfunction in the fuel level indicator, before proceeding with the rather tedious and messy procedure of replacing the sensor, it first makes sense to check the fastenings of the contacts of the two black wires that are located near the handbrake handle. Often, many detected problems disappear after stripping the contacts of these same wires or tightening the nuts with which they are attached.
That's all, replacing the fuel level sensor on a VAZ 2114 is completed, without effort or problems. As you have seen, the operation is simple and accessible to everyone. In addition to the instructions, you can watch a video on this topic.
Principle of operation
Signs of a malfunction of the fuel pressure regulator
On the Lada 2108, different engines were installed, from 1100 cubic meters to 1500. At the same time, the carburetor design did not change at all. Enlarged jet holes helped adjust the fuel supply for a more powerful engine.
The operating principle is quite complex. Gasoline passes through a filter at the carburetor inlet. There is also a valve that prevents the amount of gasoline in the chamber from decreasing.
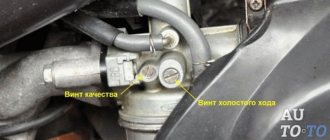
From the chambers, gasoline flows through jets into wells, where it mixes with oxygen and forms a flammable mixture. Some of the gasoline is taken by the idle jet, also mixing it with air. The rest of the mixture is injected under the valve. At the place where this injection occurs, two screws are installed - the quality of the fuel and its quantity. Thanks to them, you can adjust the number of engine revolutions and the supply of gasoline. The VAZ 2108 carburetor is adjusted using a flat-head screwdriver.
The economizer serves to add fuel to the combustion chamber when the throttle valves are fully opened.
The econostat is also responsible for the additional supply of gasoline, but, unlike the economizer, it passes it through the nozzle. The econostat starts working when the engine reaches maximum power.
The accelerator pump in Solex carburetors serves for atomized injection of fuel into the float chamber. It is activated when you sharply press the gas pedal, that is, during acceleration. Its device also provides for stopping the fuel when the gas pedal is released. This will protect the mixture in the float chamber from excessive air leaks.
Acceleration pump nozzle
A starting device is installed in order to increase the amount of gasoline supplied to the float chamber. Mainly used to start the engine “cold”. Increasing or decreasing the fuel supply is carried out manually, using a choke.
After the mixture is ready, it is fed into the combustion chamber through the intake manifold opening. Since the Solex carburetor was installed on all modifications of the VAZ 2108 engine, the difference between them can only be in the size of the manifold hole
Therefore, be sure to pay attention to the diameter of the hole and the size of the gasket. This will be useful to you if you carry out repairs.
Varieties
Depending on the type of car engine, the following fuel pressure regulators are distinguished:
- For injection engines.
- For gasoline power units.
- For diesel engines.
You can take a regulator for a 1.5-gasoline or 1.6-gasoline engine.
According to the condition, the part for the VAZ 2114 can be of the following types:
- Used.
- New.
A used car part is cheaper. But purchasing it is not always advisable in terms of savings. After all, the service life of old spare parts is short.
Depending on the manufacturer, you can get a spare part:
- Original.
- Non-original (analogue).
Analogues are usually cheaper than original parts. But difficulties may arise with their operation, since not all types of non-original regulators are suitable for the VAZ 2114.
You can get a fuel pressure regulator from your place of purchase:
- At the car market.
- In the online auto parts store.
- From a private person.
- At the car dismantling point.
- In a specialized store in the city.
You can buy and install a fuel pressure regulator from the following company on a VAZ 2114:
- SOATE.
- FENOX.
- RES.
- SARD.
- Aeromotive.
- AvtoVAZ.
A little about the operation of the fuel sensor
Fuel pressure sensor VAZ 2110: replacement, malfunctions
The latest developments by the designers of the automobile plant in Togliatti have brought the produced models closer to the best European models, but annoying, minor breakdowns can add “a fly in the ointment.” These fully include problems with the gasoline level sensor in the car tank.
It is located in the same block as the fuel pump. It includes a movable lever with a float, a resistor and a contact group, which turns on the signal lamp for the gasoline reserve in the tank. Among the most common malfunctions of this unit, the most common are problems such as resistor breakage, oxidation of the moving contact or output terminals. It is very rare that the float in the fuel level indicator loses its seal.
In any case, to repair or service this unit, it must be removed from the fuel tank. To perform this work, remove the rear seat cushion and upholstery that blocks access to the gas tank cap. When performing this operation, do not forget that you are working with a flammable substance. Fire safety rules must be strictly followed.
Unscrew all the screws securing the cover, move it slightly forward and remove it from the fuel tank. Before removing the fuel block, it is necessary to relieve the pressure in the fuel line. There are several ways to do this, and the simplest of them is to leave the car idle for about 4 hours.
Disconnect the wires and fuel line from the module, being careful not to spill any remaining gasoline in the hoses. You need to pull out the fuel pump carefully so as not to damage the float.
Replacement of the fuel sensor is carried out using a screwdriver with a thin blade.
How does this happen:
- Use a screwdriver to move the locking ring and make it possible to remove the cover from the fuel module;
- Remove all the wires, release the latches on the cover and remove the sensor itself along the grooves;
- The next step is to remove the meter from the block.
To install a new fuel sensor, everything must be done in reverse order.
How to replace the fuel level sensor in a VAZ 2114
Malfunctions
For what reasons may the fuel level indicator not work:
- lack of good contact on any part of the circuit (breaking off wires, oxidation at the junctions of connectors, cracks at soldering points);
- malfunction of the instrument panel indicator (for example, broken solder joints);
- disconnecting the float from the sliding contact;
- fuse burned out;
- lack of contact between the resistive track and the sliding contact. The reason may be the formation of oxides and deposits on surfaces, weakening of the pressure of the sliding contact on the resistive layer, and abrasion of the tracks of the resistive layer.
The pointer is lying and works intermittently
Reasons why the gauge incorrectly shows the fuel level in the tank:
- the presence of additional resistance in the circuit (oxidation at the connectors, poor ground contact, formation of oxides, deposits on the resistive layer and sliding contact);
- Float casting defect, causing it to fill with fuel. Failure is extremely rare, but still possible, as is bending of the float rod due to mechanical impact during unqualified repairs;
- formation of deposits on the guide post (typical only for tubular type sensors). In this case, the movement of the float will be difficult.
The arrow always shows a full tank if the system has:
- the float has separated from the sliding contact (in this case, the slider will always be in the extreme position);
- the wire going to the indicator has a short to ground somewhere, which causes the resistance in the circuit to decrease.
A twitching arrow of the UUT indicates partial abrasion of the resistive track of the potentiometer. This will also cause interruptions in the operation of the pointer. Since the car is most often used with a fuel tank filled to 40-60%, it is in this range that abrasion of the resistive layer occurs most quickly. Therefore, the pointer can only work properly when the position of the sliding contact falls on an intact resistive layer.
Checking the fuel level sensor with a multimeter
After a visual inspection, a check with a multimeter may also be necessary. In other words, to understand why the fuel sensor is not working, the specified sensor is also checked in ohmmeter mode.
The fact is that the resistor can change resistance over time, which leads to incorrect sensor readings. Resistance should be checked with the tank empty, 50% full and full. If it is determined that the resistance is not normal, it is better to immediately install a new sensor.
We also add that if, after installing a new FLS, the sensor does not accurately determine the fuel level in the tank, this is often due to the fact that the resistance deviates from the nominal one. In fact, we can say that the wrong sensor is installed.
As a rule, when choosing, it is important to consider that although fuel level sensors are visually similar, they usually have different resistance values. In fact, this is what leads to errors.
For this reason, you need to purchase a sensor that has the required resistance.
Fuel level sensor float and other problems
In cases where the fuel level indicator does not work, in some cases it is directly related to the float. Floats can be of two types:
- hollow float made of plastic or thin metal;
- the so-called “foam” float, which is made of a porous base;
In the first case, the float may gradually wear out and become damaged; the fuel level indicator needle gradually fails to reach the maximum when filling a full tank.
Fuel can get inside the hollow float, causing the level sensor to show incorrect data. To fix the problem and carry out repairs, it is necessary to replace the float of the fuel level sensor in the tank.
You also need to understand that if the fuel sensor is lying, you should not exclude the possibility of mechanical damage to the gas tank itself. If the tank is damaged, then the float may simply jam.
As a rule, in this case the pointer works accurately, but the range is very limited. The fuel level arrow may also be “stuck” in only one position. In fact, the problem is not the most harmless and often requires a complete replacement of the gas tank to solve it.
By the way, often when buying a used car, you can hear from the seller that the fuel pump screen was recently cleaned or the fuel pump was replaced, after which the fuel level sensor, etc., stopped working.
At the same time, the seller claims that there is simply no time to fix such a minor breakdown. In fact, if the fuel level sensor in a car does not work, this can be caused either by a failure of the sensor itself or the float, or by deformation of the gas tank. Naturally, changing the tank is quite expensive.
We also note that if the FLS does not indicate the fuel level correctly, the bending of the lever may also be the cause. In this case, the pointer arrow is not able to reach the extreme marks.
The lever can be corrected, but it is important to understand that the problem itself occurs as a result of one or another mechanical effect on the tank. Also, after editing, the float may still jam
Again, in such a situation, it may be that the tank itself needs to be repaired or replaced.
Preparatory work
- We take a pre-prepared pressure gauge, and to prevent fuel spills and air leakage, we wrap flax or fum tape around the tip.
- We are preparing a hose with a maximum internal diameter of 9 millimeters, and clamps will be needed to secure them.
- We place the prepared rags on the engine in such a way that the hose and pressure gauge fixed on it cannot roll off the surface. This is done to prevent excess fuel from spilling over the surface of the engine.
- We wrap flax or tape around the pressure gauge, then fix the hose on it and tighten everything with a clamp.
- On the ramp, unscrew the spool valve from the nipple (in this case, fuel splashes are possible due to the presence of residual pressure - approx.).
VAZ 2114 engine mounts signs of malfunction
A regular wheel cap came in handy.
Pressure gauge with pipe assembly.
We place the pressure gauge on a previously prepared rag, and the preparatory work can be considered completed.
Measurement procedure
Before you start working, you can try to relieve the pressure in the fuel system. To do this, remove the fuel pump fuse (which is located on the right side of the panel, under the front passenger’s left foot - approx.). Where 3 relays and 3 fuses are located. In the photo below it is located under the number “5”. After removing the fuse, turn on the ignition and check by ear that the fuel pump is not pumping. We start the car and wait for the engine to stall.
- After everything is ready, we check the already attached end of the pressure gauge with the hose for a secure connection.
- Next, start the engine and look at the readings that appear.
Thus, we diagnose the results that appear and compare them with the results of the norm.
Note!
The peculiarity of measuring pressure using a pressure gauge is such that its initial value on the scale has a certain inaccuracy. That is, when the air analogue has a measurement period of 15-20 atmospheres, and for fuel control the required maximum value is 5-7 atmospheres, then all measurements taken will have an error equal to the initial values on the device. Therefore, pressure testing should be carried out on a pressure gauge with maximum values of up to 8 atmospheres.
We measure the pressure in the system without a check valve
If it happens that your engine does not have a check valve, then you need to know that in such a ramp there is a constant pressure of 3.6 to 4.0 atmospheres. But the order of measurements in general is completely similar to what is described above.
Design
The regulator includes a check valve that opens when exposed to excess pressure. The RDT has two outputs, forward and reverse. The fuel pump pumps fuel into the direct line, since the fuel pump pumps fuel continuously, therefore, when a certain pressure value is reached, the RTD valve opens and excess fuel is discharged into the return line, which is connected to the tank.
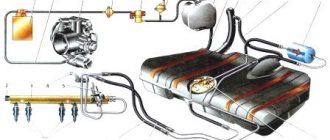
COMPONENTS OF THE FUEL SYSTEM
The VAZ 2114 fuel system consists of the following main elements:
- Gas tank;
- Fuel pump;
- Gasoline filtration devices;
- Pipeline system;
- Fuel rail;
- Injectors;
- Waste disposal unit.
Fuel system diagram
Let's analyze each component separately.
GAS TANK
The VAZ 2114 gas tank is a container made of two equal metal parts. A neck is removed from the tank into which gasoline is poured. The neck is connected to the tank via a rubber pipe and clamps.
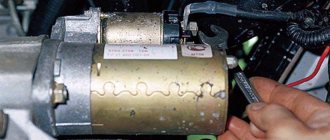
FUEL PUMP
The fuel pump is located directly in the tank. It has a fuel level sensor, which transmits information about the current amount of gasoline to the ECU. The gasoline pump is connected to a line through which gasoline is transported to the fuel rail. The fuel pump itself consists of several parts - coarse filters, wiring and an electric motor, which pumps fuel. As evidenced by reviews from owners of fourteenth cars, fuel pumps from the German company BOSCH have proven themselves to be the best.
FILTRATION DEVICE
The VAZ 2114 fuel injection system very much depends on the quality of the filter devices used. A bad filter will significantly reduce both the efficiency and the longevity of the entire system.
On the fourteenth, non-separable filters with a working element made of paper are installed. Such filters clog quite quickly, and they need to be changed at least once every 10-15 thousand kilometers.
FUEL RAIL
The fuel rail is located on the intake manifold housing. Its design consists of two parts, separated by a spring-loaded diaphragm. The first is the fuel one, in which the required level of gasoline pressure is set, the second is the air one, air is pumped into it, due to which the diaphragm compresses the fuel chamber and changes the pressure level in it.
Ramp
PIPING AND HOSES SYSTEM
To circulate gasoline from the gas tank to the injectors, the fourteenth uses steel fuel lines located on the bottom of the car. The VAZ 2114 fuel supply system also provides for a return pipeline through which excess gasoline from the injectors is returned back to the gas tank.
VAZ 2114 owners are advised to carefully monitor the condition of the fuel line in order to avoid gasoline leaks. Pipes should be checked regularly for deformation and corrosion.
INJECTORS
Injectors are valves actuated by electromagnetic control. They have a sprayer, with the help of which fuel under pressure is supplied directly to the combustion chambers.
Injectors are one of the most problematic parts of the fuel supply system of the fourteenth (as well as VAZ 2115 and VAZ 2113), the service life of which directly depends on the quality of the gasoline used. If the fine filter does not fully perform its functions, the injectors will become clogged, and from time to time you will need to clean them at a service station (doing this at home is very problematic).
A critical failure of the injectors is a short circuit or break in the winding, after which it is necessary to replace the failed part.
WASTE DISPOSAL UNIT
The EURO-3 environmental safety standard, to which the VAZ 2114 complies, provides for the presence of a gasoline vapor recovery chamber, for which the fourteenth uses an adsorber with activated carbon. The adsorber is connected to a throttle assembly, from which all resulting vapors are sucked out.
Adsorber
Replacement
Replacement process
By following the instructions step by step, you can independently remove and install a new fuel pressure regulator without any problems.
- Work on dismantling the device can only be carried out if the engine is cold. If you just drove into the garage, give the car some time to cool down.
- When the engine is running, high pressure remains inside the system, so it must be reduced before work.
- Disconnect the negative terminal from the battery to avoid electric shock and damage to the wiring.
- Remove the vacuum hose.
- Unscrew the nuts on the drain pipe and gradually reduce the fuel pressure level in this way. Be sure to hold the hose fitting with one hand.
- The tube and the washer are connected to each other by a regular rubber ring.
- The screw that holds the clamping bar is unscrewed.
- Now this very bar can be put aside for a while.
- Slightly unscrew the fixing nut that holds the drain tube and the regulator itself.
- Remove the fastening screws of the regulator holding it to the ramp.
- Carefully remove the nut, which will ultimately allow you to remove the object we are looking for.
- Install the new device by following the reverse dismantling sequence.
Be sure to check the fuel pressure in the injectors with the engine off, ignition on and the electric fuel pump on. During normal operation of the device, the pressure should be about 300 kPa. If the level you checked is below normal, this can lead to disruption of the functionality of the entire engine power system. Therefore, be careful, do the work step by step, and do not forget about the importance of each stage of repair.
https://youtube.com/watch?v=h5e-ca4cw_Y
Replacing the fuel pressure regulating device yourself is not difficult. Just keep in mind that for optimal engine operation after replacement, you will need to not only follow the sequence of work and do everything as competently as possible, but also use a new, high-quality device as a replacement. The regulator is not expensive, so such repairs will not entail significant costs for your VAZ 2114.
The VAZ 2114 fuel pressure sensor is today’s topic of conversation. I accidentally came across a question from a person who is having difficulty starting the engine. And I changed several fuel pumps, but it didn’t do much good.
The electric pump works, but it feels like it’s not pumping at all. Let's try to figure out what could be the reason? And is it worth blaming the pump right away? Yes, if the “diaper” is clogged and has never been changed, then it’s worth taking it off and seeing what’s going on there?
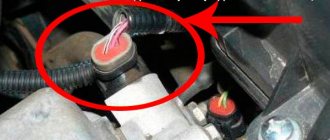
But if everything is fine here, you should pay attention to a small element that has a huge impact on the fuel supply - the check valve, also known as a pressure sensor. Let's talk about it now
Regulator replacement
The regulator is removed only when the engine is cold. When the engine is in operation, fuel pressure remains inside, so before starting the replacement procedure, the pressure indicators must be reduced.
Replacing the fuel pressure regulator VAZ 2114
- The “-” wire terminal from the battery is disconnected.
- The vacuum hose is removed.
- Remove the drain tube nuts, carefully reducing the pressure level. Hold the hose connector during the procedure.
- We fasten the washer and tube with a rubber ring.
- We disconnect the screw securing the clamping bar and remove it.
- Slightly unscrew the nut holding the regulator and drain tube.
- Remove the screws securing the regulator to the ramp.
- Carefully unscrew the nut and remove the regulator from the ramp.
- We attach the regulator using the same method, but in a different order.
It is important that with the engine off, the ignition on and the electric fuel pump running, the fuel pressure in the injectors should fluctuate around 300 kPa. If the level is lower than indicated, there is a possibility of disruption of the function of the entire motor power system.
What is the sorcerer on the VAZ 2114 and where is it located?
This strange name “sorcerer” was given to car owners by the brake force regulator. This device first appeared in 1970. This is probably not accidental, because the behavior of a vehicle on the road depends on this mechanism: the length of the braking distance, whether the car will skid when turning and by how much. During braking, the load on the front and rear axles is distributed unevenly, therefore, in order to equalize the force between the axles for effective braking, dynamic correction of the braking process is required. This correction is performed by the brake force regulator. This small detail prevents the rear wheels from locking before the front wheels, and thereby prevents the car from skidding during braking. If the sorcerer is faulty or incorrectly adjusted, the machine may even overturn. The figure below shows the design of the brake regulator. And below is its schematic representation: The brake torque regulator on the VAZ 2114 is located under the rear body, on the left rear wheel side, near the rear suspension beam. The VAZ-2107 and other “classic” models also have this mechanism, but it is located on the right side. New vehicles equipped with anti-lock braking devices and EBD electronic brake force distribution do not use the sorcerer. Understanding how the sorcerer works will help the car owner configure it correctly and operate it in the future. The sorcerer distributes the braking forces as follows: during sharp braking, the front is pressed to the bottom, and the rear is raised. In this case, the rod moves and thereby closes the flow of brake fluid to the rear brake cylinders. The spring holds the valve, preventing it from closing completely, so the rear wheel locking is activated, but a little later than the front ones. Ideally, the rear wheels should brake half a second after the front wheels.
Fuel level sensor for VAZ 2114 - 15 product review and installation
Hello dear car owners and visitors to the online store Avtoall.ru
This review will primarily be useful to those car owners who own a front-wheel drive VAZ and repair it themselves. I had this problem: the fuel level sensor stopped showing the correct parameters. I think I'm not the only one and many people have the same problem. The cause of this problem is the fuel level sensor, which is designed for a maximum of 100 thousand mileage, after which it usually stops working completely or simply begins to show incorrect fuel level indicators in the tank. I tried to clean it and bend it and came to the conclusion that it was beyond repair and required replacement. I had to order the sensor several times because they are all different and I need to buy exactly the one that is on the car. Therefore, before ordering, I recommend looking at which module is installed on your car. In my case, the car is a VAZ 21154 i 1.6L manufactured in 2110 and module 21101 was installed on it from the factory; this marking is located on the top of the module in the form of a sticker. You may have a different marking and therefore you need to buy a sensor with the same marking as yours. Different fuel level sensors have differences, for example, the bend of the float or different connection pads, and they are also attached differently. I think the differences are now clear. Now I ordered a sensor on 01/04/20 for my purchase and picked it up on 01/07/20 at the point of delivery. Everything arrived in excellent packaging and within the stated time frame I have no complaints about the product or delivery. See below for photos of my item.
Friends who are interested can watch the video review of the product below
Now directly to installing the sensor on the car. The module is located under the rear seat; it needs to be raised to a vertical position so that there is free access to the module itself. You need to lift a piece of sound insulation and unscrew the two screws that hold the hatch and remove it. Next, disconnect the block and two gasoline fittings. Before removing the fittings, the car must stand so that the pressure in the system is released; gasoline may splash out under pressure and get into your eyes; be careful when removing the fittings. Then unscrew the nuts and remove the iron ring and take out the module. If anyone doesn’t understand the process of removing the module, I have a detailed video on my channel, you can watch it and you’ll understand, nothing complicated. Below is a photo of the module.
Why do you need a fuel pressure regulator?
As mentioned above, this regulator maintains the required fuel pressure necessary for normal operation of the injectors, taking into account one or another operating mode of the power unit. In other words, the RTD affects the amount and intensity of the fuel supply that enters the engine cylinders through the injectors.
Simply put, the amount of fuel supplied to the engine at the time of injection depends on the pressure that is created inside the fuel rail (rail), as well as on the pulse duration for opening the injector and the vacuum in the intake manifold.
For more accurate dosing and maintaining constant pressure, a diaphragm valve-regulator is used, which experiences fuel pressure on one side, and a spring force on the other. RTD is used in power systems where there is a so-called “return”. The regulator is installed at the fuel rail. Also, this element can be located in the fuel tank, while such systems do not have a return line.
- Let's first look at the common design in which the regulator is located in the fuel rail. The element operates on the following principle: the fuel pump forces fuel from the fuel tank along the line. The resulting fuel pressure acts on the regulator. The device itself has two chambers (a spring chamber and a fuel chamber), which are separated by a membrane. On one side, the membrane is pressed by fuel, which enters the regulator through special inlet holes, and on the other side, there is spring pressure and intake manifold pressure. If the fuel pressure turns out to be stronger than the spring force and the pressure in the inlet, then the regulator opens slightly, resulting in some of the fuel being discharged into the return line. The fuel returns through the return line to the fuel tank.
- In systems without a return line, the regulator is usually located directly in the tank. The advantages include the absence of an additional pipeline. The injectors are supplied with the required amount of fuel directly from the tank, that is, excess fuel does not enter the engine compartment, and there is no need to deliver it back to the tank. This also allows us to talk about less heating of the fuel and provides a number of additional advantages in the form of less intense evaporation.
The fuel pump supplies the injectors with a strictly defined amount of fuel in relation to specific conditions and operating modes of the internal combustion engine. Let us add that in this system there is additionally an excess pressure relief valve, which helps to avoid its increase to a critical level.
Purpose of the regulator
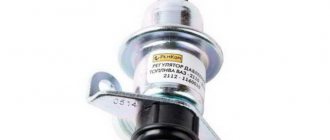
A device such as the VAZ 2114 fuel pressure regulator is designed to maintain the same level and, if necessary, correct the gasoline pressure in the system. Structurally, it is a mechanism of a membrane and a valve located inside the fuel rail (also known as the fuel supply rail). On one side, the pressure of gasoline presses on the regulator membrane, and on the other, a spring.
If the fuel pressure in the system is too high, the valve opens and excess gasoline is dumped back into the gas tank, after which the pressure returns to normal.
RTD in the fuel rail
If the turbocharger becomes jammed, releasing gasoline (and with it excess pressure) becomes impossible. As a result, the total pressure in the fuel system increases by 2 or more times, which entails severe excess fuel consumption.
In a situation where the valve completely stops holding the fuel pressure, there is a constant discharge of gasoline and its free circulation through the system. This, in turn, leads to a sharp drop in pressure and, as a consequence, a strong drop in engine power. For the same reason, starting the engine (especially after a long stay) becomes difficult; you have to spin the starter for a long time before the engine starts.
Location of the regulator in the VAZ 2114
As you can see from the above, a jammed or, conversely, weakened pressure regulator valve cannot lead to anything good. That is why, at the first sign of a malfunction, the entire device should be replaced. We’ll talk about how to do this correctly below, but first let’s say a few words about checking the device yourself.
Fuel pressure sensor VAZ 2114
The current fuel pressure is measured using a pressure sensor. It is necessary to carry out control functions of direct injection on gasoline engines. Its installation location is the fuel rail.
The use of a sensor helps maintain the pressure of the injection system, which plays an important role in maintaining the required power, reducing the level of harmful emissions and reducing the noise level while the engine is in working condition.
For some systems, two sensors are installed, one for high pressure and one for low pressure.
If the sensor is faulty, the control system applies normal pressure readings, but the motor power is reduced.
The role of the fuel regulator in the car system
At different engine operating modes, it is necessary to create the appropriate fuel pressure in the fuel system. To implement this task in practice, a special pressure regulator is used. It is used in injection engines, where the correct operation of the engine depends on the accuracy of the injection parameters.
When the governor is faulty, the engine runs unevenly, acceleration times are increased, and in some cases power can be significantly reduced. So, for example, if the amount of air coming from the manifold remains unchanged, and there is more fuel than necessary, the air-fuel mixture will not ignite or will not burn completely.
We recommend: About mixing antifreeze with water: is it possible?
Even if in this mode the electronic control unit shortens the injector opening interval, it will not be possible to completely compensate for the excess fuel pressure. This will lead to interruptions in engine operation and an increase in the amount of unburned fuel in the exhaust, which can prematurely damage the catalytic converter or particulate filter.
HOW THE REGULATOR WORKS
The fuel pressure regulator, or RDT VAZ for short, is a device in the form of a valve with a diaphragm. Its installation location is in the fuel supply rail (fuel rail). The membrane is “pressed” from both sides. On one side the pressure of gasoline presses, and on the other side a spring with air from the intake manifold “rests”.
Location of the RTD in the fuel rail
If the valve completely fails, dumping fuel back into the tank becomes impossible. The pressure of gasoline increases approximately twice, and this leads to increased consumption.
When the valve stops holding pressure, there will be free circulation of gasoline in the system, and this is a clear decrease in the operating fuel pressure. This will cause a loss of engine power.
How to properly check RTD
In order to independently check the pressure in the system, and therefore the correct operation of the regulator, you need to take a pressure gauge, the maximum pressure in which is up to 10 atmospheres. You should not use a device with a larger scale, as its readings will have a serious error. It connects between the fitting and the fuel pipe:
- first turn off and cool the engine;
- locate the fuel rail under the hood;
- remove the plug from the fuel pressure fitting;
- unscrew the fitting nipple using a spool valve;
- wipe the surfaces if fuel splashes appear under the influence of residual pressure;
- pull a hose with a diameter of up to 9 millimeters onto the fitting and secure it with a clamp;
- Connect the second hole of the hose to the pressure gauge.
Next, you will need an assistant, because the readings from the pressure gauge need to be read at one of four moments:
- when the ignition is turned on, the pressure should be 3 atmospheres;
- at idle speed - 2.5;
- when squeezing the fuel outflow hose - 7;
- with the hose removed on the RTD – 3.3.
If on your VAZ-2115 the measurements show different indicators, then you need to replace the regulator with a new one. To do this, it is enough to detect it in the system, dismantle it, and then return the fuel line to its original state. In the VAZ-2115, the engine of which has 8 valves or another system, the RTD is mounted at the very end of the fuel rail.
It is important to check the integrity of the fuel system. If leaks are found in it, then you should not trust the pressure gauge readings.
After checking under different conditions, it is worth turning off the engine and looking at the pressure gauge again; the pressure should be within 0.7 atmospheres. If the pressure drops completely, then the problem is definitely in the regulator.
Remember that a regulator will cost you much less than a large-scale repair of the fuel system or engine. It is precisely such global breakdowns that a failed RTD can lead to. The cost of this spare part is from 500 rubles. The final price of the repair depends on which manufacturer’s spare part you purchase. The cheapest parts are stock parts produced in Togliatti, and the most expensive are BOSCH components.
Signs of a malfunction of the fuel pressure regulator may be: – unstable engine operation; – the engine stalls at idle; – increased or decreased crankshaft speed at idle; – the engine does not develop full power, insufficient engine response; – jerks and dips in engine operation when the vehicle is moving; – increased fuel consumption; – increased content of CO and CH in the exhaust gases.
You will need: a 5mm hexagon, a 24mm wrench, a pressure gauge (can be a tire gauge).
1. Unscrew the fitting plug to control the fuel pressure at the end of the ramp
Please note that there is an O-ring installed in the fitting plug to control the fuel pressure. If the ring is torn or has lost elasticity, replace it or the entire plug
2. Using the metal protective cap of the tire valve, unscrew the spool valve from the fitting (the same as in the tire).
3. Connect a hose with a pressure gauge to the fitting (you can use a tire pressure gauge). Secure the hose to the fitting with a clamp. Start the engine and check the pressure on the pressure gauge. It should be 284–325 kPa (2.9–3.3 kgf/cm2).
4. Disconnect the vacuum hose from the pressure regulator - the pressure on the pressure gauge should increase by 20–70 kPa (0.2–0.7 kgf/cm2). Otherwise, replace the pressure regulator.
5. Reduce the pressure in the power system (see “Reducing pressure in the power system” in the subsection “Power system”).
6. Remove the vacuum hose from the fuel pressure regulator.
7. Unscrew the nut securing the fuel drain pipe to the fuel pressure regulator.
8. Remove the two bolts securing the pressure regulator to the fuel rail.
9. Remove the regulator fitting from the hole in the fuel rail...
10. ...and remove the regulator from the fuel drain pipe.
11. If the fuel pressure regulator o-ring remains in the rail, remove it...
12. ...and put it on the regulator before installation. Replace any sealing ring that has lost elasticity or is torn.
13. Install the regulator in the reverse order of removal.
PRESSURE IN THE FUEL LINE VAZ 2114
The pressure in the fuel line of an injection engine is an important parameter - if it is low, normal injection by injectors into the cylinders of an internal combustion engine (ICE) will not be ensured. And its high degree is also dangerous - fuel can flood the entire engine compartment, and then a fire will occur.
Car owners may have a question about how to check the pressure in the fuel rail, within what limits should the readings be, what is used to check it, and how to determine what may be faulty in the fuel line? So, in order.
VEHICLE DIAGRAM
First you should know how the fuel system (TS) works and what elements it consists of. The vehicle includes (elements in order, starting from gasoline intake to its direct injection):
- Gas tank (in the VAZ model 2114 it is located under the bottom of the trunk);
- Electric fuel pump (located in the gas tank);
- Coarse filter (represents a mesh that is located on the intake part of the pump);
- Fine filter (located immediately after the gas tank, located below the trunk, between the rear of the muffler and the fuel tank);
- Fuel rail or rail (TR), it distributes gasoline among the cylinders, it can be steel, aluminum or plastic;
- Injectors (there are four on model 2114);
- Fuel pressure regulator (it maintains the required gasoline pressure in the system for normal injection through the injectors into the cylinder).
All elements are connected to each other by a fuel line, and in the entire chain, after the pressure regulator (RDT), there is also a return hose through which excess gasoline is discharged into the tank. After the ignition is turned on, fuel passes through the system to the injectors (therefore, there is pressure in the system even when the ignition is on), and when the engine starts, the electronics send a command to the injectors, and gasoline enters the cylinders.
HOW AND WHAT TO CHECK THE PRESSURE IN THE VEHICLE
They check the pressure in the fuel rail of the VAZ 2114 with a pressure gauge - it is most convenient to connect it on the ramp, and not somewhere else in the line. At the rear of the ramp, in the direction of travel of the car, there is a fitting with a thread and a valve, closed with a plastic cap. When measuring, the pressure gauge adapter is screwed onto the fitting. The pressure gauge is easy to assemble yourself. For this you will need:
- The measuring device itself with an arrow - a tire pressure gauge with a maximum reading limit of 6 to 10 kgf/cm² is suitable;
- A piece of gasoline hose 50-70 cm long;
- A fitting for checking the pressure, which will be screwed into the ramp;
- Two clamps.
We assemble all the elements, tighten the clamps, and the pressure gauge is ready for use. That's it, now you can take measurements. To do this you will need tools:
- Wheel valve cap.
- Thin screwdriver or metal pin;
- A wrench with a fitting size (usually 17 mm):
- Pressure gauge.
To measure the pressure in the fuel rail, you need to:
- Turn off the engine, turn off the ignition;
- unscrew the cap, relieve pressure in the VAZ 2114 fuel rail by pressing the valve with a thin screwdriver;
- Unscrew the spool with the valve using the wheel valve cap. A rag will come in handy - when you dump it, fuel will spray out of the valve. To relieve pressure, you need to press the valve smoothly, releasing the pressure;
- secure the pressure gauge fitting with a wrench to the rail. Now you can start the internal combustion engine and measure the pressure in the fuel rail.
WHAT SHOULD BE THE INDICATORS IN THE PETROL HIGHWAY OF VAZ 2114
There are several modes in which you will need to check the pressure in the VAZ 2114 fuel rail in order to judge vehicle malfunctions. Make a measurement:
- When the ignition is turned on;
- At idle;
- On re-gassing of internal combustion engines;
- When the ignition is turned off.
The readings should be approximately like this:
- With the ignition on, approximately 3 kgf/cm²,
- During operation at idle speed from 2.8 to 3.2 kgf/cm²,
- When the engine speed increases, it can drop to 2.3-2.5 kgf/cm², when releasing the gas it returns to a reading of about 3 kgf/cm²,
- After stopping the engine, the pressure should drop very slowly. A rapid drop indicates a malfunction of the RTD.
Too low pressure in the fuel rail indicates that:
- The performance of the fuel pump has decreased,
- The fine filter is clogged,
- The RTD is faulty.
These parts are cleaned efficiently in car services where there is special equipment. The equipment includes a stand where they can be tested for injection performance. The clogged elements are then cleaned in the bathroom using ultrasound.
Removing the ramp to clean the injectors
You can clean the injectors yourself, but you will have to remove the rail in any case. Typically, car enthusiasts use a special liquid to clean carburetors.
Fuse and relay
Both elements can affect the fuel pump. How to check it? Simply remove the fuse cover.
See if there are burnt elements. There is a diagram on the lid that indicates which fuse is responsible for which electrical device. As for the relay, it may be located under the glove compartment or in the engine compartment. How to check the fuel pump relay? Everything is very simple. To do this, you need an assistant who will turn on the ignition at your command. At this time, you touch the relay with your hand.
It should click. If not, most likely it has become unusable. It also happens that a part does not work due to poor contact. Clean the terminals and check it again. If this does not help, replace the relay.
How to change the sorcerer
In order to replace a damaged sorcerer, you will first need to purchase a new one. One of the best of this kind is considered to be the brake regulator from. In addition to this, you will also need to purchase a canister of brake fluid, since during the repair process a significant leakage from the system may occur.
To perform the replacement you will need an appropriate set of tools, which includes:
- wrenches “10” (it is highly recommended to use special ones designed for unscrewing brake pipe fittings);
- wrenches “13” (socket and socket);
- a screwdriver with a large blade or a steel spatula;
- feeler gauge (a drill or a 2 mm thick steel plate will also work).
Adjusting the sorcerer VAZ 2114
The replacement and adjustment of the VAZ 2114 sorcerer itself should be carried out in the following order:
Place the vehicle on an overpass or inspection hole. Clean the pipe fittings and other threaded connections with a wire brush, then fill them with kerosene or WD-40 and leave it like that for a while. Using a screwdriver or a spatula, use a screwdriver or a spatula to pry the clamp-retainer of the regulator drive lever and remove it. Disconnect and dismantle the sorcerer lever. Unscrew the fittings using a special “10” wrench and immediately plug them with rubber plugs (if you are unable to move the fittings out of place, you should once again flush the threads with “Vedeshka” or kerosene and wait some more time, then try again). Unscrew the two sorcerer fastening nuts from the body using a “13” wrench. Remove the sorcerer along with its bracket. Disconnect the brake pressure regulator from the bracket. Attach the new sorcerer to the bracket (there is no need to tighten the bolts all the way). Place the bracket with the regulator in its original place, connect the tubes to it and tighten the fittings. Connect the lever from the rear beam to the sorcerer and secure it with a clamping bracket (it is important to ensure that the bracket securely grips the lever).
At this point, the installation of the sorcerer can be considered complete, all that remains is to bleed the brake system.
Replacing the sorcerer VAZ 2114
Features of installing a new device
Before removing the fuel pressure regulator, do two things - wait for the engine to cool and reduce the pressure in the fuel supply system.
After that, work like this:
- Discard the “minus” from the power source (battery);
- remove the supply hose from the vacuum booster of the system;
- Unscrew the nuts on the fuel drain hose. While performing this work, be careful, because there may still be residual fuel in the system;
- secure the tube and washer well;
- unscrew the fixing bolt that is screwed into the clamping product (then dismantle it);
- unscrew the nut supporting the drain hose and the RTD;
- Unscrew the screws connecting the ramp and regulator;
- discard the nut as carefully as possible and dismantle the RTD at the same time as the ramp.
Installation is carried out according to the given algorithm, but in reverse order. Finding breakdowns, diagnosing and replacing the VAZ 2114 fuel pressure regulator is not difficult. The main thing is to identify and eliminate the defect in a timely manner. Good luck on the road and of course no breakdowns.