How to remove a pulley from a generator?
How to remove a pulley from a generator?
What is a generator pulley? How to properly remove a pulley from a generator Tools for removing a pulley from a generator A car generator is a very important component in the system of any car. Considering the fact that the generator consists of a large number of parts, it may break down from time to time. A generator breakdown can have a very negative impact on the operation of the entire car, because without this element the car simply won’t start. The list of reasons why a generator can break down is quite extensive. One of them may be a pulley failure. How to correct the current situation? Let's figure it out.
What is a generator pulley?
The generator pulley is a special part that is installed directly on the generator.
A pulley is needed in order to ensure the required degree of belt tension and protect the mechanism from those negative vibrations that occur when the machine engine is running. The performance of the entire car will depend on how well this part works. If the pulley is deformed even to the slightest degree, the belt drive will not be tensioned correctly, which may disrupt the electrical supply to the vehicle.
On what principle does a pulley work? This element is needed in order to reduce the stroke of the belt tensioner, which during operation is put on the pumps and crankshaft pulleys. Torque from the crankshaft is transmitted to other elements clockwise through the belt. The energy also goes to the electric generator. This element is designed differently in each car, but the main principle is always the same. Each movement of the engine goes to the freewheel mechanism of the generator, which causes voltage to arise in the winding.
It is worth listing the problems that may arise with the pulley. Over time, any part of the machine wears out, this also applies to the pulley, which can wear out from the inside, as a result of which cracks may appear on the central mounting hole. Along with cracks, pulley play also appears, and this play can increase so much that it can lead to belt rupture and destruction of the coupling. The most common pulley problems are:
— curvature along the plane;
— too much wear on the central part;
What are the consequences of problems with the pulley? The consequences may be as follows:
— The crankshaft constantly moves during vehicle operation, so even small vibrations will be enough for the device to break. The pulley is the protection of the crankshaft. The pulley may stretch during use. Over time it may rupture.
— The pulley makes the belt drive operation quieter and more stable.
— When the machine operates at high speeds, the generator receives a greater load, and this contributes to accelerated wear of this unit. The pulley reduces the load on the generator.
It is extremely important to constantly monitor the condition of the pulley and its operation, since its breakdown can have an extremely negative impact on the operation of the car. If you replace the pulley in time, this will extend the life of some units inside
How to properly remove a pulley from a generator
To repair or replace the alternator pulley, you must first figure out exactly how to remove it. The pulley must be removed along with the generator, so you must act carefully.
The sequence of actions is as follows:
1) First you need to dismantle the generator. Remove the wire from the “-” on the battery.
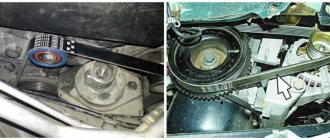
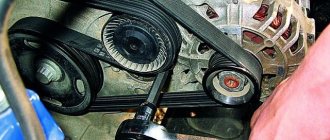
2) Next, remove the generator drive belt. To do this, you need to loosen the bolts on the lower and upper radiator mountings, and the adjusting bolt needs to be unscrewed as much as possible. Then you need to move the generator as close to the cylinder block as possible. After this, the belt will be loosened, that is, it can be easily removed from the crankshaft and generator pulley.
Why do you need a generator pulley?
The generator pulley is installed on the rotor shaft and is designed to drive the generator. The pulley receives torque from the crankshaft pulley through a belt drive.
In addition to its main function, the pulley also protects the generator. During operation, the crankshaft generates vibrations that can negatively affect the operation of the generator. The pulley plays the role of a vibration damper and, thereby, protects the generator from adverse influences.
In addition, the alternator pulley reduces the load on the engine when the speed is too high and ensures reliable battery charging.
Working principle and benefits of overrunning clutch
The generator, which is the source of electricity, is driven by an internal combustion engine, but since the engine operates at different speeds, its torque is constantly changing. The generator armature (rotor), driven by the internal combustion engine, rotates by inertia and when changing mode continues to rotate in the same rhythm, therefore the load on the belt at these moments increases significantly. An overrunning clutch (another name is an inertia pulley) is designed to smooth out differences in torque; this mechanism works on the Bendix principle in a starter. When the engine picks up speed, the parts of the overrunning clutch are engaged with each other, providing a rigid connection and maximum transmission of motion.
At first, inertial pulleys were installed only on diesel engines, but later they also appeared on premium cars with powerful gasoline engines. Now such devices can be found on many car models, for example, Ford Transit or Ssang Yong Chiron with diesel engines, and are no longer uncommon.
How to unscrew the crankshaft pulley of a VAZ
On domestic cars of the VAZ “Classic” family, as well as on other cars, the element is removed in the same way. The only difference will be what kind of gearbox is installed on the car in which such work is being done. Which direction should I unscrew the crankshaft pulley bolt? Definitely counterclockwise.
To simplify the task, you can call an assistant, who must engage direct gear (3 or 4) and keep the brake pedal depressed. At the same time, you will unscrew the pulley bolt. If the car is rear-wheel drive, then you can do without an assistant. Just put the car on the handbrake and unscrew the bolt in the same way. The work can be done from the side of the hood or below in the inspection ditch. The main thing is that it is convenient to work. You can also jack up the car and remove the front right wheel.
This will provide good direct access to the crankshaft pulley, which is unscrewed with an extension socket. The mechanism bolt rarely “gives in” immediately and is constantly stuck with threads to the inner hole of the crankshaft flange. Therefore, it is always very difficult to rip it off. If you cannot unscrew the pulley mounting bolt, then a long wrench or pipe can come to the rescue. The element is put on the key. Grasping the very edge of the collar, gathering, as they say, all your strength into a fist, you should try to remove it again. Actually, the longer the lever, the easier it is to work.
VESKO-TRANS.RU
AutoNews / Reviews / Tests
How to Remove the Generator VAZ 2112 16 Valves
We change the alternator belt on a VAZ 2112 ourselves
The belt drive powers the generator to generate electricity in the vehicle. The device can work normally according to the criteria that remains for our client; its components are useful. This also applies to the strap. Replacing a VAZ 2112 alternator belt with 16 valves is not a complicated procedure that can be done in the garage. A detailed summary and video article will help with this.
When is replacement required?
Like any consumables, the alternator belt has a certain resource and requires constant technical inspection. According to the manufacturer's advice, VAZ 2112
Regardless of whether the engine has 16 valves or 8, it is necessary to change consumables after 45 thousand km. But these are just tips, you need to constantly worry about the condition of the product and just change it correctly. The service life depends on the following reasons:
driving style; performance criterion; product properties.
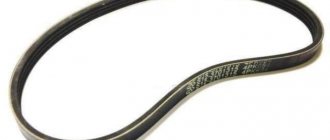
A visual inspection of the drive units should be carried out when the vehicle has driven a maximum of 10,000 km and before a long journey. This allows you to avoid unpleasant surprises from the trip - a torn belt. It is recommended to carry a spare in the trunk without assistance, because when a break occurs, the car will no longer be able to move without assistance.
It is necessary to change the belt if it breaks, stretches, as it is called, or becomes unusable. Poor voltage detection is a variant of a specific whistle that occurs when the engine starts. Tension plays an important role in belt drive performance. When the voltage is low, the device does not produce the amount of electricity required for the vehicle to operate properly. If it is strong, the service life of the belt, drive bearings and crankshaft is shortened.
Find a replacement, of course, if you look at the following:
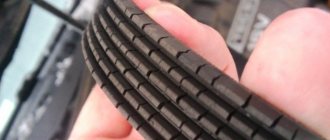
- the appearance of cracks and ruptures;
- worn surface;
Old product with worn surface
material delamination; frayed edges; strong stretch. Belt tension is easy to check. This is considered normal if, with a force of 10 kg, it bends by 10-15 mm. To test, he needs to press his thumb into the center of the belt between the crankshaft pulley and the alternator.
Replacing the belt drive pulley of a car generator. Removal, installation
How to change (remove and install) a car's electric generator belt pulley.
Detailed instructions. Subtleties and features. Personal experience (10+) Replacing a car alternator pulley
Replacing a car generator pulley in a home workshop is quite possible. To do this, you only need an available tool.
The generator pulley should not be clamped in a vice, as it can easily be deformed. You will need a special (rather simple) homemade device.
After installing the pulley, you need to take care to securely fix the nut so that it does not unscrew.
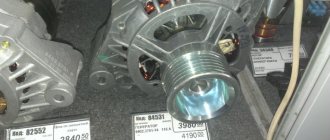
In the previous article, I wrote how to choose a suitable analogue of the original generator. In particular, it often happens that the generator as a whole fits, but the pulley
designed for a different belt. The pulley can be narrower (designed for a poly V-belt with fewer ribs), wider (designed for a poly V-belt with a larger number of ribs), or even designed for a belt of a different design.
Checking the generator capacitor
Read below what we need and how to check the generator capacitor!
- It can be checked with only 1 device, a Megaohmmeter, probes come from it, then they are connected to the capacitor.
- And if this Megaohmmeter shows infinity before turning on, and when turned on the resistance decreases and then returns to normal, this can only mean 1, the capacitor is working properly.
- At the end of all operations, it is worth inspecting both covers to identify cracks and deformations; there should be none.
- Check the front and rear bearings; they should rotate well and the lubricant should not leak.
- But if this problem is visible to the naked eye, then they will have to be replaced with new ones. During inspection of the stator, no exposed wires should be found. By checking it with a test lamp and connecting it to each terminal, at this time the lamp should glow if it is in working order. The stator should also be checked for shorts to ground - this can be easily done by using a test lamp; it is alternately connected to the terminals of the stator winding, and the wire from the current source is connected to its body (the lamp should not light up). But if it turns on, this means that short circuits are occurring in it.
How to remove the crankshaft pulley
When carrying out repair work on the engine and engine-related parts, it is necessary to remove the pulley from the crankshaft, for example, to replace the pulley or to replace sealing seals in case of engine oil leakage. It would seem a simple task, but removing the pulley from the crankshaft poses difficulties and it is not so easy to remove it. Therefore, in this article we will look at how this can be done quickly.
Why is it difficult to remove the pulley?
No. 1. Depending on the engine design, make and model of the car, the difficulty of removing the pulley varies. Some machines have a lot of space to comfortably carry out repair work, while others have very little free space. The pulley design elements cover the pulley.
The structure of pulleys is also different, there are 2 types:
- ordinary;
- damper
Damper pulleys have an additional outer ring with an elastic band in their design, which absorbs vibrations and micro-vibrations.
Before you start removing the pulley, you need to loosen the tension nuts and bolts, remove the generator and power steering belt.
No. 2. In the factory assembly, the pulley is seated on the engine crankshaft, pressed with a bolt or nut and tightened with high compression force. Thus, the factory assembly is very strong. Therefore, if you have never removed the pulley, it will be more difficult to dismantle it the first time.
In addition to tightening with the maximum permissible force with a special torque wrench, during operation, the engine becomes very hot, the threaded connection is tightened even more and sticks. And external factors influence the outside, due to which the threaded connection may be subject to corrosion.
Some engine models cannot be repaired; they are disposable. These are, for example: 1AZ-FSE, 3UZ-FSE. Each power unit was examined in detail.
No. 3. If you disengage the clutch, the engine crankshaft can be freely turned with a wrench. Therefore, in order to unscrew the crankshaft pulley nut, you need to stop the shaft from turning. If, when you press the clutch, the speeds do not change, then it is not working. Air may have entered the system. In this case, you need to bleed the clutch.
Replacing crankshaft liners VAZ-2107
Remove the hood and battery
Drain the oil from the engine (see Changing the VAZ-2107 engine oil).
Drain the coolant (see Replacing the coolant in a VAZ-2107).
We remove the radiator together with the thermostat (see VAZ-2107 radiator replacement).
Remove the carburetor (see Replacing the VAZ-2107 carburetor).
Remove the fuel pump.
Remove the ignition distributor (see Ignition distributor VAZ-2107 repair).
Having sketched the connection order, disconnect the hoses and wires from the engine.
To make it easier to dismantle the engine, remove the cylinder head (see Replacing the VAZ-2107 head gasket).
Remove the coolant pump (see Replacing the VAZ-2107 coolant pump).
We unscrew the upper or lower nuts securing the engine mount (see Replacing the VAZ-2107 engine mount).
We unscrew the bolts securing the clutch housing to the engine.
1. Fasten the lifting device cables to the block and lift it.
By placing a jack under the gearbox and slightly rocking the block, we disconnect the engine and clutch housing.
We install the cylinder block on the stand.
We remove the clutch. Remove the pulley, camshaft drive cover, chain and oil pump drive gear. Remove the auxiliary drive shaft.
Remove the flywheel and the rear crankshaft cuff holder (see Replacing the rear crankshaft cuff).
2. Using a 10mm wrench, unscrew the fourteen bolts securing the oil pan to the cylinder block...
3...and remove it along with the sealing gasket. We remove the oil pump (see Oil pump removal and disassembly VAZ-2107)
Using a 14mm socket, unscrew the two nuts securing the connecting rod cover
Using the wooden handle of the hammer against the connecting rod, we push the piston out of the cylinder.
Similarly, remove the remaining three pistons.
Using a 17mm socket, unscrew the two bolts securing the crankshaft main bearing cover...
In the same way, remove the remaining four main bearing caps.
They are marked with marks corresponding to their serial number (count from the toe of the crankshaft).
On the last (fifth) cover there are two marks stamped, spaced along the edges.
Marks on the main bearing caps
We remove the crankshaft.
From the grooves in the bed of the fifth main bearing, we remove two half rings of the crankshaft thrust bearing.
The steel-aluminum liners installed in the beds of the 1st, 2nd, 4th and 5th main bearings have a groove.
The shell of the 3rd bearing does not have a groove (similar to the shells installed in the main bearing caps).
We disassemble the crankshaft (see Disassembling the crankshaft of a VAZ-2107).
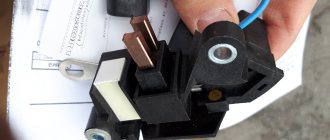
Replacing the generator pulley
1. While holding the rotor shaft well from turning with a hexagon, unscrew the nut that secures the generator pulley. For these purposes, a hexagonal hole is made at the very end of the shaft.
2. Install the head on the nut and insert the hexagon through its hole into the shaft hole. While holding the shaft from spinning, unscrew the fastening nut and remove the spring washer with the pulley.
3. Now all that remains is to install the new generator pulley in reverse order, just keep in mind that the spring washer must be placed with the convex side facing the nut. The nut should be tightened to a torque of 39–62 N•m (3.9–6.2 kgf•m).
4. After replacing the generator pulley, reinstall it back into the vehicle in the reverse order of removal. Then be sure to adjust the generator drive belt.
Replacing bearings
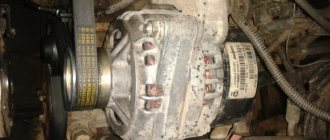
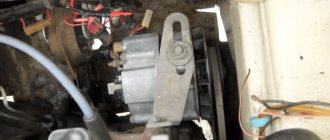
To remove the generator on a VAZ 2110 car, you must perform the following operations:
disconnect the positive terminal of the battery; release the belt tensioning mechanism and remove the belt, to do this, unscrew the fixing nut 13 and unscrew the bolt 10 of the tensioner mechanism;
disconnect the generator wires; Unscrew the lower mount of the generator, remove the bolt and remove it from the car.
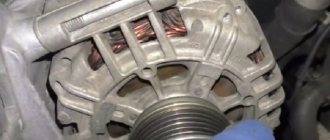
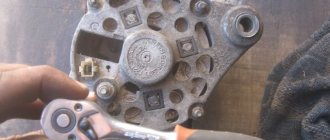
Now that the generator has been removed, you can begin disassembling it. First you need to remove the pulley, for which you unscrew its nut by 24. This can be done either using an impact wrench, or by holding the pulley in a vice and wrapping it with two or three old belts.
Unscrew the pulley nut and pull it off the generator axle. To do this, you will need a two- or three-legged puller of a suitable size, which can be purchased at any automotive market. After the pulley is removed, you can disassemble the generator housing, having first removed the voltage regulator with brush holder, diode rectifier and capacitor, which are hidden under a plastic cover.
To disassemble the generator housing, you need to unscrew the 4 screws that hold its halves together. Usually the screws become stuck during the life of the generator, so it is recommended to fill them with some kind of liquid like WD-40 before disassembling. After unscrewing the screws, remove the front cover of the generator, which contains the front 303 bearing. At the factory, when installing the bearing, the generator housing cover will be rolled to securely fasten it, so you will need to select a mandrel according to the diameter of the bearing seat, on which to rest the housing cover and knock it out or press it out from the back side.
Having selected a mandrel according to the diameter of the outer race of the bearing, hammer it into place. If the bearing has been replaced several times and its seat in the cover is broken, it must be replaced. The new cover is sold with the bearing already installed. If it is necessary to replace the rear bearing, then continue disassembling the generator by removing the stator with windings from the generator, then using your fingers to push out the plastic support of the rear bearing and remove it from the generator rotor. After removing the support, access to the rear bearing will open. To remove it you will need the same puller as for the generator pulley
Having pulled off the old bearing, press in a new one using a mandrel of the diameter of the inner race of the bearing. ATTENTION! In this case, hitting the outer race of the bearing is prohibited! This significantly reduces its service life. Clamping the rotor in a vice by the axis is prohibited! Scores on it will interfere with the assembly of the generator
If the bearing is installed without the help of a hydraulic press, the rotor must be supported with its axle on a wooden surface, preferably having first screwed a nut onto the pulley mounting thread to prevent damage. After pressing on the new bearing, reassemble the generator in the reverse order and install it on the car, connect the wiring, and then tension the belt
Before installing the old belt, check its condition and replace it if necessary.
The belt is tensioned according to the following algorithm:
- with the fixing nut on 13 of the generator belt tension mechanism loosened, tighten the tensioner bolt with a 10 wrench until the belt, when pressed with a force of 10 kgf, sags by 10-15 cm;
- Tighten the generator fixing nut.
ATTENTION! Retightening the alternator belt is unacceptable! This threatens rapid failure of its bearings and severe wear of the belt and pulleys (crankshaft and generator). At this operation, the process of replacing the generator bearings can be considered complete. At this operation, the process of replacing the generator bearings can be considered complete
At this operation, the process of replacing the generator bearings can be considered complete.
To summarize, it should be emphasized that you should not delay replacing bearings. In addition to the unpleasant sound, untimely replacement of bearings can lead to their destruction, wedge and, as a result, failure of the generator.
In some cases, the generator cannot be repaired, and a new one costs much more than the bearings and the time spent replacing them. New bearings solve the problem of generator noise and significantly extend its service life.
How to repair a pulley?
To remove this element, you need to do a series of sequential actions:
- Open the hood, remove the terminal from the battery;
- Remove the belt and take out the generator
Sometimes it is not so easy to remove a damaged or damaged pulley, as it oxidizes and sticks tightly to the generator. The question arises: how to unscrew the generator pulley? In order for the removal to go smoothly, it is necessary to use a special key, which you need to stock up on before carrying out work, and it is called a key with a fine-slotted profile. But, if you do not have such a device, you can use a special fluid such as VD-40 or brake fluid. You need to drop a few drops onto the problem area. Please note that spilling brake fluid on exposed areas of the body can cause burns. Therefore, adhere to safety measures. After completing these steps, it can be easily removed from the generator. The generator pulley is replaced only in cases where it is completely worn out. In all other cases it can be repaired.
More details about the repair process will be described in this video:
Published: February 22, 2021
Possible malfunctions and ways to eliminate them
The need to repair a generator unit may arise for various reasons. As practice shows, the most common of them are failed brushes or bearings. Read below about repairing these components.
Brush replacement procedure
Replacement of VAZ generator brushes is carried out as follows:
- First of all, you need to release the three latches on the device’s body, on its sides. These latches secure the cover to the mechanism.
- The cover itself can be detached and put aside. This will allow you to access the regulator.
- There are two bolts on the regulator that secure the device - they need to be unscrewed. Then pull the regulator and remove it.
- Assess the condition of the brushes - if they are working, then the length of these elements should be at least 0.5 cm. If their size is smaller, then you have two options - either repair it by replacing the brushes, or change the device assembly. If repairs are being made, you will need a soldering iron since the brush assembly is soldered to the relay. First, you need to unsolder the wires connected to the brushes, and then dismantle the assembly, replacing it with a new one and securely soldering it to the relay contacts. Or you simply change the relay, and further assemble the device in the reverse order (the author of the video is the IZO channel)))LENTA).
How to change bearings yourself?
To replace the bearings, follow these steps:
- On the dismantled generator, you need to block the rotor; to do this, use a screwdriver, then unscrew the pulley.
- Next, by pulling the latches, you need to remove the device casing. You need to make marks on the two halves of the case, and then, using a screwdriver, you will need to remove the front cover.
- Then you will need to knock the bearing out of its seat; to do this, you will need to place it on a more suitable object. Alternatively, you can use a 27mm socket.
- After this, you can take a new bearing device and fill it with grease. This element should be hammered through the old one. To make the device more securely fixed at the installation site, you can use a chisel to flare the edges.
- Now let's move on to the rear bearing. To do this, you need to place either a thick screwdriver or a thin chisel under it, and hit the top several times with a hammer, while simultaneously moving the screwdriver in the opposite direction. The device can be dismantled using an open-end wrench.
What is the thread on the VAZ 2110 generator pulley?
AHTUNG! IT IS NOT RECOMMENDED TO REPLACE THE ORIGINAL PULLEY WITH A VAZ PULLEY! (except to wait 100 km before the service) DUE TO THE ABSENCE OF AN OVERAGGING CLUTCH, THE BELT WILL OCCUR AND BE DESTROYED, WITH THE SUBSEQUENT TIGHTENING OF THE FRAGMENTS UNDER THE TIMING DRIVE STAR
This means that the rustling noise from under the hood completely bothered me, I even began to suspect the release valve... However, the smell of burnt rubber in traffic jams convinced me to turn my attention to the generator, its bearings and pulley. I took off the belt of the additional equipment and pronounced the verdict - generator bearings. It was lunch time, I removed the generator, brought it to the workshop and began to disassemble it. I’ll say right away, the generator is BOSCH.
The first obstacle was removing the pulley from the generator shaft. During creative searches, the following device was invented:
A 27mm nut is inserted inside the nut, then a 8mm hexagon is inserted into the shaft, the hexagon is held with a wrench or socket, and the nut is turned counterclockwise and unscrewed in this way. In this case, the generator must be gently clamped in a vice (and not as in my picture). The nut is unscrewed and the pulley is removed. During this procedure, I realized that I had also hit the pulley. Because it had a lot of play in the radial plane, and touched the generator housing, even rubbing small grooves from below.
Next comes the disassembly of the generator, unscrew everything that can be unscrewed from below (or behind) - positive contacts, cover, diode bridge, relay regulator with brushes, removed and placed nearby. Although actually it is not a relay as such, but a circuit with 3 transistors, but for brevity, let it be the old-fashioned relay regulator.
Next, the 4 bolts holding the generator halves together are unscrewed, and the lower (rear) part with the diode bridge is removed from the rotor. You can help yourself a little with a screwdriver, there is some force there, but not much.
Next you need to unscrew the 4 countersunk screws from the pulley side. They secure the front bearing thrust plate. After this, we take a three-legged puller of a suitable size, grab it under the front cover with its paws, rest against the shaft, and pull the cover off the bearing.
After this we will have a picture like this
Now you can inspect the bearings. The rear (small) one was not changed; no signs of wear were found. But the front one was simply worn out into rubbish. The bearing was purchased from a “tenth” generator, Vologda (VBF) for 110 rubles. Its catalog number is 6303, also known as 180303. The rear bearing seems to be 6003, in contrast to the “tenth” one, which is 6202. The difference is in the internal mounting diameter, ours is 17 mm, the external one is 35. The 6202 has an internal 15 mm, the external one is also 35.
At the same time, a 2110 17mm generator pulley was purchased. There are 2 varieties, 17 and 15, here 17 is our size. I also bought a “generator cover repair kit 2110”, but it was not useful.
The main problem was removing the front bearing. On top of it there is a spacer washer, quite rusty. It was impossible to get under it with a puller; it wouldn’t fit together with the bearing, so I had to carefully knock it down. Unfortunately, there are no photographs of this process, because at this point the phone was put on charge, but I will try to describe it in words. I poured WD40 liquid on it and turned it on the shaft a couple of turns using a chisel. The anchor is GENTLY clamped in a vice through the old belt. Next, I drove a chisel between the washer and the bearing, evenly and from different sides, until the washer began to move towards removal. Then I hooked it up with a puller and removed it. The bearing did not yield to the puller and was barbarously sawed off with a cutting machine, without however damaging the shaft. The sawn-off bearing came off easily.
Replacement process detailed instructions
We will look at options with 8- and 16-valve engines, which are present in the VAZ 2112 and 2110 models. Regardless of the number of valves, the same set of tools will be required for replacement. The list includes standard tools that can be found in almost every driver's garage.
Timing belt for VAZ 2110 16 valves
In addition to the timing belt itself and the roller for the VAZ 2110 or 2112, you will need:
- a special key that regulates the degree of tension of the roller;
- spanner set to “17”;
- key to “15”;
- key to “10”;
- installation, as an alternative - a powerful screwdriver.
Replacement on an 8-valve engine
Replacing the VAZ 2110 8 valve timing belt is as follows:
- First of all, we de-energize the battery - for this you need to get the negative wire;
- We unscrew the bolts that hold the timing belt protective casing, and then remove the casing;
- On the passenger side, it is necessary to remove the engine compartment mudguard along with the protective element and the right wheel;
- Our task is to ensure that the marks on the cover and, accordingly, on the pulley match, as indicated in all the diagrams. To do this, you need to twist the part clockwise;
- We go to the gearbox and remove the plug from it;
- We need to check the alignment of the marks in this hole;
- We block the flywheel - for this you can use a mounting tool or a powerful screwdriver;
- Now you can remove the timing generator pulley;
- We got to the nut that holds the timing belt pulley - it needs to be loosened, but not unscrewed;
- Now we have reached the required element of the VAZ 2110 or 2112 timing belt. Now it can be removed. All parts that it covered must be cleaned with detergent. After removing dirt, the area should be wiped with a clean rag;
- Next, a new timing belt and tensioner roller are installed - follow the direction indicated on the arrow. Sometimes it happens that the manufacturer does not indicate the arrows, in which case, you need to place the element so that the inscription is read from left to right;
- To tension, you need to turn the roller counterclockwise.
- The next step is to test the timing belt and its tension. You need to check the element with a cold engine, and the temperature in the garage or box should be within +15-+30C. We start the engine and inspect the timing belt.
If there are no unnecessary sounds or vibrations, then all the elements can be installed back - these are the wheel, casing and mudguard.
Replacement on a 16-valve engine
Despite the fact that there are more valves, replacing the timing belt is no more difficult than on the version with 8 valves. So, replacing the VAZ 2110 16 valve timing belt is performed as follows:
- As in the case of the VAZ 2110 or 2112, where there are 8 valves, we need to dismantle the belt protection. It is held in place by 6 bolts.
- Next, you need to remove the chip from the crankshaft sensor - unscrew the mount and take out the sensor itself. For clarity, you can study the photo.
- If you dismantle the gas distribution mechanism yourself, then you probably noticed the absence of one tooth. This is done so that the sensor can independently find the dead center. This feature can also be used to lock the crankshaft.
- Blocking can be done when a tube of a suitable size is placed in the hole under the sensor. Now the pulley is blocked, as a result, it can be safely dismantled.
- Next, the work scheme is practically no different from removing the 8-valve timing mechanism with your own hands - loosen the roller fastening and remove the faulty or worn belt.
- There are two ways to install a new element: remove the tension roller and then install the belt along with it, or do it by turning the camshaft.
- When the new element is installed, you can return everything to its original position. You should start by fastening the pulley - tighten the bolt and align the gear - the marks on the oil pump will help with this. If they are missing, then you can make a mark yourself.
- The parts must be combined carefully, since the timing gear should not get knocked out.
- Using a special wrench, we must tighten the belt. Not everyone has such a wrench, but as an alternative you can always take a powerful screwdriver and two nails. It is also worth remembering the nut, which must be tightened tightly.
- We check the tension; the rubber should move away from the gears, but there should be no folds.
- All that remains is to turn the crankshaft 2 times and make sure that the marks remain in the same place - the work is completed
Check the gas distribution mechanism every 10 thousand kilometers, and then you will not have to spend money on expensive repairs.
How to Change a Pulley on a Generator
Content
How to change a generator pulley
What Can Cause a Bad Pulley?
First, you need to understand the reasons for the malfunction of this item in order to protect the car owner from unplanned repairs. Damage can even occur from a small impact, due to the fact that during manufacture this part, as well as its inner ring, were not hardened. And this makes them quite fragile. It is quite possible that it could fall apart from even the slightest loose play. Therefore, during installation it must be perfectly strengthened. During the manufacture of this element, microscratches are formed on its surface. These scratches can grow over time, causing parts to malfunction and need to be replaced.
So, what can cause pulley failures?
- Not only the operation of the main unit, but also the crankshaft is at risk of failure. The fact is that while the car is moving, the crankshaft is also in constant motion. This will cause a little vibration, but it's enough to break the crankshaft. So this provides some protection for him, which is why he is so important. This also has a beneficial effect on the operation of the belt, which runs without strong vibrations. There is also less strain on the belt, allowing it to stay in good condition longer. And if you don’t want to change, then even crack.
READ Battery light on Ford Mondeo 4
It is very important to take care of the pulley as a faulty pulley can negatively impact the performance of your machine.
Replacing your alternator pulley promptly can extend the life of both small parts and large vehicle components.
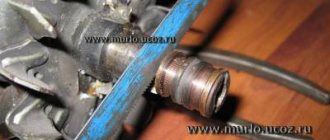
How to remove a pulley from a generator / unscrew the pulley nuts How to remove a pulley from a generator
Delko Remy.
as a way to unscrew the generator pulley nut! How to loosen a generator pulley nut
You need to unscrew the generator pulley
. What should I do? I tried different ways. Some viewers write.
Repair
In order to repair it, you first need to figure out how to remove the pulley from the alternator. There are several steps to remove this element:
- Open the hood, remove the battery terminal;
- Remove the belt and remove it generator;
- Sometimes it is not so easy to remove a damaged or damaged pulley since it is oxidized and firmly attached to the alternator. Question: how to unscrew the generator pulley? In order for the removal to go smoothly, it is necessary to use a special key that must be saved before starting work, which is called a small profile key. But if you don't have such a device, you can use a special fluid such as VD-40 or brake fluid. A few drops should be added to the problem area. Please note that contact with exposed areas of the body may cause burns. Therefore, take precautions. After these steps you can easily remove it from the generator. The alternator pulley is replaced only when it is completely worn out. In all other cases it can be repaired.
READ How to Remove the Door Trim of an Opel Vectra B
Repair is only suitable if it has minor damage. Next, I will talk about minor pulley failures and their repair.
If there is a slight play, this can be corrected. If the pulley is free, then it is certainly faulty. To get rid of the play, you need to secure the mounting bolts to the generator. If there is a small crack on the surface, it can be repaired by soldering. If the protective cap has expired, it can be replaced. But it is forbidden to use it more than once. It's pretty easy to install. It is strictly forbidden to use it without a protective case, as you will deprive this element of any protection.
No special skills are required for removal, replacement or repair. This process can actually be done on its own, only with alternator pulley it is easier to do if you have an alternator pulley as it not only makes the whole process easier but also speeds it up.
It is important that if you have already started repairing one part of the generator, check the others at the same time, at least make a visual diagnosis. This will allow you to avoid spending so much time on repairing your car.
READ How to Change the Alternator Belt on a Grant
Replacing the video generator pulley
The recording shows how you can replace a part at home
How to unscrew the crankshaft pulley on a VAZ-2112 16 valves
If you are faced with the problem of how to unscrew the crankshaft pulley bolt, this article is for you. We will describe this process in detail so that you can quickly and easily remove the crankshaft pulley and then begin repairing it.
A knowledgeable motorist usually spends no more than a quarter of an hour on the process of dismantling the crankshaft pulley. But inexperienced drivers, when trying to remove this part on their own, are faced with many problems that they often simply cannot solve. The instructions for carrying out repair work and maintenance of any modern vehicle contain comprehensive information about the dismantling process, but, unfortunately, it does not help car enthusiasts.
First of all, difficulties arise with fixing the crankshaft. It is very difficult to dismantle it if the part is constantly rotating, “slipping” out of your hands. It is also not clear to many from which side to approach the bolt that holds the pulley. And its strong tightening usually makes the process of removing the unit very, very difficult, since dismantling under such conditions is fraught with damage to the body covering or elements of the car’s engine compartment.
This is done specifically to avoid self-unwinding of this part during vehicle operation. If a bolt (nut) falls out while driving, it will not be easy to bring the car back to life in order to continue driving it, and the repair itself will cost, believe me, a pretty penny. In addition, the described fasteners increase their tightening level independently when the engine is running. And the final “indestructibility” of the bolt is given by the phenomena of coking, sticking, and corrosion.
How to unscrew the crankshaft pulley bolt - solving the problem
The pulleys of front-wheel drive cars are usually secured with a bolt. In such vehicles, the pulley is oriented perpendicular to the axis of the machine, which, of course, complicates repair work (it is very difficult to get to the fastening). In order to unscrew the bolt as quickly and easily as possible, it is advisable to prepare in advance:
- set of auto tools;
- the so-called “stump” (or “tragus”);
- car jack;
- head (socket) with a lever and extension (the head must be selected according to the size of the bolt).
The process with these devices is as follows:
- remove the wheel (of course, before doing this you need to lift the front right part of the car with a jack);
- we install the vehicle on the “stump”;
- remove the engine shield, which protects it from dirt, the air filter (they are located on the top side of the hood) and the generator belt;
- open the plug on the clutch block so that you can fix the crankshaft, and wedge the flywheel teeth using a pry bar;
- We put the head on the bolt and begin to unscrew it (if it does not give in, we slowly increase the length of the lever).
Which way to unscrew the crankshaft pulley?
This question is asked by many car enthusiasts. To prevent the thread from breaking or, even worse, the bolt head from twisting, it will not prevent the driver from figuring out which way to unscrew the crankshaft pulley bolt.
Since the pulley fixing element and flange have a normal right-hand thread, it can be unscrewed in the same way as the rest of the car’s nuts (counterclockwise).
Removing the generator, replacing the pulley and reinstalling it
The article describes in detail the procedure for removing and installing a car generator, as well as replacing the pulley.
A car generator is used to convert mechanical energy into electricity when the vehicle is moving. This current serves as a spark exciter at the spark plugs to ignite the fuel in the engine cylinders, it recharges the car's battery while it is moving, and also allows all electrical equipment in the car to operate.
As you can see, this is a very important mechanism for the electrical equipment of the entire iron “friend”. In case of the slightest malfunction, the generator should be repaired immediately, and to do this, it must first be removed, and then reinstalled - installation, which we will show how this is done correctly using the example of a VAZ 2110 car. On other VAZ models, the procedure is similar and not difficult. To repair this mechanism, you will definitely need a diagram of a car generator, it is presented there for the VAZ 2106 and 2110, as well as the principle of operation.
Pulley removal
Unscrewing a fastening bolt or nut is only half the battle. Next you need to pull the pulley out of the shaft. The pulley cannot be removed easily by hand unless its seat is broken. In addition, if the pulley fits tightly onto the shaft, it is also secured against turning by a key.
There are special pullers for removing the pulley from the shaft. There are mechanical and hydraulic pullers.
The design of a mechanical puller is simple. Usually it has three legs, with which you need to hook the pulley itself, and rest the central rod against the shaft. After which, you need to rotate the rod, the legs will straighten and pull the pulley towards you.
It also happens that when using a puller, the walls of the pulley grooves cannot withstand and break off. Therefore, when using pry bars, they must be engaged as close to the shaft as possible.
LADA 2109 › Logbook › 17. Replacing the Damper pulley and crankshaft gear
Let me briefly remind you of what I wrote in the last entry. It's been 2 days since I replaced the timing belt and the car refused to drive at speeds above 2000 rpm. More precisely, it was driving, but when the revolutions rose above 2000, it began to twitch and the Niva did not drive. The bortovik showed an error - incorrect DPKV signal. On the side of the road, having checked the DPKV chip and wires (at one time they were blowing my mind!) I realized that something was wrong here and decided to leave it as is until the morning. In the morning I decided to check my favorite sore! Crankshaft gear pin! And how he looked into the water! Once again it was torn off. More precisely, it broke halfway, but due to the fact that I also drove a self-tapping screw there, to be sure, the damper pulley did not turn due to this.
Having removed the old damper, I thought that the gear would have to be crushed again, like last time, but everything turned out to be good! And the gear came off thanks to gentle rocking.
replaced the gear, key, hammered the pin and put it all together! In order to tighten the crankshaft bolt, I had to call a neighbor, pressing the brake and holding it - in the meantime, I was tightening the bolt! He stated his conscience. After shaking it I realized that the damper doesn’t swing like it did with the old broken one! Well, now I think I’ll forget about this disease for a long time! At the same time, while the generator was removed, I decided to replace the generator belt. I took a Dayko company, it was just an old one that was already cracked! Having collected everything, I did a test run!
The engine runs smoothly... the dips at 2000 disappeared (as was to be expected) The overall result, as I did for myself, is that it’s because of the old, battered damper, which drank so much of my blood! And there were all these breakdowns! Now I think I’ll forget how to climb there for a long time))))
Replacing the VAZ 2110 generator pulley yourself
VAZ 2110 generator pulley
Very often the generator breaks down because its pulley does not function normally. Therefore, the operation of the car will become unavailable, because due to a faulty generator it will not even start. This means that replacing the VAZ 2110 generator pulley is simply necessary if any problems are observed during its operation. It can either be replaced or repaired. If this is not done in time, then in two or three months you will have to repair not only the pulley, but also other parts of the machine. The VAZ 2110 generator pulley is easy to replace with your own hands.
Functions
VAZ 2110 pulley unscrewed in the generator
A faulty pulley leads to various generator malfunctions, since it performs the following important functions:
- Firstly, it is a kind of generator protection. While the car is moving, the crankshaft is also in constant motion. This leads to small fluctuations being formed. Acting on the generator, such vibrations would lead to its breakdown. Fortunately, the pulley carefully protects him from this.
VAZ 2110 generator pulley
Note: this element is completely stationary. Despite this, it affects all components of the generator.
- In particular, thanks to it, even the belt stops oscillating with the previous force.
- The belt stretches less, so it will function longer. Therefore, if the pulley is not replaced in time, the belt may break.
- The belt drive is much quieter.
- The pulley is capable of unloading the generator at high speeds. In this case, less load will be placed on the engine.
- By using a good pulley, the battery will not drain too quickly. Therefore, the car will work longer.
- By changing the generator pulley, the gear ratio will also change. As a result, at idle the generator will spin much slower, so it will not produce anything, and gasoline consumption, among other things, will be significantly less.
Causes of breakdowns
VAZ 2110 generator drive pulley
The generator pulley breaks quite often, so in order to protect your car from such a nuisance, you should know the main reasons why this happens:
- The generator pulley, as well as its inner ring, are not hardened during the manufacturing process. Therefore, they are very fragile parts, which is why they can be damaged even with minor impacts.
Note: You must comply with all requirements for its operation. It is very important that it is well attached, since a slight play can also lead to its destruction.
- Usually there are shallow scratches on its surface (often they appear at the production stage). In fact, they do not affect its operation in any way. However, if these scratches “grow,” the pulley will have to be replaced.
Fastening the generator pulley VAZ 2110
- When installing it in place, you need to remember that the tightening torque of the product to the generator must be within 80 Nm. If this is neglected, the pulley will wobble.
Note: Tightening must also occur in a specific direction.
Replacement with generator removal
Alternator pulley play VAZ 2110
You need to know that there are two types of pulleys on sale (new and old models). You need to take the old model, since only this one is suitable for tens. The new pulleys are manufactured in different sizes. The pulley is replaced as follows:
- Open the hood.
- Remove the battery terminal.
- Remove the alternator belt.
- Remove the generator.
- Remove the damaged pulley. It is usually not easy to remove as it oxidizes and is securely attached to the generator.
Note: for this purpose, a special tool was created for removing the pulley. It is called a fine-slot profile.
- Not everyone can afford to purchase such a device. Therefore, many people use methods from “grandfather’s chest”. To do this, you should take some corrosive substance (for example, brake fluid). Drop several times onto the boiled part.
Note: precautions must be taken as brake fluid will corrode the skin if it comes into contact with it.
- Before installing a new pulley, you need to make a small hole (about 2 mm) on the inside of it. To do this, you need to heat it thoroughly and saw through it with a gentle movement. As a result, it will sit better on the generator.
- Everything needs to be collected in a certain sequence. First you need to insert the washer, then the impeller.
- Then the pulley itself is put in place.
- The entire structure is secured with three nuts of different sizes.
- The grower is inserted.
- Now you need to screw in another nut for a more secure fastening.
Note: this nut can be screwed in using a 14 mm wrench.
Pulley repair
If the pulley failure is not significant, it can be repaired. You can get rid of such troubles:
- A small play (precisely small, since if the pulley is loose, then it is already 100% damaged). To eliminate this, tighten the mounting bolts to the generator tighter.
- A small crack that can be soldered.
- The protective cover has expired. Typically a protective cover is included with the pulley. It can be installed quite simply, but it cannot be used more than once, since it is not of high quality that would allow repeated use.
- In this case, under no circumstances should the pulley be used without a cover, as it performs a protective function. This will cause it to break.
- Imbalance of pulley and coupling. This problem can only be dealt with if it is minor.
Note: The pulley can only be removed or replaced using a special tool called a fine spline profile.
You can replace the pulley with your own hands, since such work is not difficult to do even at home. However, the cost of repairs may vary. After all, it is often necessary to change not only the pulley, but also other parts of the generator, since its damage leads to failure of other components. Of course, before starting repairs, it is worth reviewing photos and videos on this topic. Instructions wouldn't hurt either. In addition, you can use the questions/answers section on many Internet sites.
What can a faulty pulley cause?
The first step is to understand the reasons for the breakdown of this element in order to protect the car enthusiast from unplanned repairs. Breakage can occur even from a small impact; this is due to the fact that during production this part, as well as its inner ring, was not hardened. And this makes them quite fragile. It is quite possible that it can be destroyed by the presence of even the slightest backlash. Therefore, it is necessary to secure it well during installation. During the production process of this element, micro scratches are formed on its surface. These scratches can grow over time, causing the part to fail and require replacement.
So, what can pulley malfunctions lead to?
- Malfunctions are fraught with consequences not only for the operation of the main unit, but also for the crankshaft. The fact is that while the car is moving, the crankshaft is also in constant motion. Thus, minor vibrations occur, but this is enough to cause the crankshaft to break. So, it serves as a kind of protection for him and that is why it is so important. It also has a positive effect on the operation of the belt, which operates without strong vibrations. The belt also stretches less, which allows it to remain in good condition longer. And if you don’t replace it in time, the belt may even break.
- This element contributes to quiet and stable operation of the belt drive.
- When the car is running at high speeds, the generator operates under the influence of a heavy load, which can lead to sudden wear of this unit. So, the pulley has the mechanical ability to remove the load from it, which, in turn, increases its service life.
- The operation of the battery, its charge, also depends on the correct operation of this part. If it doesn't work properly, the battery will drain too quickly. If the replacement is made on time, the battery will last longer.
- The replacement helps to change the gear ratio, which allows you to save a little fuel, since in idle mode it will spin slower than usual, which means less consumption.
It is very important to monitor the operation of the pulley, as a malfunction can have a detrimental effect on the performance of your machine.
Timely replacement of the alternator pulley can extend the life of both specific small parts and large components of the car.