How to replace the VAZ-2107 injector alternator belt
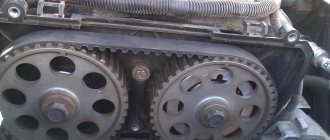
The belt is necessary to connect the generator and crankshaft pulleys, and on front-wheel drive classic models, the water pump pulley also takes part in the connection.
It is not so difficult to independently replace a torn or stretched alternator belt in a VAZ-2107 with an injector-type engine that has an additional carburetor. For this you will need:
- a mounting spatula, which can be replaced with a crowbar or a strong flat stick;
- wrenches 17 and 19.
This is quite enough to carry out repairs. Of course, if you at least have an idea where this very belt is located.
Types of devices installed on the VAZ-1111
A little about what kind of generator is used at Oka. The small car was equipped with several types of this unit. The most common and frequently encountered generator is type 37.3701, which was also installed on the VAZ models of the classic family (21010-2107), as well as the VAZ-2108. On some variants of the Oka, a device model 371.3701 was installed. Both of these options are identical in performance characteristics and differ only in minor design features.
The third version of the generator installed on the Oka is type 26.3771. In terms of performance characteristics, it is the same as 37.3701, but has a slightly different design, and the overall dimensions are smaller. It’s not difficult to visually recognize which generator is on the Oka. Model 26.3771 has internal ventilation (there are no impellers on the outside), while 37.3701 has external ventilation, so the latter has a pulley combined with the impeller.
In what situations is replacement necessary?
Wear of the element is characterized by such manifestations as cracks or tears in the blade, worn teeth and uneven edges. If you ignore such a deplorable state of a very important element, it will come back to haunt you with overheating and boiling of the engine, independent operation of the battery, which will lead to its rapid discharge.
If the belt is severely worn, it also shows signs of noise to the owner - it begins to whistle, especially at low speeds. Another reason for a whistling belt may be moisture getting on its surface, which occurs due to worn-out pipes of the cooling system - antifreeze begins to leak.
Some belts - oak - whistle when the car is started in frosty weather, and after warming up the sound disappears. A weak tension is expressed by a whistle, but in this case it is enough to simply tighten it.
HOW TO CORRECTLY TENSION THE BELT ON THE GENERATOR
When installing a generator on a VAZ 2107 yourself, the most difficult moment is considered to be proper belt tension. After all, it is through the belt that the generator mechanism will be launched, therefore, any errors and miscalculations when tensioning the rubber product will affect the performance of the car.
The belt tension is performed as follows:
- Place the new generator in its regular place, placing it on the studs.
- Tighten the fixing nuts only halfway, without over-tightening.
- Use a pry bar to install into the gap formed between the generator wall and the pump. Secure the mount in this position.
- Place the new belt on the alternator pulley.
- Hold the pry bar and begin tensioning the belt.
- Tighten the fixing nut in the upper part of the mounting of the generator unit housing.
- Afterwards, carry out a preliminary diagnosis of the degree of tension - the rubber product should not sag downward much.
- Tighten the lower stud nut until it ends without overtightening.
Next, the quality of the belt tension is checked. Using two fingers, press firmly on the free part of the belt and measure the existing deflection. Normal sagging should not be more than 1.5 centimeters.
The service life of a typical belt for a VAZ 2107 generator is usually 80 thousand kilometers. However, it is recommended to change the belt drive earlier if the generator set is being replaced.
Thus, the generator on the “seven” can be replaced with your own hands, but you must adhere to strict rules and observe safety precautions. If you have problems with the operation of the motor after replacing the device yourself, it is better to contact a professional.
If you have any difficulties or problems, you can contact a certified specialist who will definitely help!
If you find an error, please select a piece of text and press Ctrl+Enter.
DIY belt replacement process
To remove the belt, you will need access not only to the upper front part of the car, but also to the lower one.
Therefore, if a crankcase protection is installed, you will need to remove it. Some craftsmen, for convenience, to facilitate access to the belt, also remove the battery. Once you have access to the required element, inspect it. If there is no visually visible damage to the canvas, just check the tension, it may have weakened. This is easy to do, just press the belt with your fingers, simulating a pressure of approximately 10 kg, and by the distance of deflection you can determine whether the element is in acceptable tone. The maximum standards in a narrower place are 10-15 mm, and in those where the space between the pulleys is wider - 12-17 mm.
You only need to remove the belt from the pulleys if it is completely replaced; you do not need to do this to retighten it. At the bottom of the car, unscrew the nut securing the generator underneath by one turn. In the engine compartment, loosen the upper fastening nut of the same device a few turns. Under no circumstances should you completely unscrew the fasteners, just loosen them until they begin to turn freely.
To remove the belt, you will need to press the alternator slightly against the engine, but under no circumstances do this with your bare hands. Then remove the belt. You need to start with the top pulley, and then with the rest. Only in this order will it be easy to remove the element. On injection car models, you will also need to remove the crankshaft position sensor, otherwise it will interfere with the removal of the belt.
To adjust the blade tension, place a previously stored spatula or a flat piece of crowbar between the engine and the generator, using it as a lever. Having moved the generator in this way, without releasing the blade, but holding it in this position, tighten the nuts of the upper and lower fastenings, after which you can release the “lever”. It will be easier if someone helps you with this.
After the manipulations have been completed, check the belt tension again using the previously described method.
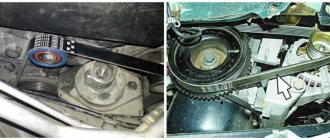
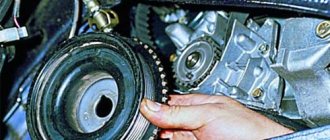
To put on a new belt, you need to know some of the nuances of this process. For example, one of the most important points: you need to put the belt on, starting with the crankshaft pulley, then on the generator pulley, and only finally on the pump pulley.
Thanks to the video instructions, you can learn in more detail and clearly how to change or tighten the alternator belt if you plan to do it yourself for the first time.
Reasons for the break
- 1. Exhausted resource. The belt needs to be changed at 50-60 thousand kilometers, but many do not do this;
- 2. Defective product. The manufacturer may produce low-quality goods;
- 3. Failed tension rollers, shafts and pulleys;
- 4. Incorrectly selected belt tension level.
Correct tension of the Priora generator belt
Signs of wear:
- 1. Lack of teeth. If there are no teeth, the product cannot engage on rollers, pulleys and shafts;
- 2. External modifications. If cracks, chips, stretching and other defects are noticed, urgent replacement is needed.
If you hear a whistle from the engine compartment when the radio, fog lights, regular headlights, etc. are on, then most likely it’s time to change the belt. Often, the whistling is eliminated if you tighten it, or vice versa, loosen the product a little. If the generator malfunctions, the “Check engine” indicator or, literally translated, “engine malfunction”, lights up on the instrument panel of the VAZ 2107.
If the belt breaks, it will not immediately become clear that it is broken, since the car’s electronics will be powered by battery energy. To prevent this, you need to monitor the condition of the product and, if necessary, try it on.
Where is the generator located on the VAZ 2107
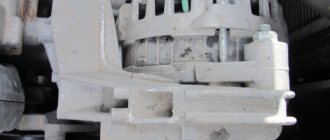
The generator on the VAZ 2107 functions in close connection with the battery. As with any other car, this device generates electricity to power all elements of the car. In this case, the generator performs its function only when the engine is running.
On the VAZ 2107 this mechanism is located directly on the surface of the power unit on its right side. This position is due to the fact that the generator is started by the movement of the crankshaft through the V-belt.
Step-by-step replacement instructions
Replacing the alternator belt on a VAZ 2107 is a very simple job and can be done in normal garage conditions without the involvement of a specialist.
Tools
To change the belt, we need:
- a set of keys;
- mount.
Keys of required sizes
Stages
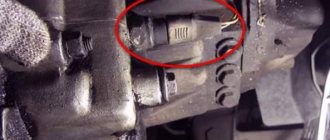
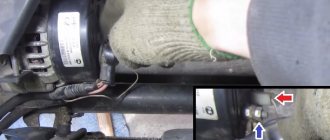
- The first step is to loosen the nut that secures the generator to the mounting plate.
Loosening the nut - Next, use a pry bar to move it towards the motor block.
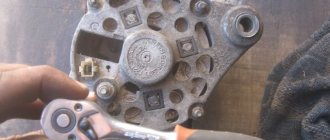
- If the power unit of your car is fuel-injected, then you need to remove the crankshaft sensor.
- Remove the old belt.
- We install a new one and tighten it on all the pulleys.
- In order to tighten the belt using a pry bar, move the generator. Having reached the required tension, tighten the fixing nut.
Tension adjustment - Do not allow it to be overtightened, otherwise it may rupture during operation.
- Tension is checked in the following way. Take a screwdriver and use it to press on the branch, as shown in the photo. Next, measurements are taken using a regular ruler. If the deflection is within the normal range, then the work can be considered completed. If not, then unscrew the nut and move the generator in one direction or another to obtain the tension we need.
Tension check
Sorry, there are no surveys available at this time.
How to replace the generator on a VAZ 2107
Replacing a generator set is required in cases where the device no longer produces the required amount of current for consumer systems. The most common reasons for replacing an installation are the following malfunctions and breakdowns:
- burnt winding;
- interturn short circuit;
- deformation of the generator housing;
- resource development.
It is almost always easier and more profitable to replace the generator with a new one than to repair it.
Tool preparation
To dismantle and subsequently install the generator on a VAZ 2107, you will need a standard set of tools, which every driver usually has in his garage:
- wrench 10;
- wrench 17;
- wrench 19;
- a pry bar or a special shovel for installation work.
No other devices or devices are required.
Dismantling works
It is recommended to remove the generator from the “seven” after the engine has cooled down. It is not recommended to work with vehicle components immediately after driving due to high temperatures and the risk of injury.
Immediately before removing the generator, you will need to remove the right front wheel, since the installation can only be reached from under the bottom of the car through the right fender.
It is imperative to securely fix the position of the car with a jack and auxiliary devices (hemp, stands) in order to eliminate the risk of the car falling during operation.
The progress of work comes down to the sequential implementation of the following actions:
- Find the generator housing in the mechanical structure of the car, feel for the bar that secures it to the engine.
- Using a wrench, unscrew the fastening nut halfway.
- Unscrew the nut on the bracket, but do not remove it from the stud.
- The generator housing can be pulled and moved in any direction - this will become possible due to the loose fastening.
- Remove the belt from the landing pulleys and remove it from the work area.
- Disconnect all incoming wires to the generator housing.
- Unscrew the fastening nuts completely.
- Pull the generator towards you and remove it from under the body.
Photo gallery: main stages of work
Immediately after dismantling work, you should inspect the generator landing site. All joints and fastenings must be cleaned of dirt and, if necessary, treated with acetone.
Accordingly, installation of the new generator will need to be carried out in the reverse order, paying special attention to tensioning the new belt.
Video: instructions for replacing the generator on a VAZ 2107
The need to replace the belt
Initially, it is important to note that the generator and its drive on a VAZ 2107 car, both injection and carburetor, are absolutely similar. The only difference between an injector and a carburetor is that the injector is equipped with a crankshaft position sensor. When it is necessary to replace the alternator belt on an injection-type VAZ 2107, this sensor must be removed.
During the operation of the VAZ-2107 car, the part in question wears out. The need to replace an element can be determined by the following signs:
- the appearance of cracks;
- whistling when starting the engine, or when sharply pressing the gas pedal, or after driving through a puddle;
- disheveled;
- sagging.
It is important to know! If the alternator belt breaks on a VAZ 21074, the engine will quickly heat up, which can lead to boiling. The battery remains without recharging, so after a short period of time it will run out.
The device in question, unless of course it is a defect, has a certain resource during normal operation of the vehicle. This resource is usually 50-60 thousand kilometers, after which the belt should in any case be changed. How to do this not only correctly, but also quickly, we will consider in the material.
Instructions for replacing the alternator belt
You must initially purchase a new item. Which belt is best to install on a VAZ 2107 depends on the amount of finances available to the owner of the “Seven”. Experts recommend not saving on such an important element and purchasing a Bosch brand part. Products of this brand are of good quality, which is actually necessary to achieve a long service life of the main components of the car.
The belt cannot be repaired, so at the first sign of wear, it must be replaced.
At the next stage, you will need to make sure that you have the necessary list of materials: open-end wrenches for “17” and “19”, a pry bar and a screwdriver. Only after this we begin to replace the product:
- First, loosen the nut that secures the generator itself to the adjustment bar.
- After this, you need to use a pry bar to press the generator to the motor. On injection "sevens" it is necessary to remove the crankshaft sensor.
- Now we remove the old element and put a new one in its place.
- To tighten the belt, you will need to use a pry bar to move the generator. After the device is in place, you can fix the nut.
- If you tighten the belt, then accelerated wear of the pump bearings and the generator itself will begin, which will have a bad effect on the service life of these devices. Also, the belt itself can break very quickly.
After completing the replacement procedure, it is imperative to tension the alternator belt. We will learn further how to tighten the alternator belt on a VAZ 2107 car.
In order to perform tension, you will need to check as follows:
- To begin, take a screwdriver in your hand and then press on the gap between the pulleys, as shown in the figure above.
- After this you will need to pick up a ruler. If the deflection does not go beyond the limits, then the work can be considered completed. How to tighten the belt if necessary?
- To do this, you need to unscrew the nut securing the generator, and then move it in one direction or the other, depending on what you need to do: tighten or loosen the tension. We tighten or loosen the device, after which the tensioner nut is fixed.
Changing the strap on the “seven” is not particularly difficult. In this case, there is no need to contact specialists at a service station, because the work can be done independently.
To check the length of an element it is not necessary to remove it. Periodically during vehicle operation it is necessary to check the belt tension.
If the size of the element in question meets the standards, then it is possible not to replace it until its service life has come. Only with timely replacement of the product can unforeseen consequences in the form of element breakage on the road be avoided.
Alternator belt for VAZ 2107
"Seven" came off the assembly line of the Volzhsky Automobile Plant in the period from 1982 to 2012. Initially, the model was equipped with a drive belt of a currently outdated model, which had a smooth surface without any roughness. However, later VAZ 2107 began to be re-equipped to meet the requirements of the time, which led to the emergence of a new type of belt with teeth.
It should be emphasized that the most popular manufacturer of belt products for the domestic automotive industry is Bosch. For many years, the German manufacturer has been producing high-quality products that, both in size and service life, completely satisfy VAZ 2107 owners.
Alternator belt sizes
All parts used in the design of the car must have markings and manufacturer numbers. Design numbers and sizes of belts for the VAZ 2107 are specified in the operational documents for this model:
- 2101–1308020 (smooth surface), dimensions - 10.0x8.0x944.0 mm;
- 2107–1308020 (toothed surface), dimensions - 10.7x8.0x944.0 m.
Selecting a generator for VAZ 2101
The manufacturer equipped the VAZ 2101 with generators of the G-221 model. The maximum current of 52 A was enough to operate all standard electrical appliances. However, the installation of additional equipment by car owners (powerful acoustics, navigator, additional headlights, etc.) led to the fact that the G-221 could no longer cope with increased loads. There was a need to replace the generator with a more powerful one.
Without any problems, you can install the following devices on the VAZ 2101:
- A generator from a VAZ 2105 with a maximum current of 55 A. The power is enough to operate a conventional speaker system and, for example, an additional LED strip for lighting. It is installed on standard mounts for the VAZ 2101 generator. The only differences are that the regulator relay is built into the generator housing, while on the G-221 it is located separately.
- Generator from VAZ 2106 with a maximum current of 55 A. Withstands slight overloads. Installed on standard G-221 mounts.
- Generator from VAZ 21074 with a maximum current of 73 A. Its power is sufficient to operate any additional electrical equipment. It is installed on standard VAZ 2101 mounts, but the connection diagram is slightly different.
- Generator from VAZ 2121 Niva with a maximum current of 80 A. The most powerful among its analogues. However, its installation on the VAZ 2101 will require significant modifications.
- Generators from foreign cars. The best option is generators from Fiat. Installing such a device on a VAZ 2101 will require noticeable changes in the design of the generator mounting and its connection diagram without guarantees of high-quality operation.