Generator brushes - element information
The brushes we are interested in are made of graphite, which is why they are often called carbon. They are used not only on cars with an internal combustion engine, but also on a wide variety of mechanisms and machines equipped with an electric motor (machine tools, lifting devices, urban public transport, and so on). The most common are EG-4 brushes.
This brand is suitable for installation on many cars of different years of production, as it has standard operating parameters. Less commonly used are other products (for example, EG-61), which are characterized by a high margin of safety due to their impregnation with special compositions.
On domestic cars, the generator and brushes for it are located under the right front headlight of your “iron horse”. They are not difficult to find. It is enough to open the hood to see the generator - its winding and two lids, which look like tin cans, come to the surface.
When do you need to change generator brushes?
During scheduled maintenance, no one pays attention to the small elements of the generator, of course. It is for this reason that the breakdown of its brushes always comes as a surprise to the driver.
Experts advise that after 50 thousand kilometers (or once every four years) you must check their serviceability and functionality, and then no problems will arise with the operation of the generator.
It is noteworthy that you can check the brushes (and, if necessary, change them) without dismantling the rather bulky generator. In addition, the following symptoms may indicate the need to look under the hood of your car and check the graphite brushes:
- unpredictable shutdown of electronic devices in a vehicle, occurring for unknown reasons;
- reducing illumination of the car interior and external light sources;
- voltage reduction;
- a car battery that discharges unreasonably quickly, which, moreover, is then very difficult (and sometimes impossible) to charge.
Any of these symptoms tells the motorist that he most likely needs to remove the old brushes and install new ones instead. You can check old products for functionality very simply.
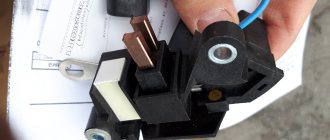
We should remove the negative from the battery, remove the voltage regulator and visually evaluate to what height the graphite parts we are interested in protrude from their “shelter”.
Brushes need to be changed urgently if their height is less than five millimeters.
Replacing generator brushes - from A to Z
Let’s say right away that this operation is very simple and does not require any special skills from the driver. First, as already mentioned, you need to remove the negative from the battery, then remove the regulator (it is located on the opposite side of the generator), and then perform the following steps:
How to remove the headlight on a viburnum
- Thoroughly clean the holder seat, as well as the pressure springs and slip ring, from soot and dust. This operation is performed using a soft bristle brush. Sometimes it may be necessary to grind the graphite brushes into the commutator using fine glass sandpaper (its grain size should be about 100).
- Install new products and make sure that they move freely in the brush holder.
- Reassemble the assembly in reverse order, and then connect the previously connected wire to the battery.
If you bought a prefabricated structure (regulator plus brushes), its installation also does not cause any problems.
Turn off the “minus” wire, remove the cap made of rubber from the “positive” wire, and then dismantle the block by unscrewing the fastening nut.
Then you will need to remove the plastic casing and remove the three spring clips located around the perimeter of the block.
Using a Phillips screwdriver, unscrew the brushes along with the voltage regulator, and disconnect all the wires leading to it. Mount the purchased prefabricated structure in the vacant space. Operation completed!
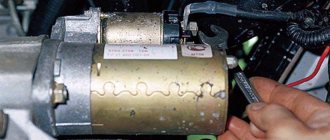
During a relatively recent repair of the cylinder head, the generator was simultaneously serviced, where the voltage regulator relay was replaced. Half a year passed and the generator began to remind itself. I began to notice that at idle (when you stop at a traffic light or just at the end of a trip), the arrows of the fuel level and voltage sensors tremble. They trembled something like this:
At the same time, the voltage on the voltmeter rose to 14.7, and sometimes up to 15 Volts, which is already unnecessary. But, interestingly, if you literally let the engine throttle before the cutoff for a second, the voltage returned back to 14.0 -14.1 V.
In general, I drove around like this for about a week, hoping to find new brushes for the old relay-regulator, but I didn’t find anything. In the end, I decided to resolder the brushes from the already installed relay to the old one, which is native to the generator. Along the way, the mileage for changing the engine oil came up.
I bought Mobil ESSO Ultra 10W-40 and an “SCT” oil filter in bulk. While the oil was draining, I began to make my way to the generator.
I really didn’t want to remove the generator, and before that the engine protection and splash guard, so I climbed over the top.
Source: https://litezona.ru/kak-pripajat-shhetki-generatora/
How to check visually, using a light bulb or multimeter
The simplest and most effective way to check generator brushes is visual.
To do this, dismantle the brush system. In this case, it is not necessary to completely dismantle the generator from the car. In many cases, the brushes can be removed without removing the alternator from the vehicle. To do this, it is enough to free access to the rear panel of the generator, then dismantle the brush system or the electronic voltage regulator, if it is structurally combined with the brushes.
We recommend: Electric power steering (EPS). How it works - how it works. Main types
Next, measure the remaining length of the brushes (size A in the example) extending beyond the fastening area. It should be at least 5 - 7 millimeters.
In the case of a combined design with a small residual length of the brushes, it is necessary to determine the nature of the repair:
- You can replace the brushes separately from the relay regulator. To do this, it is necessary to disassemble the structure. Sometimes this is technically impossible. In any case, the repair will cost about 600 rubles, plus about 400 rubles for the cost of two brushes. Brushes should be replaced in pairs;
- The cost of a voltage regulator starts from 1,200 rubles, so in most cases it is more profitable to change the entire design. This will leave a spare regulator, which may be useful later. It can be repaired slowly, independently.
You can check the generator relay with brushes using a load light.
You can use any salon light bulb as a lamp.
Separately, the generator brush can be checked using a multimeter by measuring the resistance between the copper terminal and the working surface of the brush. The resistance should be less than 1 ohm, and should not change when the copper lead moves.
Replacement starter brushes, how to solder at home
To keep your starter brushes working as long as possible, follow these tips:
When replacing, you do not need to buy them in the first tray you come across at the car market. It is better to contact a specialized store and buy certified spare parts. You should also not adjust brushes from another make or model of car, grinding them to the desired size. When starting the engine, do not force the starting device to operate for more than 5-7 seconds.
This way you can burn not only the brushes and commutator, but also the winding of the electric motor, as well as the wiring that supplies it with power. In addition, there is no need to try with a obviously discharged battery.
How to determine brush wear?
The experience of a technician is the best assistant in determining a starter malfunction in an auto repair company. Wear can only be determined by turning the starter motor. In one certain position the starter works normally, in another it is silent and contact is lost. This is explained by the presence of a gap between the worn brush and the commutator. In a worn state, the brush is pressed against the collector slip rings only under its own weight; as soon as it moves away a little, the contact disappears.
Sometimes the starter does not work correctly when brushes of normal length are skewed or stuck; in this case, it is enough to correct them. The malfunction may be a loose harness from one of the brushes. As a consequence: due to the increased load current, the second brush may burn out.
Rice. No. 1. Malfunction in the form of a copper strand unsoldered from the brush
Soldering Brushes with Silver at Home. Welding Toyota Starter Brushes Using Homemade Spot Welding
Watch to the end, soldering in 2 stages! It is possible to replace the starter brushes yourself, even at home. To do this, you need to have: new brushes, a silver product (I used a ring flattened with a hammer), a spot welder or a welding machine, or even a 12-volt battery with wires and terminals will do.
Watch to the end, soldering in 2 stages! How does a starter fail? The car will not start in cold weather. Doesn't start the first time. Starts in one go. If it doesn’t want to, it won’t start at all. One fine day you leave the house, insert the key into the ignition, the starter turns and that’s it. There was a smell of burnt wiring. It is useless to heat and light a cigarette.
This means that the starter winding has burned out, in addition to the worn brushes. Here you either rewind the winding or buy another stator. I decided to buy it because it would take a lot of time to find the wire. They sell quickly and without problems only in coils. And this is not expediently expensive. You can solder the brushes with a watch spring, but silver, in my opinion, is better.
Since it fills the stranded wire and the solder area completely! I hope my video helped you. After all, I had to suffer to come up with a simple and quick way out of the situation. Everything was done for the first time and experimentally, however, a month and a half passed and the flight was normal. 1- The car started always the first time, including from the key fob.
Source: https://thewikihow.com/video_0PGzxT_VJpo
Replacing starter brushes with your own hands - how often to change them and what is needed for this?
Hello, dear motorists! A fairly standard situation - the car stopped starting as before, with half a turn. Instead of the usual roar of the engine, only the plaintive squeals of the starter are heard from under the hood.
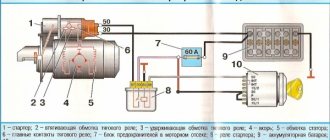
Whether you like it or not, you need to start an initial diagnosis of the starter’s condition. To do this, first we will go through the electrical circuit: ignition switch - starter. Naturally, let's start with the condition of the battery. After making sure that the battery is charged, you decide to remove the starter. What's next? How to determine what the problem is?
How can you tell if your starter brushes are worn out?
Don't rush to disassemble the starter. Check the removed starter by starting it separately from the car. You need to find out if the engine will start. Therefore, disconnect the wire from the terminal and connect it to the “plus” directly. If the motor starts working, most likely your “patient” is the power relay, but if the motor is silent, pay attention to the brushes.
A simple experiment will help determine wear or misalignment of the brushes. When checking the starter separately from the car, pay attention to how the starter motor operates. It happens that from one position it works perfectly, but as soon as you turn it on its side, the contact disappears.
This phenomenon is quite easy to explain. The starter brushes of normal length are pressed against the commutator in such a way that the starter brush holder is separated from the spring by a small gap.
If the brushes are worn out, the spring rests tightly against the brush holder, but contact between the brush and the commutator is possible under the influence of its weight. But if you change the position of the motor even a little, that’s all. The contact immediately disappears.
This phenomenon can also be observed if brushes of normal length are skewed in the brush holder and stuck.
How to change the brushes on the starter yourself?
Even a novice auto mechanic can replace starter brushes. By completing a series of simple sequential steps, you will cope with the task.
So, let's start disassembling the starter:
- Disconnect the cable from the starter terminal; remove the screws connecting the shaft and manifold covers;
- remove the cap and o-ring, ring clamp, gasket and second o-ring;
- remove the bolts connecting the manifold cover and the housing, remove the cover;
- remove the brush holder assembly. After this, the brushes will be pushed out by springs, but will be held in place by wires.
After the starter is disassembled, proceed to inspect and replace the brushes. When disassembling the starter, do not forget to carefully lay out the parts so as not to disrupt the reassembly sequence. Well, so that you don’t have “extra” details.
Replacing brushes and assembling the starter:
- inspect and, if necessary, replace the brushes or the entire brush holder assembly. Before assembling the starter, carry out its maintenance - clean all the elements;
- Install the brush plates on the commutator, center them, then put on the springs and brush holders;
- install the brush holder assembly onto the commutator armature, insert the sealing sleeve into the cutout in the housing;
- install the manifold cover on the armature, put on the O-ring and gaskets; install the manifold cover, insert the bolts;
- install gaskets, ring clamp, o-ring; Place the shaft cover on the manifold cover, tighten the bolts;
- Connect the power cable to the electromagnetic starter and tighten the nut.
That's all, actually. The starter is ready to be reinstalled.
Replacing starter brushes on a foreign car
How to change brushes on the starter of a foreign car? After all, it is not always possible to buy brushes for a foreign starter or you need to wait several weeks for delivery, and it is also somewhat more difficult to disassemble than its domestic “brothers”. There is a proposal to remake ordinary copper-graphite brushes by processing them with a file.
However, when installing a homemade brush, you need to carefully ensure that the positive wires do not short to ground. You will know that the starter brush needs to be shortened by the characteristic cracking sound.
And finally, you need to remember the minimum permissible brush length. As you know, it is not specified by manufacturers, and it is recommended to determine the condition of the brushes by eye.
However, experienced auto mechanics claim that normal operation of the starter is possible with a minimum brush length of 8 mm.
Source: https://cartore.ru/326-zamena-schetok-startera-svoimi-rukami.html
How to replace generator brushes
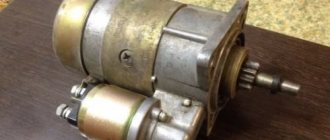
A car generator is designed to convert the mechanical energy of rotation of the engine crankshaft into electrical energy.
It performs two main functions: recharging the battery and powering the vehicle's power supply systems with generated electricity.
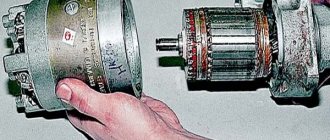
Along with the rotor and stator, the housing of the alternator also contains a brush assembly, a voltage regulator and a rectifier unit.
Brushes are the most vulnerable element of the generator. At the moment of their contact with the slip rings, the rotation speed of the generator shaft reaches 12-14 thousand rpm, which causes accelerated wear of the contacting surfaces. Timely replacement of generator brushes helps prevent damage to the brush assembly and ensure uninterrupted power supply to the vehicle while driving.
Generator brushes: what function do they perform?
When in contact with the slip rings located on the rotating rotor shaft, the generator brushes transmit current from the battery to the rotor field windings. This is how an electromagnetic field is created.
Under the influence of the alternating magnetic field of the rotating rotor, an electromotive force is induced in the coils of the stator windings and an alternating electric current is created. The current passing through the diode bridge (rectifier block of the generator) is converted into direct current. This is exactly what is needed to recharge the battery and ensure the functionality of the car’s electrical equipment.
When to change brushes: main signs
It is recommended to replace them as they wear out, but at least once every 4 years (or upon reaching a mileage of 50 thousand km).
However, under difficult operating conditions, critical wear of brush rods made of graphite or its compounds with copper (bronze, aluminum) may occur earlier than the specified period.
The brushes should protrude by at least 5 mm (the norm is 8-10 mm). This indicator is the most important - by measuring the length, you can understand whether there is a problem.
Several symptoms may indicate that your brushes need replacing, including:
- lack of starter response when turning the ignition key to the ON position - this can happen if the rods are skewed and there is no sufficient contact with the surface of the slip rings;
- slow rotation of the engine flywheel by the starter;
- reduced power of interior lighting, weak or flashing headlights, side lights;
- sudden shutdown of electrical appliances;
- rapid discharge of the battery, after which it becomes almost impossible to charge it.
We recommend: Jaguar car alarm review, instruction manual
To determine the cause of disturbances in the operation of the generator, it is necessary to accurately diagnose the malfunctions of the generator and, in particular, the brush assembly.
How to check generator brushes?
The brush assembly is usually combined with a voltage regulator. Contact with the rotor slip rings is carried out due to the force of the springs.
A malfunction of the generator brushes can be easily determined by visual inspection (sign: the length of the protruding ends is less than 5 mm). You also need to check the diameter of the slip rings (the norm is 14.2-14.4 mm, the minimum is 12.8 mm).
The presence of workings on contact surfaces is not allowed. Worn slip rings need to be replaced.
Advice
Problems with the generator can also arise due to increased brush resistance, which should be no more than 0.5 ohms. You will have to replace the brushes if, when checking, the multimeter shows increased resistance.
However, given that in most modern cars the brush assembly is combined with a voltage regulator, generator problems can be associated with a malfunction of the relay regulator, designed for a voltage of 15 V and a current of up to 5 A. For diagnostics, measurements with a multimeter are used.
When the engine is running, the voltage at the battery terminals or at the generator outputs should be in the range of 14-14.2 V. A voltage change of no more than 0.5 V is allowed.
If the fluctuations are more significant, this is a sign that the relay regulator is faulty and must be replaced.
It is also useful to check the voltage regulator.
To do this, assemble a circuit that combines, using wires, an adjustable power supply, a light bulb, a voltage regulator with a brush assembly, and a multimeter (voltmeter).
The power supply and multimeter are connected with correct polarity to the contacts of the voltage regulator. The light bulb wires are attached to the brushes. By turning on the power supply, voltage is applied (from 3 V), the light comes on.
With a gradual increase in voltage and upon reaching 14 V, the light should go out - this indicates normal operation of the regulator.
How to change brushes on a generator?
You can replace it without removing the generator - just remove the voltage regulator along with the brush assembly. Before this, you should disconnect the generator from the power supply (disconnect the negative terminal from the battery).
After this, unscrew the clamping nut and remove the voltage regulator with the brush holder. If the wear is critical (the offset is less than 5 mm), the brushes (graphite rods) will need to be replaced.
Here's how they do it:
- disconnect the contacts (unsolder the wires) and remove the old brushes, clean the soldering area, check the elasticity of the springs;
- install a new set into the brush holder, solder the contacts;
- check the free movement of the brushes in the brush holder;
- install the brush assembly in place and secure it with a nut.
Sometimes the solution may be simpler: perhaps the contact between the brushes and the rotor rings was broken due to the former sticking. The reason may be mud or graphite deposits, which can be easily removed by blowing contaminated areas with compressed air.