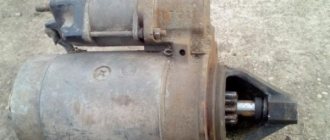
To understand the features of the repair, you must first study the design of the starter and understand how it works for the benefit of your car.
Let's start with the design. It includes four main nodes.
Knot
Peculiarities
It transmits direct current through four brushes
Freewheel with gear
A clutch or bendix drives the flywheel of your car's engine.
Serves to extend the bendix with gear when turning on the electrical appliance
Ensure easy rotation of the clutch, rotor, and gear. One bushing is located inside the starter, and the second is in the clutch housing.
Device diagram
Having familiarized yourself with the starter diagram, you can discuss the principle of its operation.
Design and operating principle
To understand the features of the repair, you must first study the design of the starter and understand how it works for the benefit of your car.
Let's start with the design. It includes four main nodes.
Knot
Peculiarities
It transmits direct current through four brushes
Freewheel with gear
A clutch or bendix drives the flywheel of your car's engine.
Serves to extend the bendix with gear when turning on the electrical appliance
Ensure easy rotation of the clutch, rotor, and gear. One bushing is located inside the starter, and the second is in the clutch housing.
Having familiarized yourself with the starter diagram, you can discuss the principle of its operation.
The operating principle is to convert an electrical signal into the rotational movement of a drive gear. Current is transmitted through the brushes to the poles of the electric motor. At the same time, the clutch extends and the gear is connected to the flywheel ring. To start the engine you need a quick but easy rotation of the starter. When the engine starts, the clutch returns to its original position.
Typical faults
It is better to start diagnosing the starter even before you remove it.
After dismantling, some signs of failure, by which the source of the problems can be determined, can no longer be determined.
Signs of a faulty element include:
Replacing the starter bushing on an Oka car
Despite the fact that the design of the starter on the Oka is implemented on a principle similar to the VAZ-2109 (the front bushing is also located in the clutch housing), the execution of the engine starting mechanism turned out to be extremely unsuccessful, as were most other components of this car. The main reason for this is the desire of designers to reduce the cost of the production process as much as possible. It is for this reason that bushings are manufactured using technology taken from powder metallurgy, and a combination of graphite chips and bronze is used as the starting material. Because of this, these parts have a very small margin of safety, which negatively affects their service life.
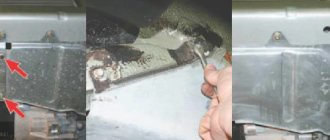
For those car enthusiasts who are interested in how to replace the starter bushing on the Oka, you need to know about one more drawback of the engine of this car. We are talking about a seat in the clutch housing itself, which breaks down unevenly during long-term operation. Therefore, if you buy a standard size product (external diameter 13.03 mm) to replace it, then most likely it will fit into place too loosely and even begin to dangle. This should not be allowed, as the part will very soon become unusable. Knowing this feature, experts recommend using a repair size bushing (external diameter 14 mm), but it often turns out that its diameter does not correspond to the size and even shape of the seat.
In the case where the development of the socket is relatively the same around the entire circumference, the problem is solved by simply adjusting the outer diameter of the sleeve using sandpaper. If, during replacement, you find that the seat is unevenly divided (for example, in the form of an ellipse), in this case it will have to be leveled. At the same time, experts do not recommend trying to unscrew the front bushing socket yourself using hand tools, since in this case it will not be possible to maintain alignment with the starter shaft, which is fraught with problems in its operation. If you find yourself in such a situation, it is better to contact specialists who, using special equipment, will turn the hole in the right direction. By the way, many car service centers manufacture repair-size starter bushings from bronze.
You can make a part of the required diameter at specialized service stations
After reading this manual, you were able to see for yourself that replacing starter bushings on a “nine”, as on any other car, is not the easiest task. Difficulties can begin already at the stage of removing the starter due to the inconvenience of work and end with pressing in the bushings. Therefore, when performing this type of repair, be patient, take your time, and follow the instructions strictly.
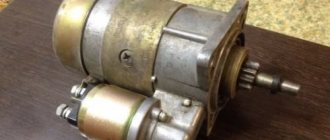
Device repair
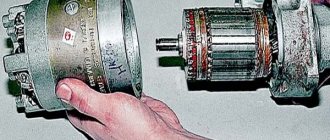
When you take out the device, place it on a workbench and clean it of dirt. First, disconnect the solenoid relay, which is secured with two screwdriver-head bolts. The anchor must be removed from the metal bendix plates. Using a 10mm key, unscrew the rear cover of the VAZ 2109 starter; a view of the rotor axis will open. There is a retaining ring installed on it, which will need to be removed using a flat-head screwdriver.
The VAZ 2109 starter housing consists of three parts, which are held together by two studs. When the nuts on these studs are unscrewed, all parts of the device are separated, so disassembling the VAZ starter does not cause any particular difficulties. It is worth noting that there are two types of devices: with and without a planetary gearbox. They have slight differences in the manifold.
If a planetary mechanism is installed, then the brushes are parallel to the starter housing, and if not, then perpendicular. The bushing is pressed into the back cover, so you need to prepare for pressing out. In order to get rid of the old bushing, you will need a hammer and a mandrel of a suitable diameter. Place it against the part and with sharp blows drive it out of the seat.
The main thing here is balance, since excessive force can cause a crack to appear in the lid. But nothing can replace it, unless you can find a similar VAZ starter. Installation of the new bushing must be done in reverse order. Assess whether the brushes need to be replaced. If yes, then replace them, clean the lamellas on the collector with a thin piece of metal.
How to check the VAZ 2109 starter and correct assembly? Try connecting it directly to the battery first. Smooth and calm work will tell you that the assembly was carried out correctly, no inaccuracies were made during the work process. If everything is assembled as it should, you can install the starter in place.
If during the disassembly process it turns out that there are serious defects (destruction of the housing, windings), then it is necessary to replace the VAZ starter with a similar model. It is worth noting that mechanisms with planetary gearboxes are considered the most efficient in operation: they have higher speeds, therefore, starting is much easier. Assembly is carried out in the reverse order to the one in which the VAZ starter was removed. Don't forget to reinstall the air filter and battery terminal when finished.
1200 rub. for the photo report
We pay for photo reports on car repairs. Earnings from 10,000 rubles/month.
Write:
Failure-free operation of the starter is ensured by the coordinated operation of all components and mechanisms, the failure of which affects the operation of the vehicle. Parts that are subject to mechanical loads are the most susceptible to wear, such as bendix, armature and bearings. The moving part of the armature consists of a shaft that rotates in two cermet bushings impregnated with oil. One of the bushings is pressed into the rear cover of the starter, the other is mounted into the clutch housing.
Replacing the starter bushing on an Oka car
Despite the fact that the design of the starter on the Oka is implemented on a principle similar to the VAZ-2109 (the front bushing is also located in the clutch housing), the execution of the engine starting mechanism turned out to be extremely unsuccessful, as were most other components of this car. The main reason for this is the desire of designers to reduce the cost of the production process as much as possible. It is for this reason that bushings are manufactured using technology taken from powder metallurgy, and a combination of graphite chips and bronze is used as the starting material. Because of this, these parts have a very small margin of safety, which negatively affects their service life.
For those car enthusiasts who are interested in how to replace the starter bushing on the Oka, you need to know about one more drawback of the engine of this car. We are talking about a seat in the clutch housing itself, which breaks down unevenly during long-term operation. Therefore, if you buy a standard size product (external diameter 13.03 mm) to replace it, then most likely it will fit into place too loosely and even begin to dangle. This should not be allowed, as the part will very soon become unusable. Knowing this feature, experts recommend using a repair size bushing (external diameter 14 mm), but it often turns out that its diameter does not correspond to the size and even shape of the seat.
In the case where the development of the socket is relatively the same around the entire circumference, the problem is solved by simply adjusting the outer diameter of the sleeve using sandpaper. If, during replacement, you find that the seat is unevenly divided (for example, in the form of an ellipse), in this case it will have to be leveled. At the same time, experts do not recommend trying to unscrew the front bushing socket yourself using hand tools, since in this case it will not be possible to maintain alignment with the starter shaft, which is fraught with problems in its operation. If you find yourself in such a situation, it is better to contact specialists who, using special equipment, will turn the hole in the right direction. By the way, many car service centers manufacture repair-size starter bushings from bronze.
You can make a part of the required diameter at specialized service stations
After reading this manual, you were able to see for yourself that replacing starter bushings on a “nine”, as on any other car, is not the easiest task. Difficulties can begin already at the stage of removing the starter due to the inconvenience of work and end with pressing in the bushings. Therefore, when performing this type of repair, be patient, take your time, and follow the instructions strictly.
Starter device
How to replace starter bushings? Before getting to the heart of the matter, it is necessary to at least get acquainted with the structure of the unit in general terms. A car starter is essentially a miniature four-lane electric motor that initiates rotation of the crankshaft. It provides the initial rotation speed that is necessary for the internal combustion engine to start. The starter is a DC electric motor that takes energy from the battery. Receiving electrical voltage from the battery, it increases power through the four brushes that are an integral part of it. Starters are:
Both the first and second have both their advantages and disadvantages.
Geared starters are good because they can provide the crankshaft rotation necessary to start the engine, even when the battery is very discharged.
In addition, the strength of gear options is the presence of permanent magnets, due to which problems with the stator winding are minimized. Although, with prolonged use of such a starter, the rotating gear may fail. To be fair, it is worth noting that this is most often caused by poor production quality or defects.
Gearless starters have a direct effect on gear rotation.
These devices have a simpler design. It is easier to repair them yourself, without resorting to the help of specialists from a car service center. They are quite reliable, and the probability of their failure due to electrical influence tends to zero. However, at low temperatures, gearless starters can still operate unstably.
How to Replace the Starter Bushing on a VAZ 2109
How to replace bushings on a VAZ-2109
replacement of VAZ-2109 Starting Bushes becomes necessary with strong axial mileage. This problem may be detected at startup. Engine speed and power are reduced.
To check the condition of the bushings, you will have to completely disassemble the starter, otherwise it is unlikely to find them suitable. The job is simple because it can be easily done independently in your own garage, without the need for outside help and without the introduction of a special tool. If your car hasn't been serviced for a long time, new bushings and brushes will come in handy.
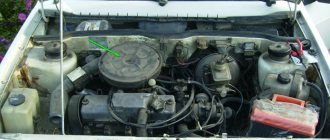
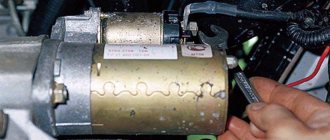
Removing the starter
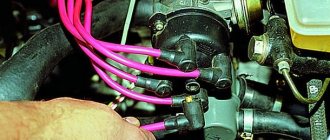
Before removing the starter , you need to prepare two keys at 10 and 13, they are useful for removing the terminal from the battery. To avoid short circuit, remove the negative terminal first. If your vehicle is equipped with an injector, you will need to remove the air filter above the starter.
The VAZ-2109 starter can be removed in two ways: from above or from below. If option 2 is selected, the crankcase must be temporarily removed so that it does not interfere. Next you need to disconnect the electromagnetic relay from 2 wires. First, disconnect the strong (thick) wire through which voltage is supplied to the starter, then the narrow one necessary to power the relay winding.
You can simply pull the narrow wire with your hand. To disconnect the power source, unscrew the nut from the electromagnetic relay contact with key 13. When disconnecting the wires, remove them from the side.
How to remove the starter?
For work, you will need 13mm wrenches (open-end, socket, socket) and a 10mm wrench to remove the terminal from the battery. Stock up on them before removing the starter. First, remove the negative terminal from the battery to prevent a short circuit. If your car has an injection system, you will have to remove the air filter, which is located above the starter.
There are two ways to remove the starter on a VAZ 2109: through the top and through the bottom. If you follow the second path, you will have to get rid of the engine protection for a while. First, disconnect two wires from the starter solenoid relay: a thin one, which is necessary to power the relay winding, and a thick one, which supplies voltage to the starter itself.
The first one is simply pulled out with your hands. To disconnect the second one, you need to unscrew the nut from the retractor contact with a 13mm wrench. When you get rid of the wires, move them to the side so they are out of the way. Using a 13mm wrench, you now need to unscrew the three nuts that secure the starter housing to the clutch block.
If necessary, you can use socket wrenches with a universal joint. But, as practice shows, all work is carried out without difficulty using a spanner. When all three nuts are unscrewed, you need to pull the VAZ 2109 starter housing to the right side to move it away from the studs.
Now all that remains is to pull the starter up or down. When removing it from the top, you may need to slightly pull the pipe going to the radiator of the cooling system to the side.
Replacement technology
First of all, you need to disconnect at least one of the wires from the battery, as well as all the wires from the starter. Then you need to unscrew the bottom bolt that secures the starter and screw it in on the reverse side to secure the engine to its front mount. Otherwise, the motor may move forward. After this, you need to unscrew the remaining two bolts that secure the starter and remove it from the car. As mentioned earlier, the bushing is built into the clutch housing. To remove it, you need an M12 tap, as well as a drill chuck. The tap will have to be inserted into the chuck, then clamped, after which it must be carefully screwed into the sleeve, thereby cutting the thread. Great care is required due to the fact that the steel of the tap is very fragile and even a slight misalignment with the applied force can lead to its breakage. In this case, the shank will remain in your hands, and the cutting part will remain inside the sleeve. It would seem that the situation is hopeless. However, it is not. The length of the sleeve is approximately 14 millimeters, which means that there is approximately 10 or 20 mm of the cutting part of the tap on the hands. You need to take a regular nut with exactly the same M12 thread and screw it onto the broken tap. In a situation where the tap is broken off so that it is impossible to screw a nut onto it, you can take a bolt with a corresponding thread about 10 centimeters long and grind grooves on it similar to the grooves of the tap. Or you can do it more radically, but at the same time simpler. Go to the store for a new tap. The tap is equipped with three grooves into which you need to insert nails of the appropriate size. This must be done in such a way that their ends protrude beyond the end of the tap by about 10 mm. Try to insert the resulting structure into the sleeve with the broken end of the tap. It may not work out right away, but with the right amount of persistence the operation can be easily accomplished. After this, you can try to unscrew the piece and try to unscrew the bushing again. As a rule, after a few turns the bushing will begin to rotate and can be carefully unscrewed. If the bushing is very stuck, you will have to cut the thread in it approximately 6 or 8 turns. After this, remove the tap, and in its place screw in a bolt of a suitable size and use it to remove the sleeve. When a new one is inserted in its place, it is slightly pressed in.
How to remove the starter?
For work, you will need 13mm wrenches (open-end, socket, socket) and a 10mm wrench to remove the terminal from the battery. Stock up on them before removing the starter. First, remove the negative terminal from the battery to prevent a short circuit. If your car has an injection system, you will have to remove the air filter, which is located above the starter.
There are two ways to remove the starter on a VAZ 2109: through the top and through the bottom. If you follow the second path, you will have to get rid of the engine protection for a while. First, disconnect two wires from the starter solenoid relay: a thin one, which is necessary to power the relay winding, and a thick one, which supplies voltage to the starter itself.
The first one is simply pulled out with your hands. To disconnect the second one, you need to unscrew the nut from the retractor contact with a 13mm wrench. When you get rid of the wires, move them to the side so they are out of the way. Using a 13mm wrench, you now need to unscrew the three nuts that secure the starter housing to the clutch block.
If necessary, you can use socket wrenches with a universal joint. But, as practice shows, all work is carried out without difficulty using a spanner. When all three nuts are unscrewed, you need to pull the VAZ 2109 starter housing to the right side to move it away from the studs.
Now all that remains is to pull the starter up or down. When removing it from the top, you may need to slightly pull the pipe going to the radiator of the cooling system to the side.
Consequences of using worn bushings
Bushing wear is a very serious malfunction, the consequences of which affect the operation of the entire mechanism. Operating a car with a starter with worn bushings leads to tragic consequences, which include:
· High heating of the armature and stator windings, as a result of which the starter refuses to work.
· Melting of the insulating bakelite due to high temperature causes an interturn short circuit in the winding wires or a short circuit.
· The increased load caused by worn bushings, which is present when the shaft rotates, causes wear of the brushes and the commutator plates in contact with them, which leads to premature wear of the brushes.
When is it necessary to replace?
Wear or complete destruction of the bushings is indicated by the appearance of excessive axial runout of the rotor, due to loss of contact and lack of mass on the rotor winding. This leads to the cessation of the starter’s operation, and if the power unit manages to start, then during operation a strong noise is heard from the engine compartment, which develops into a squeal and then abruptly fades.
In some cases, the breakdown of elements is caused by the rotation of the armature, which occurs jerkily or too slowly. If such manifestations are detected, you must immediately begin diagnostics and repairs, otherwise the problem will only get worse.
If, during inspection, signs of wear, defects, cracks, or metal shavings were revealed on the parts, they will need to be replaced. Usually the element located in the clutch housing fails.
Starter mechanism malfunctions
If any difficulties arise with starting the car, this unit is the first to be suspected, but now, knowing the design of the VAZ 2109 starter, you will quickly figure out where to look. Various sounds similar to metal grinding should also alert you; it is quite possible that your VAZ 2109 will need to disassemble the starter. The reason may lie in the flywheel, and its crown will need to be replaced. In this case, the car will most likely start, just not right away.
But if the car does not start and there are no alarming sounds, then you may have to replace the clutch. Disassemble the starter and dismantle it, try turning it in both directions. If it rotates freely, then calmly throw away the failed part. You can understand that it is necessary to remove and replace worn starter brushes installed on a VAZ 2109 by a characteristic click, after which the expected engine start will not take place.
Repair
Next, you have to check the condition one by one and take appropriate measures to eliminate problems with the following components of the starter:
Now let's talk about everything one by one.
Brushes
First, assess the current condition of the brushes. In most cases, they are the source of problems with the starter.
- Remove the pair of screws that hold the protective cover in place. The cover is now easy to remove.
- Use a screwdriver to remove the retaining ring from the shaft, and don’t forget about the adjusting washers.
- Unscrew 2 more tie rod nuts. Remove the manifold side cover.
- Use a screwdriver to press out the springs and remove the brushes from the holder.
- Measure the brushes with a caliper or ruler. If the height is less than 12 millimeters, the brushes must be replaced.
- It is also better to replace elements if there are chips, cracks and other defects on the surface.
Brushes
Anchor
If all is well with the brushes, the next suspect is the anchor.
- Remove the housing with the starter.
- At the anchor, look at the condition of the commutator, check whether the winding is intact.
- If there is carbon deposits on the collector or signs of breakdown, clean these areas with fine sandpaper.
- Check the armature and stator windings using a multimeter in ohmmeter mode.
Overrunning clutch
Parallel checking of the overrunning clutch with the armature will allow you to replace the latter at the same time.
To gain access to the clutch you will have to remove the armature from the front cover. At the same time, change it if necessary.
- Remove the retaining ring located near the overrunning clutch.
- Remove the restrictor ring.
- Remove the plastic lever stop, which will allow you to reach the anchor.
- Remove the intermediate support from the shaft.
- Check the condition of the gear teeth. If there are defects, the unit is replaced with a new one.
Bendix or overrunning clutch
Traction relay
Replacing the traction relay is necessary if, when voltage is applied to its terminals, the overrunning clutch does not extend. Sometimes the VAZ 2109 is equipped with collapsible relays. But it’s still better not to repair it, but to replace it with a new relay.
- To remove the relay, unscrew the two screws located on the front;
- Lift the relay, disconnect the armature from the lever;
- Remove the relay from the housing, grabbing the spring and armature. All elements are changed if necessary.
Bushings
Excessive wear on the bushings often impairs the performance of the starter. This is due to the material from which they are made - brass, bronze or copper. Contact with stronger metal causes wear.
Bushings
- In the case of the VAZ 2109 starter, we have one bushing located in the rear cover, as well as a second one, which you will find in the clutch housing.
- The presence of defects can be determined visually. If the elements have chips, cracks, burrs, or other defects, this indicates wear.
- Try moving the starter shaft transversely. If there is noticeable play, the starter bushings are worn out and need to be replaced.
- When planning to replace the rear bushing, it is recommended to simultaneously change the cover itself.
- The front bushing is removed from the crankcase using a tap of the required size. Tighten the tap like a thread, and resting it against the bottom of the hole, the sleeve will gradually begin to move out of its place.
- Before installing a new bushing, treat the inner surface of the seat with engine oil.
When putting the starter back together after repair, the most significant advice is to clean the surfaces from contamination. This will significantly extend the service life of the repaired unit and avoid breakdowns in the near future.
Be prepared for the fact that attempts to repair the starter will not give the expected effect. In this case, it is better to replace it completely or contact a trusted car service.
Assembly
After all faults have been eliminated, you can begin assembling the VAZ 2109 starter. Before assembling the device, all parts should be cleaned of dust and dirt. Sometimes by cleaning parts you can restore the functionality of the device.
Assembling the starter does not take much time. The assembled mechanism is installed in its regular place. Next, a connector with wires is connected to it. After final assembly, you should check the device for functionality.
If it was not possible to repair the device, then the VAZ 2109 starter will need to be replaced. Knowing how to remove the starter, replacing it with a new unit is not difficult. Thus, you can repair your car yourself, saving on service station maintenance.
Sorry, there are no surveys available at this time.
Device repair
When you take out the device, place it on a workbench and clean it of dirt. First, disconnect the solenoid relay, which is secured with two screwdriver-head bolts. The anchor must be removed from the metal bendix plates. Using a 10mm key, unscrew the rear cover of the VAZ 2109 starter; a view of the rotor axis will open. There is a retaining ring installed on it, which will need to be removed using a flat-head screwdriver.
The VAZ 2109 starter housing consists of three parts, which are held together by two studs. When the nuts on these studs are unscrewed, all parts of the device are separated, so disassembling the VAZ starter does not cause any particular difficulties. It is worth noting that there are two types of devices: with and without a planetary gearbox. They have slight differences in the manifold.
If a planetary mechanism is installed, then the brushes are parallel to the starter housing, and if not, then perpendicular. The bushing is pressed into the back cover, so you need to prepare for pressing out. In order to get rid of the old bushing, you will need a hammer and a mandrel of a suitable diameter. Place it against the part and with sharp blows drive it out of the seat.
The main thing here is balance, since excessive force can cause a crack to appear in the lid. But nothing can replace it, unless you can find a similar VAZ starter. Installation of the new bushing must be done in reverse order. Assess whether the brushes need to be replaced. If yes, then replace them, clean the lamellas on the collector with a thin piece of metal.
How to check the VAZ 2109 starter and correct assembly? Try connecting it directly to the battery first. Smooth and calm work will tell you that the assembly was carried out correctly, no inaccuracies were made during the work process. If everything is assembled as it should, you can install the starter in place.
If during the disassembly process it turns out that there are serious defects (destruction of the housing, windings), then it is necessary to replace the VAZ starter with a similar model. It is worth noting that mechanisms with planetary gearboxes are considered the most efficient in operation: they have higher speeds, therefore, starting is much easier. Assembly is carried out in the reverse order to the one in which the VAZ starter was removed. Don't forget to reinstall the air filter and battery terminal when finished.