If the starter does not click or turn, what should the owner of a VAZ-2106 do in such a situation?
There can be many reasons for this problem. The simplest and most common is a battery that is grounded to zero. Recognizing the source of the problem in this case is not difficult. You just need to turn on the headlights. If they do not light up, it means the battery is completely discharged. In this case, you can start it “from the pusher” or ask your neighbors in the garage for a “light.” By the way, the headlights can shine at full intensity. That is, the battery is not completely dead, but the starter does not have enough energy. In this case, the retractor, if everything is in order with it, will make itself felt with a click.
If the battery is charged normally, then you need to continue searching for the source of the problem. We check the integrity of the fuses. If everything is in order here, we look further. By the way, the fault may well be in the ignition switch itself. To check this version, you should carry out a simple manipulation. In particular, you need to try to start the car directly by connecting the necessary wires to each other. If after such manipulation the starter comes to life, it means that the problem is really in the lock, and it should be replaced.
However, before doing this, also check the ignition contact group - it is quite possible that a break has occurred there.
Next, carefully inspect the wiring for breaks. If everything is in order here, then we continue the search. The absence of clicks from the solenoid relay may indicate:
- contact between the rotor “mass” and the positive charge of the stator;
- jammed bushing or shaft of the electric motor.
Without removing the starter, it will not be possible to determine the exact cause. It is quite possible that the absence of clicks is due to the short circuit of the rotor or stator winding. To understand the reason, in any case, you will need to remove the starter and disassemble it.
After this, carefully inspect the retractor terminals. It is likely that they need cleaning (or replacement) after which the problem disappears. If this procedure does not help, check the relay winding. The presence of a malfunction will be indicated to you by a characteristic burning smell. The problem can also be caused by a loose fit between the brushes and the commutator, or too much wear on the commutator. It is quite possible that you just need to replace the retractor.
One point is worth noting - if you have already disassembled the starter, found a specific malfunction, and fixed it, then still conduct a visual inspection of the entire device. This kind of preventive maintenance is extremely useful in preventing future malfunctions. If you see that a part is clearly reaching the end of its service life, replace it immediately. This will eliminate the need to disassemble the starter again after some time. That is, in this case you are doing a kind of prevention.
Checking status
Before changing the relay, make sure that the problem with starting the engine is related to this component.
To do this, consider two situations that indicate its malfunction.
Situation
Your actions
The relay makes clicks, but the armature does not spin
If there are clicks from the relay, check the condition of the armature. To do this, the terminals of the retractor relay are bridged with a large screwdriver or a piece of welding cable to the terminals at the ends. Taking a thin wire or a screwdriver can easily burn the terminals. When the armature is working, after closing the terminals, the armature will spin, which can be determined by the sound. Consequently, the solenoid relay itself has failed and requires repair.
Design and technical characteristics of the VAZ 2106 starter
On the VAZ 2106, the manufacturer installed two interchangeable types of starters - ST-221 and 35.3708. They differ slightly from each other in design and technical parameters.
The first VAZ 2106 were equipped with ST-221 type starters
Technical characteristics of VAZ 2106 starters
Until the mid-80s of the last century, the manufacturer installed an ST-221 starter on all classic VAZ cars. Then the starting device was replaced with model 35.3708, which differed from its predecessor in the design of the collector and the fastening of the cover to the body. Its technical characteristics have also changed somewhat.
Since the mid-80s, starters 35.3708 began to be installed on the VAZ 2106
Table: main parameters of VAZ 2106 starters
VAZ 2106 starter device
Starter 35.3708 consists of the following elements:
- stator (housing with field windings);
- rotor (drive shaft);
- front cover (drive side);
- rear cover (collector side);
- traction electromagnetic relay.
Both covers and the starter housing are connected by two bolts. A four-pole stator has four windings, three of which are connected to the rotor winding in series, and the fourth in parallel.
The rotor consists of:
- drive shaft;
- core windings;
- brush commutator.
Two cermet bushings, pressed into the front and rear covers, act as shaft bearings. To reduce friction, these bushings are impregnated with special oil.
The design of the starter 35.3708 is practically no different from the design of a conventional electric motor.
A drive consisting of a gear and an overrunning clutch is installed in the front cover of the starter. The latter transmits torque from the shaft to the flywheel when the engine starts, that is, it connects and disconnects the shaft and the flywheel crown.
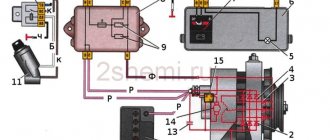
The traction relay is also located on the front cover. It consists of:
- housings;
- core;
- windings;
- contact bolts through which power is supplied.
When voltage is applied to the starter, the core is retracted under the influence of a magnetic field and moves the lever, which, in turn, moves the shaft with the drive gear until it engages with the flywheel crown. This closes the contact bolts of the starter, supplying current to the stator windings.
Video: principle of operation of the VAZ 2106 starter
Gear starter
Despite the low power, the standard starter of the VAZ 2106 copes with its tasks quite well. However, it is often replaced with a geared analogue, which differs from the classic one by the presence of a gearbox, which significantly increases the power of the device. This allows you to start the engine even with a discharged battery. Thus, a gear starter for classic VAZ models produced (Belarus) has a rated power of 1.74 kW and is capable of spinning the crankshaft up to 135 rpm (usually 40–60 rpm is enough to start the power unit). This device works even when the battery is discharged to 40%.
The gear starter has a special gearbox that significantly increases the power of the device
Video: gear starter VAZ 2106
Choosing a starter for VAZ 2106
The starter fastening device for classic VAZ models does not allow installing a starting device from another domestic car or foreign car on the VAZ 2106. Adaptation of such starters is very labor-intensive and expensive (the exception is the starter from the VAZ 2121 Niva). Therefore, it is better and easier to purchase a new starting device. A stock starter for a VAZ 2106 costs 1600–1800 rubles, and a gear starter costs 500 rubles more.
Manufacturers are recommended to give preference to well-established brands:
- "Elektromash" (Kherson, Ukraine);
- KZATE (Samara, Russia);
- "Atek" (Vitebsk, Belarus).
Starter operating principle
The starter switch is usually operated by the ignition key. Turn the key to the ignition on position to apply current to the solenoid.
The ignition key has a return spring so that as soon as you release the key, it springs back and turns off the starter.
When the switch applies current to the solenoid, the electromagnet attracts the iron rod.
The movement of the rod closes two heavy contacts, completing a circuit from the battery to the starter.
The rod also has a return spring and when the ignition switch stops supplying current to the solenoid, the contacts open and the starter stops.
The starter should not rotate any more than is necessary to start the engine, which is why it needs return springs.
The starter consumes a lot of electricity, which quickly drains the battery.
If the engine starts and the starter remains engaged, the engine will spin the starter so fast that it can be severely damaged.
The starter motor itself has a device called a bendix gear, which engages its gear with a toothed ring on the flywheel only while the starter is turning the engine. It switches off as soon as the engine gets up to speed, and there are two ways it does this - inertia system and pre-engagement system.
The inertia starter relies on the inertia of the gear - that is, on its reluctance to start turning.
Imagine that you suddenly unscrew a bolt: the inertia of the nut does not allow it to turn immediately, so it moves along the thread of the bolt.
When the inertia starter rotates, the gear moves along the threads of the engine shaft and meshes with the flywheel toothed ring.
Then it reaches a stop at the end of the thread, begins to rotate with the shaft and thus rotates the motor.
Common starter problems and their causes
Regardless of whether a gear starter is installed on a VAZ 2106 or UAZ, the problems are similar. If the car does not start, the VAZ 2106 starter does not turn well, first check the quality of battery charging. In addition, you should check how well the terminals are secured. If everything is fine with the charging and terminals, then the cause of problems with starting the engine may be in the starter.
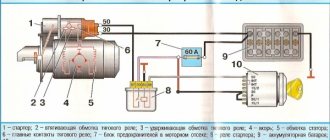
VAZ 2106 starter circuit
The following malfunctions of the VAZ 2106 starter are possible:
- The device turns on, but the traction relay does not work: the traction wire is broken, the tips are not tightened well, there is a short circuit in the traction windings or to ground, the contacts have oxidized, the retractor armature is stuck.
- After switching on, a click occurs, the traction relay works, but the armature does not function or it rotates too slowly, the starter does not turn: the fastening bolts on the retractor are not tightened well, the brushes are worn out or stuck, the commutator plates are short-circuited or are burned out, the windings are damaged.
- When starting, the relay clicks, the armature works, but the crankshaft does not rotate: the buffer spring is broken, the clutch slips, slips out of the axle, or the clutch engagement lever is broken.
- The starter does not turn off when the engine starts: the relay or drive lever is stuck, the contacts are stuck together, the mechanism is skewed, the ignition switch return spring is faulty.
- Increased noise during startup: the unit is poorly secured, the bushings are worn, the teeth on the gears are broken.
Design and principle of operation of the VAZ 2109 starter relay
The operation of the relay is based on electromagnetism: a copper conductor is wound around the tubular core of the device, and when current passes through this structure, a magnetic field is created. Under the influence of the resulting force field, the anchor located in the tube is pulled inward.
The design of the described device has two coils.
The switching on of the first is noted at the moment when voltage is applied to the relay, the second begins to work after the armature enters the core.
The anchor overrunning clutch is connected by a lever directly to the anchor. Due to this relay, firstly, it controls the process of supplying voltage to the internal combustion engine, and secondly, it allows the gear to engage with the flywheel of the car engine.
The additional VAZ 2109 starter relay has several contact pins. Two of them transmit current from the car battery, and one has the status of a controller (a wire runs from it to the vehicle’s ignition switch), which controls the operation of the entire device. The control terminal is the thinnest, and the power contacts look like bolts of relatively large thickness (they are mounted on a textolite cover). Inside the relay, the contacts are rectangular or round.
As you can see, the design of the relay is quite simple; any car enthusiast can figure it out after spending very little time. The task of this machine unit is to transmit torque to the starter flywheel by turning off the power and disconnecting the wire after starting the vehicle engine.
VAZ 2110 does not start: the starter does not turn, but clicks and other faults
All cars use a starter to spin the crankshaft when starting the engine. The power of this device allows the crankshaft to overcome compression in the cylinders and frictional forces. If the starter does not turn, then the engine cannot start, as a result, the car stands still. For a motorist, the worst situation occurs when, when turning the key, he hears clicking sounds in the power plant or silence.
By the “silence” of the engine it is impossible to determine what exactly is not working. It’s good if it’s a starter, since repairing or replacing it won’t be as expensive as repairing a VAZ 2110 engine. There can be many problems with this element; this article contains the main faults and ways to solve them. If you want to repair or replace it yourself, then this will require a connection diagram, since the starter is an electrical device.
Why doesn't the starter turn?
The rotation of the motor shaft comes from the starter, which is a DC electric motor. If it does not work, then you need to find out the cause of the breakdown of the starting system.
Low battery
The most common situation that car owners encounter is a low battery charge. When the voltage source is discharged or breaks down, the starter does not turn, the retractor does not click, which does not allow the engine to start.
When the charge is low, the starter does not work and the following symptoms appear:
- Turning the key does not start the engine. The starter unit does not make clicks or other sounds, and the device does not spin up. To diagnose the battery, you can try to activate another energy consumer. We are talking about optics, a car radio, a stove or interior lighting.
- The indicator lights on the control panel go out after turning on the ignition. Clicking sounds are also heard indicating that the starter relay is activated.
- The starter unit makes several clicks, and the indicator lights on the control panel go out or their brightness decreases.
Diagnostics of battery operation can be carried out using a tester or a load plug, an example of testing with a multimeter:
- The ignition is turned off and the hood of the car opens. The terminals must be cleaned, as poor current transmission may be due to oxidation of the contacts. For cleaning, it is better to use a toothbrush or fine-grained sandpaper. You must act carefully so as not to damage the top layer on the clamps.
- The clamps are disconnected. Wrenches are used to loosen the nuts on the contacts.
- A visual check of the battery housing is carried out. Battery malfunctions are often caused by damage to the case and leakage of electrolytic solution from the battery.
- If there is no damage, unscrew the caps on the battery banks. The presence of liquid inside the device is checked. If the electrolyte does not completely cover the jars, you need to add distilled water to the battery.
- The next step is to directly diagnose the battery voltage. The multimeter probes are connected to the battery terminals. When the engine is not running, the operating voltage parameter should be from 12.5 to 13 volts. You can diagnose the battery with the power unit running - it should be from 13.5 to 14 volts.
The battery technician spoke in detail about diagnosing a car battery using a multimeter.
If the battery voltage is more than 14.2 volts, then the battery is discharged and the generator device has to operate in enhanced mode.
To restore charge, the battery must be charged, and it is important to maintain the load current on the device. The charging procedure is carried out using starting-charging equipment; the task usually takes at least eight hours to complete.
Alarm problems
Sometimes it is impossible to start the car, the starter does not turn on, the battery is charged, the electrical circuit is fine. There is a possibility of malfunction of the immobilizer and alarm system. The nature of the breakdown does not depend on the make of the car and the year of its manufacture. In this case, you need to find out which model of anti-theft system is installed on the car.
This is interesting: What do you need to know before buying new tires?
A characteristic sign of a problem in the immobilizer is that the starter does not rotate, the engine does not start, and there are no relay clicks. Sometimes it happens like this - the car starts up, but immediately stalls. The engine may not respond to starting from the key fob or key. If at least one of these signs is present, then the starting system is blocked by the alarm.
Starter failure
It is not often that there is a problem with starting a car engine due to a malfunction of the starter itself. It is impossible to see the breakdown from the outside and you cannot do without a full inspection. Identifying the problem and fixing it usually takes a lot of time, money and effort.
Here is a list of the main breakdowns that occur in a starter device that has been in use for more than 15 years:
- Identification of a short circuit that caused the failure of the coils. A sign of a problem is smoke from the housing, the smell of burnt wires.
- Wear of the retractor relay parts, disruption of the bendix action. The starter does not connect to the engine flywheel and does not start it.
- Complete wear or breakage of the bendix teeth. The device is unable to start the engine.
- Burnout of electrical connections in the starter housing.
In many cases, it is not possible to repair the starter yourself. To do this you will have to contact the experts. But repairs will be carried out in the workshop if the bendix or solenoid relay is faulty. If the winding burns out, you will be advised to purchase a new starter.
But often starter breakdowns can be solved yourself. For example, drivers sometimes mistake a broken ignition switch for a faulty starter and buy a new one. Therefore, before repairing, you need to carefully check everything and find the exact cause.
Modern cars use special monitoring systems, making it difficult to check and find faults yourself. The operation of the starter is controlled by an electronic unit, so if it breaks down, it is recommended to contact a specialized service center.
The starter armature is jammed.
The author of the article has encountered such a malfunction several times, but, as a rule, the brushes immediately become unusable and, without analysis, you will not be able to distinguish between armature jamming and brush wear.
If, by some miracle, the brushes hold up, then when you turn the key to the start position, you will hear a very loud click, and then, for a while, all the devices will go out (you may feel a specific smell)! Burning out of the mass manifests itself in exactly the same way!
In any case, the car will not go anywhere on its own. It is necessary to carry out diagnostics and use a tow truck/tug to proceed to the repair or parking area.
The starter brushes are worn.
The malfunction manifests itself in the same way as burning of the contact coins (loud clicks when turning the ignition key), the only difference is that when the brushes wear out, the starter will never rotate.
It is checked in the same way when bridging the contacts of the solenoid relay with a screwdriver.
The ignition switch is faulty
If the ignition switch does not work, this can be determined by the following symptoms:
- The starter unit is not functioning. The device does not make clicks and the relay does not operate. This problem is caused by a lack of power that must pass through the switch device.
- The electrical equipment installed in the machine does not function. Electrical appliances may not be connected to each other, for example, a stove and interior lighting. But activation of the equipment occurs as a result of the functioning contact component of the ignition switch.
- If the driver moves the key in the lock, some electrical equipment and devices may turn on at a certain position of the key. This indicates that the contact elements have closed and the power supply to the equipment has been restored.
All causes of malfunctions in the operation of the ignition switch can be divided into two groups - mechanical and electrical. Malfunctions in the operation of the lock always occur as a result of its incorrect installation or rapid wear of the components.
Malfunction of electrical components
Electrical problems usually occur due to overload of devices and equipment installed in the machine, the contact component breaks. With additional installation of lighting devices and other consumers, the ignition switch may not be able to withstand the increased load. Due to the increase in load, carbon deposits form on the contact component and appear on the metal part.
To prevent overload of the switching device, additional electrical equipment must be connected to the electrical circuit via a relay. The presence of this element will relieve part of the load. Problems in the electrical component of the lock may be caused by a short circuit in the electrical circuit. This malfunction is typical for all domestically produced cars; it is considered their “disease”.
The Auto Electrician HF channel spoke about diagnosing the ignition switch, checking electrical faults and ringing the device.
Mechanical failure
Mechanical malfunctions of the ignition switch include wear of the contact tracks or the contact elements themselves. The problem may be physical damage to one of the component components of the device. Also, the cause is often considered to be overheating of the contact elements and the plastic case; melting leads to the inoperability of the mechanism. To determine mechanical problems with the ignition switch, you will need to dismantle the device.
Diagnostics of the switching device is carried out using a multimeter or voltmeter:
- The negative cable is disconnected from the battery; a key is used to disconnect the wire from the clamp.
- The plastic upholstery around the steering column of the car is being dismantled. Depending on the car model, the dismantling procedure will be different. Usually, to remove the trim, it is enough to unscrew the bolts connecting the two parts of the trim to each other.
- The plug connected to the device is disconnected from the machine's power supply. The wiring harness is removed from under the control panel.
- The key is installed in the switch. It is necessary to rotate the control element to all available positions. You need to stop in each of them to use a tester to diagnose the resistance between the contact elements of the wiring. To check, the multimeter is switched to ohmmeter mode.
- If the test shows that the resistance value is 0, this indicates that the contact elements of the lock are working properly. When the operating resistance parameter corresponds to infinity, the contact components are non-working and must be replaced. If the resistance value is measured in numbers, this indicates burning of the contact elements.
- To diagnose the functionality of the backlight, you need to apply a direct current of 12 volts to the contacts. The example is considered on a Lada car, so current is supplied to components numbered 2 and 6 located on the connector. If the indicator light does not light up as a result of the action, this indicates a fault in the wiring or damage to the cable.
- If diagnostics show that some of the contact elements are faulty, it is necessary to completely replace the contact component.
This is interesting: Self-replacement and repair of the tachometer if it doesn’t work
Solenoid relay malfunction
When the battery is sufficiently charged and the alarm is turned off, but the engine does not start, the starter is faulty. If you hear metallic clicks when you try to start, then this is the work of the solenoid relay. It is faulty because it makes a knocking sound, the flywheel and bendix do not engage with each other and do not start the engine. You can check this failure of the solenoid relay and start the engine by closing two relay contacts with a screwdriver or wrench.
Attention! Before the procedure, you need to put the gearshift lever in the neutral position.
If the engine starts, then it is necessary to repair or replace the solenoid relay. The contacts, which are made in the shape of nickels, can burn in it. Drivers often believe that they cannot be repaired and can only be replaced. But temporarily the nickels can be restored. To do this, they are cleaned with sandpaper and installed in place. However, they have a protective coating that is removed by sanding. Therefore, after some time the procedure will need to be repeated.
Other reasons
There are other reasons for starter failure; here are some of the most common ones.
- Brush wear. Because of them, starting the motor is impossible, or operation will not always occur.
- Short circuit of windings.
- The rotor shaft is jammed due to bearing wear.
- Bendix teeth wear.
- Freewheel slipping. The device drive needs to be replaced.
- The drive moves along the shaft thread with great force. To fix the breakdown, you need to disassemble the starter, wash and lubricate the threads with engine oil.
- The stator has permanent magnets that can come off. To resolve the issue, you will need to disassemble and glue the magnets into place.
- The return spring on the retractor relay has slipped.
- Broken or deformed bendix fork. The repair consists of replacing the fork or bendix assembly.
Slow rotation of the crankshaft can occur for the following reasons:
- Engine oil is too thick. This happens in severe frost. The lubricant needs to be replaced to match the temperature.
- The battery is low. There is not enough energy to rotate at the required speed. More often this happens in winter, and the battery needs to be charged or replaced with a new one.
Sometimes the problem is that when the engine is hot, the starter does not operate, but when the engine cools down, everything is fine. This is due to the installation of the wrong size bushings. Their diameter is chosen smaller than required. When heated, the bushing holes become smaller and the starter shaft jams.
On our website you will find:
- current information about Lada, new products in production and news related to the brand;
- statistical data on sales and the place of the Russian automobile industry in both the local and international markets;
- useful tips on operation, repair and maintenance of VAZ cars;
- all the most important information that will help you when repairing VAZ cars;
- reviews of the most common problems faced by machines.
If you have any questions regarding the repair of your car, materials and spare parts for it, you can get advice from a specialist. To do this, go to the CONTACTS section and send your question. You will find this and much more about the features of domestic cars on our portal OLADE.RU
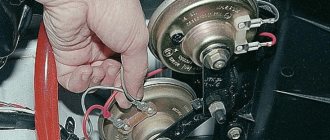
Preparation for testing and necessary tools
In order to properly reach the solenoid relay with your hands, you need to take care of access to it. If you still have a foreign car, then you will have to drive the car into a hole, an overpass, or, in extreme cases, jack it up as much as possible in order to crawl under it, because in most foreign cars this part is accessible only from below, and if you are the owner of a miracle of the domestic automobile industry , then everything is much simpler and easier - just open the hood. Having found the solenoid relay, look for the terminals on it. This is not difficult to do, because there will be a wire on one of the terminals - this is the positive terminal.
A multimeter must be connected to this positive terminal in voltmeter mode. This is done easily and simply. Connect the red (positive) wire of the multimeter to the relay terminal, and connect the black (negative) wire to the vehicle ground. After connecting, either secure the wires in this position, or call a passerby, a friend, a relative (underline the tedious) so that he (she) starts the engine. And you look at the readings of the device, which should produce a stable 12 volts when the starter clicks repeatedly.
Features of mechanism diagnostics
Starter for VAZ 2106
The starting unit is checked using a tester. After turning on the device, the voltmeter reading should not be higher than 8V, and the current should not exceed 23A.
You can check the windings using a tester; if it lights up, it means there is a short circuit. To perform a visual inspection of the starting unit, it must be removed and cleaned of dirt (video author - Irina Kuzilova)
When disassembling the device, each part should be visually inspected. Scores and scratches can be removed using sandpaper. Broken and worn parts must be replaced. It is also necessary to replace the VAZ 2106 starter bushings if they are badly worn.
A faulty collector cannot be repaired; it is advisable to replace it. The height is checked on the brushes. More than 12 mm is considered optimal, otherwise the brushes must be replaced.
Display errors and testing
The starter can deceive you, because it can click even at lower voltage. By the way, if it (voltage) is below 12 volts, then you need to charge the battery and/or check the ignition switch. In this case, all that remains is to resort to checking directly. To do this, turn off the engine, disconnect the wire from the relay (the one that comes from the ignition) and use a screwdriver to short-circuit the positive terminal. This is a simple way to apply voltage directly to the starter relay.
If the car did not start at all, then such actions can directly start it instantly. By the way, if the car starts when connected directly, then either the ignition switch is closed and needs to be changed, or the relay is rotten and also needs to be changed. That's all the checks. As you can see, there is nothing complicated or secret in this matter, and even a novice car enthusiast can cope with such a task.
Really good and competent mechanics, if the starter or relay breaks down, strongly recommend replacing the entire assembly rather than buying and installing individual parts. The fact is that the relays and the starter work in unison and detailed replacement of individual parts can cost, if not more, then the same amount. The question is, why buy part of a unit when you can buy the whole thing for the same money?
The procedure for checking if the engine does not start is always the same. First, the battery charge is checked, then the ignition itself, and lastly the starter with its retractor relay. No need to do the opposite, just waste extra time.
And one last thing. If the entire unit fails, do not rush to throw it in the trash. Many offices completely replace their filling, and the money is cheaper than buying a new one. The economy will be modest, but it will be there.
Reasons for a cold or hot system
Since system temperature can affect the causes of starter problems, it is necessary to test its operation in both states - cold and hot. In the first case, the following problems may appear:
- thick oil
- reduction in battery efficiency.
In a cold system, such a set is extremely small, because the low temperature here is dangerous only for liquids. However, when hot, the following problems are possible:
- bushing wedge;
- crankshaft failure (rubbing of liners, axle displacement, etc.);
- bushing wear.
Such problems more often arise on a well-developed system where the temperature has risen. If such a tendency is observed, it is recommended to check the system at a car service center. There may be problems with the crankshaft, which can lead to expensive car repairs.
If there is no difference between the operation of the starter in both cases, then it is recommended to look for reasons among the general ones. Most often, the problem is in the starting device itself or the power system.
Malfunctions
Troubleshooting a traction relay is not that difficult. It should be noted that its operation is accompanied by a click - this is the result of the armature being retracted and the gear being engaged.
When you turn the key, this click is clearly audible. Thus, the absence of a click may indicate a break in the coils, lack of power, or the armature being stuck in one position.
If, when you turn the ignition key, a click is heard, but the starter itself does not start or starts but spins very slowly, this may indicate that the contact plates are burning.
Continued operation of the starter after starting the power plant will be accompanied by a characteristic buzzing sound.
It is possible that the armature is stuck in the retracted position and cannot return back, so it keeps the bendix gear engaged and continues to close the contact plates.
Starter solenoid relay
The design of the relay in the starter of a VAZ 2106 car is considered to be quite simple, and every even slightly enthusiastic motorist can easily disassemble and assemble it independently. However, removing and then reinstalling the solenoid relay turns out to be an impossible task for many. However, professionals can handle this without difficulty.
If you suspect that the solenoid relay in your car is broken, you should definitely check it. The relay in the VAZ 2106, as in other car models, works as an electromagnet. In order to check its serviceability, you need to close it with a metal object, for example, a screwdriver. If the starter starts to rotate, then the fault is indeed in the relay. If you hear clicks from the retractor relay, but the starter does not start to rotate, then you need to look for the breakdown in it itself.
Why might the starter relay stop functioning? There may be several reasons. Firstly, materials can deteriorate due to age. Secondly, the winding may burn out. And finally, thirdly, the nickels inside the relay itself can burn out.
Video “Reassembling the mechanism at home”
Find out how to rebuild the starter yourself from the video below (the author of the story is the onotole channel).
Welcome, friends, to the DIY car repair website. Almost every driver, at least once in his life, has encountered a problem related to starting a car engine.
Usually the problem is solved by simply recharging the battery or cleaning the contact connections. The situation is much worse when the cause of engine failure is hidden in a malfunction of the solenoid relay or the starter itself.
Starter solenoid relay
A new problem arises for the motorist - how to check the starter solenoid relay, identify the fault and, if possible, repair it at home, with your own hands.
Brushes and winding
Inside the starter housing there are 4 steel cores (shoes) with a winding that is connected into a circuit.
Healthy! Some cars do not use cores with windings, but magnets, which is much more convenient.
The current to the winding comes from the central input, and the output is output to two copper-graphite positive brushes that go to the commutator. Also connected to it are negative brushes that come from the starter mass. All brushes are constantly pressed using small springs. But, since graphite is not the most durable material, these elements tend to wear out quite quickly. When brush wear reaches a critical level, the solenoid relay stops receiving current.
In the event of such a breakdown, the starter will not make any extraneous sounds. To repair, you will need to disassemble it and evaluate the condition of the brushes. If everything is in order with them, then we look at the windings. If they burn out, the layer of varnish that is applied to them will also burn out. Also, instead of copper color, the windings will be black. An unpleasant burning smell also indicates a problem. In this case, the best thing would be to replace the entire assembly, although you can get by with new windings.
Self check
To independently check the functionality of the solenoid relay, you first need to check the starter itself. The scheme is quite simple. First of all, turn the key in the ignition and try to start the car. If the starter does not work, you will hear a specific clicking sound. This means that the fault lies in the relay.
Without disassembling or dismantling the starter, you can check the mechanism of the device yourself. To do this, bridge two contacts on the rear panel of the traction relay (they look like copper bolts). If the device starts to move (spins), then the problem is in the retractor.
Remember that when disassembling and repairing a car yourself, you should be careful and careful. Follow the instructions to avoid aggravating the damage or getting injured.
VAZ 2106 starter repair
Most faults in the VAZ 2106 starter can be fixed on your own - all the necessary elements for this are available for sale. Therefore, if the symptoms described above appear, you should not immediately replace the starter with a new one.
Removing the starter
To remove the VAZ 2106 starter you will need:
- wrench 10;
- socket wrench or 10mm socket with extension;
- wrench 13;
- screwdriver with a Phillips blade.
The starter itself is dismantled in the following order:
- Use a Phillips screwdriver to unscrew the clamp screw on the air intake hose.
Remove the hose from the air filter pipe and move it to the side. The hose is attached to the air filter housing pipe using a worm clamp - Using a 13 key, loosen first the lower and then the upper nut securing the air intake by 2–3 turns.
To remove the air intake you need to unscrew two nuts - We remove the air intake.
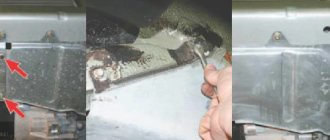
- Using a 10mm wrench, unscrew the two nuts securing the heat-insulating shield.
The thermal insulation shield in the engine compartment is secured with two nuts - From the bottom of the car, using a socket wrench or a 10mm socket with an extension, unscrew the lower nut securing the shield to the engine mount.
At the bottom, the heat-insulating shield is held on by one nut - Remove the thermal insulation shield.
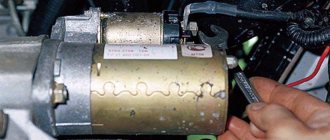
- From the bottom of the car, using a 13mm wrench, unscrew the bolt of the lower starter mounting.
The lower starter mounting bolt is unscrewed with a 13mm wrench - In the engine compartment, using a 13mm wrench, unscrew the two bolts of the upper starter mounting.
The starter is attached to the top with two bolts. - Holding the starter housing with both hands, we move it forward, thereby providing access to the tips of the wires connected to the traction relay.
To provide access to the wire ends, the starter must be moved forward - We remove the control wire connector on the traction relay by hand.
The control wire is connected to the traction relay through a connector - Using a 13mm wrench, unscrew the nut securing the power wire to the upper terminal of the traction relay.
To disconnect the power wire, you need to unscrew the nut with a 13mm wrench. - Grasping the starter housing with both hands, lift it up and remove it from the engine.
To remove the starter from the engine, you need to lift it slightly
Video: dismantling the VAZ 2106 starter
Disassembly, troubleshooting and repair of the starter
To disassemble, troubleshoot and repair the VAZ 2106 starter you will need:
- key to 8;
- key to 10;
- key to 13;
- Phillips-blade screwdriver;
- slotted screwdriver;
- hammer;
- pliers;
- calipers;
- special mandrels for pressing in starter bushings;
- ohmmeter
The work is performed in the following order:
- Using a 13mm wrench, unscrew the nut securing the wire to the lower terminal of the traction relay.
To disconnect the power wire from the starter, you need to unscrew the nut - Remove one spring and two flat washers from the terminal.
- Disconnect the starter winding wire from the relay output.
- Using a slotted screwdriver, unscrew the three screws securing the traction relay to the starter cover.
- We remove the relay.
To remove the traction relay, you need to unscrew three screws - Remove the spring from the relay armature.
The spring can be easily pulled out of the anchor by hand - By lifting the anchor up, we disengage it from the drive lever and disconnect it.
To remove the anchor, you need to move it up - Using a Phillips-head screwdriver, unscrew the two screws on the casing.
- We remove the casing.
To remove the starter housing, you need to unscrew two screws - Using a slotted screwdriver, remove the ring securing the rotor shaft.
You can use a slotted screwdriver to remove the retaining ring. - Remove the rotor washer.
- Using a 10mm wrench, unscrew the tightening bolts.
The main parts of the starter are connected using coupling bolts - Separate the starter cover from the housing.
After unscrewing the coupling bolts, the starter cover is easily detached from the housing - Using a slotted screwdriver, remove the screws securing the windings.
The screws securing the windings are unscrewed with a slotted screwdriver. - We remove the insulating tube from the housing.
The insulating tube is pulled out of the starter housing by hand - Disconnect the back cover.
The starter's rear cover can be easily removed from the housing - We take out the jumper from the brush holder.
After unscrewing the screws securing the windings, the jumper is removed - Using a slotted screwdriver, remove the brushes and their springs.
To remove the brushes and springs, you need to pry them off with a screwdriver - Using a special mandrel, press the bushing out of the rear cover of the starter.
If there are signs of wear on the bushing, install a new one in its place and, using the same mandrel, press it in. The bushings are pressed out and pressed using a special mandrel - Using pliers, remove the cotter pin of the starter drive lever.
The cotter pin of the starter drive lever is pulled out using pliers - We remove the lever axis.
The axle of the drive lever is pushed out with a thin screwdriver - We remove the plug.
- We disengage the lever arms.
- Remove the rotor along with the coupling.
To disconnect the rotor from the cover, use a thin screwdriver to disengage the arms of the drive lever - Remove the drive lever from the front cover.
After disconnecting the shaft, the drive lever can be easily pulled out of the front cover - Use a slotted screwdriver to move the washer on the rotor shaft.
The washer on the rotor shaft is moved using a slotted screwdriver - Unclench and remove the fixing ring.
Disconnect the coupling from the shaft. The locking ring is opened using two screwdrivers - Use a mandrel to press the front bushing out of the cover.
We inspect it and if signs of wear are detected, we install and press a new bushing with a mandrel. The front cover bushing is pressed in using a special mandrel - Using a caliper, measure the height of each brush (charcoal).
If the height of any brush is less than 12 mm, replace it with a new one. The height of the brushes must be at least 12 mm - We inspect the stator windings.
They should not have any traces of burnout or mechanical damage. The stator windings must have no traces of burnout or mechanical damage. - We check the integrity of the stator windings. To do this, connect the first ohmmeter probe to the terminal of one of the windings, and the second to the housing. The resistance should be about 10 kOhm. We repeat the procedure for each of the windings. If the resistance of at least one of the windings is less than specified, the stator should be replaced.
The resistance of each stator winding must be at least 10 kOhm - We inspect the rotor manifold. All its slats must be in place. If we find traces of burning, dirt, or dust on the collector, clean it with fine sandpaper. If the lamellas fall out or there are signs of severe burning, we replace the rotor with a new one.
- We check the integrity of the rotor winding. We connect one ohmmeter probe to the rotor core, the other to the commutator. If the winding resistance is less than 10 kOhm, the rotor should be replaced with a new one.
The rotor winding resistance must be at least 10 kOhm - We reassemble the starter in reverse order.
Video: disassembling and repairing the VAZ 2106 starter
When it's the starter
If after these steps the starter continues to be silent, it means it is broken. To repair it, you need to disassemble the solenoid relay. But how to do this if the mechanism itself is not intended for disassembly? In an old-style relay, you need to unscrew one or two screws and unsolder the wiring that goes inside the device.
Modern devices are non-separable, and in order to open the back panel, you will have to flare the metal body of the mechanism. Flaring can be done with a large screwdriver or pliers. After this you need to remove the cover. To repair, clean the burnt contact plate and the surfaces of the bolts from soot to a shine. The better you clean it, the longer the relay will last you.
Of course, it would be wiser and safer to go to the nearest service station, but for a number of reasons, drivers sometimes repair the car themselves. Saving money and time requires preliminary preparation and certain knowledge in machine repair.
If your car does not start at any time, the starter retract relay may be the cause. However, it is best to check this.
If the battery is charged and there are no faults in the circuit, then the reason lies in the starter itself or its components. the relay is activated and retracted.
On VAZ 2109 vehicles, the starter relay is used to activate the windings and transmit torque from the rotor to the flywheel. When the engine starts, the relay turns off the drive and turns off the power.
Our clients are VAZ cars, including model 2109, which have a standard electronic engine starting system. Here's what you need to know.
- Starter. This is a small electric motor that is briefly connected to the engine flywheel using a coupling (shaft) to cause the flywheel to rotate.
- With its small size, the starter carries large currents through itself.
- If the starting circuit was specifically blocked during ignition, no component of the metering system would be able to withstand such ongoing loads. As a result, they will be burned.
- Therefore, for such purposes, the starter is remotely connected to the battery via a relay. Its contacts are designed for huge currents.
- The starter operates for a short time and should turn off once the engine starts. Otherwise, its active destruction will begin due to the influence of the driving force.
- These tasks are perfectly performed by relics. In fact, the design includes a retractor device that ensures the functioning of a set of accounting programs and current protection, and timely shutdown of the starter.
Before replacing the relay, verify that the engine starting problem is related to this component.
To do this, we will consider two situations that indicate its malfunction.
READ How to Remove the Heater on a Nissan Primera P11
Your actions
The relay clicks, but the armature does not rotate
If there is a click from the relay, check the condition of the valve. To do this, pull the retractor terminals using a large screwdriver or a piece of welding cable toward the terminals at the ends. Running the narrow tab over another screwdriver can burn the terminals. When the armature is working, after the terminals are closed, the armature will be wrapped, which is detected by the sound. As a result, the electromagnetic relay itself has failed and needs to be repaired.
Even if the terminals are quiet after closing, the problem should be found in the starter. The baton no longer plays a role here.
Having discovered that the relay has developed its own skill, it is absolutely necessary to replace it; In other words, repair it if possible.
There shouldn't be any problems with the disassembly process. The main thing to do here is to remove the starter as it holds the required coil. Further disassembly is carried out in the form of an assembly.
- Apply the handbrake, disconnect the battery by removing the negative terminal.
- A large cross section runs from the battery to the relay contact. Of course, turn it off by turning it off with key 13.
- Remove the narrow power cable from the retractor relay.
- Use the same number 13 wrench to remove the three mounting nuts that hold the starter to the clutch.
- Remove the device, of course, from below or from above. If you chose the top, you need to rotate the starter a little around its axis and get it.
- The lower output is more difficult, since the crankcase must be removed. If there is parallel work that requires such manipulations, there will be no problems.
READ Removing Starter Nissan Almera Classic
Special tests of the starter electromagnetic relay. Good electrician.
The next step is to completely replace the rack or try to repair it.
Only relays that have a detachable design can be repaired. Cars often have relays with a built-in housing. Repairs there are also likely, but only partial.
- Remove the two bolts that hold the relay to the starter, disconnect the core bracket from the upper end of the drive arm;
- Instead, replace it with a new cleaning relay after the replacement is completed.
If you're looking to save money or just want to tinker with your wagon, try fixing a bent rail. To do this, you can purchase a detailed annotation for you.
If this measure does not help, we will get acquainted with disassembling and repairing the case.
- The relay consists of a housing with a winding inside, a core with a return spring and contacts.
- The spring disconnects the starter rotor gears from the bending crown when the power to the coil winding is turned off.
- The rear cover of the relay is screwed to the housing. Therefore, first remove this cover by unscrewing the corresponding fasteners.
- Both contact bolts have a nut that can also be unscrewed.
- The washers are visible under the nuts. Do not lose them so they can be returned to their place during reassembly.
- Solder on both sides of the winding, armed with a soldering iron. Then remove the cover.
- If you find traces of carbon deposits on your contacts, you can remove them with a small file.
- There is a rubber O-ring under the cover. Check it for stability and integrity. If the ring is damaged or worn, replace it with a new one.
- Remove the contact plate with the rod.
- Remove the return spring using a flathead screwdriver.
- If the spring is deformed, greatly stretched, it needs constant modification. Otherwise, a worn spring will not guarantee proper contact. As a result, traffic does not go well.
- Disassemble the contact plate. To do this, remove the retaining ring and insulation washer. Then the plate itself will fall out due to the pressure created by the spring.
- Remove the contact bolts from the cover. Glue the surfaces of their contacts. Often the relay stops working due to burns on the contact surfaces.
READ How to Check the CVT on a Nissan Beetle
How to check the starter yourself. Using a battery and two wires)
- If the carbon deposits are very strong and cannot be removed with regular sandpaper, do not rush to get new bolts. Just rotate them 180 degrees. So they will already touch the side where there is no soot.
- The relay windings are housed in a solid housing. If they are damaged, there is nothing more you can do other than replace the pin completely.
- Change what is left for our client to do with the distorted and worn out relay elements, and then collect what is left for our client to do if the opposite occurs. Install the retractor relay as intended and ensure that the ignition returns to normal.
If the relay has a built-in housing, some advise replacing it. However, if you wish, you can even repair this device. To do this, you need to tan the case using pliers, then solder the contacts and remove the cover. Then follow the note above.
The last change step for another repair is to check the winding resistance.
If the unit is working normally, the next indicator will show you the multimeter operating in ohmmeter mode.
Source
The VAZ 2109 starter retractor relay is responsible for inputting and outputting the starter from the state of engagement with the car engine. This small and simple mechanism is of great importance for the normal operation of the internal combustion engine.
VAZ 2106 starter does not work on a hot engine
- To the beginning of the forum
- Forum Rules
- Old design
- FAQ
- Search
- Users
Yes, I haven’t changed anything, and the protection is in place. It all started slowly, i.e. sometimes it didn’t work when hot the first time, then more and more often, and now it’s not possible at all
It happened to me too. Until the starter turned on while driving. The contacts on the retractor are screwed on with a nut, it is unscrewed, the contact dangles - it does not work the first time. Then it completely unscrewed, the contact fell and closed.
Just try changing the retractor.
The contacts are definitely tight - I just recently changed the brushes and checked everything. Are there any other options?
Have you taken it apart (retractor) or something? If it’s collapsible, you have to solder it there, you won’t be able to get there easily. And if it’s non-separable, how did you take it apart? Now they install only non-separable ones.
In principle, even non-dismountable things, after a fair amount of fucking, can be disassembled and reassembled, in the absence of money and time. But it's better to install a new one. And the comrade’s problem is definitely in the retractor.
Source
Principle of operation
It all works like this: when the engine is not running, the armature of the retractor relay is pulled out of the housing due to the action of the spring on it. The same spring holds the Bendix and gear through the fork in a position where there is no engagement.
When the ignition key is turned to the start position, the solenoid relay is first activated.
The electrical energy supplied to the coils of the solenoid relay ensures the appearance of a magnetic field inside the housing.
This field acts on the armature, and it, overcoming the force of the spring, enters the body, after which the retracting coil is turned off and ceases to create a magnetic field, but in the retracted position the armature is held by the holding coil with its magnetic field.
In this case, the armature pulls the fork, which in turn moves the bendix forward along the rotor shaft, and its gear engages with the flywheel ring.
The armature, entering the housing, pushes the starter relay rod, and, moving, closes the contact plates of the positive terminals with each other.
Electricity from the battery is supplied to the brushes of the starter motor, and its rotor begins to rotate. And since the gear has already engaged, the rotor begins to rotate the flywheel.
After starting the power plant and turning the ignition key back, the power to the holding coil stops, its magnetic field disappears and the armature comes out of the housing under the influence of a spring.
At the same time, it disengages the bendix through the fork and stops acting on the relay rod. He, in turn, moving away, opens the contact plates, and the starter is completely turned off.
Price issue
Many owners are interested in how much this device costs and which starter is best to choose for the VAZ 2110. A standard unit from AvtoVAZ will cost about 5,000 rubles. Imported analogues are also suitable for the VAZ 2110. For example, you can take the BOSCH model, which costs about 10 thousand rubles.
There are also budget freelance models on the automotive market; they can be purchased for 3 thousand rubles. Whatever the starter, it should come with a warranty. Of course, the imported version works better, but the standard device has an excellent price-quality ratio.
Assembly
After diagnosing starter problems and identifying breakdowns, the faulty parts are replaced with new ones. The starter is assembled in the reverse order. Before the unit is installed on the car, it is checked using the battery. The driver must remember that such a procedure is recommended even in the absence of obvious problems, and then the service life of the VAZ-2105 starter will be much longer.
Source
- Tuning VAZ 2105 - tuning the interior, engine, bumper, radiator grille of the VAZ 2105
- VAZ 2105 engine: characteristics, malfunctions and tuning
- Repair of distributor on VAZ 2101-07 and VAZ 2108-09 cars
- Starter repair for VAZ 2108, VAZ 2109, VAZ 21099
Dismantling and assembly
Dismantling of the VRS is carried out as follows.
- The terminals are removed from the battery to avoid accidental short circuit and fire.
- The starting device is removed from the machine.
- It is recommended that the starter be thoroughly cleaned of dirt and dust to protect the internal parts from debris.
- Unscrew the brush fasteners, remove the contact from the VRS bolt;
- Unscrew the screws securing the VRS to ground.
- Remove the VRS.
Next, the VRS is analyzed.
- The nuts at the ends are unscrewed.
- HRV is halved.
- The core is removed and needs to be replaced with a new one (if the problem is related to it, which happens in 99 cases out of 100).
The new VRS is installed according to the reverse instructions for dismantling. As a rule, problems should not arise during installation. It is recommended to thoroughly clean and degrease the contacts before connecting the relay.
Bushings
Bushings (aka bearings) are located in front and behind the starter. They are responsible for rotating the device shaft. If these elements are worn out, the starter will start clicking, but will not turn. Problems with bushings can also be caused by the fact that the starter is installed incorrectly, that is, it does not occupy the desired position along the axis. Or the winding could short-circuit. In this case, see the previous paragraph.
Healthy! Also, problems with the bushings will be indicated by “heavy” cranking of the starter, even if the engine is well warmed up.
Although many do not consider bearing failure to be a serious failure, they need to be replaced. Otherwise, the starter shaft will jam, which in turn can cause a fire.
For what reasons can the starter relay fail?
Most often, failure of this device is caused by burning of its contacts. The phenomenon is very common, due to the fact that a high current flows through the relay (from 80 to 300 A). Because of this, a spark gap may form, which causes the contacts to burn. This in turn leads to low conductivity of electrical energy.
Also, a break in the winding is often noted on the solenoid relay. In cases where such a disaster occurs in the middle of the winding, the driver has no choice but to buy and install a new device. But when a break occurs in the soldering area of the winding and contact, the situation can be corrected by replacing the damaged area.