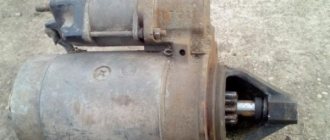
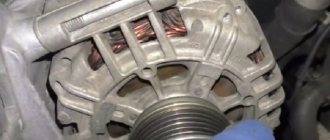
The Bendix or starter drive is a unit consisting of a clutch with a gear and a fork connected to a solenoid relay. The clutch is also called an “overrunning” clutch. Three types of starters were installed on Lada 114 hatchbacks: 29.3708, 423.3708. and also 5712.3708. The first two differ only in the shape of the fork, as well as in the design of parts not related to Bendix. And the starter 5712.3708 is a modern device equipped with a gearbox. The seating dimensions of all starters do not differ in any way. On any car, including the VAZ-2114, replacing the Bendix begins with dismantling the starter. We will look at this operation now.
The following video shows how a starter behaves with a faulty bendix.
Preparing to replace the bendix: removing the starter on a VAZ-2114
The starter can be accessed from above or from underneath. Let's consider the second option: roll the car into the pit and use the handbrake. Next, use a 10mm wrench to unscrew two screws from the bottom (photo 1) and two screws on the side members.
Down with the mudguard!
Finally, remove the screws on the cross member (photo 3) to remove the engine splash guard.
Disconnect the negative terminal from the battery - you will need a 10mm key.
On a VAZ-2114, you can replace the bendix in one way - remove the starter.
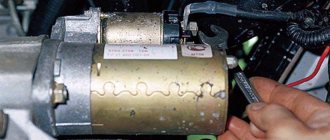
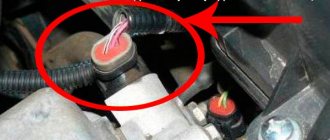
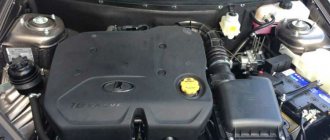
The location of the starter under the hood is marked with a red arrow.
For this:
- Unscrew the nut securing the power wire to the starter (photo 1). Remove the terminal and also disconnect the block with the control wire (photo 2);
Two separate wires
Remove the chip as in the picture
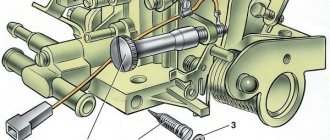
- Using a spanner or socket wrench, unscrew the three fastening nuts - with them the starter is pressed to the crankcase;
Fastening elements
- The assembly can now be removed.
Installation is carried out in reverse order.
The appropriate key size is “13 mm”.
Video instructions for node “5712”
On any VAZ 2114 car, including the starter, the engine starts, and therefore it is so important to promptly identify and correct problems with this unit, due to the breakdown of which, normal driving of the car is, in principle, impossible. That is why it is advisable for VAZ 2114 owners to know how to independently diagnose and repair the starter of this car model.
A starter malfunction is most often determined by the following symptoms: insufficient rotation of the starter due to a drop in power. As a rule, in such cases it is necessary to repair the starter and replace the relay. You should also be wary of voltage surges that occur. However, the most common cause of starter malfunction is idle, i.e., rotation of the unit without engine rotation. This symptom indicates the need to repair the solenoid relay.
In addition, turning on the starter may be delayed or when, after turning the ignition key, the starter simply does not work. These symptoms indicate that the bendix is faulty and needs to be replaced urgently, because although the starter is spinning, the engine does not start.
The tool requires two keys: “13”, “10” and two screwdrivers - flat and figured (cross-shaped).
First, the negative wire is disconnected from the battery.
Then, using a key set to “13”, unscrew the 2 fixing screws located at the top and connecting it to the clutch housing.
Most often there is no third bolt, and if there is one, dismantling requires a lift or an inspection hole.
Then, by pushing the starter forward from the connector in the starting relay, the first wire is removed. Next, use a key set to “13” to unscrew the fixing nut of the wire connecting the traction relay in the starter to the positive terminal of the battery.
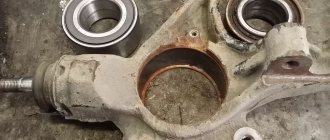
Assess the condition of the flywheel teeth.
Next, you need to unscrew the 2 screws securing it from the starter cover. Next, using a key set to “13”, you need to unscrew the nut securing the starter output winding with the solenoid relay.
Then the washer-bracket is dismantled.
Next, use a “10” key to unscrew and then remove two long tightening screws.
Assess the condition of the bushings.
To disconnect the starter housing, hit its lower part a couple of times or more with a rubber wooden hammer or hammer.
Then use a screwdriver to remove the bendix ears from the fork and replace it.
The order of assembling the parts is reversed and finally the starter is installed in place, connected and its functionality is checked.
To ensure that spark plugs do not bother you for a long time, you need to buy them only in a professional store. Here you can find a huge range of spark plugs at the lowest prices.
Repair of starters 29.3708 and 423.3708
Use a screwdriver to unscrew the screws securing the solenoid relay. Then the relay is removed - its armature is disconnected from the plug.
Down with the relay... and both rings
Taking a tube of suitable diameter, knock the upper retaining ring off the shaft. Then remove the lower retaining ring using special pliers. The top ring must also be removed.
The body is disassembled: the protective cover is unscrewed, the stopper and all washers are removed, then two nuts are unscrewed and the rear casing is removed.
Disconnect the rotor and stator
Next, being careful, dismantle both brushes and remove the brush holder. As a result, what remains is an “assembly” consisting of parts: rotor, front cover, bendix.
Removing the stopper and rotor
Now you need to remove the plastic fork stop from the cover. The rotor is then pulled back.
The Bendix assembly with the fork is easily removed from the cover. Installation of the unit is carried out in the reverse order.
How to disassemble the bendix itself
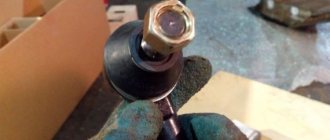
Remove the retaining ring - here you need pliers again. Then the disc and thrust washer can be easily removed. The result is shown in the photo.
Bendix parts separately
Finally, the coupling and fork are simply pulled off the bearing. There shouldn't be any problems.
When installing a new bearing or a new fork, you don’t need to skimp on lubricant. LITOL-24 is suitable here.
Update for starter 29.3708
Above we discussed how starter 423.3708 is disassembled. For the 29th model, everything looks more complicated:
- The relay is mounted on three screws, not two;
- The fork is fixed to the axle, and this axle is removed before knocking out the ring over the bendix;
- To remove the bendix, you need to separate the bearing and fork. To do this, bend the fork eye with a screwdriver.
Points 2-3 are illustrated by one photo.
The 29th model is more “complicated”
Be careful!
Performance evaluation
After completing the work, you should check how the engine starts. The starting engine should run smoothly, without knocking and grinding noises characteristic of a faulty overrunning clutch. This is a sign of a high-quality replacement of the Bendix on VAZ-2109-2115 cars.
In some cases, changing the bendix is not enough. Prolonged operation of a faulty clutch leads to wear and damage to the flywheel teeth. In this case, the symptoms of failure that existed before replacing the gear may become weaker, but do not disappear completely. In such cases, it is necessary to replace the flywheel.
The Bendix or starter drive is a unit consisting of a clutch with a gear and a fork connected to a solenoid relay. The clutch is also called an “overrunning” clutch. Three types of starters were installed on Lada 114 hatchbacks: 29.3708, 423.3708. and also 5712.3708. The first two differ only in the shape of the fork, as well as in the design of parts not related to Bendix. And the starter 5712.3708 is a modern device equipped with a gearbox. The seating dimensions of all starters do not differ in any way. On any car, including the VAZ-2114, replacing the Bendix begins with dismantling the starter. We will look at this operation now.
The following video shows how a starter behaves with a faulty bendix.
Quick repair of Bendix starter 5712.3708
If the starter has been removed, remove the solenoid relay from it by unscrewing the two screws on the housing. Then the four pins are unscrewed and the cover can be moved forward. Everything here looks simpler than in starters of “early” models.
The goal is to dismantle the drive with gearbox
Remove the plastic stop. Then we remove the drive assembly - here it consists of a bendix and a gearbox.
On starters of the “new” model installed on the VAZ-2114, the bendix must be replaced strictly according to the instructions: first remove the gearbox cover, then the three gears, and only then can you knock off the retaining ring.
Removing the gears from the gearbox...
The three axes of the gearbox must be located on a flat surface. Then, taking a hammer and a mandrel, carefully knock down the upper retaining ring.
Dismantling “extra” elements
Both the top and bottom rings will need to be removed from the shaft. Everything here differs little from the starters of the first models.
Finally, you need to remove the plug. The side fastening tab is bent with a screwdriver. This operation is difficult to perform - there is a risk of breaking the plastic.
Removing the plastic plug
There is only one operation left: the bendix without a fork is pulled up from the shaft. We wish you success.
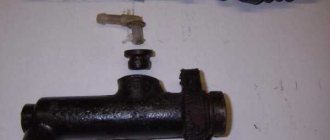
What is Bendix, and in what cases is it required to be replaced?
Bendix is a clutch used to engage the starting electric motor and flywheel when starting the engine. Externally, the element is an oblique gear and is located on the starter shaft. At the moment it is triggered, it moves forward with the help of a solenoid and connects to the flywheel.
When the power supply stops, the gear returns to its place, disconnecting from the flywheel. The amplitude of movement of the clutch is about 10 cm. The bendix is protected from excessive displacement by locking rings.
Signs of a malfunctioning clutch are clearly visible, so the question of how to check the starter bendix usually does not arise. The “symptoms” of a malfunction include:
- a grinding noise in the flywheel area when trying to start the engine;
- the starter rotates idle, without transmitting torque to the flywheel;
- a characteristic knocking sound at the moment the solenoid relay is activated, after which the shaft does not rotate.
A faulty gear is usually not repaired, but replaced. Repairing the element is possible, but such actions are not justified in terms of financial and time costs. Therefore, if the coupling breaks, it must be replaced. If you still want to repair it, a detailed video will be at the end of the article.
Note: if the part extends, but does not engage with the flywheel, proceed as follows: put the car in 2nd gear and manually shift it a couple of centimeters. The position of the flywheel and helical gear changes, after which starting the engine becomes possible. Before attempting to start, the car is removed from gear.
This method is not a repair method, but it allows you to start the engine and get to your home or auto repair shop.
Some recommendations for repairing and installing Bendix
In any case, before installing the starter after installing the bendix, check the entire device. It is advisable to do this at a special stand in the workshop. If this is not possible, then connect the starter to a well-charged battery. There are other important points:
- when disassembling and reassembling, pay attention to the plastic washers: they must be intact;
- when buying a new Bendix, take the old one with you: the mechanisms may have small but important differences that are difficult to remember visually;
- If you are repairing an overrunning clutch for the first time, write down the disassembly process on paper so that you can later reassemble the device correctly.
In conclusion, it’s worth adding: if you want the Bendix to work for a long time, do not run the starter for more than 15 seconds (especially in winter) - give a break for at least a minute. And lastly: a properly repaired and assembled mechanism will last for several more years without problems.
Useful tips
It is worth noting that when buying a new Bendix you need to have an old copy with you. Very often, different couplings differ from each other in small details that are not visually memorable. In the worst case scenario, you may end up purchasing the wrong mechanism.
Note! A cracked or worn plastic washer located on the starter cover can be replaced. If there is damage to the insulation on the mechanism pin, it can be repaired using electrical tape.
Today, any car repair can be performed at a service station, but in some cases you can do without this service. As a rule, this concerns minor repairs or replacement of components in mechanisms. Thus, with the help of video and photos, you can replace the bendix on the starter with your own hands. When disassembling the VAZ starter repeatedly, instructions are not needed, since everything can be done from memory. Self-repair is considered a profitable business, since the price of car service services is far from affordable.