Operating principle of the interior heating system
In normal mode, the system operates as follows.
The coolant (coolant), passing through the engine, heats up, taking heat from it. After which it enters the radiator, where it is cooled again, releasing thermal energy into the atmosphere, and then again sent to the engine. Thus, the coolant circulates in a closed circuit. We will conditionally call this circuit the main one. But the coolant also has an alternative route of movement - through the interior of the car. By setting the interior heating temperature by rotating the corresponding knob on the dashboard, the driver thereby opens the damper to a larger or smaller width, opening the path for the liquid along its second circuit. The wider the damper is open, the more coolant heated by the engine will enter the cabin. Or rather, into the interior heating radiator. But the purpose of this element is still the same - to force the liquid to give up its heat, only not to the atmosphere, but to the interior.
And to make the heat exchange process even more intense, the heater radiator is equipped with a fan that blows warm air into the cabin (the direction of its movement is set by an additional switch - either directly into the cabin, or onto the windshield, or under the feet of the driver and passenger).
Actually, that’s the whole mechanism – everything is extremely functional and nothing superfluous.
see also
Comments 126
I had such an experience recently. This is shit. I washed it and put it back and I’m incredibly happy. The efficiency of this radiator is nothing. The cracks have nothing to do with it. Don't waste your time.
Slit it! I replaced the original radiator with an original one, no result. I replaced it with a radiator from Largus - no result (barely warm air). I closed all the cracks (where the air was blowing from) and it became noticeably warmer. This was enough for me because we didn’t even have a minus yet, but there are still gaps))
yes, I also think that I made a mistake that I didn’t even immediately glue the radiator around the perimeter, well, as they say, the new one is already on the way, the insulation is ready, there will be a new post soon)))))
In theory, the radiator should be removed and sealed on the sides and at the end and everywhere shorter. If you google there is an article somewhere. I sealed it only where I got it without removing it... almost nowhere, roughly speaking. There is a result, it’s enough for me for now, I’m too lazy to shoot again
Stove malfunctions and repair methods
You need to understand that failure can threaten each of the components of the heating system.
Their symptoms and remedies are as follows:
- The air entering the cabin does not heat up. There may be two reasons for this: either a coolant leak has occurred, which should be indicated by a light on the dashboard indicating that the engine is overheating, or the radiator is faulty. Both of these troubles are not so terrible if you detect them in time and contact a car service center. In the first case, it is necessary to determine the location of the leak (this is either a worn oil seal or one of the pipes), eliminate it and fill the corresponding tank with new fluid. In the second case, you will need to replace the Logan stove radiator.
- The fan does not blow warm air into the cabin. Most often, the cause of this is either a faulty motor or a problem in the car's electrical wiring. In both cases, repairing the stove is a job for an auto electronics specialist. As a rule, eliminating this malfunction does not take much time, and in our car service it is carried out in the presence of the customer. Also, the reason for the lack of air flow from the stove may be a clogged cabin filter, through which cold outside air flows to the stove. But if you carry out all the procedures for scheduled maintenance of your car, your car will not face this problem.
Functional load
- The radiator grille is necessary in order to protect the chassis element of the same name from negative external influences. These include the ingress of foreign objects, overheating or hypothermia. If this part is made of chrome-plated components, then it also optimizes the airflow of the radiator honeycombs.
- This element significantly increases the stability of the cooling system. This prevents excessive heating of the coolant.
- The presence of chrome-plated components significantly extends the life of the parts with which such a grille comes into contact.
- Decorative function is a common reason for purchasing a particular car. Although very often car owners tune the radiator grill of the Lada Largus, decorating it in a certain way. There is no need to choose between beauty and functionality.
Why do you need to replace the Renault Logan heater radiator?
Most often, radiator failure (and not only the heater, but also the engine) is caused by low-quality or exhausted coolant. This is why it is so important to replace it regularly. The tank in which it is located is specially made of transparent plastic so that the car owner can determine by color the time when the old coolant will need to be drained and the tank needs to be filled with a new one.
And this procedure itself is far from the most pleasant, so it is better to entrust it to a car service technician. And it is not at all necessary to come to a service station specifically for this - you can change the coolant during the next scheduled maintenance or vehicle diagnostics.
How the device works
The above-mentioned unit is designed specifically for this type of vehicle. It allows you to regulate the direction of movement of warm air in relation to the people sitting there. Thus, a concentrated hot stream is mixed with salon coolness and delivered “at the place of demand.”
The essence of the stove's operation is based on the reflection of the air flow from the plane. The laws of physics work perfectly with it - it spreads, creating rarefaction and draft. It is worth noting that the effectiveness of this device increases significantly if it is located successfully. The overall increase in thrust leads to a significant increase in efficiency, raising its level by 20%.
As practice shows, the stove can be made not only of plastic, but also of metal. Of course, the second option will cost less than the first, but it still loses in design. However, plastic is not as durable as metal, so it is preferable for domestically produced vehicles.
Renault Logan heater radiator replacement
Replacing the Renault Logan heater radiator requires, first of all, detailed knowledge of the design of this car. Different makes and models of cars perform this operation differently. Just to get to this part on Logan, the master will have to remove not only the dashboard, but also a good part of the decorative trim of the interior. Of course, before removing the failed radiator, you will need to let the engine cool (and this takes one and a half to two hours) and drain all the coolant from the tank.
The difficulty of this procedure on Logan is that this car does not have a special hole for draining antifreeze. Therefore, the master will have to use a vacuum pump for this purpose. Moreover, you need to be extremely careful when working even with cold antifreeze, since the vapors of this liquid are poisonous.
Only after there is no coolant left in the system does the actual replacement of the Logan heater radiator begin. Before unscrewing the fastening elements of this part, the technician disconnects the pipes through which antifreeze circulates. If they are worn out and heavily soiled, you can take this opportunity to replace them too - this is unlikely to greatly increase the cost of repairs.
When the new unit takes its normal place, the technician, before adding coolant, checks the tightness of all connections. To be fair, let’s say that you can be completely sure that nothing is leaking only after the new element is connected and tested in operation.
A conscientious specialist will definitely recommend that the car owner carefully monitor the coolant level for the first few days, so that if it does leak somewhere, it can be detected in a timely manner.
As you can see, replacing a heater radiator on a Renault Logan is a very difficult procedure. Therefore, without having experience in this matter, it is better not to tackle it yourself, but to entrust the matter to service station specialists. They will take responsibility for both the quality of the replacement and the quality of the new radiator itself - of course, if it was purchased at a car service center.
Features and sequence of replacement
If the radiator of a Lada Largus car is clogged, you can try to flush it. This will require dismantling this unit. It is also removed from the car for the purpose of replacement. Mounting the radiator is not difficult at all.
Next, we will consider the sequence of manipulations that the owner will need to perform with his own hands so that the radiator is dismantled, and then a new analogue is installed.
- 1. We provide measures for the safe implementation of the event (activate the parking brake, let the engine cool, etc.).
- 2. Remove the crankcase protection.
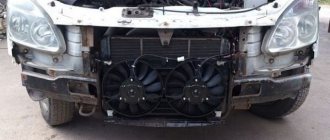
- 3. Then you will have to remove the front bumper of the Lada Largus, since the layout of the engine compartment is such that it will not allow removing the radiator without dismantling this body component.
- 4. We proceed to draining the antifreeze from the cooling circuit. There are no drain plugs on either the block or the radiator assembly. To do this, press the clamp on the lower radiator pipe and remove the hose from the fitting.
- 5. Collect the liquid in a suitable container.
- We dismantle the reservoir of the power steering unit along with the bracket and tie it to the engine.
- We disconnect the entire list of hoses adjacent to the radiator.
- If your car has air conditioning, then you will need to unscrew the air deflector fastener, and then remove this component.
- Disconnect the connector with wires from the electric fan.
- Next, release the air conditioning system pipeline from the corresponding holder on the fan frame.
- Now you need to unscrew the air conditioner condenser fasteners from the radiator. We hang the condenser itself from the upper cross member of the body.
- We dismantle the LADA Largus fan. Here you will need a “10” head.
- After the radiator mount is removed, we remove the product itself, having first disconnected the entire list of supply pipes.
- We begin the installation of the radiator by installing this product in the appropriate mounting brackets in the subframe. Then we hang the brackets.
- Next, we return the fan to its place, not forgetting to connect its drive to the on-board electrical network.
- We attach the pipes, which we fix with new clamps.
- In the station wagon modification with air conditioning, we install the condenser in the corresponding seat on the radiator.
- We mount the LADA Largus air deflector and attach it to the body elements.
- Now we attach the power steering and air conditioning pipelines to the holders on the electric fan frame. We also return the reservoir and bracket for the hydraulic power steering system to their original place.
- Fill with antifreeze. We start the engine, warm it up and check the functionality of the cooling circuit and heating system of the Lada Largus interior.
Replacing the Renault Logan heater radiator with your own hands
During the investigation with the cooling/heating system, I came to the conclusion that in order to increase the temperature in the cabin in winter, it is necessary to replace the stove. The thermostat is new (the old one seemed to be stuck), the antifreeze has been replaced, as it recently turned out - the expansion tank is intact and without any hints. And he let the air out repeatedly. But in winter, in my opinion, it’s still not warm enough, especially when I read how others’ Logans are burning hot. I decided to at least give the stove a whirl, maybe it had clogged up in 8 years. Initially, I was tormented by a dilemma: flush the system and replace only the stove, or also replace the main radiator, since one of its top mounts is broken and the seal is ensured by a cold-welded seal, and a steel tension wire is responsible for its position in space. The nuance is that when flushing, the stove radiator is most likely clogged, since it has the narrowest channels. So it’s worth flushing with the old stove radiator. Again, factory-made flushing compounds are added to the antifreeze, which implies its irreversible loss and the addition of a new one. But on the other hand, I have no complaints about the main radiator other than unaesthetics and improper mounting, but the budget for the event increases rapidly when replacing both radiators. Although on a trip to the south in Volgograd traffic jams a couple of times the temperature crawled by 6 notches, it was over 35'C. I'm sinning with a fur coat between the Conder radiators and the main one, especially since the distance between them is minuscule - the Conder radiator is dented inward. You need to remove the bumper, disassemble them and see what’s there, wash them. Judging by the video watched today, the condenser is attached to the main one with two Torx screws from the bumper side. And today, while torturing a search on logan.ru, I came across an interesting idea - when replacing the stove, you don’t need to drain the antifreeze, you just need to clamp the pipes. Brilliant! The dumbest and simplest option, just for me, especially since I have something to clamp. I received the ordered radiator, a clip to replace the one that was broken for lining the rack, and I bought a liter of antifreeze and a bottle of distillate on the way.
Repair
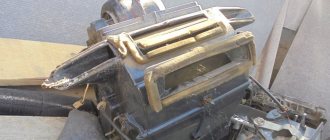
After a thorough diagnosis, as a result of which we can say with confidence what caused the malfunction, we can begin repairs. To do this, you can use the services of specialists from service stations or carry out the repairs yourself. This type of repair is not complicated and does not require special knowledge and skills. The set of tools is minimal (a set of heads and a pair of screwdrivers). In order to remove the Largus stove motor, the manufacturer recommends dismantling the entire tidy. But this takes a very long time and in some situations is almost impossible (for example, if a malfunction is discovered on the road). This repair can be done by unscrewing part of the panel and bending its edge. But this method is not suitable for all configurations. If the car has additional sound insulation installed, then dismantling with the dashboard bent will not be possible. In this case, we can give one recommendation: try to unscrew part of the panel and remove the fan, and if that doesn’t work, then dismantle the whole panel and only then proceed with replacement.
Method 1
- Remove the side trim (from the dash to the roof) on the passenger side.
- Unscrew the two screws securing the torpedo at the top and bottom (the top one is behind the side trim, and the bottom one is under the oval plug).
- Next, you need to unscrew the screws under the center console from below (to the right and left of the heater control unit).
- Remove the radio and disconnect it from the electrical wiring.
- Behind it there is another fastening screw.
- Then you need to unscrew the screw behind the oval plug at the bottom, on the driver's side.
- Next, you need to pull the torpedo towards you and either substitute something, or you will need an assistant who will hold it in this position.
- Then we put our hand behind the dashboard and feel for the fan cover.
- Disconnect the terminal and, pressing the latch, turn it 90⁰ and pull it towards you.
- Next, we diagnose the motor itself with the impeller and decide: either a complete replacement or repair will be required.
- Then we collect everything in reverse order. There is a small nuance: if there is a pin on the cover where the terminal connects to the motor, then you first need to put the terminal on the pin, and then connect the terminals.
If you still can’t get it, then you shouldn’t pull the torpedo any further, otherwise you might break the fastenings. But restoring them will be more difficult, and a more serious tool will be required. In this case, you must continue to unscrew the panel to dismantle it. If, apart from replacing the electric motor, nothing needs to be done behind the dashboard, then it is possible not to completely remove the panel, but only partially, sufficient to provide access to the engine.
How to replace the stove tap on Niva 21214
Method 2
- Remove the driver's side trim.
- Unscrew the screw located behind it.
- Open the fuse cover.
- Remove the lever from the headlight range control and unscrew the range control itself.
- Take out the instrument panel.
- Remove the steering wheel (if the car is equipped with airbags, you must first remove the airbag).
- Next, you need to take out the glove compartment light and remove the terminals from it.
- Release the diagnostic connector (bend the latch and push it inward).
- If there is an airbag on the passenger side, you will need to remove the airbag switch and disconnect it from the electrical wiring.
- Unscrew the heater control unit and disconnect the terminals.
- That’s it – the panel is free, now you need to pull it towards you (you don’t need to pull it hard, if it doesn’t work, it’s better to check if everything is unscrewed and disconnected).
- It is necessary not to pull too much, just to ensure free access to the electric motor.
- Then we repair or replace the engine and install everything in the reverse order.
All work takes a small amount of time, and this type of repair can be done even by a non-professional. Of course, with a little repair skills, you can get the job done much faster and with better quality. It is easier to replace the electric motor without removing the entire dashboard, but with it removed, access is much better, and additional repairs can be made behind the instrument panel. And by following the recommendations described above, this will be easier.
Causes of heater malfunction
If it’s getting cold inside your Renault Logan, you shouldn’t be depressed and sound the alarm, because most of the stove breakdowns can be repaired with your own hands. So, let's figure out what breakdowns are most common on older Renault Logans related to the operation of the cabin heater.
See:
- There is an air lock in the heat exchange system, the radiator does not heat.
- The thermostat is faulty, the engine does not heat the fluid.
- The water pump is not working properly.
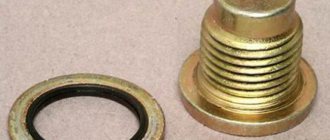
- Logan's heater radiator is clogged.
- Engine malfunction.
- Weak air flow or no heat at all.
- The fan motor is faulty.
- The fan speed controller has failed.
- The Renault heating system tap does not work.
Listed above are the most common malfunctions of the Renault Logan . Next we will talk about each problem separately.
Operation of electric windows when the ignition is turned off
Quite often, Lada Largus owners complain that the power windows do not work when the ignition is off or the key is in ACC.
This can be corrected by a small modification of the car's electrical circuit. Video on how to make power windows work on a Lada Largus without ignition:
To perform this work, you must remove the interior fuse box.
It is worth recalling that this modification, like the previous one, must be carried out with the battery disconnected!
First of all, you need to find fuses F13–F16, which are responsible for the functionality of the ESP, after which, carefully bending the terminal clamps and pulling out the plastic clip, remove the power supply strip.
The removed strip is divided transversely into two parts. The first part returns unchanged to the place corresponding to fuses F15 and F16.
A thick copper wire with a cross-section of approximately 1.5 squares is soldered to the remaining second half, which, in turn, is soldered (screwed) to any thick wire that receives power when the key is turned to the ACC position (or has constant voltage - as you like).
The modified half of the strip is installed in place, the mounting points are isolated, the fuses are returned to their place and reassembly is carried out in the reverse order of disassembly.
Hello, dear friends! Today we will be a little creative, reflect and prepare the ground for further action. And why all? Yes, because the topic of our conversation will be tuning the Lada Largus.
This is a popular car in Russia and the CIS countries, which is closely associated with the French auto company Renault and received a lot from it. Therefore, the current Lada Largus compares favorably with outdated domestic station wagons.
Yes, Largus is a full-fledged station wagon or van, as some are used to saying. Even the presence of the prefix Cross in the name does not make it a full-fledged crossover.
I would like to discuss with you possible improvements for the Lada Largus, and also separately tell you a little about the Cross version. If you are ready, then we can begin.
Troubleshooting
To troubleshoot a Renault heater , we will try to reveal the essence of each of them.
- An air lock in the Renault heating system can be caused by earlier work to replace antifreeze. As a rule, the cooling system of a Renault Logan car is designed in such a way as to automatically get rid of air pockets. The video guide shows how to change the timing belt and drive belts on a Volga Cyber with your own hands. Despite the perfection of this design, air pockets still appear, as a rule, during the process of repairing the cooling system. There is one simple way to eliminate an air lock on a Renault Logan. Removing the front bumper on a Renault, how to reliably solder the bumper part 1 u.p. No. 196. Disconnect both pipes from the cabin heat exchange, then, connecting each pipe in turn, pour coolant into the expansion tank. After such manipulations, the antifreeze should flow through the opposite tube, at which point you need to insert the second hose into place. How to remove and install sills on a Renault Duster: photo. Usually after such actions the stove heats noticeably better.
- If the thermostat does not work on a Renault Logan, the engine does not reach the required operating temperature, as a result of which the coolant is not able to warm up the heater radiator. To solve this problem, it is enough to change the thermostat, fortunately this is not difficult to do. The thermostat housing is located at the bottom of the cylinder head near the gearbox housing.
Radiator Grille Installation
The process is also not complicated. Installation should begin from the top of the grille, then fix the grille fasteners from the bottom.
The whole process is also shown in the video:
What is the benefit of replacing the standard radiator grille?
- Updated appearance of the car.
- Remove nameplate/logo.
- Improved radiator protection from midges and stones.
Do you want to attract even more attention to your car? Install beautiful alloy wheels.
Found an error? Select it and press Ctrl+Enter..
In accordance with the Lada Largus maintenance regulations, we replace the coolant every 90 thousand km or after 3 years, whichever comes first.
LADA > Largus
We carry out the work on a cold engine, placing the car on an inspection ditch or overpass. If the engine is hot, you need to let it cool and then relieve excess pressure in the cooling system by unscrewing the expansion tank cap.
From the bottom of the car we remove the protection of the power unit. How to do this can be found in the article “ Lada Largus: changing the oil and oil filter in a 16-valve engine .”
The radiator and cylinder block do not have plugs for draining fluid.
We place a wide container with a volume of at least 6 liters under the radiator. To reduce the intensity of liquid drainage at the initial moment, the cap of the expansion tank should be tightly screwed on.
Replacing the heater fan (heater) for Renault Logan, Sandero, Duster, Lada Largus
Detailed video
- instructions for removing and installing a heater fan (
heater
, air conditioner) without dismantling.
Attention! Before carrying out this work on Renault Logan, you must first drain the antifreeze into a separate container.
See:
- If the Renault Logan water circuit pump does not work correctly, it does not produce the proper pressure, coolant cannot flow into the heater radiator, and accordingly it does not heat the air. A detailed article on how to replace a low beam lamp on a Renault Duster, article numbers are given, there is video and photo content, tips on replacement and selection. This problem usually leads to engine overheating, so the water pump needs to be replaced urgently. Video review on how to remove and install the front bumper on Renault Logan and Lada Largus cars with your own hands. In order to change the water pump, it is necessary to disassemble the gas distribution system and drain the antifreeze in advance.
- If the car was previously operated carelessly, and water was poured into the system instead of antifreeze, corrosion products may well clog the interior heater radiator, which in turn negatively affects its operation.
Unfortunately, cleaning the radiator of the Renault Logan heating system is not practical. How to replace generator bearings for Renault Logan 1.4-1.6 (2008-2014). Replacement instructions, catalog number, dimensions. Video description of the procedure for replacing all lamps in a Renault Logan headlight unit with your own hands. This part needs to be replaced.
To replace this part, it is necessary to disassemble the cabin heater body, first freeing the cooling system from antifreeze.
- This fault can cause air pockets in the cooling system. According to the video for the Renault Logan fan, just like on the Renault, then you need to remove the fan itself. Due to engine overheating, the cylinder head gasket may be damaged, thus allowing gases to enter the water supply system. With the engine running, open the filler neck of the expansion tank and pay attention to the condition of the antifreeze. If air bubbles enter the reservoir, this indicates a faulty cylinder head gasket.
- This problem is due to poor air conductivity by the Renault cabin filter. » Video gallery » Russian rock » eyelashes on nissan ti >
heater motor Largus — search on DRIVE2
Characteristics of LADA Largus – on the official LADA website
Stove fan repair Izhevsk / instrument-remont.ru
Replacing the heater motor for Logan, Largus, Duster without removing it.
Review from the owner of Lada Largus
- with your own hands. In this video, I will try to explain how you can change stove motor
to Largus
, Logan, Duster, without removing the dashboard, but only.
#26 Furnace, problem and temporary solution. — Lada Largus.
Review from the owner of Lada Largus
After all, this is Logan, a stove
It costs pennies and is easy to find, so I won’t create a problem. went to the same day.
Heater motor lubrication - Lada Largus, 1.6 l., 2013.
“Your hands, Frenchman, are not entirely straight, and despite my sincere respect for you, I will be forced to remove them from your shoulders right now.”
Malfunction of the “Stove”, the stove does not blow - Lada Largus.
Review from the owner of Lada Largus
Removing and installing the condenser
To complete the task you will need keys: key for 7; Torx T30; socket head 10; pliers; flat blade screwdriver; container for drained liquid.
Disconnect the negative terminal of the battery.
We remove the refrigerant from the air conditioning system, as indicated in the article “How to unload and load refrigerant from the Lada Largus air conditioning system”
Removing the radiator deflector (article - removing the radiator)
Using a 10mm socket, unscrew the bolt securing the tube flange and disconnect the high pressure tube from the condenser.
Remove the O-ring from the tube
Use a 10 mm socket to unscrew the bolt.
Disconnect the compressor tube from the condenser
Remove the O-ring from the tube
Using a 7 head, unscrew the four screws securing the condenser to the radiator of the cooling system
Lifting the condenser on the right side, remove the condenser bracket from the holder on the radiator of the cooling system. We also remove the bracket from the left side of the capacitor
Condenser installation
Install the capacitor in reverse order.
Before installation, you need to add compressor oil to the condenser in the amount according to the table in the article “How to unload and load refrigerant from the Lada Largus air conditioning system”
We insert the capacitor into the opening of the radiator frame and install its supports into the mounting points in the radiator housing
We remove the plugs from the tubes and the condenser and install new O-rings on the tubes
Apply Sanden SP 10 compressor oil to the sealing rings
We connect the tubes to the condenser fittings and secure them with bolts. Tightening torque of tube bolts – 8 Nm
Installing the front bumper
After this, we evacuate the system and charge it with refrigerant.
Checking the air conditioning system for refrigerant leaks
Source
2271-3-7-07-03 (Copy)
We fill until the liquid begins to flow out through the air outlet fitting. We wrap the cap of the air release fitting and the cap of the expansion tank.
Let's start the engine. When the engine warms up, the outlet (lower) radiator hose should be cold for some time, and then quickly heat up, which will indicate the beginning of fluid circulation in a large circle. After waiting for the cooling system fan to turn on, stop the engine. After the engine has cooled, check the coolant level. If necessary, we bring it to normal.
Tuning methods
If you start from the specific amount of money, time and features of the appearance of the Lada Largus, then you can use one of the methods presented below for tuning the radiator grille.
Economy tuning
Such a modification is made using inexpensive elements and means. Basically, it is carried out independently, that is, without the help of special service workshops. Its main advantage is considered to be the minimum material costs. As for the shortcomings, without a sufficient amount of time and certain knowledge in this area, adequate improvement is impossible.