The Kalina car has a fairly simple design, thanks to which experienced car owners can carry out most routine repairs and restoration operations in a personal garage. With your own hands you can:
- replace the air pump and air filter;
- replace the ignition system module;
- change the diode bridge;
- remove air from the cooling system;
- dismantle the water pump and replace it with a new one;
- change the protective cover of the grenade, replace the worn, crisp CV joint with a new part.
Grenade
The Kalina CV joint or “grenade,” as car owners call this unit in driver’s slang, is a mechanism that transmits rotation to the wheels. Structurally, grenades are quite simple, while ensuring rotation of wheels that are not located parallel. The functional unit is securely covered under a ribbed cover containing lubricant inside. After several years of hard work, the rubber boot of the hinge exhausts its service life: its surface becomes covered with tears, allowing lubricant to seep out, and dust and water begin to actively penetrate into the unit from the external environment. If the defect that has arisen is not detected in a timely manner, the Lada Kalina grenade can very quickly fail, since the mechanism does not tolerate moisture, sand and dirt falling on the contacting surfaces. Prevention is always cheaper than treatment, so it will be much cheaper to change the boot than to wait for a breakdown and replace the entire device.
Replacing the outer CV joint on a Viburnum with your own hands - Automaster
CV joint (constant velocity joint - approx.) or popularly just a “grenade”, is designed to transmit torque to the wheels of a car. CV joints can be internal or external, and the devices themselves are quite simple in technical terms and consist of a ball bearing that rotates transversely to its axis.
In the video, replacing CV joints on a Lada Kalina:
Failure of the CV joint on the Lada Kalina is a very common occurrence, and the main reason for its failure is torn anthers. Because, together with dust and water falling under them, the lubricant turns into thick mud, and it is no longer able to fully perform its functions.
Replacing a grenade on a Lada Kalina with your own hands
A constant velocity joint (CV joint) is a unit through which torque is transmitted from the transmission unit to the drive wheels. This device is also popularly called a “grenade”.
There are both external CV joints, which directly engage the wheel hub, and an internal CV joint, which is adjacent to the gearbox. Both hinges on one side of the car are connected to each other by a metal pipe, and the entire structure is called an axle shaft.
It happens that malfunctions appear, so many drivers are interested in how to change them.
The CV joint device is not particularly complicated. The unit includes a housing, a boot and a bearing, the separator of which is capable of rotating at different angles to the axle shaft, providing the ability to transmit rotation when the wheels are turned through the steering, therefore, using the tips, you can figure out on your own how to change the CV joint.
The video demonstrates the procedure for replacing the CV joint in the Lada Kalina chassis:
For models of domestic origin, including the Lada Kalina, failure of the hinge we are considering is a fairly common case.
The most common factor causing the breakdown of this unit is a torn boot.
This is due to the fact that dirt and moisture enter the working area of the hinge, eventually washing away the bearing lubricant, which causes wear and loss of functionality. And the outer CV joint needs to be replaced. You can do this procedure yourself.
Source: https://kip-pribor.ru/drugoe/zamena-naruzhnogo-shrusa-kalina-svoimi-rukami.html
How the malfunction manifests itself
The Lada Kalina CV joint is a unit designed to work in extreme conditions. Accordingly, this device has a solid margin of safety and high-quality protection from adverse factors - a boot made of durable rubber, hermetically isolating the mechanism from the external environment. If the car undergoes maintenance on time and is carefully maintained by the owner, and is used on good highways, then both external and internal CV joints work flawlessly for a long time, without causing any complaints.
When the car is used to travel over rough terrain, where potholes are common, the hinges, which experience extreme loads, can be damaged. In addition, the breakdown of this functional unit may be due to other circumstances:
- production errors;
- use of material that does not meet technical requirements;
- use of low quality lubricant;
- clogging of the internal space.
If the owner of the car begins to hear a metallic grinding, clicking or crunching noise while driving along the highway, you should check the integrity of the boots and the functionality of the outer and inner CV joints at the first opportunity. If any of the components fails, it is completely replaced.
How to replace the CV joint boot on a Lada Kalina?
We will replace the boot on the removed axle shaft, this will simplify and speed up the work process.
1. Place the car on a flat surface, tighten the handbrake and place wedges or something similar under the rear wheels to prevent the car from rolling.
2. Take the “balloon” and start removing the wheel. Don't rush to jack up the car; remove the bolts while the car is standing on four points. After this, you can jack up one side on which the work will be done. It is dangerous to work on a jack, so be on the safe side and place a block or metal jack under the car.
3. Using a flat-head screwdriver, pry up the protective cap and remove the wheel arch liners (if any).
4. Place a container under the drain hole of the gearbox, unscrew the plug and drain the transmission oil.
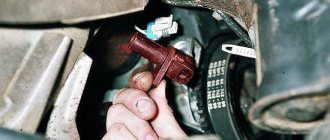
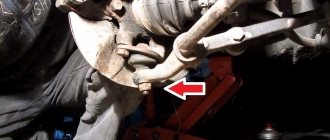
5. Next, you need to unscrew the two mounting bolts that secure the ball joint to the steering knuckle.
6. Now you need to unscrew the hub nut. To do this, you need to fix the hub; to do this, just press the brake pedal. If you have no one to help you, use some kind of device that will apply pressure on the brake instead of an assistant.
7. We take out the thrust washer, then turn the wheels to the extreme position (it all depends on which side the replacement is happening from) and squeeze the outer CV joint out of the hub. To prevent the drive shaft from falling, it is better to hang it with a piece of wire.
8. Using a pry bar, press the inner CV joint out of the box with one hand, and hold the drive shaft itself with the other hand.
Important note! If you need to remove both drive shafts, you should insert the old CV joint into the box before pressing the second shaft in its place. If you do not do this, the alignment of the side gears will be disrupted, after which you will not be able to install the drive shaft.
9. Take the drive shaft and fix it in a vice, then use a screwdriver to remove the old clamps and cut off the old boots (if they are damaged). If the anthers are in order and will be installed back, there is no need to cut them off.
10. Next, using a hammer and a soft metal or wood socket, knock the outer and inner CV joints off the drive shaft.
11. Using a washing liquid (kerosene, gasoline, etc.), rinse the “grenade” and check the condition of its parts. If during the inspection you did not find anything suspicious (violation of symmetry, play, crack development, etc.), you can begin installing new boots on the shaft.
12. We put on the boots carefully so as not to tear them, then we fill the outer CV joint housing with special lubricant, after which we install its drive shaft. Then we fill the hinge until it clicks.
13. Next, using pliers, squeeze the clamp on the boot on one side. Squeeze the boot slightly to release the air, then tighten the boot clamp on the other side.
14. Replace the retaining ring of the inner CV joint and lubricate its splines with graphite grease, then carefully install the hinge into the gearbox housing.
15. We fix the shaft in the side gear; to do this, take a wooden block, place it on the drive shaft and hit the block with a hammer along the axis of the drive shaft.
Further assembly is performed in reverse order.
How to identify a malfunction?
CV joint is a design that is a complicated version of the cardan and gear drive. Just like the cardan, the grenade ensures the transmission of torque when the direction of the axes changes. And just like a gear drive, a CV joint engages between the driving and driven elements, only the role of the teeth in this case is played by balls moving in the longitudinal recesses.
Since the balls constantly move along the grooves, metal is produced there over time, which leads to the appearance of extraneous noise. If you ignore the first symptoms of a serious defect and postpone inspection of the grenades until later, one of the units may collapse during the trip.
Replacement
Cars July 19, 2017
"Lada Kalina" is a front-wheel drive car in which the engine and gearbox are located transversely relative to the body. The drive to the wheels is carried out through the main gear.
Torque is transmitted through constant velocity joints (simply CV joints, or “grenade”). There are several of them - internal and external. Despite their reliability, these elements can fail.
Well, let's look at how to replace a “grenade” on a Kalina, what tools are needed for this and what are the signs of a malfunction.
Device
In terms of their design, the inner and outer CV joints are very similar. Thus, the design of the element includes:
- Half shaft.
- Clamp and boot.
- Clip.
- Hinge housing.
- Separator.
- Ball.
- Retaining and cone ring.
- Spring washer.
Thanks to this device, the elements are capable of transmitting torque to the wheels at an angle of up to 45 degrees (not only in the horizontal, but also in the vertical plane).
How to determine a breakdown?
The grenade is a ball bearing, the cages of which have transverse grooves. Due to this, the angle between the driven and driven axle shaft changes. Thus, the CV joint not only transmits torque, but also changes the angle between the axle shafts. In view of this, over time, it develops.
In places where the parts do not fit tightly, backlash and extraneous noise are formed. In fact, this is accompanied by a characteristic crunch. It occurs due to large wear on the balls that move along the grooves. The crunch can appear both during straight-line movement and when turning. In the latter case, most likely, the external grenade of the Kalina requires replacement.
Disassembly algorithm
When a decision is made to dismantle the outer CV joint for replacement, proceed according to the following scheme:
- Using a gate extension, the wheel bolts are torn off and the hub nut is unscrewed.
- The car is lifted off the floor with a jack.
- The wheel is dismantled.
- The fastener of the ball joint is unscrewed.
- Having turned the steering wheel as much as possible, you need to press the steering knuckle and remove the hub with the hinge. In this case, you can help yourself a little with a hammer.
- The damaged protective cover and clamps are removed from the grenade.
- To dismantle the CV joint, special equipment is used. If it is missing, the hinge can be knocked down with gentle blows of a hammer.
Let's get to work. Dismantling the CV joint
First of all, put the car on the handbrake (or install anti-rollbacks). Then we remove the wheel bolts and hub nut. The latter may not be supplied, so we use an extension cord. Next, place the car on a jack, lift its front part and remove the wheel. Then we find two bolts that secure the grenade to the steering knuckle.
Now we twist the steering wheel to its extreme position (so that the disc looks out of the wheel arch). Pull back the steering knuckle along with the shock absorber strut. Next, remove the outer part of the hub with the external “grenade”. If it is tight, you can use a hammer. But you need to hit through a wooden block, otherwise the part will be seriously damaged.
Next (if it is an external hinge) remove the old boot and clamp. Now you need to get the “grenade” itself out of the hub. To do this, you can use a puller or hit the CV joint with a hammer. In this case, you need to rotate its axle shafts.
If it is intended to replace the internal “grenade” on the Kalina, all operations are carried out in a similar way. The only thing is that the part is removed from the box using a pry bar, without hitting it with a hammer.
Installation of spare parts
Replacing the CV joint on a Kalina car is done as follows:
- A protective cover is put on the axle. To make work easier, the axle can be treated with lubricant.
- Lubricant is placed in the hinge.
- Lubricant is added inside the protective cover.
- With gentle blows using a wooden block, the grenade is mounted on the axle shaft.
- When the installation of the CV joint is completed, air is removed from the protective cover and fastening is carried out using clamps.
- The steering knuckle is mounted, the hub nut is fixed, and the wheel is mounted in place.
- All fasteners are securely tightened and the car is removed from the jack.
Replacement of internal and external CV joints - affordable price, impeccable quality
In a car service, replacement of CV joints, internal and external, is carried out with a minimum of discomfort for the car owner: quickly and at an affordable price. Carrying out such a responsible operation as replacing the outer or inner CV joint on a car, our craftsmen guarantee the exceptional quality of the work performed and the spare parts used.
Replacing a CV joint (replacing a grenade) - the design and principle of operation of this unit
CV joint - or constant velocity joint - is a device that transmits torque from the differential to the wheels. The CV joint consists of the following parts:
- Frame;
- Separator;
- Clip;
- Balloons;
- Clamps;
- Retaining rings;
- Protective cover (dust boot).
The spherical body has grooves for the balls, just like the CV joint cage. The cage is designed to hold the balls in position (just like any regular bearing). Thanks to its design, this joint can transmit rotation at almost any angle of deflection of the shafts (up to 350 degrees), and transmit it evenly. The boot also protects the internal surfaces of the hinge from moisture, dust and dirt, which increase friction and prematurely wear out this unit.
Prices for replacing the CV joint boot
| Name of works | Domestic cars | Foreign cars: | SUVs, minibuses |
| Replacing the drive assembly | from 1,000 rub. | from 1,500 rub. | from 1,500 rub. |
| Replacing the CV joint | from 1,000 rub. | from 1,500 rub. | from 1,700 rub. |
| Replacing the CV joint boot | from 1,200 rub. | from 1,500 rub. | from 1,600 rub. |
Replacing a grenade (CV joint) - signs of a malfunction of this unit
A malfunction of the outer CV joint and the inexorably approaching replacement of the outer CV joint will show the following symptoms:
- Distinct clicks from under the wheels when turning;
- Barely perceptible jerks at the moment when the car starts moving.
These signs intensify on potholes, when moving over snowdrifts and holes. And replacing the outer CV joint (outer grenade) becomes obvious. Moreover, replacing the outer grenade is required somewhat more often, because it is these CV joints that are subject to increased loads, since the rotation angles at the hub of this joint are much greater.
There is another surefire way to make sure that the outer grenade needs to be replaced:
- Turn the steering wheel as far as possible;
- Start moving (slowly);
- If a crunching sound appears from below, you should carefully check the outer CV joint - it may have failed and needs to be replaced.
The inner CV joint is checked in a slightly different way:
- Grab the drive shaft with your hand.
- They shake it and try to rotate it around its axis.
- If the backlash is increased, then replacing the inner CV joint (grenade) is not far off.
Replacing the internal grenade (internal CV joint) - algorithm
- The car is raised (you can lift only the front or rear of it using a jack).
- Unscrew the hub nut.
- Remove the desired wheel.
- Unscrew the ball.
- Unscrew the 6 fasteners of the internal grenade to the gearbox flange and remove the axle shaft.
- Remove the stop ring.
- Remove the inner CV joint from the axle shaft.
- Change the boot.
- Mount a new grenade on the axle shaft and perform reverse assembly in a mirror order.
Replacing the outer CV joint (outer grenade) is an important nuance
A number of motorists believe that replacing a grenade is a simple operation, feasible even for an inexperienced driver. However, incorrect replacement of the outer grenade can lead to an unpleasant phenomenon when the car begins to noticeably move to the side where the new CV joint was installed. As a rule, a more correct, or even better, professional replacement of the outer CV joint eliminates this symptom.
There is another fairly simple but important operation with CV joints - replacing the grenade boot in the event of its depressurization. If carried out in a timely manner, it can protect against complete replacement of a CV joint that has become worn out due to dirt and moisture getting into the joint.
Replacing a grenade - price and other advantages of contacting Maximum Security
In addition to competitive prices, our company is ready to offer high speed and quality of service. We carry out grenade replacement, that is, replacement of the internal and external CV joints, for cars of any makes and models, including VAZ 2109, VAZ 2110, VAZ 2114, VAZ 2115, Toyota and many others.
Preventing grenade malfunction
Under normal conditions, these joints travel over 300 thousand km. Having a reliable design, the CV joint is able to withstand serious loads, but not in the presence of sand and dust. It is enough to burst the rubber of the protective cover, and the lubricant, mixed with dirt, will turn into a thick abrasive paste, which will inevitably undermine the health of the mechanism. Thus, it is necessary to periodically carry out external inspection of grenades in order to promptly detect damage to the anthers. At the first hint of a leak in the seal, repair and replacement should be carried out.
With torn rubber, a grenade can certainly drive for some time, but the longer repairs are delayed, the more expensive it will have to pay. Even if you change the grenade yourself, the cost of repairs will reach 3 thousand rubles, and there are several such units on the car.
Replacing the outer CV joint
In the process of replacing the outer CV joint
The work of replacing an outer or inner CV joint is not very difficult and can be done by any motorist who has at least once repaired a car with his own hands. And in order for the repair to be easier and faster, you need to prepare the following tools:
- Socket heads for “17” and “30”.
- Driver or ratchet.
- Extension for the wrench.
- Jack.
- Wheel chocks.
- Hammer.
- Vise.
Step-by-step disassembly procedure
After you are convinced of the malfunction of one or another CV joint, you can begin to work.
- First of all, we tear off the mounting bolts from the wheel and the hub nut, then we set the wheel chocks under the rear wheels. (To make it easier to tear off the nuts, it is better to use an extension for the wrench - approx.).
- We put the car on a jack and hang the wheel.
- We remove the wheel and, for greater reliability, place it under the car next to the jack.
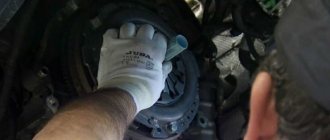
- Now that this picture appears before you, all that remains is to unscrew the 2 bolts that secure the ball joint to the steering knuckle.
Unscrew the bolts marked with a red marker on both sides.
CV joint VAZ. Lada grenade. Comparison of different manufacturers
They counterfeit everything related to the AvtoVAZ assembly line. Any part purchased at a car store can be a counterfeit...
BEWARE OF FAKE! CV joint LADA Image. features
CV Joint Review
(grenades) for VAZ 2108-2115.
Without causing strong blows, the CV joint will move out of place
If the internal CV joint is supposed to be replaced, then work 1 to 6 should be performed as well, after which, using a pry bar, we remove it from the gearbox and take out the entire assembly.
We take the inner CV joint assembled with the axle shaft to a vice where we clamp it and dismantle it.
- After the “bare” axle shaft appeared before us, the work on removing the CV joint can be considered completed.
Step-by-step assembly procedure
Work on assembling all parts should be carried out in the same order as removal, however, there are some nuances in these works.
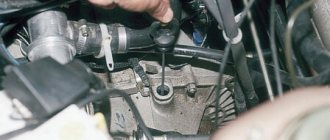
- First of all, we put the new boot on the axle shaft; this may cause some difficulties. To make the task easier, the axle shaft can be coated with lubricant.
- Then add lubricant to the CV joint.
New lubricant added to CV joint
All work on changing the CV joint, if the work is carried out correctly, will not take more than 1.5-2 hours. You can check the quality of the work performed immediately after the repair. If you start driving with the wheels turned to the side and there is no crackling, squeaking or noise, it means that the repair was carried out correctly and the car can be safely operated further.
Driving type
It has been noticed that aggressive driving can finish off grenades much earlier than the allotted time. If careful drivers sometimes have grenade boots that last for 15 years, then a reckless driver will have to repair the unit after only 3 years. The service life of hinges and anthers can only be extended by periodic visual monitoring of the condition of the protective covers, as well as a quiet ride.
We recommend reading:
- Improving the hood of the Lada Kalina car
- We screw the fog lights on the Lada Kalina
- Selection of covers for Kalina
- Optimal tire pressure for Lada Kalina
- Spare parts and accessories for Kalina
- Guide to replacing Kalina brake pads
Assembly procedure step by step
Replacing the boot of the outer CV joint of Renault Logan, as well as the inner grenade and oil seal with your own hands
We carry out the entire list of assembly operations in a Lada Kalina car in strictly reverse order. During the procedure, it is necessary to take into account some nuances.
- First, we put the boot on the axle shaft. If this is difficult, then its surface can be lubricated with the grease supplied with the new hinge kit.
- Now we fill the same grease into the CV joint bearing, and the remainder into the internal cavity of the boot.
- We install the hinge on the axle shaft. We also use a hammer, applying a shock load to the body. The retaining ring should be replaced.
- When the “grenade” “sits” in its place, we push the boot, after squeezing it with our hands to remove excess air. We install clamps.
- We do the same when replacing the internal hinge.
- Now we install the axle shaft into the transmission housing until the shaft engages with the side gear. Don’t forget to fill the unit with oil afterwards.
- We insert the outer joint into the steering knuckle until it fully engages with the splined race of the hub. Screw on the central nut (do not tighten it).
- We return the ball joint to its place.
- We hang the wheel and do not tighten its fasteners too much.
- We lower the car (we do not unload the jack completely). Tighten all fasteners to the required torques. We remove the jack and stops. Replacement of the outer CV joint is complete.
The owner of LADA Kalina will spend no more than 3 hours of his time to complete the full list of replacement actions. We check the correct installation of the hinges. To do this, we start driving the car with the wheels turned out as far as possible. We observe the absence of crunching and other characteristic sounds from the axle shaft. Now you know how to change a faulty CV joint.
Lada Granta buy on credit
Installation of 16 cm speakers in the front doors of Lada Granta
Grant brake pads
Disassembling the hinge
An important diagnostic step is to inspect the CV joint boot. If it has visible damage, water or blockages have almost certainly penetrated inside.
In addition, it is necessary to completely disassemble the mechanism. To securely fix the part, you will need metalworker's cleats. After the outer CV joint housing is removed, all balls should be removed from the separator. This can be easily done with a screwdriver. It must be made of a sufficiently soft metal so that the surfaces of the parts are not damaged during operation.
Then you will need to remove the separator from the holder. In this case, special attention should be paid to the position of the separator windows. When working, the following sequence must be observed:
- To reach the separator, the elongated windows must be located against the protrusions in the housing.
- The clip should be removed when its tabs are placed in the windows.
Replacing a grenade on a Lada Kalina - how to change it yourself
CV joint (constant velocity joint) serves to transmit torque to the wheels from the transmission device. The outer element engages with the wheel hub, the inner element with the gearbox. They are connected to each other by a metal pipe.
The axle shaft structure consists of:
- housings;
- anther;
- bearing;
- separator.
With good preparation, you can do the repair yourself. Find a video with step-by-step instructions, consult with professionals and experienced car owners (for example, on specialized forums and websites).
In this article we consider signs of malfunction, preventive measures to extend the life of the CV joint, and features of purchasing spare parts. Here are recommendations from experienced car owners.
Find out the cost of replacing a grenade on a Lada-Kalina online in 3 minutes
Don't waste your time - use the Uremont search and get offers from nearby services with specific prices!
Replacing a grenade on a Kalina with your own hands
With this car, CV joint failure is a common occurrence.
Most often, the destruction of the boot leads to a malfunction.
Due to liquid and dirt entering the hinge area, lubricant is washed away. As a result, the spare part loses functionality and is more likely to break. To carry out work at home, prepare:
- socket heads 17 and 30;
- “ratchet”;
- die with extension;
- drift, hammer and vice;
- wheel chocks and jack.
Replacing a grenade on a VAZ car of the Kalina model is carried out only after diagnostics. Most often, a malfunction is indicated by a crunching noise during heavy vehicle movement with the steering wheel turned out. If this effect occurs even with minimal load, the cage or joint is likely to be in poor condition. You can’t move further by car - you need to go to a car service using a tow truck or solve the problem on the spot.
Replacing a grenade on a Kalina - symptoms of a malfunction
CV joints last a long time if protected from the external environment. If you follow the manufacturer's recommendations and undergo regular maintenance in a timely manner, and also drive on smooth roads, the external and internal units will last a long time. A significant reduction in the warranty period occurs for the following reasons:
- factory defects (violation of technology, low-quality raw materials, etc.);
- boot damage;
- using the unit without a sufficient amount of lubricant (or using a product of poor quality).
Replacing a Lada-Kalina grenade - diagnostics
Over time, the CV joint wears out in places where the parts come into close contact. That is why a specific crunch (creaking) is a clear signal of a problem. If this sound appears when turning, there is a problem with the external elements. With a straight line - with an internal one.
The functional state of the anther is critical for the node in question. This rubber element, as we have already written, protects the device from blockages. Be sure to check the boot - it must be clean and undamaged. Otherwise, change it immediately: do not lead the situation to the need to install a new unit.
Replacing the internal grenade on the Kalina - dismantling
Put the car on the handbrake and install the anti-recoil devices. Remove the wheel bolts and hub nut. Raise the front of the car with a jack and remove the wheel. Find the bolts securing the CV joint to the steering knuckle and unscrew them. Turn the steering wheel all the way, pulling the steering knuckle back. Remove the outer hub part with the outer element. If you cannot do without a hammer, use a wooden block to protect against damage.
Specifics of replacing the external grenade on the Kalina
When dismantling, it is necessary to remove the old clamp and boot. Next, we take out the device we are interested in from the hub. At the same time, it is necessary to rotate the axle shafts. Operations to replace internal and external units are carried out according to the same algorithm. Only in the case of an internal element, the spare part is removed from the box using a pry bar.
To carry out such work, you do not need to have much experience, but it is important to confidently hold a wrench in your hands and spend some time on preparation.
Replacing a grenade on a Kalina - watch the video
Today you can find step-by-step instructions online that will help you understand the procedure and avoid mistakes. Do-it-yourself assembly when replacing a grenade on a Kalina includes installing a new boot on the axle shaft (the clamps of the old one will not provide the necessary tightening, even when the part is relatively intact). Press a special lubricant into the bearing - choose products from a trusted manufacturer to extend the life of the new spare part. Add the remaining lubricant to the boot and place the unit on the axle shaft.
with a detailed description of replacing a grenade on a Kalina with your own hands - the most visual guide.
Replacing the Kalina-1 grenade, the main advice of experienced car owners
The standard lifespan of these parts is 300,000 kilometers. But durability is reduced under the influence of negative factors. The most critical of them is the unsatisfactory condition of the boot, as a result of which moisture and dirt get onto the device. The grease thickens. Experienced car owners recommend regularly checking the condition of the unit and promptly changing the rubber protection if minimal traces of destruction are detected.
Unscrew the wheels and inspect all the elements.
Detecting a breakdown at an early stage and timely repair will avoid costly restoration.
The 2nd important aspect when replacing a grenade on a Kalina is the choice of a new unit
The opinions of the owners of this model of VAZ car differ. More often than others there are positive reviews about the following brands:
It is convenient to purchase a set at once, which also includes clamps and a boot. It will take you no more than an hour to work independently, unless unpleasant force majeure arises.
Replacing the external grenade on a Kalina once can cause problems for a novice car enthusiast. You can always contact a car service, for example, using the Uremont.com aggregator. For the convenience of drivers, the following are provided:
- interactive map with addresses of service stations partners;
- real user reviews and ratings;
- consultation with specialists;
- online form for making a request;
- feature articles, etc.
How do you understand that the CV joint boot needs to be replaced?
- Everything is very simple, you drive into a pit and check the boot, if there is no damage on its surface and the boot is “dry” (no traces of oil), you can safely continue driving from time to time, performing this simple check procedure.
- Sometimes problems with the CV joint boot manifest themselves in a different way, for example, during a sharp start, a single crunch or knock may be heard in the area of the front wheels. For some, a crunching sound occurs when turning the wheels while driving. In such cases, you most likely won’t get away with just replacing the boot and you will have to change the entire “grenade” assembly.
Well, let’s finish this brief excursion and move on directly to the troubleshooting process, but first, prepare the tool.
You will need:
- Jack, hammer, wooden block;
- Keys to “17”, “30”;
- Mount, spray can;
- Flat-head screwdriver, special pliers for installing clamps;
- New boot + CV joint grease, graphite grease, kerosene or similar flushing fluid.