Time passes and technology improves along with it. So, the pivot system was replaced by ball joints. But any equipment breaks down over time and needs to be repaired - with your own hands or for a fee, but it needs to be done. This instruction tells in detail how to carry out the process of replacing a ball joint in a garage, the video will show this process in detail, and the photos will help you imagine it more realistically.
- How to diagnose a ball joint?
- Aurally
- To the touch
- Dynamic diagnostics
- What should a new ball joint be like for a VAZ 2112?
- Technical description of the ball joint
- Ball joint manufacturers
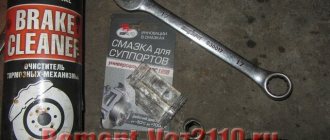
- Tool
- Changing the ball
- Preparing a new ball joint
- Removal
- Installation
How to diagnose a ball joint
This can be done in two ways - listening and feeling. Let's look at each separately.
Aurally:
- This method does not require any additional equipment.
- Place the car on a level surface and in as quiet a place as possible so that sounds can be heard better.
- Place your foot on top of either front wheel.
- Rock the car from side to side.
- If, when rocking, the car makes dull metal impacts on one side, then there is a possibility that the ball joint on the side of the emanating sound has become unusable.
Advice! Of course, the words “there is a possibility” only indicate a possible malfunction. To diagnose an exact breakdown, it is best to use the second method.
To the touch:
- First, the car should be raised so that the front wheel can rotate freely.
- First, lift it with a jack, then support something and lower the car onto this object.
- You can substitute bricks, a wooden block or other thing at hand.
- Rock the wheel from top to bottom.
- Again, when rocking, dull sounds should be produced.
- To be sure, you need to place your hand (two fingers) at the junction of the lever and the ball joint.
- With your fingers you will feel the knock that the ball joint pin creates.
Advice! If there is even a slight knock in the ball joint, it is better to replace it. Never delay car repairs - in the end, even your life may depend on it.
- Do the same operation with the second wheel. If any problems are found, make appropriate repairs.
Dynamic diagnostics:
- In this case, it is necessary to listen to extraneous sounds directly while the car is moving.
- The malfunction of the ball joint will be especially audible when the wheel hits the slightest hole on the road.
- A knock will be heard from the side of the faulty ball joint.
- In this way, you can determine whether the VAZ 2112 ball joints need to be replaced or not.
- But this method also does not fully guarantee that it is the ball joint that has failed!
Replacement
Of course, if you wish, you can contact the same car service center, where they will replace the supports for you for a certain price. On average in Russia, this service costs around a couple of thousand for the entire work. However, replacing the supports is not difficult, and you can carry out this procedure yourself, thereby saving some money.
Algorithm for removing old ball joints:
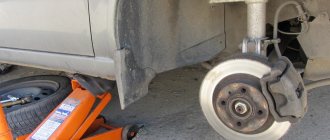
- Put the car on the handbrake, remove the AB terminal from the battery, set up the wheel chocks and jack up the car near the problem wheel.
- Loosen the bolts holding the problem wheel and remove it.
- Unscrew the nut securing the ball pin.
- Install the puller (you can pry it with a pry bar and tap it with a hammer) and then press out the ball pin.
- Take a lever and use it to move the suspension arm down. After this, the ball joint can be removed without much effort. It is best to enlist someone’s help at this stage, since it is inconvenient to do this alone.
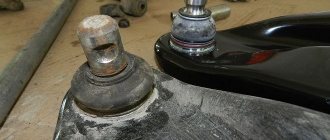
- That's all, now the ball joint has been removed and a new one can be installed in its place. When choosing a new support, carefully examine it for defects. The main attention should be paid to the boot - after all, it is directly responsible for the lifespan of the ball joint. Check that there are no cracks or scratches.
What should the new ball joint be like for the VAZ 2112?
We all don't want to drive a car that has low quality parts and have to make frequent repairs. Therefore, replacing ball joints on a VAZ 2112 requires a serious approach. Let's list the characteristics of a really good ball joint.
Technical description of the ball joint
So:
- The ball joint housing must be welded in two parts.
- Carefully inspect the ball body for cracks and chips.
- The ball joint pin must be hardened, not painted.
- The finger should not dangle loosely in the body - in a good ball joint it is difficult to turn it by hand. Only using a crank will it turn.
- Modern ball joints come with a nut and boot.
- The nut should not be weak and have a Teflon insert, or a ball nut should be made with a cotter pin hole and a castle nut.
- The boot must be intact, without cuts, cracks, or scratches. There should be a metal retaining ring inside the boot.
- Well, the price, of course, for a good, decent ball joint is not the cheapest.
Manufacturers of ball joints:
- Each car owner chooses the ball manufacturer himself.
- There is only one principle - do not buy ball joints that are too cheap. There is a very high probability that they will not be of good quality and will have to be replaced again after a very short mileage.
- Among many motorists, ball joints are considered the best.
Tool:
- Ball joint puller
- Set of heads
- Vorotok
- Hammer
- Crowbar or crowbar
- Lubrication
- Metal brush
- Rust Cleaner
- Jack
- Car stand
As you can see, the price of a replacement tool is low, since most of the list is available to every motorist.
Changing the ball
Let's start looking at the process of “replacing ball joints on a VAZ 2112” by preparing a new ball joint for installation on the car.
Preparing a new ball joint
Note! It is best to prepare the support in a vice.
So:
- Holding the ball joint housing in a vice, remove the nut from the pin.
- Remove the ball joint boot.
- Place a small tube on the ball pin and rotate it in a circle.
Attention! Do not use pliers to turn the finger - do not knock off the thread!
- The finger should turn with effort, but should not get stuck or bite.
- For better performance of the ball joint, add lubricant to the housing.
- While rotating the finger, press the grease into the body with your finger and press it down by rotating the ball joint finger.
Using this little trick, replacing the VAZ 2112 ball joint will happen much less often!
Removal
So:
- Raise the car on a jack and place it on a stationary object (as for diagnosing a ball joint).
- Set the car's hand brake or place bricks or other anti-roll bars under the wheels.
- Remove the wheel from the side of the broken ball joint.
- Turn the steering wheel so that the best access to the connection between the lever and the ball joint is provided.
- Clean the joints with a metal brush.
- Spray your finger with a rust ball and wait a few minutes.
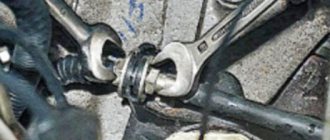
- Then, using a 19mm wrench, unscrew the ball joint pin nut and remove it.
- Now we need a ball joint remover.
- If you use a puller, as in the photo, then insert the lever-ball connection inside the puller, and use the bolt to press out the ball joint pin.
- During this procedure, it is advisable to tap the lever with a hammer so that the ball disengages faster.
- If you use a different puller, ask others how to use it.
- In general, you can remove the ball joint without using a special puller.
- First, you need to rest the mount so that when you press its end, pressure is created on the suspension arm (see Repairing the suspension - how to do it correctly) down. You can rest the pry bar against the steering knuckle.
- You can also spray with rust remover.
- Having created the necessary pressure on the lever, hit the lever sharply with a hammer at the junction with the ball joint.
- As soon as the ball joint is freed from the lever, you should press the lever with a pry bar and move the steering knuckle away.
- Using a 17mm socket, unscrew the two bolts securing the ball joint to the steering knuckle.
- Remove the ball.
Installation
Advice! Before installing a new ball joint, lubricate the ball joint bolts, but do not lubricate the pin.
So:
- Everything is installed in reverse order.
- Secure the ball joint to the steering knuckle with two bolts, tightening them with a 17mm socket.
- Using a pry bar, install the ball joint pin into the hole in the lever.
- Tighten the ball pin nut with a 19mm wrench.
- You need to tighten it tightly to prevent it from unwinding.
Remember! The wheel must be tightened on the ground so that the vehicle is under load.
After installing the ball joint, reinstall the car wheel. Replacement of the ball joint on the VAZ 2112 is completed!
The characteristic knocking and creaking of ball joints on front-wheel drive Lada cars indicates that they are worn out and it is time to replace them. Replacing ball joints is not as labor-intensive as on rear-wheel drive VAZs. The MacPherson suspension used on cars of the Volzhsky Automobile Plant has two ball joints for each wheel: lower and upper. VAZ ball joints differ in design, so the upper and lower units are not interchangeable.
On the upper ball joint of the VAZ 2110, the axial and radial play is measured with a special device. If it is absent, use a caliper, having previously dismantled the unit. The maximum allowable amount of play is 0.7 mm. It is difficult to notice the play of the VAZ lower support manually, so its condition is assessed by measuring the distance between the surface of the liner holder and the top of the head of its pin. Measurements are taken in a loaded state through a hole in the liner holder. If this value exceeds 11.8 mm, the VAZ support needs to be replaced.
Replacing a ball joint begins with preparing the necessary tools: a special puller, a socket or socket wrench for “17” and “19”, a balloon wrench, a mounting blade or a pry bar. Start the repair by checking the ignition is turned off and the condition of the handbrake lever - it must be tightened. For safety, place chocks under the wheels.
It is advisable to have a partner to help. If there is no one to help, and you cannot independently move the suspension arm and remove the assembly at the same time, you can simply lower the jack, first placing a stop under the brake disc. The disc and support will remain in place, and the suspension arm will lower under the weight of the vehicle.
If there is no puller, unscrew the ball stud mounting nut only halfway. Then, pulling back the pin bracket with a pry bar, carefully strike the fastening element with a hammer, gradually unpressing the pin. After this, using a key set to “17”, unscrew the fasteners securing the ball joint to the steering knuckle and remove it. These bolts have spring and flat washers, which must also be removed and cleaned.
Before installing the boot, be sure to fill it halfway with lithol or grease. For reliability, seal the installed boot with a special sealant. Bolt the new assembly to the steering knuckle, then, pressing the lower suspension arm down, insert the ball pin into the eye and secure it with a nut. When the Lada is suspended on the jack, do not tighten the nuts and bolts completely.
The ball joint is designed to connect the wheel hub to the lever, so that the latter is not subject to such heavy loads when driving. Also, the ball joint holds the wheel and does not allow it to deviate from the horizontal position when hitting an obstacle.
Replacing ball joints
The replacement of VAZ 2110 ball joints can be done by the driver himself; a standard driver's tool kit and a ball joint remover are suitable for this.
The order of repair operations:
- We lift the front part of the car (the so-called “front”) on a jack and fix it on special supports. Next we dismantle the wheel. Do not forget to put the vehicle on the parking brake and additionally place thrust mechanisms under the rear wheel pair. The initial stage of loosening the wheel mounting bolts when removing and the final stage of tightening the fasteners when installing the wheel is carried out only on the car removed from the jack. The bolts must be tightened with a force of 6.5–9.5 kgf•m.
- Using a socket set, remove the ball joint from the control arm.
- Unscrew the 2 fastening bolt connections of the ball joint to the steering knuckle and remove them with engravers and washers.
- Place the removable support device by turning the fist and using the twisting method, press the hinge pin out of the vehicle's front suspension arm.
- Using the “mounting tool” we move the suspension arm down and remove the ball joint.
- Let's try to move the finger in the ball joint. It must sit stably and motionlessly in its seat; only a small play is possible in the range of 05 - 07 mm.
- If, with a slight application of force, the pin moves along the guides of the support, then the product must be replaced.
- If the rubber ball boot has defects, but dirt has not penetrated into the support lubrication system, then you need to replace the protection and fill the boot with new lubricant used during operation of the product. If dirt has penetrated the support lubrication system, the product itself must be replaced.
- Insert the spacer sleeve until it stops.
- Fill the new rubber boot of the ball joint halfway with operating lubricant.
- Installation of the product is carried out in reverse order. To perform the boot's moisture-protective functions and prevent the penetration of dirt and dust, it is advisable to cover the surface of the ball joint with sealant or graphite lubricant. When installing the product, you need to carefully, without defects, install the boot in place. If an old boot is used, it must be intact, without cracks, cuts or holes.
- Having removed the car from the jack, it is necessary to swing it strongly to install the ball joint on the seat, and then finally tighten the fasteners of the hinge joint to the suspension arm with a force of 8.0–9.6 kgf•m, and the fasteners of the hinge to the steering knuckle - 5, 0–6.3 kgf•m. After “hundreds” of runs, check the tightness of these connections again.
On our website you can watch a video “replacing a VAZ 2110 ball”; the video clearly shows how to carry out these repairs.
Replacement Tools
To make repairs you will need:
- Head and collar.
- Liquid WD-40 or similar. It will help unscrew the mounting bolts.
- A puller for removing the ball joint itself.
- ShRB-4 lubricant. It will be needed to lubricate the seats. Since you only need a little of it, you don’t have to buy a whole package.
- Hammer.
Removal process (exact algorithm) on a VAZ-2112
Subsequence:
- Initially, you need to hang the wheel on the side where the ball is worn. Then it will need to be removed from the car.
- Then you need to unscrew the central nut that secures the support to the rack. To do this you need to crawl under the car.
- Next, you will need to unscrew two more bolts that secure the lever to the hub. Initially, you don’t need to completely unscrew them, you just need to let them go. Then they will be removed completely.
- Then, using a puller, the ball is pressed out. After pressing out the pin, you need to unscrew the two bolts that were previously released.
- After this, the support is completely removed from the car.
In the event that a puller is not at hand, you can use a regular crowbar.
It will need to be inserted between the CV joint and the lever. In this case, the crowbar should be used as a lever. You need to press on it until the finger comes out of its seat.
Also, during this procedure, you can lightly hit the place where the finger sits with a hammer. This must be done sensitively so as not to damage the hub.
Installing a new ball joint
Next, the ball is replaced with a new one and assembly is performed. There is no need for a puller here.
To install the pin in place, it must be placed in the socket and pressed with the central bolt until the pin fits into place. To facilitate the landing procedure, you can use lubricant. You also need to lubricate the inside of the ball joint first.
Change the ball joint on time!
When this spare part fails, severe wear of the tires begins, the car stops holding the road, the wheel can fall on its side, making it difficult to drive the car.
If you do not replace a worn-out spare part in time, it will negatively affect the entire operation of the chassis, and will also cause other components to fail.
Ball selection (survey)
Tools and materials for replacement
Tools for work.
To replace the ball, you will need to prepare. To do this you need:
- Keys and gates.
- Liquid WD-40.
- Litol or ShRB lubricant.
- Puller.
- Hammer and crowbar.
Ball location
The ball joint connects the lever and the steering knuckle.
They are located on both sides of the car on the bottom of the lever.
It is used to attach the lever to the hub.
Replacement time
When driving a car on a bad road, you will need to change the ball joints often.
- Initially, when it fails, a knock will be heard.
- Then the car will begin to pull to the side even when driving on a good road.
- Then the tires will begin to wear unevenly.
- When turning the steering wheel, squeaks may appear.
- It will become more difficult to turn the wheels.
If the finger moves freely with little hand force, the ball joint requires replacement.
Replacement
The whole process is carried out in the following stages:
- Withdrawal. Hang the wheel, unscrew the nut on the pin, then knock the rod out of the socket.
Jack up and remove the wheel.
Unscrew the nut securing the support to the lever.
You will need to unscrew the two nuts that hold the support in the lever.
Unscrew the 2 bolts securing the ball to the knuckle.
If you have a puller, then work on removing the ball can be carried out with its help.
We install the puller and press out the pin.
Use a tool to remove the lever and remove the ball joint.
If you don’t have a puller, you can use a hammer and crowbar to press it out. The first one needs to hit the place where the support fits, and the second one needs to create a shoulder for pressing it out.
If there is no puller, insert the assembly and knock out the lever with a hammer.
When the bolts are tight to unscrew, you can use WD-40.
Results
If you follow the above recommendations, you can fix the problem and change the ball joint yourself. Do not allow the ball joint to wear out completely. In this case, it may lead to an accident.
When operating a car on bad roads, the ball joint can quickly fail. At low speeds, a worn part will create a knocking noise, and at high speeds the car will become difficult to control . Also, a worn part will cause the tire to wear unevenly. It also affects the fact that other suspension parts will begin to wear out heavily.
It would be dangerous to drive such a car.