Signs of malfunction and replacement of the crankshaft position sensor on a VAZ 2114
First, let's look at what a crankshaft position sensor is. The crankshaft position sensor of the VAZ 2114, like many other VAZ models, is an electromagnetic device that transmits information about the position of the crankshaft to the electronic “brains” of engine control. This sensor is very important; the correct operation of the fuel injectors and the ignition system depends on it. It doesn't break down often. But if you are going on a long trip, it is advisable to have a spare one.
Crankshaft position sensor VAZ 2114
Removing the damper
On a VAZ 2110, the damper is removed in the following sequence:
- Disconnect the ground from the battery;
- Remove the radiator fan and fluid coupling;
- After loosening the bolts securing the fan pulley, remove the belt;
- It is advisable to remove the radiator, but if it does not interfere, you can leave it, protecting it from damage from the engine compartment with a sheet of plywood or cardboard;
- Remove the pulley from the radiator fan;
- We gain access to the damper, unscrew the bolts, dismantle it;
- When removing the hub, you need to secure it from turning (for which there is a special tool).
Next we proceed depending on the purpose of the analysis. If you only need to replace the damper, we do it and assemble everything in the reverse order.
You should know that replacing the liners on a VAZ 2110 can be done either with or without removing the crankshaft. But this requires a special device, and besides, it is better to entrust such work to an experienced mechanic - a mechanic.
If the crankshaft was dismantled to replace the liners or half rings, then we continue:
8. Remove the lightweight or regular crankshaft; 9. We remove the half rings; 10. We evaluate the condition of the liners, and if they do not need replacement yet, then be sure to remove them and mark each of them; 11. But, unfortunately, no matter how carefully the owner treats his VAZ 2110, sooner or later the time for physical wear comes for the liners - they need replacement.
You should know:
- Four repair kits of inserts are produced for the VAZ 2110. You need to buy them only as a set, and only in a strict sequence of sizes. Sometimes, however, situations are possible when you have to purchase them “through size”;
- thus, the crankshaft only lasts for four (and sometimes even three) overhauls;
- replacement of liners cannot occur without grinding the crankshaft. The only exception is if it is replaced with a new one. At the same time, an experienced craftsman can turn the crankshaft into a lightweight one.
But if replacing the crankshaft pulley is not such a difficult task, and almost any home craftsman can do it, then grinding and tuning the crankshaft should be entrusted only to experienced motorists.
When reassembling, please note that the groove on the hub must be aligned with the segment key. In addition, the bolt holding the hub requires a torque wrench. Its tightening torque should be 400 N/m.
Sensor types
Sensors differ in operating principle and design features.
- inductive type. Inside there is a metal rod with a magnet at the outer end. It is designed to magnetize the rod. A winding of copper wire is wound around this rod, the ends of which are brought out in the form of connectors for connecting wires. The operating principle of the inductive type crankshaft position sensor: when a steel object is located next to the rod, a signal appears at the terminals.
- The operating principle of the next type of crankshaft sensor is slightly different. It has a hall sensor inside. When a metal object is brought close to it, its state changes (from logical zero to one and vice versa).
- frequency Let's look at how this type of crankshaft sensor works. The engine control unit generates pulses of a certain frequency. They are fed to the sensor and when a metal object is brought to the sensor, the generation frequency changes. By changing the frequency, the controller determines the presence of an object near the sensor. The sensor reacts to the metal of the crankshaft ring teeth (on some cars it is located on the flywheel).
Symptoms of a problem
Signs of a malfunction of the DPKV can be different. Often, dirt adheres to the end of the sensor itself, which can interfere with reading. Also, symptoms of a faulty crankshaft sensor may be as follows:
- The idle mode is unstable;
- Engine speed rises or falls spontaneously;
- Power drops;
- During acceleration, a “failure” is felt;
- The car doesn't start well.
In these cases, for the most part, the VAZ 2114 crankshaft position sensor is replaced.
In addition, the VAZ 2114 crankshaft sensor may well be in good working order. And on the “tidy” the DPKV error will appear (0335 or 0336). The reason for this may be a broken wire near the connector. This is easily determined visually; then it is enough to replace the connector without replacing the sensor itself.
If the owner notices signs of a malfunction of the crankshaft sensor on his car, then this is a “signal” about the need for diagnostics.
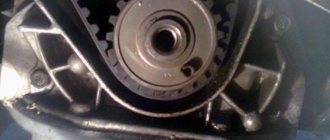
It is not difficult to guess where the crankshaft sensor is located on a VAZ 2114. Like many other VAZ models, it is attached to the engine, and more specifically to the oil pump, near the generator drive pulley, on its cover. The sensor is attached with one bolt, which is typical for many models of this family.
Here is the crankshaft sensor on the VAZ 2114
Typical causes of failure:
- Physical damage to the case;
- The interturn closure of the winding turns entails a change in the generation frequency transmitted to the control unit (frequency type sensors);
- Emergency wear or loss of pulley teeth.
Crankshaft pulley damper signs of malfunction
The crankshaft pulley, like other drive components, is one of the parts that is subject to preventive replacement if it is equipped with a torsional vibration damper.
And as always in such cases, the service station client has a question: why change something that still works. Therefore, it is necessary to clarify the role of the pulley damper in order to dispel common misconceptions. On modern engines, especially diesel engines, a crankshaft pulley with a torsional vibration damper is often used. The uneven application of force transmitted from the pistons to the crankshaft during each stroke causes deformation of the crankshaft. Of course, the crankshaft has a certain elasticity that allows it to withstand this unevenness, but recently the design of internal combustion engines has been changing due to growing requirements for their energy efficiency.
In the 21st century, engine designers have achieved significant increases in torque in the lower rev range. But at the same time, the load on engine parts also increases, despite the fact that there is a requirement to reduce their weight. All this increases the torsional deformation of the crankshaft, as well as the risk of resonance phenomena. Therefore, a crankshaft pulley with a torsional vibration damper appeared, which plays a dual role. Firstly, it protects the poly-V-belt from jerking, and secondly, it helps dampen the resonant vibrations that occur in the crankshaft.
The vibration damper is a pulley consisting of several parts. Usually this is the inner part, which is attached to the crankshaft toe, and the outer part, which is the pulley itself and the elastic element between them. That is, the design of a pulley with a vibration damper resembles a silent block with the difference that the pulley dampens rotational movements. There are also more complex designs - pulleys for cars with a stop-start system or highly accelerated diesel engines.
The most common type is a single pulley damper.
, consists of three parts: 2 metal (iron, steel, aluminum) and a rubber element connecting these 2 parts. This type is widely used on diesel and gasoline engines.
Stop-start engine pulley
, is distinguished by a more complex design of the damping element, which allows it to withstand a very large number of engine starts over the period of operation.
Double pulley damper
, installed on many diesel engines, is technically the most complex type. Made from 7-8 metal parts and 2 rubber inserts.
The elastic element of the damper pulley undergoes deformation as many times as the mixture ignites in the engine cylinders - up to ten million times per thousand kilometers. Naturally, due to significant loads, the pulley damper is subject to wear and therefore requires regular inspection and preventive replacement in cases of unsatisfactory condition.
Car owner mentality and damper pulley replacements
The problem is that the importance of a pulley damper is often underestimated. Many people believe that it only protects the belt and attachments: the alternator, air conditioning compressor, power steering pump and water pump. And since in previous car models all this worked perfectly with conventional monolithic pulleys, the modern design is mistakenly perceived as overkill.
When the car owner is told the cost of this part, he is unpleasantly surprised. Suspecting the car service is trying to make too much money at its expense, the driver turns to the Internet or a seller at the car market and finds out that “the same part” can be purchased at several times cheaper. Naturally, we are talking about a pulley in which there is no trace of a damping element.
Those who sell or advise on Internet forums to change the pulley provided by the automaker with a torsional vibration damper to a regular one-piece one, use references to the past as an argument. The car owner is told that “from time immemorial” there were no dampers in the crankshaft pulleys and everything worked perfectly. Of course, attention is not focused on the fact that the engine of a relatively new car was also developed quite recently and is many times more economical than its predecessors. But it is precisely the efficiency of modern engines that is an achievement for which one has to pay for the use of more high-tech components.
True, the awareness of both car owners and auto mechanics in matters of choosing spare parts is gradually increasing. Many people already understand how important it is for modern engines to use the components provided by the design. Therefore, the “cheap parts” business went further in its ingenuity and offered the “perpetual damper pulley” to the market. It is argued that the part, fully performing its function, does not need to be replaced. It’s like an “unchangeable ruble”: once you receive it, you are always at peace...
Any more or less technically literate client should understand that where there is work, there is wear and tear. However, critical thinking is very easily turned off by the desire to save money. Moreover, the ersatz part is made in such a way that its appearance strongly resembles a real damper pulley. The seemingly separate metal parts are actually a single whole. The illusion is created by a rubber ring inserted into a groove in a solid metal pulley.
This type of pseudo-damper in no way meets the requirements of the car manufacturer. Not only does this pulley not absorb vibration, it is also much heavier because it contains more metal. This difference from the original part compromises the integrity of engine components, particularly the crankshaft, and can lead to accelerated journal wear and other serious failures.
NTN-SNR specialists
, which produces a wide range of vibration damper alternator pulleys, recommends replacement only using parts that meet the original design and OE quality standards. In addition, when servicing a car, you must follow a number of rules related to replacing this component.
Diagnostics and nuances of replacing the damper pulley
It is advisable to replace the torsional vibration damper simultaneously with replacing the belt and drive parts at a mileage of about 90-120 thousand km. However, after 60 thousand mileage, in order to ensure that the damper pulley is in good condition, it is necessary to conduct a visual inspection of it to identify the following signs of wear or damage:
• cracks, deformation and other damage to rubber; • cracks on the hub or in the spinning area; • separation of different parts of the damper.
The presence of cracks on the drive belt, which, judging by the mileage after its installation, should still be in good condition, may also indicate a malfunction of the damper pulley.
Car owner complaints that may indicate a failure of the damper pulley may include complaints about unusual vibrations in the cabin, drive belt whistling, as well as unusual noise or knocking, the frequency of which changes with engine speed.
If you suspect a malfunction of the damper pulley, if there are no obvious external signs of failure, you can use the dynamic pulley inspection method. This method recommended by NTN-SNR
, consists of sequentially performing three simple operations.
Functionality check
If you decide to check the serviceability of the sensor yourself, treat this procedure responsibly and carry it out correctly. On a VAZ 2114 car, the crankshaft sensor is checked in several ways.
- Using a multimeter. The serviceability of the induction sensor can be assessed by the resistance of its coil. In a working product it is 500-700 Ohms.
- On the multimeter, set the measurement limit to 200 millivolts, connect the probes to the terminals (where the standard wires are connected). Pass a steel object several times in front of the core. The working sensor will “see” the metal and there will be voltage spikes on the multimeter display. If there are none, replace the part.
- But the most accurate results when checking are provided by an oscilloscope. When using this device, one hundred percent results can be guaranteed; it reads all the information from the sensor while the engine is running. It can be observed on the device screen. The engine, during tests, should operate at different speeds. They start with eight hundred revolutions, then two thousand, and raise it to six thousand. If the lines (on the device screen) are of different lengths, you need to look for the cause of the malfunction. Remove dirt, check the pulley for defects, and so on.
Remove from the engine
The malfunction has been identified. Let's start eliminating it. Let's look at this operation using the VAZ 2114 as an example.
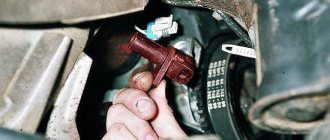
Turn off the car ignition. We open the hood, fix it firmly, and visually determine where the VAZ 2114 crankshaft sensor is located. Before removal, it is advisable to remove all contaminants in the area where it is located. Next, carefully remove the block with wires from the connector.
Connector DPKV VAZ 2114
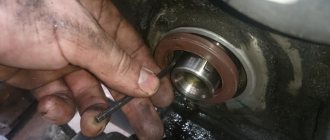
Using a “10” wrench, unscrew the fastening bolt.
Removing the crankshaft sensor on a VAZ 2114
Removing the DPKV VAZ 2114
After dismantling the sensor, it is advisable to check the generator drive toothed pulley for defects. Since its damage can introduce errors into the operation of the entire system.
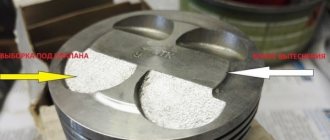
After we are convinced that there are no defects of any kind, we proceed to assembly. The seat must be clean. We install the new part in place and fasten it with a bolt (the tightening torque should not exceed 8-12 Newton meters). In this case we use adjusting washers. They are sold complete with a new sensor. Thus, using a special probe, we ensure that the gap between the pulley and the sensor core is one millimeter. The permissible error is 0.41 millimeters in the larger direction.
The gap between the pulley and the crankshaft sensor core on a VAZ 2114
We connect the block with wires into place.
After installation and checking the gap, we try to start the engine. With a confident start and stable operation of the engine, we can say that the repair was carried out successfully.
Despite the fact that the breakdown of the synchronizing sensor is not frequent, knowledge of its symptoms and consequences, as well as methods of elimination, will be useful to the car enthusiast.
New sensors are available in almost any auto parts store. The price of DPKV can vary between 200-400 rubles. How much a VAZ 2114 crankshaft sensor costs depends on your region, the location of large spare parts stores nearby (usually cheaper there) and the greed of the seller. Can be ordered in the online store. When purchasing, take the old one with you so as not to make a mistake in choosing a model. To avoid defects and repeated purchases, it is advisable to purchase from well-established sellers.
Replacing the crankshaft position sensor VAZ 2114
One of the most common problems of the VAZ-2114 car is the failure of the DPKV crankshaft position sensor. The fragility and unreliability of the sensor design forces motorists to either shell out considerable sums for repairs at a car service center, or learn the basics of repairs on their own, and, in our economically unstable life, the second option is best. Next, we will teach you how to replace the DPKV with your own hands. So, let's go!
Crankshaft position sensor: principle of operation, types
DPKV is a small electronic device located near the pulley under the hood, which performs a critical function: by transmitting an impulse of the crankshaft position to the engine, the sensor coordinates the movement of the injectors, which directly affects the fuel supply, which, in turn, determines the operation of the ignition system. You need to monitor the condition of the sensor regularly, especially if you have planned a long trip.
Sensors are divided into two types, each of which has its own operating principle:
- Inductive. It consists of a magnet and a metal rod wrapped with copper wire. The inductive sensor gives a signal by reacting to the approach of a steel object, that is, the crankshaft.
- Impulsive. The sensor consists of a hall, which changes its position when a metal object approaches it. Due to this, impulses arise, which are then sent to the power unit and determine the operation of the ignition system.
Signs of breakdown
You can determine that the sensor has failed by the following signs:
- Idling malfunctions, instability in engine operation is observed;
- The engine loses power;
- The engine accelerates chaotically or, conversely, slows down;
- Heavy plant;
- During high-speed movement and, especially during acceleration, dips are observed.
The main malfunctions may be the following:
- Mechanical deformation;
- Broken wires or shorted wires (this problem is especially common in used cars);
- Wear of the pulley and other parts.
Repairing the sensor is difficult and almost impossible at home. But replacement is not difficult, and it is not that expensive. Let's now find out how to replace the sensor on a VAZ-2014.
Step-by-step instructions for replacing the sensor
If you strictly follow the instructions, the replacement procedure usually does not take much time.
- First of all, to make further work safe, turn off the ignition and raise the hood.
- We find the device and, if it is covered with dust and dirt, which is observed quite often in the practice of motorists, be sure to use a rag to clean both the sensor and its installation location, so that when installing a new device, there is no short circuit in the wires.
- Now we have access to the device. A positive point is the ease of removing the sensor, which cannot be said about other parts. But here it is very important to observe the subordination of actions: first, by bending the fasteners, remove the block and wires, then, after unscrewing the bolt, carefully, slowly, remove the DPKV
- Just in case, it is worth diagnosing the condition of the pulley; toothed parts are often deformed, which also causes a disruption in the fuel supply system and leads to errors in the data transmitted by the sensor, which can already be dangerous.
- We check that the installation site of the new part is clean.
- We mount the sensor.
Installation is carried out in the reverse order of dismantling: tighten the bolt, fasten the block, start the engine, check the sensor data.
An important point during installation is to maintain the required gap, which should not exceed 1 mm. If the gap is too large, you should select a device of the appropriate size: do not try to fix the DPKV of the wrong type, as this connivance can lead to negative consequences.
How to check for sensor malfunction with the device?
Despite the fact that a sensor malfunction is usually determined by the above symptoms, this may not be enough for a correct diagnosis, since different types of breakdowns have the same symptoms. Dips during acceleration can also occur when other parts are deformed, such as the ignition system or braking system, and this also occurs when the engine itself malfunctions.
You can definitely check the sensor using the following method:
We buy a voltmeter (it’s easy to find in any car store) or a multimeter, which is even better. On the multimeter we turn on the voltmeter function, measuring 200 mV. Now we connect the probes to the sensor. And then the most interesting thing: take any screwdriver (necessarily with a metal rod) and hold the screwdriver close to the sensor. The data on the voltmeter will change, monitor its data: if the device shows 0.3 V, then the device is working properly; If the readings fluctuate, replace the sensor without a doubt.
Checking the integrity of the master disk
The so-called drive disc with teeth is part of the pulley, based on the position of which the corresponding sensor transmits information about the crankshaft speed and its location. The injection system operates based on this signal, which is why if the pulley is stationary, the car will not start. If the disc is damaged but still spins, it causes the motor to malfunction.
Thanks for subscribing!
When inspecting the pulley, you need to check whether all the teeth of the drive disk are intact (there are 58 of them in total, in two places there are gaps between the teeth of 1 pitch). If there is significant damage to the drive disk, the pulley also needs to be replaced. There should be no foreign particles on its surface that could lead to signal deterioration and failure of the crankshaft position sensor.
If characteristic symptoms appear, it is necessary to check the integrity of the crankshaft pulley. Particular attention should be paid to the condition of the teeth of the drive disk and the damper bushing (if any). If damage is found, the crankshaft pulley assembly must be replaced.
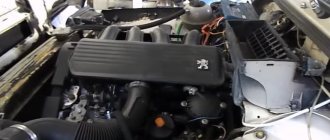
Hello everyone!;) A few days ago a slight noise began to be heard from the engine compartment. I went to look - I was not happy, under the timing mechanism, on the crankcase protection, I found wet spots, and the noise was coming from the timing belt. The conclusion was clear - the pump was leaking. There was no time to think at all, so I went online to see what was needed for replacement, how to change it, and of course, which brands of components to choose. And then the most interesting thing began! ;D There are a lot of disputes about who says GAtes, who says Ina, and who even takes Balakovo. But since the problem had to be solved, I had to read and study a lot. Next, I will write my personal opinion on this whole matter, because... I don’t like to save on important things, especially on a car, so I usually choose more reliable parts. The miser pays twice;) Or even three times in this case)
Why do you need to twist the crankshaft pulley?
Removing the crankshaft pulley is performed for various reasons.
Crankshaft pulley
Most often it has to be removed when replacing the timing belt or replacing crankshaft seals. Usually the belt is changed either according to the regulations, or when defects are identified that require its replacement. Oil seals are replaced when oil leaks occur due to product wear.
On a VAZ 2114, the crankshaft pulley is secured with a bolt. During removal, a problem arises when unscrewing the mounting bolt. Firstly, it is inconvenient to get to. Secondly, at the factory they always tighten it very tightly so that it does not unscrew on the road. If a fastener comes loose while driving, it can result in costly repairs. During operation, thanks to the right-hand thread, the tightening is enhanced. In addition, coking and sticking of the part occurs. Thus, sometimes the bolt is very difficult to remove.
Tools
To successfully dismantle the VAZ 2114 crankshaft pulley and replace consumables, you should prepare the following tools:
- standard set of keys;
- jack;
- support or stump;
- socket head;
- extension;
- pulley puller;
- pry bar, screwdrivers.
It is more convenient to carry out work on a lift or ditch for inspection.
Stages of work
In order to remove the crankshaft pulley on a VAZ 2114, you need to dismantle some parts and components. The entire process of removing the crankshaft disc consists of the following steps:
- First, to dismantle the generator belt, you need to unscrew the locking bolt and loosen the tension bolt.
- Next, you need to lift the front of the car and remove the right front wheel.
- In the upper part of the engine compartment of the VAZ 2114, remove the air filter and the engine mud shield.
- Next, remove the alternator belt.
- To secure the flywheel from turning, you need to open the plug on the side of the VAZ 2114 clutch. Then insert a screwdriver or pry bar into the opened opening between the flywheel teeth.
Fix the flywheel and unscrew the bolt - Next we move on to unscrewing the fastener. To make it easier to unscrew, you need to apply special liquids to the threaded connection that corrode corrosion. For this purpose, special WD lubricant, brake fluid, and vinegar essence are suitable.
- Then the head of the key is put on and, using a lever, it is turned counterclockwise so as to tear the bolt from its original position.
We put the head on the bolt - If you are unable to unscrew the fastening element by hand, you can use the starter.
Unscrew the fastening bolt - Place the lever coming from the head against the spar or the floor in the direction of the shaft movement, and then turn the starter several times, giving the crankshaft a rotational impulse.
- After unscrewing the fastening element, you need to remove the crankshaft pulley. It is held in place by a key and is difficult to remove easily. You can use a special device with paws that cover the edges of the disk.
- If you don’t have a puller, you can use pry bars or screwdrivers by inserting them between the crankshaft and the pulley on each side, gradually moving the part to be removed away from the shaft. The touch point should be chosen closer to the crankshaft.
- Before removing the disk, it is advisable to tap it with a wooden hammer to avoid possible distortion. The part should be dismantled carefully so as not to damage the key and groove.
After completing the necessary replacement, when reinstalling the crankshaft pulley, the seats should be treated with grease so that the parts fit without effort. In this way, distortions can be avoided.
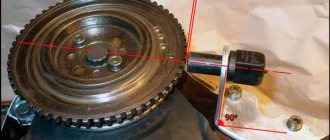
Checking the integrity of the crankshaft pulley
You can verify the serviceability of the pulley by visually inspecting it. The alternator belt allows you to preliminarily assess the presence of damage to the engine compartment. If it is motionless, but is intact, this usually confirms the destruction of the crankshaft pulley , or its displacement from the guide key.
You can certainly find out the cause of the malfunction by removing the right front wheel or driving the car into a pit or overpass. If the belt and generator shaft are stationary and the car does not start, it is necessary to check the integrity of the pulley and the reliability of its fastening. Most often, the disc becomes unusable due to delamination of the damper rubber bushing (not all have it!). In this case, the inner part of the pulley will rotate when you try to start the car.
As a result, the engine begins to malfunction. This malfunction can be identified by checking the location of the marks on the camshaft and crankshaft and the position of the drive disk at this moment.
How to remove the crankshaft pulley of a VAZ 2114 yourself: instructions, photos and videos
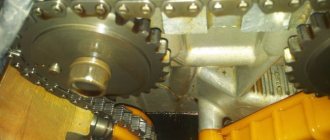
The crankshaft gear is the gear through which the engine equipment rotates. Depending on engineering solutions, it has the shape of a gear with teeth for a chain or belt.
Crankshaft Gear for Chain
Crankshaft Gear for Belt
As a rule, timing gears (lower) and oil pump drives are installed on the crankshaft. The gears are mounted with a tight fit, fixed on the keyway, and pressed with threaded fasteners.
Crankshaft gear malfunctions
Common crankshaft gear problems include:
- Natural mechanical wear of the teeth. High speeds and vibrations affect the contact surfaces of gears. Over time, wear appears on the gears, and they are replaced with new ones. The wear on the timing gear can negatively affect the valve timing;
- Wear or damage to the keyway of the crankshaft gears. The fact is that even a slight gear play, which will not have a noticeable effect on the operation of the engine, will eventually develop into a problem. The crankshaft gear backlash will increase. If the problem is not addressed, the keyway may become severely damaged, requiring the crankshaft to be replaced.
Replacing the crankshaft gear
The easiest way to remove the gear from the crankshaft is if the shaft itself is removed from the engine. As a rule, gears are installed on the shaft with interference, so a puller will be required. The sequence is as follows:
- install the puller and by rotating its rod, gradually “press out” the gear;
- Remove the gear from the shaft, remove the key, and inspect the keyway on the shaft.
Replacing the crankshaft gear
To mount the gear, you will need a round attachment similar to a steel tube, which will easily fit onto the shaft. Necessary:
- install the key;
- lightly press the gear;
- placing the tube on the shaft, rest it against the gear;
- lightly tapping the tube with a hammer to “seat” the gear into place.
If you only need to replace the gear, this can be done without removing the engine and crankshaft. Removing the crankshaft gear must be done after the engine has completely cooled down and the car has been immobilized.
Let's consider the procedure for replacing the timing gear of a VAZ 2110 engine.
- The first step is to remove the timing case;
- Then install the timing mechanisms according to the marks on the crankshaft and camshaft pulley (this is necessary so as not to disrupt the engine’s timing);
- If you did everything correctly, the marks on the flywheel should match. To check this, remove the rubber plug on the gearbox;
- Then you need to fix the rotation of the engine. For this it is better to use special clamps. If this is not possible, you can insert a regular flat-head screwdriver into the transmission inspection window;
- Unscrew the pulley and remove it;
- Check the position of the mark on the timing sprocket;
- Loosen the timing belt tension roller and remove the belt;
- Remove the crankshaft gear and inspect the keyway;
- Reassemble components and mechanisms in the reverse order of disassembly, checking the timing marks.
Also interesting: TOP 10 best brake pads for VAZ and Lada (Front, rear)
You can change the crankshaft gear in a home workshop, but you should understand that an error in setting the gas distribution mechanism can lead to serious engine damage. If you do not have experience with such repairs, it is better to contact specialists.
Reverse actions
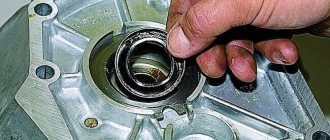
After removing the pulley, you can carefully examine it and put it aside for garage scrap metal. Take the new part in your hands and lubricate the key seat well with grease. Slightly tilting the key towards the hub, we slowly push the pulley onto the shaft. For this purpose, you should have a hammer in one hand, and in the other a piece of soft rubber, which is placed between the hammer and the body and prevents the hammer from damaging the crankshaft pulley.
Once the hub is in place, you need to tighten the fixing bolt. This must be done without any tricks: a wrench and a pipe will help tighten this bolt until it stops. To avoid turning the crankshaft when you begin to apply significant force to tighten the bolt, you need to lock it using a metal pin (large screwdriver), inserting the latter between the teeth of the flywheel ring. To do this, you need to open the clutch housing ventilation plug.
It is not recommended to tighten the bolt to the limit; you may miscalculate the effort and break it, and this is almost a disaster. To do this job correctly, you will need a torque wrench. As soon as the sensor shows a tightening torque of 400 N/meter, no further force is allowed.
After this, put the belt on the crankshaft pulley and tighten it using the tension bolt on the generator. Don't forget to tighten the generator mounting bolts and reconnect the connector on the ignition coil.
If you followed everything described above, then you now not only know how to remove the crankshaft pulley, but also know how to do it yourself.
Another surprise from the previous owners
I began to notice incomprehensible sounds coming from the crankshaft pulley, visually it was crooked, I thought that the rubber damper on it had broken, I bought a new DAMPER pulley, and my surprise knew no bounds when, during dismantling, I saw that the pulley was made of cast iron, with great difficulty I managed to remove the gear The HF key turned out to be so broken that the gear, in relation to the TDC mark, moved clockwise on the shaft a tooth forward, and the same tooth could be moved counterclockwise by moving it behind the mark, in general the timing belt did not work very correctly, the car was terribly stupid, sometimes it would not work It picked up speed, stalled, crashed, in general I was really worried.
everything was done almost at night) the car was needed in the morning, in general, at one in the morning I set the marks, the most important thing is that everything became as it should, mark to mark, although the RV gears are ordinary (not split)
I will say that only after that I felt the real effect of the flashed ECU, the car really drove, the first two days it was not usual))