How to replace pistons
This is a fairly serious operation that fits into the category of a major overhaul. It requires the application of both skill and simply physical strength. In addition, there is a fairly large volume of tools and devices. What a repairman will need:
- Replacement pistons set with rings.
- Pins and stops.
- Crankshaft oil seals.
- Complete locksmith set of keys.
- Retaining ring removers.
- Hammer and punch.
- Engine oil.
- Containers for oil and antifreeze.
- Clean rags.
Some aspects will be mentioned briefly as they are described in separate articles. So.
The work is best done on a stationary lift. As a last resort, in a well-equipped inspection pit.
Using containers, drain the antifreeze and oil from the crankcase. These details are described in some detail in separate articles. As well as removing the gearbox. Which is the next step. After removing the box, it’s time to work on the motor.
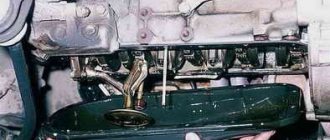
The generator belt is released and unscrewed using the 17 head for the damper mounting bolt. When removing the damper, it must be checked to see if it needs to be replaced. Remove the cover and, in sequence, the timing belt and crankshaft gear. Now remove all the bolts holding the oil pan. Remove the oil intake. Now access to the crankshaft is completely open. Using a wrench, unscrew the 10 bolts securing the journals of the 5 main bearings and set them aside.
Special attention! The inserts must be folded in the order in which they were installed. It is best to mark them with a marker so as not to accidentally replace each other, and then install them in the reverse order.
Everyone in their place. Otherwise, you can get premature wear on the crankshaft surface, which will lead to its replacement.
Once the fasteners are removed, you can finally remove the crankshaft assembly with pistons and connecting rods for replacement. Transfer it to a clean surface and wipe with a rag. Using a puller, pull out the retaining rings of the piston pins, then carefully, using a drift, knock out the pins and remove the pistons. Replace all pistons in the group. Install new pistons in place according to the marks. Insert fingers and secure with rings
Reassemble everything in reverse order, paying special attention to the order in which the neck liners are installed. Reinstalling the timing belt is a very important operation, and there is a separate article on its implementation.
Replace the crankshaft oil seals. Add oil and antifreeze and you can try starting it.
Replacing Priora pistons during tuning
There are no special features here, except for the uniqueness of the pistons themselves. They usually have a shorter skirt and slight design differences. They all boil down to increasing engine power. But most importantly, they must have grooves for the valves. This is an indispensable condition when choosing a replacement. Sometimes they are called "turbo pistons". But this is already a specialization of young “racing drivers” and mechanics serving this category.
Video on replacing Priora pistons:
Video “Replacing the phase sensor”
This video demonstrates how to change the DPRV on a VAZ car (the author of the video is the channel In Sandro's Garage).
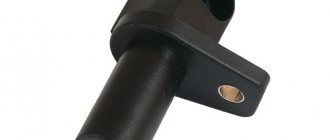
The Lada Priora car has an inductive crankshaft position sensor. It is built into the oil pump cover opposite the drive disc on the generator drive pulley. The drive disk is a toothed disk with 58 cavities equidistant from each other. With this number of cavities, the disk ends up with 60 teeth, two of which are cut specifically to create an impulse (reference impulse), which is captured by the sensor to coordinate the operation of the controller with the top dead center of the first and fourth cylinders.
As the crankshaft rotates, these teeth change the sensor's magnetic field, inducing pulses of alternating current voltage. The electronic control unit, based on signals from the sensor, opens the fuel injectors. The installation gap between the sensor core and the disk tooth should be 1±0.2 mm.
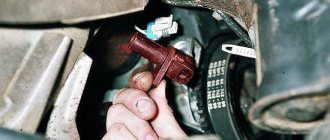
The sensor is removed to check it and replace it with a new one. Prepare a standard set of tools and perform the following sequence of actions:
First of all, you need to de-energize the car by disconnecting the minus terminal from the battery.
Disconnect the connector with the power wires from the sensor by squeezing the plastic lock on the block.
- Unscrew the sensor mounting bolt and remove it from its bracket.
- Now that the sensor has been removed, you need to check its resistance. Connect a tester to it; a working sensor should have a resistance of 500-700 Ohms. If it is significantly lower, then most likely an interturn short circuit has occurred, and if the resistance tends to infinity, then there is a break or broken contact inside.
At this point, the repair work to remove and check the crankshaft position sensor on the Lada Priora car has been completed. Carry out installation in reverse order.
Sources
- https://vaz-russia.ru/remont-vaz-2170-priora/zamena-datchika-polozheniya-kolenvala-na-priore.html
- https://avtozam.com/vaz/lada-priora/datchik-kolenvala-i-raspredvala/
- https://zubilovaz.ru/lada-priora-datchik-polozheniya-kolenchatogo-vala
Timing gear small VAZ 2170 PRIORA (21126dv.), crankshaft pulley small 21126-1005030-00
When replacing the timing kit on a VAZ 2170 with an engine modification 21126, carry out a complete inspection of the timing gears for wear on the working surface. If it is present (depleted), it is necessary to replace the crankshaft gear and camshaft. Please note that timing gears differ in the type of recess in the gears themselves.
Wait for the order to be processed, the manager to call and for clarification on the product. Most items are in stock, but due to back-to-back orders, items may not be available until stock is restocked. The warehouse is replenished daily on weekdays.
02. By courier in Yekaterinburg IN THE EVENING - 250 rubles, from 21 to 23 hours
Delivery to your doorstep, contactless delivery, contactless payment. Access to the apartment is for disabled people only! Delivery as orders accumulate!
02.2. Taxi delivery - during store opening hours! The availability of goods and the deadline will be confirmed by the manager.
Payment for goods is made in advance, on a Sber card or on the website! Delivery according to Citymobil or Yandex or Uber tariffs, choose whichever is cheaper. We recommend Yandex! . You receive the order yourself from the taxi driver.
Option1: (More convenient and faster) Order on the website or coordinate your order by phone, pay, we reserve and wait. You order a taxi directly to the entrance of the store at Baku Commissars 113 - Store sign - Auto parts illva.ru - either the taxi driver picks up the order or we can go out ourselves and give it to the taxi driver.
Option2; (The term is longer and depends on the workload of managers) We order a taxi, but payment for delivery and goods is preliminary, we will add the amount to your order or inform you by phone of the payment amount.
02.3. By courier outside the EKAD, IN THE EVENING, up to 20 km, from 20 to 22 hours
Deliveries that are too distant can be discussed and agreed upon with the courier!
04. Russian POST, prepaid
The manager will calculate the cost of delivery and notify you by phone or by mail if your phone number is not available or the cost of the order is small.
After sending, we will definitely send the TRACK NUMBER of the parcel.
On the official websites of the largest manufacturers of spare parts: SS20, Tehnoressor, Demfi, SEVI, online store illva.ru - IP Koroleva, recommended as a reliable supplier of original spare parts.
07. TC SDEK - careful and fast delivery
We recommend for parcels up to 10 kg, inexpensively and without queues, many delivery points in all large, medium and small cities, select the closest one to you on Yandex maps by entering into the search - SDEK and your city. After sending, we send you a tracking number. Fill in your full name in the Name field. Long distance payment upon receipt. Shipping is free.
05. TK GTD (TK KIT) - a lot of branches
We recommend! delivery to more than 300 cities of Russia and the EAEU (Kazakhstan, Kyrgyzstan, Armenia, Belarus, Crimea). The delivery price can be checked with our manager or on the TK KIT website. After sending, we send you a tracking number. Delivery to TK KIT is FREE!
07. TC "Energia" - reasonable prices
If TC GTD (KIT) or SDEK does not travel to your city, then this is a good option, BUT small parcels up to 5 kg can cost 2-3 times more expensive, since there is no PACKAGE service like TC GTD and, for example, send a box measuring 15x15x2 to Energy before 500 rubles and at KIT 150 rubles to any city in Russia. For large parcels from 5 kg and larger than 40 cm, the price is approximately the same.
Delivery throughout Russia and the countries of Belarus, Kazakhstan, and China.
Fill in your full name and indicate the series and passport number in the comments to the order below. Delivery in Yekaterinburg to TC Energia is FREE!
06. TC "Business Lines"
Prices are high with lots of markups! Attention!! TC DelLinii automatically includes services in the invoice - Insurance and Delivery by courier - but you may not be able to afford these services upon receipt, otherwise delivery with them will be twice as expensive! It is not profitable for her to carry small and inexpensive cargo. After sending the goods, we send you a tracking number. Please fill in your full name when ordering. In the comments to the order below, indicate the series and passport number. Payment for delivery upon receipt - the cost of sending this shopping center is indicated below.
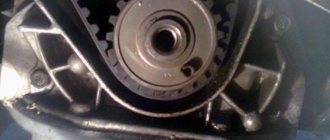
Marks on the motor housing
It will be simply impossible to install all the moving marks without additional landmarks, so they are applied to the motor housing during the manufacture of engine parts. The cylinder head has two camshafts, respectively, two pulleys. For the correct orientation of their installation, there is a notch on the rear cover of the timing belt for each pulley individually. They are two cutouts in the housing, which covers the working area of the belt drive.
It is important to install both camshaft pulleys accurately, otherwise major problems with the engine may occur. There is another landmark on the cylinder block in its lower part
This is a notch for correct orientation of the crankshaft. The pulley on this shaft operates in a recess in the oil pump housing. It is as if half-enclosed by a metal skirt. It has a slot as a timing mark for the crankshaft pulley.
Problem areas in the engine
During the operation of this vehicle, owners discover malfunctions and weak points of the engine. These include the following:
- Water pump. This element is also called a liquid pump. It breaks quite often. If the vehicle owner did not look at the temperature sensor readings in time, then a breakdown of the liquid pump can lead to serious consequences. This installation quickly overheats, and then it simply jams. To restore the functionality of the part, you will have to sharpen the cylinders and then change the piston group.
- Radiator. It is imperative to check the radiator periodically. Quite often, a leak forms in places where there are adhesions. They must be eliminated as quickly as possible.
- Roller in the gas distribution mechanism. This is another weak point where breakdowns can occur. If you hear a hum in the area under the timing belt cover while the engine is running, then you must take all necessary measures. If the hum begins to interfere only when the trip is long, then the functionality of the roller can be restored by using more lubricant. However, this will not save you for a long time, so major repairs will be required. The roller will have to be replaced. If you continue to ignore unpleasant sounds, then in the future this will lead to the fact that the load on the timing belt increases significantly. As a result, he either breaks through or flies out of his place. As a result, the valves bend, so a complete overhaul of the entire unit is necessary.
Quite often, Priora drivers complain that oil is leaking under the cover of the valve mechanism. To fix this problem, you just need to replace the gaskets.
As a rule, repair work consists of boring the cylinders or simply replacing the pistons.
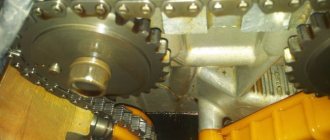
Engine design with chain drive of oil pump and timing belt
Crankshaft gear malfunctions
Common crankshaft gear problems include:
- Natural mechanical wear of the teeth. High speeds and vibrations affect the contact surfaces of gears. Over time, wear appears on the gears, and they are replaced with new ones. The wear on the timing gear can negatively affect the valve timing;
- Wear or damage to the keyway of the crankshaft gears. The fact is that even a slight gear play, which will not have a noticeable effect on the operation of the engine, will eventually develop into a problem. The crankshaft gear backlash will increase. If the problem is not addressed, the keyway may become severely damaged, requiring the crankshaft to be replaced.
Replacing the crankshaft gear
The easiest way to remove the gear from the crankshaft is if the shaft itself is removed from the engine. As a rule, gears are installed on the shaft with interference, so a puller will be required. The sequence is as follows:
- install the puller and by rotating its rod, gradually “press out” the gear;
- Remove the gear from the shaft, remove the key, and inspect the keyway on the shaft.
To mount the gear, you will need a round attachment similar to a steel tube, which will easily fit onto the shaft. Necessary:
- install the key;
- lightly press the gear;
- placing the tube on the shaft, rest it against the gear;
- lightly tapping the tube with a hammer to “seat” the gear into place.
If you only need to replace the gear, this can be done without removing the engine and crankshaft. Removing the crankshaft gear must be done after the engine has completely cooled down and the car has been immobilized.
Let's consider the procedure for replacing the timing gear of a VAZ 2110 engine.
- The first step is to remove the timing case;
- Then install the timing mechanisms according to the marks on the crankshaft and camshaft pulley (this is necessary so as not to disrupt the engine’s timing);
- If you did everything correctly, the marks on the flywheel should match. To check this, remove the rubber plug on the gearbox;
- Then you need to fix the rotation of the engine. For this it is better to use special clamps. If this is not possible, you can insert a regular flat-head screwdriver into the transmission inspection window;
- Unscrew the pulley and remove it;
- Check the position of the mark on the timing sprocket;
- Loosen the timing belt tension roller and remove the belt;
- Remove the crankshaft gear and inspect the keyway;
- Reassemble components and mechanisms in the reverse order of disassembly, checking the timing marks.
Repair stages
To do this, you need to have screwdrivers and wrenches, an assembly blade, torque wrenches, a soft hammer, and a device for installing the pistons.
The algorithm of actions is as follows:
- First you need to disassemble the motor. This will not be difficult, but all actions must be performed slowly and carefully.
- First of all, you should remove all accumulated carbon deposits that are located in the area where the cylinders are located. It is imperative to remove carbon deposits located in the oil grooves in the area of the cylinder beds.
- After this, you need to insert the bearing shells. In this case, you should focus on the marks that were made during the disassembly of the motor. The locking-type antennae of the liners must fit exactly into the grooves that are in the beds. You definitely need to keep an eye on this.
- Now you should coat the liners with oil.
- Next, you need to install the crankshaft in the cylinder block. Then the half rings are lubricated with oil. When installing, you need to check that the grooves on them are directed precisely towards the crankshaft cheeks.
- Then you need to install half rings, which are made of a compound of aluminum and steel. They are distinguished by a white tint. Installation is carried out on the front side in a bed located centrally.
- On the other hand, a metal-ceramic ring needs to be secured to the bed. It has a yellowish tint.
- Next, the half rings, which are already installed, need to be rotated so that the ends of the parts are located at the end of the cylinder bed.
- Now you need to mount the bearings (root) of the liners into the covers. Again you need to look at the marks that were made when the unit was disassembled. You need to make sure that the locking type antennae fit exactly into the grooves. Then the liners need to be well lubricated.
- After this, the covers are installed. Be sure to look at the numbering of them and the cylinder.
- Then you need to coat the threads on the bolts and the ends where the covers will be secured with engine oil.
- Then the third cover is used, and the bolts are tightened again. The same should be done with the bolts on the 3, 4 and 5 covers. Moreover, everything must be carried out in exactly this sequence.
- When all the bolts are tightened, you need to check how easily the crankshaft moves. To do this, turn it several times.
- Then the oil pump is installed and fixed. After this, you need to do the same with the holder for the oil seal located at the rear.
- A connecting rod is installed in the piston. And then the piston pin is inserted. Be sure to oil both the connecting rod itself and the pin.
- Install retaining rings. Check that they are in the grooves.
- Then the oil scraper ring and the piston ring are installed. It is best to have special equipment for such manipulations. The tool is called a puller.
- You need to check that the ring can rotate freely.
- Wipe the connecting rod journals located on the crankshaft. The same applies to the cylinder mirrors.
- A liner is installed in the connecting rod, and the antennae must be exactly located in the connecting rod. The piston and liner need to be lubricated, and then a compression ring must be installed. The connecting rod is lowered into the cylinder.
- The mandrel must be attached to one side. Next, use a regular hammer handle to push the piston.
- The connecting rod head should be mounted to the crankshaft journal area.
- Insert the cover and secure it. Make sure that the markings on the bottom and on the roof are clearly on the same side.
- All the bolts are tightened, and then all the other pistons are installed.
- Secure the oil receiver.
- Install the flywheel and plate. Be sure to first use an anaerobic type clamp to secure the bolts.
- A layer of lubricant is applied.
- An oil sump is installed.
Replacing camshafts on a VAZ 2114 with your own hands
Camshafts, like other mechanisms and components of a car, determine the quality of engine operation. This material will tell you how to determine the malfunction of the shafts, how to replace the camshafts on a VAZ 2112 16 valves, and what needs to be prepared for this.
The pulleys of the 16-valve VAZ 2112 must be replaced when they are worn out or have mechanical damage. In particular, we are talking about:
failure or exhausted service life of the pulley bearing journals; mechanical bending of the camshaft; spent service life, as well as scuffing of element cams. Lada 2112 with 16 cl internal combustion engine If some kind of extraneous knock appears in the valves while the engine is running, it is usually caused by one of these damages. If you have recorded a reduced pressure of the engine fluid in the system, this may indicate an increase in the clearances in the bearings.
To do this, in order to eliminate this malfunction, it is necessary to grind and restore the pulley bearing journals. You should also enlarge the grooves through which the engine fluid flows. This is done so that the lubricating fluid, after the next grinding, lubricates the internal combustion engine elements. As for the necks, after grinding they should be polished with green GOI paste.
Required Tools
You need to prepare:
- new replacement parts (exhaust and intake timing pulleys);
- 8 mm socket wrench;
- sealant.
New sports shafts Socket wrench “8” Glue sealant
Stages of work
To correctly carry out the process of replacing exhaust elements, we suggest you use the instructions prepared specifically for our users. This manual is also suitable for those who want to replace exhaust camshaft seals, sensors or plugs.
Which timing belt is better to choose for a VAZ-2112 16 valves
- Open the hood of your 16 valve VAZ 2112. Remove the protective cover of the timing belt.
- After this, it is necessary to remove the cylinder head cover, as well as the engine fluid emergency pressure monitoring device (sensor). The sensor is removed so that it is not damaged during the work. You can also remove the sensor wire tip.
- Once the sensor is removed, you need to remove all the screws that secure the camshaft bearing housing. This is done using an “8” socket wrench. All bolts should be unscrewed evenly, not one at a time.
- After this, dismantle the bearing housing of the exhaust camshafts of the 16 valve VAZ 2112. It should be noted that the housing is dismantled with spark plug wells. They need to be pulled out of the case.
- Now regarding the plugs for technological holes. During the camshaft replacement procedure, motorists often lose the plugs. The plugs are small round shaped parts.
The plugs need to be removed from their installation locations in the cylinder head; there are two plugs in total, and they are located in the area of the rear ends of the camshafts.
Once these items are removed, place them separately. It's better not to lose the plugs.
After this, you can dismantle the exhaust camshaft. It is advisable to remove the exhaust camshaft first. With the exhaust camshaft removed, proceed to remove the intake valve element. Now it's up to the seals. We begin to dismantle the oil seals and put them aside. By the way, when dismantling the oil seals, also be careful not to damage them. After removing the seals, inspect the dismantled devices. The oil seals must be free of mechanical damage, signs of wear, microcracks, etc. If you decide to install sports timing pulleys on your 16 valve VAZ 2112, then you need to purchase tuning parts in advance. Installation of sports elements is common among Russian motorists. Take your sports camshafts and lubricate their cams, as well as the supporting elements, with engine fluid. Please note: the exhaust and intake sports components are not interchangeable, they are marked. For example, the numbers 1006014 are marked on the components of the exhaust valves. After this, a small layer of sealant must be applied around the perimeter of the cylinder head of the 16 valve VAZ 2112, as well as along the surface of the pulley bearing housing. More precisely, the application sites are marked in the photo. It is better not to overdo it with sealant. Once the sealant is applied, the pulleys can be placed in place. Then install the bearing housing on the cylinder head. Tighten all screws evenly until the body parts are flush with the cylinder head. By the way, it is also advisable to tighten the screws in a certain sequence; you can learn more about this in the video and photo.
Which timing belt to choose for Priora 16 valves
Which timing belt is better?
The range of different timing belts is quite wide. Depending on the brand, it differs in both price and quality. But the best belt is considered...Read More
Timing kit (belt + rollers)
| Manufacturer | vendor code | price, rub. |
| CONTITECH | CT1137K1 | 2976 |
| INA | 530053610 | 3044 |
| GATES | K015631XS | 3478 |
| BOSCH | 1987948286 | 3567 |
Necessary tools when replacing the timing belt on Priora 1.6 16 cl
- Wheel key;
- Jack or lift;
- Drive wrench with extensions and heads for 10 mm, 13 mm, 15 mm and 17 mm;
- 5 mm hexagon;
- Stationery proofreader;
- Curved retaining ring puller (for tensioning the timing roller).
Khabarovsk Forum – 27R.Ru – 27 Region
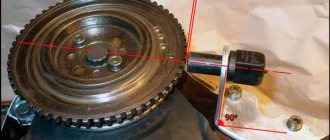
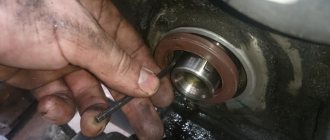
Repair. The key on the crankshaft under the timing pulley was broken.
Seems like a fairly common failure:
The end bolt on the crankshaft that secures the timing belt toothed pulley and the large outer belt pulley has become slightly loose. As a result, the key under the timing gear pulley was broken. Replacing this pulley and installing a surrogate key did not help much. It broke again in 4 days.
The eternal question: WHAT TO DO? Do not suggest replacing the crankshaft or replacing the engine. Interesting concrete experience with results, both positive and negative.
There are proposals to put this entire farm on good cold welding. What do you say?
Re: Repair. The key on the crankshaft under the timing pulley was broken.
Re: Repair. The key on the crankshaft under the timing pulley was broken.
Unread message TDA_ » 07 Nov 2009, 20:01
surik_v wrote: The eternal question: WHAT TO DO? Do not suggest replacing the crankshaft or replacing the engine. Interesting concrete experience with results, both positive and negative.
There are proposals to put this entire farm on good cold welding. What do you say?
Maintenance
The service interval for the Priora engine is approximately 15 thousand km. This is what the plant that produces this unit does. Experts recommend carrying out the first check after 3 thousand km. Basically, at this stage, more attention should be paid to the places where the fastenings for mounted equipment are located. In addition, during the first inspection and maintenance, the oil or oil filters must be changed.
If the engine has an 8-valve design, then it is necessary to check the condition of the valve clearances during the first check. If the engine has a 16-valve design, then such actions will not be necessary, since such a unit has hydraulic compensators. Similar checks are also carried out after 15 thousand kilometers for the Priora.
When the odometer already shows more than 30 thousand km, you will need to not only replace the oil filters, but also the oily liquid itself. Be sure to also change the spark plugs, and then the filters in the power system.
Often, at approximately this mileage, the timing rollers begin to function poorly or completely break. If the Priora has an 8-valve engine, then the gasket in the valve mechanism cover should also be replaced.
When the mark on the odometer reaches 45 thousand km, you should change the oil again. It is imperative to check the tension in the timing belts. Moreover, these actions are carried out for engines with both 8 and 16 valves.
Then scheduled maintenance is carried out when the mileage reaches 60 thousand km.
This time you need to pay attention to the spark plugs and generator drive belts. Sometimes you need to flush the power system
This is especially true for the place where the throttle pipe is located. It is recommended to change the sensors that control idle speed at this time.
When the mileage reaches 75 thousand km, on a unit with 8 valves it is necessary to change the timing belts. The same applies to the oxygen sensor. It is also better to replace the coolant, since by this time it has already partially or completely lost its functions.
Further maintenance will be repeated for the Priora. As a result, the minimum risk for this engine is approximately 100 thousand km. Sometimes, if all the rules are followed and proper maintenance is performed, it is possible to stretch this time to 200 thousand kilometers. Of course, if you change the design (tuning), this increases the power of the unit. But even if you comply with all the requirements, sooner or later you will not be able to do without repairs. Of course, following the rules will delay this, but you will have to either replace the parts yourself or contact a specialist.
2.10. Replacing the front crankshaft oil seal
| GENERAL INFORMATION |
DIESEL ENGINE Crankshaft oil seal
| I – oil seal with spring; II – oil seal made of PTFE material; 1 – working edge; 2 – oil seal |
Installing crankshaft oil seals
| 1 – front oil seal; 2 – front cover of the cylinder block; 3 – cylinder block; 4 – flywheel; 5 – flywheel mounting bolt; | 6 – clutch housing shield; 7 – rear oil seal holder mounting bolt; 8 – rear oil seal holder with oil seal assembly |
| EXECUTION ORDER |
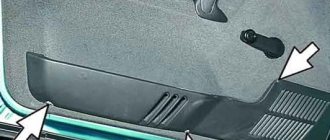
| 1. Remove the right front fender lock. |
| 2. Remove the camshaft drive belt (see subsection 2.4.1). |
| 3. Unscrew bolt 1 securing the crankshaft pulley, while holding the crankshaft from turning. At service stations, devices T 30004 or MP 1-310 are used for this (2 – device; 3 – crankshaft pulley). |
| 4. Remove crankshaft pulley 3. |
| 5. Using an MP 1-226 sealing ring puller, remove the old oil seal. |
| 6. Wipe the crankshaft with a clean cloth. |
| 7. Place the new oil seal on the crankshaft with the working edge inside the cylinder block using a suitable mandrel, for example T 10053/1. |
| 8. Press in the oil seal until it stops using mandrel 1. At service stations, for this purpose, use mandrel T 10053 with bolt T 10053/2 (1 – mandrel T 10053; 2 – bolt T 10053/2). |
items 1–4
| EXECUTION ORDER |
| 1. Remove the engine crankcase (see subsection 3.1). |
| 2. Unscrew the fastening bolts 7 and remove the front cover 2. The cover is installed on silicone sealant D176404 A2 without a gasket; it can be torn off from the block by knocking it down with gentle blows of a rubber hammer. |
| 3. Remove front oil seal 1 from cover 2. |
| 4. Thoroughly clean the oil seal seat in the cover and the mating surfaces of the cover and cylinder block from oil and old sealant residues. |
| 5. Using a suitable mandrel, press the new oil seal into the cover until it stops. |
| 6. Apply silicone sealant to the lid (the place where the sealant is applied is shown by the arrow). At the same time, do not apply too thick a layer of sealant; the layer thickness should be 2–3 mm. |
| 7. Place the guide mandrel on the crankshaft to avoid damaging the seal lip and install the cover in place. Tighten the cover fastening bolts evenly crosswise to a torque of 15 Nm. |
| 8. Reinstall all removed parts in reverse order. Please note that the sealant dries within 30 minutes, so you can fill the engine crankcase with oil no earlier than 30 minutes after installing the crankcase. |
PETROL ENGINES 1.0 l, 37 kW AND 1.4 l, 50 kW
| EXECUTION ORDER |
| 1. Remove the right front fender mudguard. |
| 2. Remove the generator drive belt (see subsection 2.3). |
| 3. While holding the crankshaft from turning, unscrew bolt 18 (see Fig. Cylinder block of 1.0 l, 37 kW and 1.4 l, 50 kW engines) securing the pulley. |
| 4. Remove pulley 17 of the generator drive. |
| 5. Remove the oil seal 16 from the cover 15 using an o-ring remover or by picking it up with a screwdriver. If the oil seal cannot be removed, you can remove the timing gear cover 15, but in this case you need to replace the cover gasket 20. |
| 6. Press in the new oil seal as far as it will go, with the working edge facing inward. |
| 7. Install all removed parts in reverse order. |
Instructions: How to unscrew the crankshaft pulley bolt yourself
Automotive repair is a process that has a lot of nuances, and repairing a car yourself without years of experience is not so easy. Even detailed instructions do not always help, since they do not take into account all the difficulties that a car owner may encounter during repairs.
If it is necessary to remove the crankshaft pulley during the repair process, difficulties may arise with the bolt holding the unit. And in this case, problems arise not only with the fact that it can “burn”, but also with its very position. In this article, we will answer in detail the question of how to unscrew the crankshaft pulley bolt in order to spend a minimum amount of time on this procedure and not damage the unit.
What is the problem when unscrewing the crankshaft pulley?
Even a person far from cars knows that the crankshaft rotates while the car is moving. Based on this, we can conclude that it will also rotate when you try to unscrew the bolt that connects the pulley and the crankshaft. The problem is that the direction of rotation of the unit and the thread of the bolt are the same. This means that by applying force to unscrew the bolt, it also affects the crankshaft, which rotates.
It should also be taken into account that while the car is moving, the bolt is strongly tightened, and this was not done by accident. It is important that in no case does the pulley move away from the crankshaft while the car is moving, which can be dangerous not only for the car, but also for the people in it.
There are other factors that do not allow you to easily unscrew the crankshaft pulley, in particular: corrosion, burning, coking, sticking, etc. Based on this, we can conclude that separating the parts is not so easy, and this will require not only special knowledge, but also a number of specific tools that are not available in every garage.
What tools are needed to remove the crankshaft pulley bolt?
As noted above, when trying to unscrew the pulley from the crankshaft, the part constantly rotates, which makes it almost impossible to do this without locking means. In addition, getting to the crankshaft pulley bolt is not so easy, given that it is located perpendicular to the axis of the car.
Before you begin work on separating the pulley and crankshaft, you must prepare the following tools:
- A socket to the size of the bolt or a socket wrench (most often the connecting bolt has a “head” of 36 or 38 millimeters);
- Lever for key or socket, as well as extension;
- Standard set of automotive tools;
- Mount (or something similar);
- Jack for raising a car;
- “Stump” or “Trest”, which can be installed as a safety net for the jack.
When all the tools are ready, you can proceed directly to the procedure of twisting the bolt and separating the parts.
Symptoms of malfunction and diagnostics of the piston group
Of course, if the pistons are destroyed after hitting the timing belt, then the car simply won’t start, that’s all. But how to determine normal wear, or burnout of the piston, requiring its replacement? The first sign of possible wear of the piston group is a drop in engine power. Of course, this could be a sign of many other problems. For example, fuel supply systems. But it won’t hurt to check the condition of the Priora pistons.
Even in modern times, the age of total computerization and widespread use of electronics, the condition of the pistons is checked with a good old compression meter. This is a pressure gauge equipped with a special valve that “collects” the pressure in the cylinders over several strokes.
How to measure the compression of a Priora piston
Two people need to do this work. One of those participating in the process is driving a Priora. At a signal from your partner, you need to press the gas pedal all the way and turn on the starter, rotating the engine until the second participant gives the go-ahead. The person checking the compression, having previously unscrewed the spark plugs, inserts the tip of the compression gauge into the vacated hole.
Attention! Professional devices have a flexible hose and replaceable bushings with spark plug threads, which is much more convenient. After this, a signal is given and the partner rotates the starter
The device will show the condition of the pistons and whether they require replacement
After this, a signal is given and the partner rotates the starter. The device will show the condition of the pistons and whether they require replacement.