What is an amplifier for?
How to connect a car amplifier with your own hands
The sound quality will depend on how well the connection is made. There are various options for installing a stereo sound or audio system in a car. So:
- If you are not satisfied with the power of your car radio (see Compare car radios and choose the best) or the quality of the sound it produces, you can solve this issue with the help of an amplifier. Of course, this is not at all the same equipment that is used in sound systems that operate on a 220-volt power supply.
- There is only one battery in a car, and two in a truck or bus - 12V each. Amplifiers for cars are designed for such a low-power network. How do they increase the existing voltage?
- The fact is that a voltage converter is built into the car amplifier. Depending on the technical characteristics of a particular device, the converter, using a pulse, can increase the voltage from 12 to 100 volts. So, the amplifier independently provides itself with the required voltage.
How to connect with your own hands
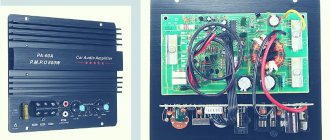
Making a subwoofer amplifier with your own hands
Those who do not know how to connect an amplifier to a car radio should first familiarize themselves with the tips and recommendations of experienced professionals. Another difficulty lies in the fact that there are several options for connecting the amplifier to the radio. This depends on the type of amplifier chosen, additional equipment, and mounting location.
The process has several nuances, taking into account which such situations can be identified.
- Connection in bridge mode.
- Carrying out installation if there are no linear outputs on the head unit. This situation often becomes a big problem for beginners when connecting an amplifier to a standard radio.
- The difference is in the connection diagram of the amplifier with speakers or with an additional subwoofer (passive or active).
- Availability of additional devices (remote microphone, headset).
- The need to connect an amplifier at home through a power supply.
- The presence of 2 amplifiers (how to connect amplifiers to the standard radio in this case).
The simplest connection of the amplifier is carried out according to the standard scheme. In this case, the amplifying device is connected directly to the battery.
Before connecting the car amplifier, the negative charge is connected to the car body (for the purpose of grounding). The positive charge must be connected to the battery terminal with the “+” sign.
After this diagram for connecting a car amplifier with a power source has been completed, it needs to be connected to other acoustic devices. During the work, you need to know which wire goes to the amplifier sockets.
A wire with red insulation on “+” is intended for connecting voltage.
The wire painted black at “-” is attached to the GND connector.
The signal cable coming from the radio is connected to the Remote socket.
In powerful audio systems, a capacitor is installed before connecting the amplifier in the car.
Step-by-step connection process
The entire workflow can be divided into several stages.
At the initial stage, you should prepare all the necessary devices and consumables.
- The amplifier is installed in a pre-selected location.
- The interior trim is dismantled to install additional and signal wires. The latter should be protected from contact with wiring.
- The power cable is laid from the battery to the amplifying device. The fuse must be mounted 30 cm from the battery.
- A signal cable is attached to the Line-out connector (it is on the radio) and connected to the Line-in socket (it is on the amplifier).
- An additional cable is used to connect the Remote connectors (on the amplifier) and B+Ant (at the source).
- Connection to speakers. If the task is how to connect an amplifier with a bridge, then one of the amplifier channels is fixed with a “+” terminal, the other with a “-”.
- If there is a capacitor, fasten with short wires.
Connection without tulips
Standard devices with a built-in amplifier often do not have linear outputs. Adapters will help solve this problem. The progress of work in this case will be somewhat different.
The head unit is removed and connected to the adapter
In this case, it is important to set the output signal indicator (it must match the characteristics of the amplifier). Attach the adapter to the wiring harness (using electrical tape). To avoid knocks and damage to the housing, the adapter is wrapped in foam rubber. The signal cable is attached to the adapter, and power is supplied to the amplifier. Line wires are secured in accordance with their standard markings.
Line wires are secured in accordance with their standard markings.
How to connect two or more amplifiers
This equipment will allow you to achieve high signal power and good sound quality. In this case, the car enthusiast must be prepared for several difficulties:
- power supply;
- turning on amplifiers remotely;
- running an RCA cable to multiple amplification devices.
If you decide to connect a second amplifier, then it must be equipped with a capacitor. The circuit should be selected taking into account the power of the devices. You can use 1 capacitor for 2 amplification devices. It is placed parallel to the battery.
The RCA cable is installed taking into account the requirements of the amplifier brand. One possible option is to use the output connectors on the amplifiers (if available). Another optimal solution is to separate channels by input. This is done using a crossover.
Where and how to install
Before you begin, you should select a suitable installation location. Some car models have niches for placing speakers. This fact makes the task easier. If the location for the speakers is not prepared by the manufacturer, then you need to choose it yourself.
It is recommended to install the front pair of speakers in the car on the outermost sections of the dashboard. Another suitable option is the front door housing. In this case, not only high sound quality is achieved, but also the most reliable fixation of the device. To install speakers in doors, measure the diameter of the speaker and cut a hole for it in the door trim.
The rear pair of speakers is most often placed on the floor in the luggage compartment. However, it will require some work to achieve good sound. The standard trunk shelf is removed, and an acoustic podium with speakers is installed in its place.
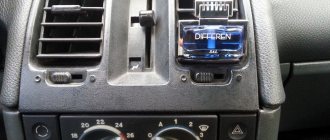
How to properly connect an amplifier in a car
This situation is especially evident when using a subwoofer: the output voltage of the amplifier at a lower supply voltage cannot drive a powerful load in the form of low-frequency dynamic drivers. Fuse The power wiring of an automobile system is an object that poses a fire hazard, therefore a fuse is required for the positive wire, which, if the voltage increases and the wire heats up during a short circuit, will melt and de-energize the system.
In this case, there is a high chance of “burning” both the amplifier and speakers.
Other models have a special switch with which you can switch the equipment to mono mode.
Connecting the cable to control the amplifier We have already said that it is necessary to lay wires to control the amplifier itself. Substituting the values, we get the maximum current consumed - 21.6 A. If we consider as an example two two-channel amplifiers with a total power of watts, then at the maximum volume level they will consume watts.
Read more: How to connect a 2-key switch
Car amplifier - connection.
The “Hi Input” connector is a special input for connecting directly to the car radio speakers. If they are not there, then there is no reason to despair, there is a way out - the car amplifier can be connected directly to the output of the car radio speakers. This will not only greatly reduce the sound quality, but may also cause a fire. As we have already said, it is very thin and is in dire need of high-quality shielding.
Also, this mode can be selected when the car radio has its own crossover and can be controlled directly from the menu. If this condition is not met, you may get unpleasant wheezing in the speakers.
How to choose an amplifier
The next parameter is the load resistance. The device is installed in close proximity to the battery, so that in the event of a short circuit, it is triggered first. You can set the start of the range in the range from 50Hz to Hz. It depends on it in what form it will arrive from the source, with or without distortion. The simplest example.
It is convenient to place it along the standard wiring. All these amplifiers belong to D-class. But of course not directly, but through a special attenuator, a device for reducing the amplitude. The connection diagram for speakers through an amplifier in a car does not allow parallel laying of power cables and wires going to the speakers. Do-it-yourself installation of an amplifier in a car
Location of the amplifier and wires to the amplifier
Having decided on the type, you need to know how to properly connect the amplifier, taking into account its location, since the length of the installation wires depends on this. For example, when installing an amplifier in the trunk of a car, additional connecting wires may be needed (connecting the radio to an amplification device and a subwoofer).
The place where the amplifier is mounted must have normal air circulation (the amplifier tends to heat up). Several possible options for installing a power amplifier:
- car trunk (disadvantage: large number of connecting wires, advantage: free space);
- center or front part of the car interior (good connection with the load and a wide range of transition frequency levels);
- rear parcel shelf in coupe or sedan cars;
- under the driver or passenger seat (the advantage of this location is free access to the device if necessary, saving connecting wires and improving sound quality).
Note: The length of the mounting wire will depend on the installation option and the design of the vehicle itself. For a multimedia system you will need about 5-6 meters, for car speakers about 3-4 meters.
The wires to the amplifier and fuse themselves are an important element. Interblock wires (interconnection wires) and power supply are selected according to the parameters (power) of the amplifier device, while adding another 30% due to low efficiency.
For example:
- With the sound volume at maximum, the power consumption of 2-channel amplifiers with a total power of 200 W will be about 260 W;
- Based on Ohm's law and taking into account that the battery voltage is 12V, we obtain a current strength of 21.6A. The cross-section of the connecting wire depends on the current strength.
Let us also add that an important element in the connection diagram is a fuse (in the event of a short circuit, it prevents a fire). An element rated 50A is installed near the car battery. There are different types of fuses: AGU, ANL, etc.
It should be noted that in addition to knowing how to connect a radio to an amplifier, it is important to take into account the features of the wire and the quality of the signal. Otherwise, the quality of the sound signal coming from the radio to the amplifier directly depends on the interconnect cable
Basic minimum requirements for selecting an interconnect cable:
- not a thin cable, with continuous shielding;
- cable with strong insulation and a good central core;
- high quality RGA connector.
How to connect a four-channel amplifier
It is necessary to check whether the car audio amplifier is capable of functioning in bridge mode before connecting 4 speakers to it. Otherwise, the sound will be distorted or the device will quickly fail after switching on due to overheating caused by excessive load. If the four-channel amplifier is connected incorrectly, the speakers will reproduce not the sum, but the difference of the stereo channel signal.
The resistance of the speakers and subwoofer connected to the same channel should not be lower than the operating resistance for which the amplifier is designed. Otherwise, the device will also be overloaded, which will lead to overheating and rapid failure of the device. The choice of connection diagram depends on the availability and number of speakers.
If the output power of a car amplifier exceeds 400 W, then to protect against power surges, a special capacitor should be connected in parallel to the power terminals. The fuse required to protect the power supply is 35 A. The higher the amplifier's output power, the greater the current the fuse must handle.
To the radio
The connection diagram for a 4-channel amplifier depends on the number of linear outputs on the car radio. If the head unit has a special output for a subwoofer, then it must be connected to the corresponding input on the device. To connect a four-channel amplifier to a two-channel radio, you need to use splitters. Otherwise, the sound will be played only by 1 pair.
Connecting a 4-channel amplifier to a radio with 4 outputs is carried out using 2 pairs of interconnect cables equipped with RCA connectors. The linear output of the front channels of the head unit is connected to the connectors marked with the letters A and B. The signal from the rear channels is supplied to sockets C and D. If the head unit does not have linear RCA outputs, then you can send a signal from the radio to the amplifier from the high level outputs, to to which the speakers are connected.
To the speakers
Connecting a 4-channel amplifier to 4 speakers is as follows:
- First, you should connect the speakers located on the left side of the car in parallel. This can be done close to the device after the speaker wiring has been installed.
- One of the wires is then connected to the positive terminal of the first channel on the amplifier, and the other to the negative terminal of the second channel. As a result, the sound power will be 2 times higher than with the standard connection method.
- The second pair of speakers installed on the starboard side is connected in the same way. It is worth considering that with this connection method, the volume of the front and rear acoustic speakers will change simultaneously. The ability to adjust the stereo balance between left and right will remain. This can be done using the controls on both the amp and the car radio.
If you need to connect 4 speakers to an amplifier and a subwoofer, then you can use the following bridge connection scheme: the subwoofer is connected to the first pair of output channels, and the full-range speakers are connected to the second. It must be taken into account that in both cases the acoustic resistance becomes half as much due to the parallel connection.
If the speakers individually have an impedance of 8 ohms, then the amplifier must be rated for a 4 ohm load. If the speaker impedance is 4 ohms, then this device should be able to handle a 2 ohm load in bridged mode.
You can also connect 8 speakers to a 4-channel amplifier, for example, in a bus or other large vehicle. The connection using the bridging method in this case is more complex. Care must be taken to ensure that the connections are correct. Each pair is checked for phasing to achieve natural and high-quality sound transmission. First you will need to connect the speakers in parallel, 2 pieces at a time. The result will be 4 pairs of columns.
Then take 2 previously made pairs of columns and connect them in series with each other. The remaining 2 pairs are assembled in exactly the same way. The result will be 2 speaker systems consisting of 4 speakers. Each of them is connected to a four-channel amplifier via a bridge circuit. It is worth considering that the device must be designed to operate with a 4-ohm load. Also in this case it will not be possible to connect a subwoofer.
How to connect component speakers to a car
When installing a sound system, the simplest operation is to install the radio in the car. Absolutely anyone can handle this; just connect the wiring outputs to the device’s power socket and slowly place it in the panel. Installing the speakers and making the correct connections is much more difficult. The speakers are connected in advance, based on a diagram that takes into account the design features of the body and the type of finishing material inside the cabin.
Speakers can be placed in:
- front and rear doors;
- kick panels;
- space under the seats;
- rear panel and trunk.
It's not just an electrical professional who places the speakers in the car door trim. You will also need a specialist auto mechanic in acoustic isolation who knows how to get clear sound and avoid rattling sound from the speakers when working. The help of this specialist will also be needed in manipulating installation in the rear panel of the machine, since the level of quality of the fasteners will play an important role in the sound.
You need to install speakers under the seats in an 8+1 layout. This will also require the intervention of highly specialized specialists with extensive experience. Such installation requires the presence of special boxes for installation. Such boxes can be purchased in stores or made to order, in accordance with the purchased acoustics. Such solutions are already an additional service.
How to connect two amplifiers to one radio
Appetite comes with eating. It’s the same with speaker systems: the process of creating an ideal car speaker system is addictive, once you touch the world of good car sound. Sooner or later, the owner of car speakers comes up with the idea that it would be nice to connect two amplifiers to one radio. When first a thought appears, and then a second amplifier, then this is all right. But the trouble is that usually thought slows down, and the amplifier (given as a gift, got it for the occasion, changed) - here it is, already there. The one you got - after all, you don’t look a gift (found) horse in the mouth.
How to connect speakers to an amplifier in a car
The simplest way is to connect two speakers to a two-channel receiver, four to a four-channel receiver, and so on. But often it is not possible to install another device, and the number of speakers needs to be increased. In such cases, one of the above methods is used.
Serial connection
With this option, the columns are connected one after another
It is very important to follow the rule here - the connection is made by connecting the positive terminal of one speaker to the negative terminal of the other. When all elements are connected in one chain, the total impedance increases, while the output power begins to fall
This method is most often used when it is necessary to reduce the output parameters of elements, for example, to reduce the power of the supporting central or rear channel. The sequential method allows you to assemble a chain of any number of loudspeakers. In this case, their total resistance should not exceed 16 Ohms. This is explained by the fact that there are very few amplifiers with high impedance.
To assemble the chain correctly, you need to use a simple formula:
A = A1+A2
where A1 and A2 are the impedance values of the speakers, and A is the impedance value that will be obtained when assembling the chain.
The connection itself is carried out as follows:
- the first column is connected with a minus to the positive channel of the second channel;
- The positive terminal connects the first speaker to the negative terminal of the device;
- the second speaker is connected with a positive voltage terminal.
If a chain of several columns is connected, the installation will be carried out according to a similar scheme.
Parallel connection
This option is exactly the opposite of the sequential one. With the parallel method, the impedance will drop and the output power will increase. The number of speakers used will depend on the receiver's ability to handle low loads, as well as the power level of the speakers used. The most common receiver models can operate at an impedance of 1–2 ohms. It is very difficult to find a device capable of operating at a resistance of 0.5 ohms.
The final impedance value is calculated using the following formula:
A = (A1xA2) / (A1 + A2)
where A is the final resistance value that will be obtained after collecting the entire chain of elements, A1 and A2 are the impedance value of the connected columns.
When assembling the chain, the connection is made in accordance with the phase - the negative terminal of one column is connected to the positive terminal of the second device.
Parallel-serial connection
This option allows you to achieve the desired sound quality. This is accomplished by combining acoustics and matching them with the receiver in terms of impedance.
Also, parallel-serial connection is the most common method. This is because it allows you to fully regulate the amount of power supplied to the device and at the same time avoid excessive load on the amplifier.
The method is combined, that is, the connection diagram is a parallel and serial connection of speakers.
It is performed as follows:
- the negative terminal A1 is connected to the positive terminal A2;
- negative contact A3 is connected to positive;
- positive terminals A1 and A3 must be connected to one channel;
- negative contacts A2 and A4 - into one negative channel;
- the resulting contacts are connected to the receiver, and the correct polarity must be observed.
When using two-channel equipment, the subwoofer will be connected in the same way. If the amplifier is four-channel, then the sub must be connected using a separate bridge.
When installing acoustics, do not forget that all terminals and wires used must be of high quality. Polarity must also be strictly observed.
If you strictly follow all the connection diagrams, you can easily achieve high-quality sound from the radio in your car.
Connecting 2 or more TVs to a passive antenna
Passive are those that do not have a structurally built-in amplifier. They receive a signal only due to their shape. If amplification is required, it is provided by an additionally connected external unit.
The best options here would be:
for 2 TVs – SAH 204F;
for 3 – SAH 306F, etc.
for 4 – SAH 408F, etc.
The maximum number of TVs connected using one splitter is 8 using SAH 812F. If a larger number is required, it is necessary to build a circuit of dividers, splitters and at least one amplifier.
Important! When connecting a TV to a passive antenna, it must be taken into account that in the digital TV broadcast range, the attenuation per tap is from 3.8 to 4 or more dB. Therefore, using a combination of a splitter and a passive design without loss of quality is only possible in an area where the signal is strong - at least 70%. Another option for connecting three or more television receivers is to use an active splitter
In this case, the cable from the antenna is connected to a divider that has an amplification stage, and it, in turn, transmits the signal to another passive type splitter
Another option for connecting three or more television receivers is to use an active splitter. In this case, the cable from the antenna is connected to a divider that has an amplification stage, and it, in turn, transmits the signal to another passive type splitter.
An active splitter can have a separate input for power or use current supplied from the receiver through the same cable that carries the antenna signal.
Difficulties and solutions
The current consumption of an audio system consisting of 2 amplifiers increases by 2 times or more. In this case, the generator and battery may not be able to cope with such a load. The battery will discharge prematurely, and the voltage in the car's on-board network while listening to music may be below normal with the engine running.
At high volumes, sound distortion may occur.
To cope with this complexity, you need to install a more capacious battery and a more powerful generator. The capacity of the new battery should be 5...15 A*h more than the standard one, and the output current of the generator should be 10...30 A. You can also install a special capacitor that will protect against a drop in the supply voltage of the amplifiers. At the moment of lowest consumption, it charges, and when the load increases, it discharges, maintaining the voltage almost unchanged.
If there is no sound from the speakers connected to one of the amplifiers, the problem may be due to an incorrect or unreliable power connection or signal from the car radio. All connections must be checked carefully. The housings of the devices should not come into contact with the car body to avoid the appearance of ground loops, which will lead to noise and interference.
Source