Every equipment owner should know how to test a car amplifier for functionality . First you need to check the presence of power at the amplifier terminals, we do this with a multimeter or any car light bulb.
The absence of voltage of 12-14 Volts at the main power terminals of the amplifier indicates:
- about problems with the car wiring;
- with a short circuit in the power supply circuits.
Many car amplifiers, budget class and above, are equipped with a built-in protection system with an indication, which is a red LED, labeled “Protect”. If everything is in order with the power supply in the car’s on-board system, then you need to more carefully repair and restore the device’s functionality at home using a multimeter .
Typical faults
Before you repair, install and configure the ULF in your car, you need to understand the breakdown. It is simply impossible to consider all the faults that can be encountered in practice, since there are so many of them. The main task of repairing a sound amplification device is to restore a broken component, the failure of which led to the inoperability of the entire board.
In any electrical equipment, including amplifiers, there can be two types of faults:
- contact is present where it should not be;
- There is no contact in the place where there should be contact.
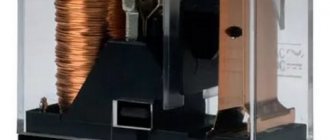
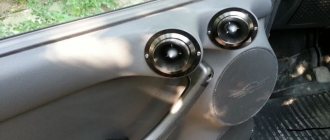
Automotive ULF microboard
Functionality check
Repair of car amplifiers first begins with ULF diagnostics:
- First you need to open the case and carefully inspect the circuit, use a magnifying glass if necessary. During diagnostics, you may notice damaged components of the circuit: resistors, capacitors, broken conductors or burnt out board tracks. But if you find a burnt-out component, you need to take into account that its failure may be a consequence of the burnout of another element, which in appearance may seem intact.
- Next, diagnose the power supply, in particular, check the output voltage. If burnt out resistors are identified, these elements will need to be replaced.
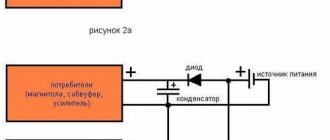
- Apply power to the ULF and the Remout output, then you need to short-circuit the system to positive and look at the PROTECTION diode indicator. If the light comes on, this indicates that the device has been protected. The reason may be poor power or its absence on the board, a broken transistor, or problems with the operation of the voltage converter. In some cases, the reason lies in the breakdown of the transistor power amplifier for one of several channels.
- If, after power has been applied, the fuse element does not burn out, you need to check the voltage level at the output. It should be approximately 2x20 in or more.
- Carefully inspect the transformer device of the voltage converter; it may have burnt out turns or broken circuits. Smell this element, it may smell burnt. In some ULF models, a diode assembly is installed between the PN output and the amplifier - if it fails, the assembly can also include protection.
Soldering iron on an amplifier chip
How to check a car amplifier with a multimeter
Before checking the sound amplifier for functionality, you need to use a multimeter to determine if there is a short circuit in the power supply circuits, which could occur as a result of a breakdown of a semiconductor diode or transistor.
To check the operation of the audio amplifier, or rather its inverting and pulsation-smoothing unit, you need to set the multimeter to current measurement mode and connect it in series to the power circuit. The operating current should be in the range of up to 500mA (that is, 0.5 A). If this value goes off scale, then the power supply installed inside the amplifier has probably failed, or rather a breakdown of the power circuit.
Troubleshooting
Do-it-yourself repair of a car amplifier is carried out in accordance with what problem was identified during its operation:
- If a transistor in a car amplifier breaks down, then before directly replacing it, it is recommended to diagnose the power supply safety element. You also need to make sure that the diodes on the buses are working. If everything is in order with these parts, the installed transistors need to be changed.
- For more specialized repairs, you will need an oscilloscope. By installing the device probes on pins 9 and 10 of the generator board, you need to make sure that there are signals. If there are no signals, then the driver is changed; if there are signals, then the field-effect transistor elements are replaced.
- Capacitors are changed much less frequently during the repair process - as practice shows, this happens infrequently (the author of the video is the HamRadio Tag channel).
How to check the audio amplifier in a radio
To figure out and understand how to check whether the sound amplifier in the radio is working or not, you need to apply an algorithm similar to checking a car amplifier. That is:
- check the presence of power and short circuit in the power supply system;
- carefully inspect the circuit board for the presence of clearly failed elements and radio components;
- check the tightness of the radiator to the transistors and microcircuits of the output stages.
There are many ways and techniques for ringing a sound amplifier, but not all specialists want to reveal the secret of finding a fault.
Basic Amplifier Settings
Now let's move on to the question - how to set up a car amplifier? There are several configuration options - for use with or without a sub.
How to properly configure the ULF without a subwoofer - first you need to set the following parameters:
- bass boost - 0 decibels;
- level - 0 (8V);
- The crossover must be set to FLAT.
After this, adjusting the audio system settings with an equalizer, the system is configured to suit your preferences. The volume must be set to maximum and turn on some track. How to set up an amplifier in a car for use with a subwoofer is also not a particularly complicated procedure.
For proper configuration, it is advisable to use the following parameters:
- Bass Boost should also be set to 0 decibels;
- the level is set to 0;
- the front crossover is set to the HP position, and the FI PASS control element must be set in the range from 50 to 80 Hertz;
- As for the rear crossover, it is set to the LP position, and the Low control must be set in the range from 60 to 100 Hertz.
It is very important to observe these parameters, since they determine the quality of the adjustment and, accordingly, the sound of the audio system. In general, the setup procedure is similar, using a level control to ensure a more harmonious sound. The sensitivity of the rear and front speakers should be adjusted to each other.
If you don’t understand anything about this, it’s better not to go there, because repairs will cost more after you burn or break.
TTauto › Blog › Secrets of connecting and setting up car amplifiers
Correct tuning of the amplifier is the key to its high-quality operation.
It is not easy to do without special knowledge. If you have little experience in setting up a music system in a car, or if this is your first time doing this, then these tips will be useful to you. You decided to improve the sound of the system in your car and bought an amplifier. Now we need to figure out how to properly connect it to the radio and acoustics, and then configure it to achieve better sound quality. A number of actions must be performed before turning on the amplifier for the first time and then adjusting it correctly.
Settings before first use
Before turning on the amplifier, it is important to pre-set it. This can be done on an amplifier that has not yet been installed, knowing the composition of the audio system components:
1) the Gain or Level control should be at a minimum;
2) the LP filter for the subwoofer channel must first be turned on at 80 Hz, and the Subsonic filter can be set at 20-30 Hz if a subwoofer is used in a bass reflex enclosure;
3) we first set the HP filter to the Full position for the door speakers or in the rear parcel shelf, and if the amplifier is connected to small 8-10 cm speakers in the dashboard, then turn on the HPF at 120 Hz;
4) when using the amplifier in channel mode, the HP filter for tweeters and LP filter for midbass must first be turned on at 4 kHz;
5) The Hi\Low Level switch must correspond to the type of connection. If the amplifier will receive a signal from speaker wires, then you need to set the control to the Hi Level position. If the signal is taken from the linear outputs of the radio, then we set the regulator, accordingly, to the Low Level position;
6) bass boosts and equalizers must be turned off at the preliminary adjustment stage;
7) on amplifiers equipped with an input selector, you can do without Y-splitters. For example, by switching the input selector to the 2CH position (copy the signal from two RCA inputs to all other channels), you can connect a 5-channel amplifier to a radio that has only one pair of line outputs. But when using all linear RCA inputs, you must remember to turn off the selector, otherwise you will lose the ability to adjust the sound from the radio.
As a rule, all amplifier controls are “recessed” into the body to avoid accidental changes in settings, and in some models the control panel is hidden by a removable cover.
We turn on the amplifier and, first of all, look at the connection indicator - is it red or green. If you have connected everything correctly and no antenna from the wiring has shorted, then the indicator will glow green, and if something is wrong, it will glow red. You can start setting up only in the first case. If the indicator is red, find an inaccuracy in the connection and eliminate it.
Checks before purchase
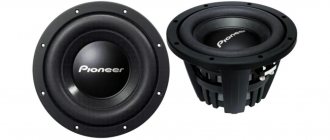
Visual inspection
Pay attention to the integrity of the diffuser, whether there are any cracks or damage on it. Inspect the line of its attachment to the basket; it should be smooth and have no signs of removal or installation. Also inspect the dust cap, it should be intact and there should be no traces of plywood on it. Pay attention to the fastening of the centering washer to the basket and reel; there should be no tears there. The magnet should not have chips or cracks. In other words, make sure that the subwoofer is not damaged or has not been repaired. We do not recommend buying refurbished speakers secondhand, even if the repair was of adequate quality.
Features of online purchasing
Online there is an additional risk of running into a scammer, in order to protect yourself as much as possible and buy a used subwoofer without wasting your nerves, follow the following recommendations:
- purchase goods through advertisements on large, specialized forums. They generally care about the quality of transactions and set trading rules with an emphasis on combating fraud;
- try to purchase equipment from a seller with a good rating, or try to find a guarantor or people who have already made purchases from this person. But it’s not difficult to do this on forums;
- check other threads and messages from the seller;
- ask for additional photographs of the product with the number and name written by hand, if for some reason these were not included in the ad;
- ask for additional photographs from the required angles to visually assess the condition of the case, magnet, suspension, coil, etc.;
- when purchasing for a large amount, there is a practice of a guarantor, when the money is transferred to a third party (a well-known and authoritative person), who gives it to the seller after the buyer confirms receipt of the goods;
- do not hesitate to ask for a photo of the seller’s passport;
- choose a method of money transfers with identification of the recipient (for example, transfers where you need to indicate the recipient’s passport details).
How to repair a home theater
In the vast majority of cases, the cause of headphone malfunction is a broken wire near the connector, but it also happens that the wire breaks at the entrance to the headphone. It also happens that you need to disassemble the earphone for some kind of mod. Doing this is not always as easy as it seems. The article will show you how to disassemble a vacuum earphone similar to a standard Samsung headset and more. How to disassemble an earphone Each earphone has two main parts and they are glued together with glue, which makes disassembly difficult. In order to disassemble the earphone, first of all we go through the edge of a knife or blade along the joint of the parts in a circle: For definiteness, I will call the silver part in front of the speaker the front wall, and the back white part - the earphone bowl. We use pliers. Tricks with a knife will not be enough, and to disassemble the earphone you will have to turn to pliers for help: If you take standard pliers, then there will be notches on the earphone, so pliers with flat noses without teeth are advisable. Why put so much pressure at all? We’ve figured out how to push, now let’s look at the question of why to push.
Low bass output.
- If two subwoofers are used, they can have reverse polarity. Then frequency compensation occurs and the low-frequency signal level becomes lower. Look at the "Reverse" button on the back of the subwoofer. Press the button once to switch the polarity. Both speakers are now the same polarity and the low frequency signal level will increase.
- The subwoofer may not reproduce bass because... a signal with an insufficient level of low-frequency component comes from the signal source. Turn the "Bass" knob on the source to its maximum position.
- If increasing the low-frequency signal level at the source does not bring results, you need to increase the signal level at the subwoofer itself. Turn the “Level” control on the rear panel of the subwoofer. Continue turning the knob until the bass level is satisfactory. Next, slowly turn the “Crossover frequency” knob in any direction and listen to select an acceptable tone level.
No sound output.
- Check the input level on the rear panel of the subwoofer. The LED will blink if there is an audio signal coming into the subwoofer. If the LED does not blink, the problem is with the signal source. Turn the volume knobs on the source. The source may be a mixer, stereo receiver or amplifier.
- Check the cable connecting to the subwoofer for wear or breakage. If there are signs of mechanical defect, replace the cable.
- Remove the back panel of the subwoofer and inspect the speaker cone winding for damage or breakage. If there is mechanical damage to the winding, the speaker must be replaced.
In case of serious electrical breakdowns or any breakdowns that you cannot fix yourself, we recommend contacting qualified specialists.
Where to begin?
Before checking any element with a multimeter for serviceability, be it a transistor, thyristor, capacitor or resistor, it is necessary to determine its type and characteristics. This can be done by marking. Once you know it, it won’t be difficult to find a technical description (datasheet) on thematic sites. With its help, we will find out the type, pinout, main characteristics and other useful information, including replacement analogues.
For example, the scanning on the TV stopped working. Suspicion is raised by the line transistor marked D2499 (by the way, a fairly common case). Having found a specification on the Internet (a fragment of it is shown in Figure 2), we receive all the information necessary for testing.
Figure 2. Specification fragment for 2SD2499
There is a high probability that the datasheet found will be in English, no problem, the technical text is easy to understand even without knowledge of the language.
Having determined the type and pinout, we solder the part and begin testing. Below are the instructions with which we will test the most common semiconductor elements.