I made myself additional stops for the rear windows, but I didn’t like that they just burned. I started looking for flashing brake light circuits, all the circuits were either difficult for me, since I’m not good at this or not working.
But I still found a simple circuit for NE555. I assembled it and it worked. There are several flashes and then it burns constantly without irritating the cars behind. Just what I wanted! I'm sharing with you!
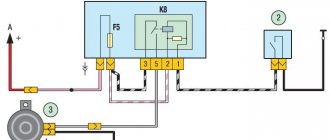
We need: Microcircuit - NE555 Diode - 1n4007 Transistor - IRF540 C1- 22 uF C2- 10 uF R1-1k R2- 5k R3- 10k R4- 470k
So the diagram itself:
You can download it here.
Well, a few photos themselves...
Stopak's work on video;
It might come in handy for someone, because the fashion for them is coming back...
How to make a flashing brake light with your own hands? Our Guide »
How to make a flashing brake light with your own hands? Our Guide
It depends on the wishes of the owner himself. You can make only the LED strip flash. It looks quite aesthetically pleasing in combination with statically burning lanterns.
How to make a flashing brake light with your own hands?
To answer this question more fully, you should understand the principle of operation of such a modification. In fact, a special relay is built into a regular circuit. As a result, after pressing the brake, the brake lights begin to operate in pulse mode. After a couple of seconds, normal operation begins. In practice, this looks like a few blinks and then the light just stays on. This attracts the attention of drivers behind. Thus, the risk of an emergency situation is reduced.
This is perhaps the easiest way to make a flashing brake light. True, this scheme is not always reliable. Relay failures are possible, but it all depends on the quality of the build. To make such a device, you can take almost any turn signal relay. But it is best if it is a relay already used on your model. This will make connection work easier and reduce the risk of failure.
The connection is made to standard wiring. This is not difficult to do. It is advisable to add a fuse to the circuit. The same one that is installed in your car on the turn signals will do. Before final installation, it is advisable to check the functionality of the assembled circuit. The disadvantage of this design is the constant blinking of the signal.
Using this chip you can make a brake light control unit. When assembled correctly, you can customize the brake light to your liking. To change the number of blinks, the capacitance of capacitor C1 is changed, as well as the resistance of the resistor. The second chain, C2-R2, regulates the frequency of flashes. In order to avoid problems on the road with law enforcement officers, it is advisable to add to the scheme the ability to quickly disable the function.
This is done in two ways:
- You can install a button with a 1 kOhm resistor in the cabin. When it is pressed, current is supplied bypassing the microcircuit and the stops operate in normal mode;
- A simpler option is to use a regular switch, which is used to switch the brake lights to normal power if necessary.
What will be the fine?
If the driver allows the installation of non-standard lighting equipment, then he must obtain a permit for it from the traffic police and go through several stages of approval, including within the framework of technical expertise. Based on the results, a certificate of changes in the design of the vehicle is issued. Approximately the same procedure is carried out when approving non-standard daytime running lights. If such a document is not on hand, then the traffic police inspector has the right to issue a fine.
In accordance with Article 12.5. Code of Administrative Offenses of the Russian Federation, “driving a vehicle in the presence of malfunctions or conditions under which the operation of the vehicle is prohibited shall entail a warning or the imposition of an administrative fine in the amount of five hundred rubles.”
Thus, red flickering lights are prohibited by traffic regulations, and their use is not permitted. If such lamps are nevertheless installed and they are very annoying to drivers, then any citizen has the right to write a complaint to the traffic police about the improper use of lighting equipment, attaching footage from the DVR to it.
Do-it-yourself flashing brake light
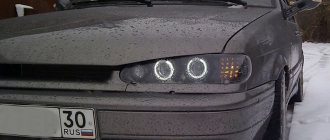
Many have noticed that in cars that participate in Formula 1, the brake light not only lights up red, but also flashes. This kind of signal makes it clear that braking is in progress. By analogy, people modify the brake lights of their cars. There are many ways to achieve a flashing brake light, let's look at the most popular ones.
Flashing the brake light using the turn signal relay
You will need the following items:
Next, we make the connection according to the diagram, namely: plus to pin 49, ground to pin 31, and plus light bulbs to pin 49a.
Result on video
Flashing stop lights based on two timers
This scheme has some advantages, but requires a lot of knowledge, time and effort to implement. It has one difference from the first scheme: the stops blink at the first moment of braking, and then they simply light up as usual.
If desired, you can adjust the flash frequency and blinking duration.
To implement the scheme, the following is necessary:
When to replace
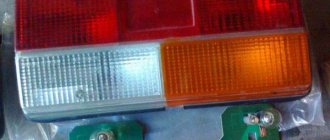
Brake lights, as a rule, burn out at the most inopportune moment, or it happens that they stop working correctly, this especially often happens if it performs two functions, dimensions and stops, and it turns out that the dimensions work, but the stops do not. In addition, if the contact is poor, the light may begin to blink. In these cases, it is necessary to replace the rear brake light bulb. It is also quite rare to change the working lamp, this is done if the result from the standard one does not suit you, and you want to get a better result, in this case it is changed to LED lights, since it has a number of advantages such as:
- Specific luminous efficiency is better
- The operating time is 100 hours, which is significantly higher than that of a simple lamp, for which these hours are equal to two thousand
- It flares up instantly, thereby warning vehicles behind you about your braking earlier.
- High performance properties, which allows you to extend work, despite the vibrations that occur when driving on our roads
How to make a flashing brake light with your own hands? Our Guide
Many drivers are interested in how to make a flashing brake light with their own hands. This is perhaps one of the most attention-grabbing types of tuning. This modification is not too difficult to do. Well, the appearance improves significantly. Thanks to this tuning, it’s easy to stand out from the crowd on the road. Of course, not all police officers will be able to appreciate the idea. Therefore, it is advisable to provide a way to quickly disable such a function. The brake lights can operate in a constantly flashing mode. So it’s fragmentary, only immediately after pressing.
ONLY SIMILAR
Car manufacturers didn't think much about the poor owner who decided to change the brake light bulb himself. Not only are lamps available with base and baseless, but the former only seem the same. And it would be nice if they were single-stranded or double-stranded, since for each type the fixing protrusions on the base are located differently! A few years ago, these pins were always arranged in diameter, that is, strictly opposite each other - everything was good, simple and clear. But then for some reason they came up with the idea of shifting them along the arc of a circle by a couple of tens of degrees - and the assortment doubled! In addition, the traditional “trick” of double-filament lamps remains: here the pins are located, although in diameter, but at different heights. In general, do not rely on your eye, but take the burned-out bulb with you to the store for a thorough comparison.
Do-it-yourself flashing brake light
Once, while in St. Petersburg, I noticed that the car in front had a flashing brake light. It became interesting, I also decided to make myself a similar brake light. Prices for such devices start from 400 rubles.
And I just found several options for a flashing brake light. I chose the famous NE555 timer.
For assembly we need:
Microcircuit - NE555, Diode - 1n4007, Transistor - IRF540, C1- 22uF, C2-10uF, R1-1k, R2- 5k, R3- 10k, R4- 470k, Breadboard, contacts.
Schematic diagram of a flashing brake light
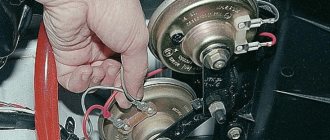
Mounting on mounting plate
The circuit is installed in the brake light panel
I like to solder on a mounting plate. Yes, it’s very tedious, but you don’t have to bother with etching the board.
When soldering, be careful, especially with a field-effect transistor; it is better to hold the legs of the transistor with tweezers for heat dissipation. Strictly observe the polarity or you will burn the entire circuit. To be on the safe side, you can include a diode in the positive bus section of the circuit.
This is how the signal works from the outside.
Flashing stop light
In previous publications, the topic of a brake light with dynamic lighting has already been touched upon, or rather, a version of a brake light with running lights was mentioned. See the article "Brake Signal Running Lights". Some will be content with the normal flashing of brake lights. In traffic, this will attract the glances of other road users. And there is even an advantage of this option - the complexity of the circuit will be quite low. It is the flashing signal that will be discussed in this article.
So, a simplified flashing brake light is obviously inferior in terms of entertainment value to its older brother, but this option is also much easier to make. Every cloud has a silver lining. Meanwhile, there is some point of adjustment in this case, namely adjusting the blinking frequency of the LEDs. This can be controlled using capacitors of various capacities. From words to deeds - let's turn to the electrical diagram
Electrical circuit of a blinking brake light “option 1”.
A do-it-yourself flashing brake light can be made based on the brake light circuit with running lights already known to us, which was described in previous issues. The circuit is based on the KA561LA7 microcircuit; 2 of its elements contain a multivibrator. To obtain a higher-quality digital signal at the output, the third element of the microcircuit is used as an inverter, playing the role of a separator of the analog circuit and a multivibrator. As we mentioned above, the blinking frequency directly depends on the capacitor capacity. The relationship is inverse - the higher the capacitance of the capacitor, the slower the blinking occurs. On the other hand, a capacitor with a smaller capacitance will provide a higher blinking frequency. Along with this, the resistor located in the capacitor circuit also has some influence on the frequency - a recharging cycle of the capacitor occurs through it.
Circuit elements - DIY replacement options for a flashing brake light
Microcircuit - let's first consider its analogues. The easiest way is to get the American version CD4011A “Texas instruments”. It will be quite difficult to find a chip made in the USA, but there are plenty of Chinese options on the market.
Capacitor C1 has the following parameters: current is alternating, voltage above 16 V. Resistors must cope with a power of at least 0.25 W. You can install any LEDs that meet the voltage requirement above 3.3 V. Color is also an important indicator - brake lights should be red.
A universal circuit board will do an excellent job as the basis of our circuit; you just need to organize the connection of the elements with flexible conductors, which in itself is the simplest way to implement it. Also, no configuration or adjustment is required; it is only important to assemble everything correctly and preferably test it before putting it into operation.
The only drawback is the absence of any control based on the blinking principle. This circuit ensures that the brake light blinks from the moment you press the brake until it is completely released. It is logical to assume that it would be worth blinking for 3-4 seconds after pressing, and then shining constantly. In the following diagram we will look at the implementation of just such an option.
Electrical circuit of a blinking brake light “option 2”.
This scheme implements the option of blinking during the first moments of the brake lights, and then the LEDs should shine evenly, without flickering. The circuit is based on 2 timers based on NE 555 microcircuits. First, the generated control signal is discretely supplied to the transistor in the same way as the first circuit, and then a constant voltage is generated on its basis. Eventually the relay stops working and becomes a conductor.
Note that if it is necessary to eliminate the influence of the circuit, it is necessary to move the switch SW1 to position 1-2. However, the transistor and relay will be used after such a switch.
To enlarge the diagram of a flashing brake light, just click on the picture; there is also a description and marking of the parts.
The circuit board for a blinking brake light with your own hands may look like the image below, and the circuit can also be implemented on a universal circuit board.
Shown here is a version of the finished board from the track side.
On the top side is the side where the parts are soldered.
Removal and replacement
The rear lights of the Niva Chevrolet, as on other cars, are rarely changed, only if the glass is damaged. To change faulty lamps it is not necessary to completely remove them.
To complete this procedure, you must follow a certain procedure:
- We remove the terminals from the battery so as not to cause a short circuit during operation.
- Then we open the trunk and remove the part of the trim that covers the mount.
- The part is secured with 4 bolts, which can be unscrewed with a 10 mm ratchet wrench.
- Disconnect the wire terminals.
After this, you can install the new one in reverse order.
In order to replace a faulty lamp, it is not necessary to completely remove the lamp. It is enough just to lift the part of the casing that covers the cartridges. Then we press the plastic clips to remove it and replace the burnt out lamp with a new one.