Design and typical malfunctions of rear lights
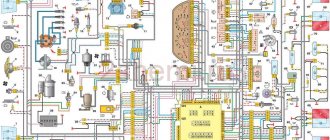
Structurally, the rear light of the VAZ-2107 car consists of:
- left and right diffusers;
- left and right conductors;
- two 4 W lamps and two sockets for them;
- six lamps with a power of 21 W and six sockets for them;
- four M5 nuts.
The rear light of the VAZ-2107 consists of diffusers, conductors, lamps and sockets.
The brake light and side lights on the rear light should be red, the turn indicator should be orange, and the reverse indicator should be white . The most typical malfunctions of the rear lights of the VAZ-2107:
- lack of mass on the lantern;
- lamp burnout;
- oxidation of contacts;
- broken or frayed wiring;
- failure of connector contacts, etc.
No mass
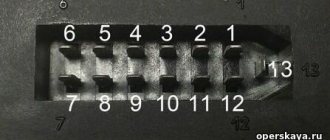
One of the reasons that the tail light does not work may be the lack of weight on it. You can check the integrity of the ground wire visually or by ringing it with a tester. The ground wire in the standard configuration of the VAZ-2107 is usually black, and it occupies the extreme position on the connector block. It is followed by wires:
- brake light (red);
- side lights (brown);
- fog lamps (orange-black);
- reverse lamps (green);
- direction indicator (black and blue).
The wires on the connector go in a certain sequence and have their own colors
Illuminated license plate VAZ-2107
To illuminate the license plate in VAZ-2107 cars, AC12–5-1 (C5W) type lamps are used. The license plate illumination is turned on by the external lighting switch - the first button on the left under the gear shift lever. To replace the license plate light bulb, you need to lift the trunk lid, use a Phillips screwdriver to unscrew the two screws holding the backlight light and remove the lampshade from the light housing, then replace the light bulb.
To illuminate the VAZ-2107 license plate, AC12–5-1 (C5W) type lamps are used.
The rear lights of the VAZ-2107 car are a key element of the lighting system and perform a number of functions related to the safety of the vehicle. Proper operation and timely maintenance will extend the life of the rear lights and ensure comfortable and accident-free driving. You can give your car a more modern appearance by tuning lighting fixtures, including taillights.
Causes of reverse lights not working
If you find that the light on the seven does not light up when reversing, then you need to immediately identify the problem and fix it. Most likely the reason will be:
- Fuse blown. If any electrical appliance or circuit malfunctions, the first step is to check the serviceability of the fuses. From the name you can guess that the essence of a fuse is to protect an electrical circuit from high current and short circuit. If the fuse is blown, it needs to be replaced and the lights will work properly.
- Bulbs burn out. One of the reasons is the burnout of the lamps, but this factor is easy to exclude, since if the lamps burn out, not both of them burn out at once.
- The integrity of the wiring is compromised - mechanical stress often contributes to damage to the wires. Rarely is the cause of their damage due to a short circuit. To determine if the wiring is working properly, you will need to use a multimeter by ringing each wire or measuring the voltage on the lights.
- Sensor malfunction - it is also called the reverse switch, since it is responsible for turning on and off the light alarm. Moreover, it may either break, in which case it will need to be replaced, or the terminals may oxidize, compromising the quality of the contact connection.
This is what the sensor on the gearbox looks like:
The sensors on 4- and 5-speed gearboxes of 7s are different. You need to pay attention when purchasing.
Malfunction of the reverse sensor is quite common, so you first need to check the integrity of the fuse, then make sure there is voltage on the lights, and only then proceed to replace the switch in question. Moreover, its malfunction can be manifested not only by the lack of lighting of the lights, but also by constant burning. If the 3X lights are constantly on, then it is necessary to replace the sensor.
How to find the reverse sensor VAZ 2107
The element in question, which is responsible for turning the rear lights on and off on the VAZ 2107, is located in the main mechanism - this is the gearbox. To find the location of the switch, you need to crawl under the car and look at the box. The element is attached to the bottom of the gearbox on the right side.
It is impossible to confuse it with another sensor if you know where the box is and what it looks like. There is only one sensor installed on the box, not only on carburetor, but also on injection modifications.
This small part cannot be repaired, so if it is found to be faulty, it will need to be replaced. To make sure that the cause is in the device in question, you should remove the lead wires from the sensor terminal, and then move the gear shift lever to the reverse position. Set the multimeter regulator to the continuity position and touch the two contacts with the probes. If the device emits a sound signal when the reverse gear is engaged and, on the contrary, is silent when the lever is moved to the neutral position, it means that the element is working and you need to look for the cause in other components. Knowing where the frog is located on the VAZ 2107, it will not be difficult to check it further.
Read, it may come in handy: What kind of torpedo can be installed on a VAZ 2107
Location under the bottom of the car
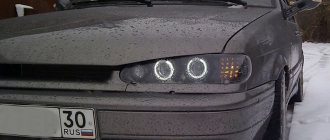
Tuning headlights VAZ-2107
With the help of tuning, you can achieve a more modern and stylish appearance for the VAZ-2107 headlights, give them exclusivity, and, in addition, improve their technical performance. Most often, LED modules assembled in various configurations, as well as glass tinting, are used for tuning. You can purchase ready-made modified headlights or do the conversion yourself. Among the most popular options for tuning headlights are the so-called angel eyes (LED modules with characteristic contours), eyelashes (special plastic covers), DRLs of various configurations, etc.
Video: black “angel eyes” for the “seven”
VAZ-2107 is one of the most respected domestic car brands by car owners. This attitude is due to a number of reasons, including reasonable price, adaptability to Russian conditions, availability of spare parts, etc. The driver can perform minor repairs on almost any vehicle system on his own, using a set of publicly available tools. All this fully applies to the lighting system and its main element - headlights, the repair and replacement of which, as a rule, does not cause any particular difficulties. When carrying out repair work, you must, however, adhere to certain rules so as not to damage or disable adjacent components and parts of the machine. Practice shows that careful and caring attitude towards lighting devices can guarantee their long service life.
How to change the reverse sensor on a VAZ 2107
Before replacing the sensor, it is advisable to clean the gearbox of dirt. If this is not done, it may get into the oil, which is located in the crankcase. Replacement of the VAZ 2107 reverse sensor is carried out in the following sequence:
- disconnect the wire tips from the sensor contacts;
- Using a 22mm wrench, unscrew the old sensor from the gearbox, removing it along with the metal washer;
Note: if the sensor is “stuck” and cannot be unscrewed with a wrench, you can try to unscrew it using a chisel and hammer. However, this must be done extremely carefully so as not to damage the gearbox housing, which is made of a fragile aluminum alloy.
- clean the sensor seat;
- put a new washer on the new sensor and screw it into the gearbox using a 22mm wrench;
- Place the wire ends on the sensor contacts.
Now you know how to change the reverse sensor on a VAZ 2107. After installing the new sensor, pay attention to how tightly the wire tips fit on the sensor contacts. They should not dangle or fall off. If necessary, tighten the tips using pliers. It is a good idea to clean the tips before placing them on the sensor contacts. This way you can be sure of reliable contact on this connection.
What is needed for replacement
To change the part, you only need two things: a 22mm wrench and a new reverse sensor with a metal washer-spacer. It is advisable to use a socket wrench with a long wrench. But, if you don’t find one, you can get by with a cap or even a carob.
Tinting the rear lights of VAZ 2107
This is one of the popular, simple and cheap types of car tuning. With its help, you can give a stylish appearance with minimal time and money. In practice, two methods of tinting are used: paint and film. It cannot be said that one is worse or better - they both have advantages and disadvantages.
To tint headlights with paint you need a special heat-resistant varnish. To tint you will have to remove and disassemble the taillights. The order of operations is as follows:
- Open the lid in the trunk trim.
- Remove the board with lamps.
- Unscrew 4 screws.
- Move the upholstery to the side.
- Disconnect the flashlight connector.
- Unscrew the nuts securing the lamp to the body.
- Take out the flashlight.
- Remove the glass.
- Clean the surface.
- Clean the glass with sandpaper
- Apply paint.
- Assemble and install the rear light.
Painting with varnish should be carried out in a clean room so that dirt or dust does not get on the surface to be painted. Before painting, the surface must be prepared by thoroughly cleaning and degreasing it. You need to apply paint from a can from a fairly large distance, otherwise it will “float”. Painting should be done in several (5-6) layers. Each layer is applied to the dried previous one.
The taillights of the VAZ 2107 can also be tuned using a tint film. In this case, the film is applied to the glass instead of varnish. What to consider when gluing film to lights:
You need to use more expensive and high-quality film.
It is better not to use film with low light transmittance. In addition to black, you should pay attention to red and other colors of film. They often look even more impressive and original. You can apply not full, but partial film tinting
This helps transform the appearance of your headlights without reducing their brightness. After tinting the lights, it is worth replacing the standard lamps with more powerful ones to compensate for the loss of brightness.
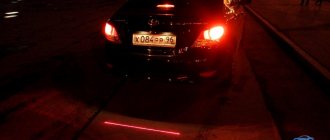
The main causes of brake light failure
Unlike dimensions and hazard lights, your car must have working brake lights. They signal to cars behind that the driver is slowing down. Notifying drivers behind when braking helps prevent collisions and accidents. It is quite difficult to detect a stop fault on a VAZ 2107 yourself, since these signals are located at the rear. In order to see the operation of the brake lights, you will need two people, one of whom must press the brake pedal, and the second must control the effect.
When you press the brake pedal, the following effects may occur:
- If they don’t light up, you need to look for the problem. Moreover, the signal that both lamps on the car are not lit indicates the need for a global check, since paired light elements burn out in rare cases.
- They are half lit - if only one brake light is on, then you need to disassemble the second headlight and check the serviceability of the lamp. It is more likely that the lighting element (light bulb) has failed, and less often the cause may be a broken contact.
The reasons for the stop malfunction on the VAZ 2107 are:
Flashlight weight
- Fuse F11(10A) has failed. A fuse consists of a fuse-link that burns out when a large current passes through the circuit. The fuse is designed for the appropriate current value, so its blowout may be due to a short circuit or the installation of high-power lamps.
- Wiring is shorted or damaged. This type of malfunction often occurs after work has been carried out in the interior or luggage compartment.
- Oxidation of contacts. Oxidation may form over time at the junction of the lamps with the socket, or at the junction of the wires to the headlights, which is caused by poor contact and moisture getting inside the taillight headlight unit.
- Burnout of incandescent lamps - lamps have their own resource, so often the inoperability of the brake light is associated with their burnout.
- The malfunction of the toad or frog is a sensor that is located in the brake pedal structure. The sensor closes the contact when the brake pedal is pressed, causing the brake light to come on.
These are all types of malfunctions that are associated with the inoperability of the stop on the VAZ 2107 and other cars. You can identify the breakdown and fix it yourself, without contacting an electrician. To identify a breakdown, you will need a tester or multimeter. Let's take a closer look at how to find and fix brake faults on a VAZ 2107.
Read, it may come in handy: Mud flaps on the VAZ 2107: replacement features
Checking the light bulbs
The most common scenario is trivial: a light bulb or even two has burned out (this also happens, for example, when a car gets caught in a heavy downpour). Well, or in case of abnormal contact closure. So, we disassemble the sidelights from the inside and take out the brake light bulbs. If they turn black/cloudy/stained, we change them immediately without further discussion. If the defect is not visually detected, then the best option would be to take a good-quality spare light bulb and replace it with the problematic one. In this case, the brake pedal should be in the pressed position (by the way, if you are checking alone, you can put something heavy on it, for example, a brick). If a new lamp lights up, then this is exactly the problem. No - let's move on. Checking contacts:
It is possible that the contacts in the socket have oxidized and do not give a good light bulb a chance to light up. This reason can be detected visually by removing the lamp and inspecting the socket. To clean the oxides, we rotate the lamp in the socket or, to be sure, we treat the socket from the inside with a small piece of sandpaper. You should also check the contacts leading to the cartridge; damage may occur or the cartridge needs to be replaced. If this is okay, we continue checking the contacts in the wire block for oxidation. Manual stripping may be required. Or try putting on and taking off the spare part several times in a row (this will remove the oxide layer if it is not too large).
DSS:
For VAZ owners, the brake light sensor is one of the most vulnerable points in the system. This may be why the lights don't light up. You can check for a malfunction using a fairly simple method: remove 2 wires from the frog and connect them directly with a piece of wire. If at the same time the brake lights come on, then the DSS needs to be changed - it is not working. By the way, many experienced VAZ owners begin a general check to identify such faults with this sensor, since it fails quite often.
Contacts have oxidized
It is not difficult to identify such a malfunction; to do this, you should unscrew the lamp from the socket and inspect the inside. Oxides and rust can be identified visually, and to eliminate the malfunction, you will need to clean the contacts with sandpaper. After this, before installing the light-emitting element, you should treat the socket area with silicone grease.
This is interesting! The contacts may oxidize, become corroded, or become loose, resulting in the brake lights not functioning properly. The contacts should also be checked on a frog or DSS.
The device of block headlights VAZ 2107
The headlights on the VAZ 2107 are plastic boxes with a front side made of glass or durable transparent plastic.
Glass headlights are scratch-resistant and provide better, more focused light output. But glass breaks easily when hit by stones and physical impact. Plastic has less focusing properties and is scratched. But it has greater fracture strength and small stones are unable to damage it. This is why many car owners prefer plastic headlights.
Inside the headlight unit there is a 12-volt lighting lamp with two filaments for low and high beam, a side (parking) lamp and a turn signal lamp. The latter is also intended for emergency signaling.
The lamps are inserted into sockets, and behind them there is a reflector that focuses the light and directs the beam onto the road surface.
The VAZ 2107 headlight has an important detail - a hydraulic corrector. When heavily loaded, the front of the car, and with it the headlight beam, lifts up. The hydraulic corrector changes the vertical angle of the headlight, which allows you to adjust the angle of the light flux and direct it down onto the canvas.
The back side of the headlamp has a cover, which is used to replace burnt out lamps.
Typical headlight malfunctions and methods for eliminating them
During operation, the car headlight is one way or another subject to mechanical damage and exposure to atmospheric factors, so after a certain period of operation it may require repair or restoration.
Glass replacement
To dismantle the VAZ-2107 headlight, you will need an 8-size open-end wrench and a Phillips screwdriver. The sequence of actions when removing the headlight is as follows:
- Under the hood, you should find the power plugs for the lamps and hydraulic corrector and disconnect them.
- On the front side of the headlight, you need to unscrew three bolts with a Phillips screwdriver.
- When unscrewing one of the bolts from the reverse side, you will need to secure the counter nut with a size 8 wrench.
- Remove the headlight from the niche.
The glass is attached to the headlight housing using sealant. If it is necessary to replace the glass, the joint should be cleaned of old sealant, degreased and a new sealing layer applied. Then attach the glass and secure it with masking tape. After 24 hours, the headlight can be replaced.
Video: replacing headlight glass on a VAZ-2107
Replacing lamps
To replace a burnt-out high-low beam lamp in a VAZ-2107 headlight, you must:
- Disconnect the negative battery terminal.
- Remove the headlight unit cover by turning it counterclockwise.
- Disconnect the power supply from the lamp.
- Remove the spring clip from the chuck grooves.
- Remove the lamp from the headlight unit.
- Install the new lamp in reverse order.
When carrying out work to replace lamps, you should remember that when we touch the lamp bulb with our hands, we oil it, and this can lead to premature failure of the lamp.
Replacing side light bulbs and direction indicators, as a rule, does not cause any difficulties: to do this, you need to remove the corresponding socket from the reflector and remove the lamp by rotating it counterclockwise.
Video: replacing the main and side lamps on a VAZ-2107
Glass cleaning
If the headlight glasses have lost their transparency, you can try to restore their appearance and light transmittance by contacting a service station specialist or performing the restoration of the optics yourself. To do this, the car owner will need:
- sandpaper of different grain sizes;
- abrasive and non-abrasive paste;
- masking tape;
- rags;
- grinding machine or grinder with a grinding wheel.
Glass restoration work is carried out in the following sequence:
- The headlight is covered around the perimeter with masking tape or film so that during work the paintwork of the body is not damaged.
- The surface of the glass is treated with sandpaper, starting with coarse sandpaper and ending with fine-grained sandpaper. If grinding is performed mechanically, the surface should be periodically moistened with water.
- The treated surface is thoroughly washed with water.
- The glass is polished with polish and washed again with water.
- The surface is alternately treated with abrasive and non-abrasive paste using a grinding machine with a foam wheel.
Installation of xenon headlights on a VAZ 2107
Xenon headlights are characterized by a particularly powerful luminous flux, which requires additional focusing using lenses. Full-fledged xenon headlights are expensive and include, in addition to the power supply and lamps, an automatic beam height adjustment system and a headlight glass washer. Each of the elements is extremely important for safety:
- correct focusing and adjustment of the light flux is necessary so that oncoming drivers are not blinded by bright light;
- Without a washer, dirty headlight glass overheats and may burst.
If you do not have the funds to install xenon headlights of appropriate quality, it is better not to install fakes, endangering yourself and other road users, so we do not recommend installing this type of lighting and did not describe the connection