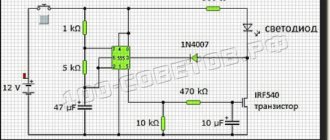
Hi all! I can’t say that car horn malfunctions occur very often and everywhere. But we cannot exclude a situation in which the signal does not work.
Car horns are safety features. Moreover, they must be present in all vehicles and be in good condition. This will allow you to give a timely signal to other road users, inform about the approach, and prevent collisions and other dangerous situations.
But at some point it happens that the sound signal located on the steering wheel suddenly stops working. It is necessary to address the issue of diagnostics as soon as possible, since it is dangerous to continue operating the car with a non-working horn.
Fuses and relays in Lada Priora, electrical diagrams
Lada Priora is another car in the line of new VAZ cars, which is gaining popularity among segments of the population. External similarities with the 10th model attract the attention of young people; the relatively low price is also a reason for purchase for most car enthusiasts. Along with the growth in popularity, the owners of this model are gaining experience in repair and maintenance, which is becoming more and more every year. If your Priora has electrical problems, do not rush to get upset; first, check the fuses and relays in your Lada Priora. These are the ones that will be discussed in this article.
Features of electrical equipment
The electrical circuit of a Lada Priora car includes several main elements - front and rear blocks, control panel blocks, as well as engine control systems. All these elements are connected to each other by special plugs located on the left under the center console, as well as above the mounting block. Only the control panel and engine control system harness is located in the heating system shaft, on the driver’s side. It should also be noted that the rear block and the device are connected to the control device via an electrical package, which is located inside the car.
The main systems that the electrical circuit includes:
- heating unit, stove;
- optics, including main headlights, dimensions, fog lights, turn signals;
- windshield and rear window cleaning system, if provided for by the vehicle design;
- car central locking;
- electric windows.
Diagnostic tester with test lamp for checking electrical circuits
Fuse box in the passenger compartment of VAZ-2170, -2171, -2172
The fuse box in Priora is located at the bottom of the dashboard, on the left side of the steering wheel. To get to it, you need to open the cover, which is held on by three latches. Rotate each locking knob 90 degrees and pull the lid down and it will snap open.
Fuses in the interior mounting block
F1 (25 A) - radiator cooling fan . If your fan does not work, check its motor by applying 12 V directly to it from the battery. If the engine is working properly, then most likely the problem is in the wiring or connectors. Check the serviceability of relay K1.
The fan in the Priora usually turns on at a temperature of 105-110 degrees. Do not allow the engine to overheat, watch the arrow of the temperature sensor.
If the fan runs constantly and does not turn off, check the coolant temperature sensor located on the thermostat. If you remove the connector from the working sensor, the fan should turn on. Check the wiring to this temperature sensor, as well as the contacts of relay K1, move this relay, clean the contacts. If this is the case, replace it with a new relay.
F2 (25 A) - heated rear window . Check together with fuse F11 and relay K2. If the rear window does not fog up, the heating element threads may have broken. Inspect all the threads and if you find a break, seal it with special glue or varnish, which can be bought at car dealerships for 200-300 rubles. Check the connection contacts at the terminals to the heating elements at the edges of the glass, as well as the switch on the dashboard and the wiring from it to the rear window.
F3 (10 A) - high beam, right headlight . F4 (10 A) - high beam, left headlight . If the headlights do not shine on high beam, check the K7 relay and the headlight bulbs. The steering column switch, wiring or connectors may also be faulty.
F5 (10 A) - sound signal.
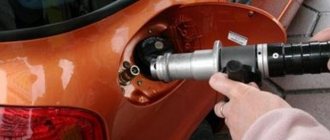
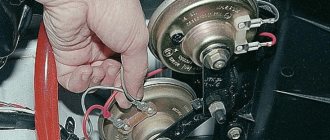
If the signal does not work when you press the steering wheel button, check relay K8. The signal itself is located under the radiator grille; you can get to it by removing the plastic casing from above. Check it by connecting the voltage to 12 V. If it doesn’t work, try turning the adjusting screw, or replace it with a new one.
F6 (7.5 A) - low beam, left headlight . F7 (7.5 A) - low beam, right headlight . When replacing lamps, be careful; there are separate lamps for the low and high beams, so they can be easily confused. It is better not to install lamps in high-power headlights; the reflectors may melt and the desired effect will not be achieved. Most low beam headlight problems that cannot be corrected by conventional means can be related to the light control module (LCM). The low beam relay is only available in cars equipped with a light sensor, it is located in the place of relay K1; on most cars this relay is not in the mounting block; the low beam circuit goes through the MUS block. It happens that the tracks in the block burn out; if there are problems, it is better to replace it with a new one. If the windshield wipers turn on spontaneously when the low beam is not working correctly, the problem is most likely in the windshield wiper control unit, located in the center of the dashboard, the topmost block, next to the radio, is best reached from the glove compartment, or by hand through the removed console covers at the feet.
Why is the engine cooling radiator fan not working?
| If the engine boils, you should find the cause as quickly as possible so that the situation does not happen again. Sometimes it’s all about a lack of antifreeze or a clogged radiator, and sometimes the reason is that the radiator fan does not turn off. Do you know why this happens? |
The operating temperature of the “tens” engine is about 87-89 degrees. The thermostat opens at 85 degrees, and the Carlson (radiator fan) on the standard firmware should turn on at 105 degrees and turn off at 97C.
If the radiator fan does not turn on
Start with the simplest thing - by checking the cap (cap) of the expansion tank. Make sure that the valve on it is in good condition, if necessary, replace the cap or modify it. If the radiator fan still does not spin, then proceed to checking the thermostat (for example, touch the lower radiator hose; if it is cold, then change the thermostat). The next step is to check the electric fan fuse cooling systems (F7 at 20A in the mounting block). By the way, the same fuse is also responsible for the sound signal, so if it does not work, then 100% of the fuse should be replaced. We also check the radiator fan relay in the additional fuse box. Now we move on to the electric fan itself, which is installed on the radiator. How to check a radiator fan? It’s very simple, you need to connect it directly to the battery, if the fan turns on, it means it’s working. We also check the radiator fan switch sensor:
- If it is a carburetor, then we close the contacts on the sensor, which is located in the radiator. If the fan turns on, then the sensor is faulty.
- If it is an injector, then we remove the connector from the sensor, which is located next to the thermostat. Because The radiator fan is controlled by the ECU (the brains of the machine), so the fan should turn on in emergency mode. If this happens, it means the sensor is not working (see diagrams SOD engineering and carb.).
The last possible reason why the electric fan does not work is an open circuit. We look for a broken wire and check all contacts using the cooling system electric fan diagrams:
If the radiator cooling fan is constantly running
| If the radiator cooling fan is constantly running, even when the engine is cold (does not turn off at all) | ||
| Cause: | Diagnostics | Solution |
| Open circuit in the coolant temperature sensor or its circuits | The “Check engine” lamp is on. The sensor and circuits are checked with an ohmmeter. | Replace sensor |
| The electric fan relay contacts do not open | Checking with a multimeter | Replace relay |
| The injection system control unit or its circuit (ECU) is faulty | Check the unit at a service station | Replace the ECU firmware or the unit itself |
| (Carburetor) Radiator thermal switch contacts do not open | When the terminals are disconnected from the thermal switch terminals, the electric fan stops working | Replace thermal switch |
By the way, do you know how to install a double radiator fan on a VAZ 2110?
xn--2111-43da1a8c.xn--p1ai
Replacement and repair of VAZ sound signal
The most common reason for the absence of a sound signal lies in the signals themselves. The reason is mechanical, moisture and oxidation lead to blocking of the sound membrane and, as a result, the absence of vibrations and sound effect. Sometimes you can restore functionality by spraying the signal with WD-40 or a similar composition.
On cars, where two signals are installed, as a rule, they are of different tones, low and high. If one signal fails, the second will not be able to fully provide the required power, and therefore requires replacement. As a rule, many signals are equipped with a tone adjustment screw, and if there are wheezing, grinding and other unwanted sound effects, you can use the adjustment to achieve a suitable sound. Also, with their help, you can move the “soured” membrane, thereby restoring the functionality of the signal.
Replacing the sound signal on a Priora
Welcome! Sound signal - is needed to attract the attention of road users or pedestrians, only all cars are equipped with a sound signal, and if for some reason it is not present, then the operation of the car is prohibited, this signal can ensure the safety of your car in any emergency situation, as well as protect your same life and if it suddenly fails or if you want to change it to a more powerful one, then this will be a very big plus for you, since you will be more noticeable on the road.
Note! To replace the sound signal, you will need: Wrenches, as well as a pair of screwdrivers!
Summary:
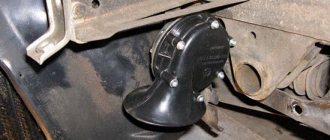
Where is the horn located? It is located behind the radiator grille, removing it without removing the front bumper is very inconvenient, but it can still be done, especially if you don’t have big hands and have a small key that you can get through on top of the bumper and unscrew the signal mounting nut, but to get through from above , to begin with, you will need to unscrew the six screws and pull the upper part of the bumper towards you, as shown in the small photo, in the large photo we indicated all the screws that need to be unscrewed, and the blue arrows show those screws that are located approximately in that area but they are behind frame and since they are not visible, we indicated them with blue arrows in the photo.
Note! If you want greater access to the signal, then remove the front bumper; how to do this, read the article: “Replacing the front bumper on cars”, if you chose a shorter route but you have problems with the fact that you cannot reach the nut which attaches the sound signal to the bracket, then you can also remove the radiator grille, access after that will be very good (How to remove the grille, read the article: “Replacing the radiator grille on a Prior”)!
When should you change the sound signal? Any detail and sound signal applies to this too, over time it begins to deteriorate, the signal has the following symptoms: “Sound disappears and wheezing appears when you press the signal,” if you experience such symptoms, then the signal will need to be removed and replaced with a new one, or simply adjust it so that it works louder (We have already written how to do this in this article, at the beginning you will need to remove the signal), in other cases you do not need to touch the signal (For example, there are people for whom the signal sometimes works when pressed, sometimes it doesn’t , in this case, the ring on the steering wheel is most likely to blame, it doesn’t make good contact and that’s why this happens).
Note! If the signal suddenly stops working for unknown reasons, do not rush to buy a new one, first check the fuse that goes to it, and then the relay, maybe they are just burnt out and require replacement!
Block in the engine compartment
The power fuse box is located in the engine compartment under the hood, near the left strut support. To get to it, you need to open the lid by prying the latch.
1 (30 A) - engine control system circuit . If there are problems with the electronic control unit, short circuits or other malfunctions, this fuse may blow out.
2 (30 A) - vehicle on-board circuit . 3 (40 A) - vehicle on-board circuit .
4 (60 A) - generator circuit.
5 (50 A) - electric power steering circuit.
6 (60 A) - generator circuit.
In case of any problems, it is important not to panic, to think soberly and logically. The most important thing is to diagnose and establish the cause of the breakdown. If you don’t have enough experience or nerves, it’s easier to sign up at the nearest car service center if it has a competent electrician.
I hope this article will help you deal with electrical problems and quickly fix any Priora malfunctions. If you have any experience or information, please leave a comment below, useful information will be added to the article.
BMW.Planet
Join the party! Have a BMW? PRESS!
Author Subject: The horn does not work. The relay works (clicks). Fixed it. there was a dead klaxon. (Read 26443 times)
0 Users and 1 Guest are viewing this topic.
We recommend reading on the topic The horn does not work. The relay works (clicks). Fixed it. there was a dead klaxon.
- Krasnodar region repaired the engine
Here's a guy who fixed the engine :D.
I'll buy a wiper relay.
Now more than 2 investments go through at a time.
And so, gentlemen, not very much. the following problem arose. To begin with, what is Moscow at the moment. South-Western Administrative District I will buy a fuel pump relay M10, 7 pin.
Hello! The mtech 2 signal button does not work. That is, it works on the right spoke. the left and the bottom do not. V.
Good evening! My suspicions fall on the mass air flow sensor, because the rest was changed, measured, etc.
Car E30 s50b30 (aka M50 in theory), I drove without any problems at all, everything was ok, etc. I went into the car in front of the house.
Good day, guys. Priora. The sound signal does not work, the fuse clicks, everything is fine. I thought it might have burned out, bought a new one, installed it - the fuse also clicks, but there is no sound, what could be the reason? Thanks in advance. The sound signal does not work; the relay clicks.
Similar articles
Removing, installing and adjusting the sound signal of the VAZ 2170 Priora
- Repair manuals
- Repair manual for VAZ 2170 (Priora) 2004+.
- Removing, installing and adjusting the sound signal
Lada Priora cars are equipped with a sound signal of type 20.3721.
| . Scheme for switching on the sound signal: 1 – mounting block; 2 – sound signal switch; 3 – sound signal; A – to the main fuse block (F3); B – to the electronic anti-theft system control unit, terminal “20”; K8 – horn relay |
The circuit for switching on the sound signal is shown in.
If the sound of the signal becomes quieter or wheezing appears, you can try to adjust the signal with the adjusting screw.
You will need a key "13".
1. Remove the front bumper (see “Removing and installing the front bumper” ).
| 2. Disconnect the wiring harness connector from the horn. Check the signal contacts and wiring harness terminals. If they are oxidized, clean them. | 3. Unscrew the fastening nut and remove the horn and bracket assembly. |
4. If cleaning the contacts does not produce results, disconnect the wire from the negative terminal of the battery and the wiring harness block from the signal.
| 5. Clamp the signal by the bracket in a vice. Connect the wires to the battery and the horn contacts (“minus” to the top horn contact, “plus” to the bottom). | 6. Turn the adjusting screw (slowly) with a screwdriver until the signal sounds loud and clear. If this fails, replace the signal. |
↓ Comments ↓
1. Car structure
1.0 Car structure 1.1 General information about the car 1.2 Passport data 1.3 Car keys 1.4. Controls 1.5. Heating and ventilation of the cabin 1.6 Ensuring a comfortable air temperature in the cabin 1.7. Doors 1.8. Passive safety equipment on the car 1.9. Seats
2. Recommendations for use
2.0 Recommendations for use 2.1. Safety rules and recommendations 2.2 Running in the car 2.3 Operating the car during the warranty period 2.4. Preparing the car for departure
3. Problems along the way
3.0 Malfunctions along the way 3.1. The engine does not start 3.2 Malfunctions of the fuel injection system 3.3 Idle speed has disappeared 3.4. Interruptions in the operation of the 3.5 engine. The car moves jerkily 3.6 The car accelerates poorly 3.7 The engine stalled while driving 3.8. Oil pressure dropped to 3.9. Engine overheating 3.10. The battery does not recharge 3.13. Knocks in the engine 3.16. Wheel puncture
4. Maintenance
4.0 Maintenance 4.1. General provisions 4.2. Inspection work 4.3. Lubrication and filling works 4.4. Diagnostic work 4.5. Repair and adjustment work
5. Engine
5.0 Engine 5.1 Design features 5.2 Possible engine malfunctions, their causes and solutions 5.3 Useful tips 5.4 Checking compression in the cylinders 5.5 Removing and installing the decorative engine casing 5.6 Removing and installing the engine splash guard 5.7 Installing the piston of the first cylinder to the TDC position of the compression stroke 5.8 Replacing the drive belt gas distribution mechanism and tension roller 5.9 Replacing the power unit supports 5.11. Replacing engine seals 5.13. Engine cylinder head 5.15. Engine repair 5.16. Lubrication system 5.17. Cooling system 5.18. Power supply system 5.19. Design Features
6. Transmission
6.0 Transmission 6.1. Clutch 6.2. Gearbox 6.3. Front wheel drives
7. Chassis
7.0 Chassis 7.1. Front suspension 7.2. Rear suspension
8. Steering
8.0 Steering 8.1 Design features 8.2 Possible steering malfunctions, their causes and solutions 8.3. Steering column 8.4. Steering linkage 8.5. Steering gear
9. Brake system
9.0 Brake system 9.1 Design features 9.2 Possible malfunctions of the brake system, their causes and solutions 9.3 Bleeding the brake system hydraulic drive 9.4 Removing and installing the vacuum brake booster 9.5 Replacing the brake pedal axle bushings 9.6. Main brake cylinder 9.7. Front wheel brakes 9.8. Braking mechanisms of the rear wheels 9.9. Pressure regulator 9.10. Brake hoses and tubes 9.11. Parking brake
10. Electrical equipment
10.0 Electrical equipment 10.1 Design features 10.2. Battery 10.3. Mounting block (relays and fuses) 10.4. Generator 10.5. Starter 10.6. Ignition switch (lock) 10.7. Electronic engine control system (ECM) 10.8. Ignition system 10.9. Lighting, light and sound signaling 10.10. Windshield cleaner 10.11. Washer reservoir 10.12. Electric fan of the engine cooling system 10.13. Electric motor of the heating and ventilation system fan 10.15. Cigarette lighter 10.16. Instrument cluster 10.18. Electronic anti-theft remote control system 10.19. Immobilizer 10.21. Replacing sensors and switches
11. Body
11.0 Body 11.1 Design features 11.2 Possible body malfunctions, their causes and solutions 11.3 Removing and installing windshield frame lining 11.4 Removing and installing soundproofing upholstery in the engine compartment 11.5. Removing and installing bumpers 11.6 Removing and installing the fender liner and protective wing cover 11.7 Removing and installing the front fender 11.8 Removing and installing decorative sill trims 11.9. Hood 11.10. Trunk lid 11.11. Doors 11.12. Seats 11.13. Seat belts 11.14. Rear view mirrors 11.15. Interior fittings 11.16. Instrument panel 11.17. Heater 11.20. Body care
12. Applications
12.0 Appendix 12.1 Appendix 1. Tightening torques of threaded connections, Nm 12.2 Appendix 2. Fuels, lubricants and operating fluids 12.3 Appendix 3. Nominal filling volumes 12.4 Appendix 4. Basic data for adjustments and monitoring 12.5 Appendix 5. Spark plugs used on vehicles 12.6 Appendix 6. Lamps used on a car 12.7 Appendix 7. What you need to have in a car 12.8 Appendix 8. Tools used when repairing a car
13. Electrical diagrams
13.0 Electrical Diagrams 13.1 Diagram 1. Instrument Panel Harness Connections 13.2 Diagram 2. Vehicle Front Wire Harness Connections 13.3 Diagram 3. Engine Electronic Control System (ECM) Harness Connections 13.4 Diagram 4. Vehicle Rear Wire Harness Connections 13.5 Diagram 5. Light Harness Connections license plate light 13.6 Diagram 6. Left front door wiring harness connections 13.7 Diagram 7. Right front door wiring harness connections 13.8 Diagram 8. Rear door wiring harness connections
How to choose
Having decided to replace a relay or fuse in a Priora, take full responsibility for their selection and purchase. Under no circumstances should you buy cheap parts of unknown quality and origin.
It is better to give preference to original products produced by VAZ. As a last resort, buy relays or fuses from one of the well-known companies, such as Bosh, Hella or Tesla.
Replacing the sound signal on a Lada Vesta is a simple procedure that any owner should be able to perform. After all, driving without a properly working horn is a priori unsafe, and taking a car to a service station due to such a breakdown is an unreasonably large amount of time. However, replacement in the event of a malfunction is not the only need. Many people are simply not satisfied with the volume or tone of the sound signal, and they replace the standard Vesta components with alternative ones. Therefore, both of these paths need to be considered in more detail.
Installing LED tail lights on Priora
As for LED tail lights for Lada Priora cars, their prices are of course a little higher. Namely, a set of such lighting equipment can be purchased for around 3,200 rubles. As for installing a flashlight instead of a standard one, there is absolutely nothing unusual here.
It is necessary to disconnect the power connector for the flashlight, which is standard for all types of Priora, and then, after removing the old flashlight, install a new one with LED lights in its place. There is no need to perform any additional actions or manipulations. And the result of the work done can be seen in the photo below:
The Priora has three brake lights: two in the rear lights and an additional one installed in the spoiler. Their purpose is to warn drivers of cars moving behind about braking. Operating a vehicle with non-functioning brake lights is prohibited. If the lights on the Priora do not light up, you need to contact an auto electrician or fix the problem yourself. In the latter case, the driver needs to have a minimum set of tools to find and eliminate the causes of the malfunction.
What to do if the brake lights do not work
The Priora has three brake lights: two in the rear lights and an additional one installed in the spoiler. Their purpose is to warn drivers of cars moving behind about braking. Operating a vehicle with non-functioning brake lights is prohibited. If the lights on the Priora do not light up, you need to contact an auto electrician or fix the problem yourself. In the latter case, the driver needs to have a minimum set of tools to find and eliminate the causes of the malfunction.
Why do the brake lights on the Priora not light up?
There are several options for the malfunction:
- three brake lights do not light;
- one or two stops do not work;
- brake lights flash.
One brake light usually won't light because the bulb is burned out. In other cases, the problem lies in the wiring, fuses or in the limit switch that is responsible for turning on the brake lights when braking. A faulty switch can also cause another type of malfunction, when the brake lights do not go out and are constantly on.
A faulty switch, such as a lamp or fuse, is not repairable and must be replaced. Also, if the brake lights on a Priora do not light up, the reason may lie in oxidized contacts of the rear lights.
To solve the problem yourself, you need to have the minimum tools necessary to find a solution to the problem:
How to check the operation of brake lights
Checking the functionality of the brake lights does not take much time. This requires two people. One should press the brake light, the other should make sure that all three brake light bulbs come on.
It is also possible to check the functionality of the “stops” alone. For example, you can press a brick onto the pedal or insert a stick between the seat and the pedal. But it’s easier or easier to invite an assistant, with the words: “Hey, you, come here”)
Troubleshooting
- If all the brake lights do not light up, the first thing to check is the power fuse. It is located in the main mounting block under the dashboard, at the driver’s feet. The fuse number is F10. In addition to the brake lights, it protects the power supply circuit for the interior lighting and instrument panel lights. The fuse condition can be determined visually. If the conductor is burnt out, the fuse must be replaced. If it burns out again, the short circuit must be found and repaired.
- Next you should check the lamps. To do this, you need to remove the non-working lamp from the headlamp and replace it with a known working one. Alternatively, you can check the resistance of the llama, but this option is much less reliable.
Advice: it is quite possible for two brake light lamps to burn out at the same time, so if the Priora brake lights, in addition to the additional one, do not light up, first you need to check the lamps, then the wiring.
- Another reason is oxidized contacts in the headlight unit. Oxides can be detected visually by simply removing the lamp from the socket. To clean the contacts, you should use sandpaper; if you don’t have it, you can try to scrape off the oxides with a screwdriver or knife, or simply twist the lamp in the socket to remove the oxidized layer.
- The contacts in the wire blocks that fit the headlight may also oxidize. You should inspect the contacts and, if necessary, clean them with a thin screwdriver. It is necessary to clean the contacts on the board and on the block. In the field, you can try to put on and remove the connector from the headlamp several times to clean out the oxides.
- Next, you need to check the condition of the tracks of the headlight unit on which the brake light does not light up. It is better to do this with a multimeter, but damage is often visible “by eye”.
- If the track is burnt, it can be restored by soldering a thin copper wire.
- If all the lights do not light up when you press the brake pedal, you should check the sensor (switch) located near the brake pedal. This is easy to do: you need to remove the wires from it and short-circuit them. If the brake lights come on, the sensor must be replaced with a new one. Otherwise, you need to check the electrical circuits.
Checking the electrical circuit of the brake lights must begin by inspecting the electrical contacts suitable for the mounting block. Oxidized contacts or a broken (burnt) wire are a common cause of no power to the brake light circuit. To check a circuit, you need to have an understanding of the circuit.
The positive power wire for the brake lights comes to the mounting block from contact “30” of the generator. Next, the current passes through fuse F10 to the wire going to the block inside the passenger compartment, from which voltage is supplied to the brake light sensor. A separate wire runs from the sensor to the rear lights through the entire interior. It supplies voltage to the left taillight, then to the right headlight and brake light built into the spoiler.
To check the circuit, you must use an indicator or voltmeter.